World 2/2-3
< World 2
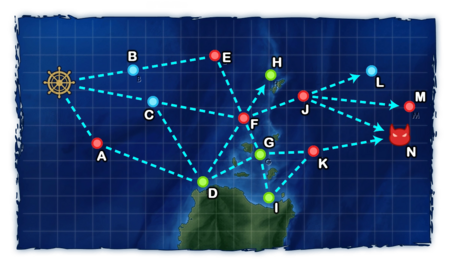
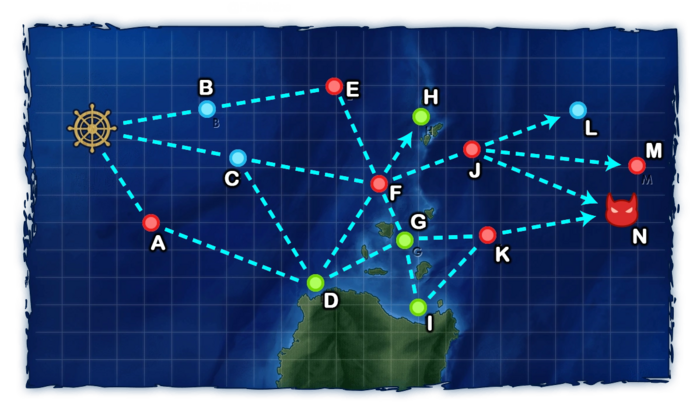
World 2-3: 東部オリョール海 Eastern Orel Bay
| Strategy Name | オリョール哨戒 (Orel Patrol)
| ||
| Difficulty | ☆ ☆ ☆ ☆ ☆
| ||
| Item | |||
| Strategy Content | オリョール海に進出、同海域を哨戒。敵通商破壊艦隊を排除、我が方り海上輸送ラインの防衛に努めよ!
Enter Orel Bay and conduct a patrol. Destroy the enemy transport fleet while protecting our own supply lines! | ||
| 2-3 | ||
| Fleet | Light: 1CL, 4DD, 1XX, / 1CL, 5CA Heavy: 2CV, 1AV, 1CL, 2DD | |
| Route | Random (Heavy can off-route) | |
| Other Notes | 1/8 of boss comps will have this airpower | |
| AP | AS | AS+ |
| 36 | 81 | 162 |
Map Unlocking & Progression
2-3 is unlocked after clearing 2-2.
To clear the map, the boss's flagship must be sunk once.
Stage Guide
| 2-3 Branching Rules | ||
|---|---|---|
| Nodes | Rules | |
| Start | A |
|
B | ||
C | ||
C |
D |
|
F | ||
D |
F |
|
G | ||
F |
H |
|
J | ||
G | ||
G |
I |
|
K | ||
J |
L |
|
M | ||
N | ||
Tips
Regarding the branching rules, 1XX, 1CL, 4DD or 1CL, 5CA are the only two comps that guarantee the boss routing. Otherwise, any other fleets have a chance of off-routing, but should still be able to reach the boss node most of the time as long as CL+DD ≥ 4.
- Bring at least one AV, CV(L), or CL to avoid the chance of off-routing from F to H.
- Bring at least 1AV and 2DD/DE to avoid the chance of off-routing from F to H when rolling the north route, and avoid off-routing entirely when rolling the south route.
- Bringing more heavy ships ((F)BB(V)/CV(L/B)) will reduce the chances of reaching the boss.
- Fleets that contains SS(V) have a chance of reaching dead-end nodes H L M.
Recommended Fleets
- 2(F)BB(V)/CV(L), 1AV, 1CL(T), 2DD
- Standard comps used for farming the boss node or clearing daily.
- Starting at node B, there is around 10% off-route chance near the end (J L route).
- Starting at node A, boss reach is guaranteed.
- 1CL, 4DD, 1XX
- 1CL, 5CA
- Weaker fleets with 100% boss routing, but may cause some issues reaching the boss.
Resource Nodes
D G H I are "Normal Resource Nodes" rewarding respectively fuel ![]() , ammo
, ammo ![]() , ammo
, ammo ![]() , and fuel
, and fuel ![]() .
.
- See here for more details.
Enemy Compositions
2-3 A: 敵前衛警戒部隊 (PoiDB)
| # | Enemy Form. |
Base EXP | Normal Battle Node | AD/AP AS/AS+ |
|---|---|---|---|---|
| A | Line Ahead | 70 | 0/0 0/0 | |
| Line Ahead Double Line |
80 | 0/0 0/0 | ||
| Line Ahead Double Line |
90 | 0/0 0/0 | ||
| Line Ahead Double Line |
110 | 0/0 0/0 | ||
| Line Ahead Double Line |
120 | 0/0 0/0 | ||
| # | Enemy Form. |
Base EXP | Normal Battle Node | AD/AP AS/AS+ |
2-3 B
| # | Empty Node | ||
|---|---|---|---|
| B | 気のせいだった。/敵影を見ず。/穏やかな海です。/穏やかな海峡です。/警戒が必要です。/静かな海です。 Must be my imagination./No enemy spotted./Calm seas./Calm straits./Be alert./Peaceful seas. | ||
| # | Empty Node | ||
2-3 C
| # | Empty Node | ||
|---|---|---|---|
| C | 気のせいだった。/敵影を見ず。/穏やかな海です。/穏やかな海峡です。/警戒が必要です。/静かな海です。 Must be my imagination./No enemy spotted./Calm seas./Calm straits./Be alert./Peaceful seas. | ||
| # | Empty Node | ||
2-3 D
| # | Resource Node | ||
|---|---|---|---|
| D | Gained 15~45 | ||
| # | Resource Node | ||
2-3 E: 敵前衛警戒部隊 (PoiDB)
| # | Enemy Form. |
Base EXP | Normal Battle Node | AD/AP AS/AS+ |
|---|---|---|---|---|
| E | Line Ahead | 70 | 0/0 0/0 | |
| Line Ahead Double Line |
80 | 0/0 0/0 | ||
| Line Ahead Double Line |
90 | 0/0 0/0 | ||
| Line Ahead Double Line |
110 | 0/0 0/0 | ||
| Line Ahead Double Line |
120 | 0/0 0/0 | ||
| # | Enemy Form. |
Base EXP | Normal Battle Node | AD/AP AS/AS+ |
2-3 F: 敵水雷戦隊 (PoiDB)
| # | Enemy Form. |
Base EXP | Normal Battle Node | AD/AP AS/AS+ |
|---|---|---|---|---|
| F | Line Ahead Double Line |
100 | 0/0 0/0 | |
| Line Ahead Double Line |
110 | 0/0 0/0 | ||
| Line Ahead Double Line |
130 | 0/0 0/0 | ||
| # | Enemy Form. |
Base EXP | Normal Battle Node | AD/AP AS/AS+ |
2-3 G
| # | Resource Node | ||
|---|---|---|---|
| G | Gained 15~45 | ||
| # | Resource Node | ||
2-3 H
| # | Resource Node | ||
|---|---|---|---|
| H | Gained 20~40 | ||
| # | Resource Node | ||
2-3 I
| # | Resource Node | ||
|---|---|---|---|
| I | Gained 15~45 | ||
| # | Resource Node | ||
2-3 J: 敵巡洋艦戦隊 (PoiDB)
| # | Enemy Form. |
Base EXP | Normal Battle Node | AD/AP AS/AS+ |
|---|---|---|---|---|
| J | Line Ahead | 100 | 0/0 0/0 | |
| Line Ahead Double Line |
100 | 0/0 0/0 | ||
| Line Ahead Double Line |
110 | 0/0 0/0 | ||
| Line Ahead Double Line |
120 | 0/0 0/0 | ||
| Line Ahead Double Line |
140 | 0/0 0/0 | ||
| # | Enemy Form. |
Base EXP | Normal Battle Node | AD/AP AS/AS+ |
2-3 K: 敵巡洋艦戦隊 (PoiDB)
| # | Enemy Form. |
Base EXP | Normal Battle Node | AD/AP AS/AS+ |
|---|---|---|---|---|
| K | Line Ahead | 100 | 0/0 0/0 | |
| Line Ahead Double Line |
100 | 0/0 0/0 | ||
| Line Ahead Double Line |
110 | 0/0 0/0 | ||
| Line Ahead Diamond |
120 | 0/0 0/0 | ||
| Line Ahead Double Line |
140 | 0/0 0/0 | ||
| # | Enemy Form. |
Base EXP | Normal Battle Node | AD/AP AS/AS+ |
2-3 L
| # | Empty Node | ||
|---|---|---|---|
| L | 気のせいだった。/敵影を見ず。/穏やかな海です。/穏やかな海峡です。/警戒が必要です。/静かな海です。 Must be my imagination./No enemy spotted./Calm seas./Calm straits./Be alert./Peaceful seas. | ||
| # | Empty Node | ||
2-3 M: 敵揚陸艦隊 (PoiDB)
| # | Enemy Form. |
Base EXP | Normal Battle Node | AD/AP AS/AS+ |
|---|---|---|---|---|
| M | Double Line | 200 | 0/0 0/0 | |
| Double Line | 210 | 0/0 0/0 | ||
| Double Line | 220 | 0/0 0/0 | ||
| Double Line | 230 | 0/0 0/0 | ||
| # | Enemy Form. |
Base EXP | Normal Battle Node | AD/AP AS/AS+ |
2-3 N: 敵主力打撃群 (PoiDB)
| # | Enemy Form. |
Base EXP | Boss Battle Node | AD/AP AS/AS+ |
|---|---|---|---|---|
| N | Line Ahead | 220 | 7/13 27/54 | |
| Line Ahead | 230 | 12/24 53/105 | ||
| Line Ahead | 240 | 18/35 77/153 | ||
| Line Ahead | 250 | 18/35 77/153 | ||
| Line Ahead | 260 | 18/35 77/153 | ||
| Line Ahead | 270 | 18/35 77/153 | ||
| Line Ahead | 280 | 18/35 77/153 | ||
| Line Ahead | 290 | 19/37 81/162 | ||
| # | Enemy Form. |
Base EXP | Boss Battle Node | AD/AP AS/AS+ |
Ship Drops
This map currently has "limited-time" drops that don't appear in the table below, see Drop List for more info.
| Ship drops | |||||||||||||||||||||||||||||||||||||||||||||||||||||||||||||||||||||||||||||||||||||||||||||||||||
|---|---|---|---|---|---|---|---|---|---|---|---|---|---|---|---|---|---|---|---|---|---|---|---|---|---|---|---|---|---|---|---|---|---|---|---|---|---|---|---|---|---|---|---|---|---|---|---|---|---|---|---|---|---|---|---|---|---|---|---|---|---|---|---|---|---|---|---|---|---|---|---|---|---|---|---|---|---|---|---|---|---|---|---|---|---|---|---|---|---|---|---|---|---|---|---|---|---|---|---|
| Type | Ship? | A | E | F | J | K | M | N | |||||||||||||||||||||||||||||||||||||||||||||||||||||||||||||||||||||||||||||||||||||||||||
| DD | Makigumo | ✓ | |||||||||||||||||||||||||||||||||||||||||||||||||||||||||||||||||||||||||||||||||||||||||||||||||
| CL | Kitakami | ✓ | |||||||||||||||||||||||||||||||||||||||||||||||||||||||||||||||||||||||||||||||||||||||||||||||||
| CL | Ooi | ✓ | |||||||||||||||||||||||||||||||||||||||||||||||||||||||||||||||||||||||||||||||||||||||||||||||||
| CL | Nagara | ✓ | |||||||||||||||||||||||||||||||||||||||||||||||||||||||||||||||||||||||||||||||||||||||||||||||||
| CL | Sendai | ✓ | ✓ | ✓ | ✓ | ||||||||||||||||||||||||||||||||||||||||||||||||||||||||||||||||||||||||||||||||||||||||||||||
| CA | Myoukou | ✓ | ✓ | ✓ | ✓ | ✓ | |||||||||||||||||||||||||||||||||||||||||||||||||||||||||||||||||||||||||||||||||||||||||||||
| CA | Takao | ✓ | ✓ | ✓ | ✓ | ✓ | ✓ | ✓ | |||||||||||||||||||||||||||||||||||||||||||||||||||||||||||||||||||||||||||||||||||||||||||
| CA | Atago | ✓ | ✓ | ✓ | ✓ | ✓ | ✓ | ✓ | |||||||||||||||||||||||||||||||||||||||||||||||||||||||||||||||||||||||||||||||||||||||||||
| CA | Mogami | ✓ | ✓ | ✓ | ✓ | ✓ | ✓ | ✓ | |||||||||||||||||||||||||||||||||||||||||||||||||||||||||||||||||||||||||||||||||||||||||||
| CA | Tone | ✓ | ✓ | ✓ | ✓ | ✓ | ✓ | ||||||||||||||||||||||||||||||||||||||||||||||||||||||||||||||||||||||||||||||||||||||||||||
| CA | Chikuma | ✓ | ✓ | ✓ | ✓ | ✓ | |||||||||||||||||||||||||||||||||||||||||||||||||||||||||||||||||||||||||||||||||||||||||||||
| CVL | Ryuujou | ✓ | ✓ | ✓ | ✓ | ✓ | ✓ | ✓ | |||||||||||||||||||||||||||||||||||||||||||||||||||||||||||||||||||||||||||||||||||||||||||
| CVL | Shouhou | ✓ | ✓ | ✓ | ✓ | ✓ | ✓ | ✓ | |||||||||||||||||||||||||||||||||||||||||||||||||||||||||||||||||||||||||||||||||||||||||||
| CVL | Hiyou | ✓ | ✓ | ✓ | ✓ | ✓ | ✓ | ✓ | |||||||||||||||||||||||||||||||||||||||||||||||||||||||||||||||||||||||||||||||||||||||||||
| CVL | Junyou | ✓ | ✓ | ✓ | ✓ | ✓ | ✓ | ✓ | |||||||||||||||||||||||||||||||||||||||||||||||||||||||||||||||||||||||||||||||||||||||||||
| FBB | Kongou | ✓ | |||||||||||||||||||||||||||||||||||||||||||||||||||||||||||||||||||||||||||||||||||||||||||||||||
| FBB | Hiei | ✓ | |||||||||||||||||||||||||||||||||||||||||||||||||||||||||||||||||||||||||||||||||||||||||||||||||
| FBB | Haruna | ✓ | |||||||||||||||||||||||||||||||||||||||||||||||||||||||||||||||||||||||||||||||||||||||||||||||||
| FBB | Kirishima | ✓ | |||||||||||||||||||||||||||||||||||||||||||||||||||||||||||||||||||||||||||||||||||||||||||||||||
| BB | Fusou | ✓ | ✓ | ✓ | |||||||||||||||||||||||||||||||||||||||||||||||||||||||||||||||||||||||||||||||||||||||||||||||
| BB | Yamashiro | ✓ | ✓ | ✓ | |||||||||||||||||||||||||||||||||||||||||||||||||||||||||||||||||||||||||||||||||||||||||||||||
| BB | Ise | ✓ | |||||||||||||||||||||||||||||||||||||||||||||||||||||||||||||||||||||||||||||||||||||||||||||||||
| BB | Hyuuga | ✓ | |||||||||||||||||||||||||||||||||||||||||||||||||||||||||||||||||||||||||||||||||||||||||||||||||
| CV | Akagi | ✓ | |||||||||||||||||||||||||||||||||||||||||||||||||||||||||||||||||||||||||||||||||||||||||||||||||
| CV | Kaga | ✓ | |||||||||||||||||||||||||||||||||||||||||||||||||||||||||||||||||||||||||||||||||||||||||||||||||
| CV | Souryuu | ✓ | |||||||||||||||||||||||||||||||||||||||||||||||||||||||||||||||||||||||||||||||||||||||||||||||||
| CV | Hiryuu | ✓ | |||||||||||||||||||||||||||||||||||||||||||||||||||||||||||||||||||||||||||||||||||||||||||||||||
| DD | Mutsuki | ✓ | ✓ | ✓ | ✓ | ✓ | ✓ | ||||||||||||||||||||||||||||||||||||||||||||||||||||||||||||||||||||||||||||||||||||||||||||
| DD | Kisaragi | ✓ | ✓ | ✓ | ✓ | ✓ | ✓ | ||||||||||||||||||||||||||||||||||||||||||||||||||||||||||||||||||||||||||||||||||||||||||||
| DD | Satsuki | ✓ | ✓ | ✓ | ✓ | ✓ | ✓ | ||||||||||||||||||||||||||||||||||||||||||||||||||||||||||||||||||||||||||||||||||||||||||||
| DD | Fumizuki | ✓ | ✓ | ✓ | ✓ | ✓ | ✓ | ||||||||||||||||||||||||||||||||||||||||||||||||||||||||||||||||||||||||||||||||||||||||||||
| DD | Shirayuki | ✓ | ✓ | ✓ | ✓ | ✓ | ✓ | ||||||||||||||||||||||||||||||||||||||||||||||||||||||||||||||||||||||||||||||||||||||||||||
| DD | Hatsuyuki | ✓ | ✓ | ✓ | ✓ | ✓ | ✓ | ||||||||||||||||||||||||||||||||||||||||||||||||||||||||||||||||||||||||||||||||||||||||||||
| DD | Miyuki | ✓ | ✓ | ✓ | ✓ | ✓ | ✓ | ||||||||||||||||||||||||||||||||||||||||||||||||||||||||||||||||||||||||||||||||||||||||||||
| DD | Murakumo | ✓ | ✓ | ✓ | ✓ | ✓ | ✓ | ||||||||||||||||||||||||||||||||||||||||||||||||||||||||||||||||||||||||||||||||||||||||||||
| DD | Isonami | ✓ | ✓ | ✓ | ✓ | ✓ | ✓ | ||||||||||||||||||||||||||||||||||||||||||||||||||||||||||||||||||||||||||||||||||||||||||||
| DD | Ayanami | ✓ | ✓ | ✓ | ✓ | ✓ | ✓ | ||||||||||||||||||||||||||||||||||||||||||||||||||||||||||||||||||||||||||||||||||||||||||||
| DD | Shikinami | ✓ | ✓ | ✓ | ✓ | ✓ | ✓ | ✓ | |||||||||||||||||||||||||||||||||||||||||||||||||||||||||||||||||||||||||||||||||||||||||||
| DD | Hibiki | ✓ | ✓ | ✓ | ✓ | ✓ | ✓ | ||||||||||||||||||||||||||||||||||||||||||||||||||||||||||||||||||||||||||||||||||||||||||||
| DD | Ikazuchi | ✓ | ✓ | ✓ | ✓ | ✓ | ✓ | ||||||||||||||||||||||||||||||||||||||||||||||||||||||||||||||||||||||||||||||||||||||||||||
| DD | Inazuma | ✓ | ✓ | ✓ | ✓ | ✓ | ✓ | ||||||||||||||||||||||||||||||||||||||||||||||||||||||||||||||||||||||||||||||||||||||||||||
| DD | Hatsuharu | ✓ | ✓ | ✓ | ✓ | ✓ | ✓ | ||||||||||||||||||||||||||||||||||||||||||||||||||||||||||||||||||||||||||||||||||||||||||||
| DD | Nenohi | ✓ | ✓ | ✓ | ✓ | ✓ | ✓ | ||||||||||||||||||||||||||||||||||||||||||||||||||||||||||||||||||||||||||||||||||||||||||||
| DD | Wakaba | ✓ | ✓ | ✓ | ✓ | ✓ | ✓ | ||||||||||||||||||||||||||||||||||||||||||||||||||||||||||||||||||||||||||||||||||||||||||||
| DD | Hatsushimo | ✓ | ✓ | ✓ | ✓ | ✓ | ✓ | ||||||||||||||||||||||||||||||||||||||||||||||||||||||||||||||||||||||||||||||||||||||||||||
| DD | Shigure | ✓ | ✓ | ✓ | ✓ | ✓ | ✓ | ||||||||||||||||||||||||||||||||||||||||||||||||||||||||||||||||||||||||||||||||||||||||||||
| DD | Murasame | ✓ | ✓ | ✓ | ✓ | ✓ | ✓ | ||||||||||||||||||||||||||||||||||||||||||||||||||||||||||||||||||||||||||||||||||||||||||||
| DD | Yuudachi | ✓ | ✓ | ✓ | ✓ | ✓ | ✓ | ||||||||||||||||||||||||||||||||||||||||||||||||||||||||||||||||||||||||||||||||||||||||||||
| DD | Samidare | ✓ | ✓ | ✓ | ✓ | ✓ | ✓ | ||||||||||||||||||||||||||||||||||||||||||||||||||||||||||||||||||||||||||||||||||||||||||||
| DD | Suzukaze | ✓ | ✓ | ✓ | ✓ | ✓ | ✓ | ||||||||||||||||||||||||||||||||||||||||||||||||||||||||||||||||||||||||||||||||||||||||||||
| DD | Ooshio | ✓ | ✓ | ✓ | ✓ | ✓ | ✓ | ✓ | |||||||||||||||||||||||||||||||||||||||||||||||||||||||||||||||||||||||||||||||||||||||||||
| DD | Michishio | ✓ | ✓ | ✓ | ✓ | ✓ | ✓ | ✓ | |||||||||||||||||||||||||||||||||||||||||||||||||||||||||||||||||||||||||||||||||||||||||||
| DD | Arashio | ✓ | ✓ | ✓ | ✓ | ✓ | ✓ | ✓ | |||||||||||||||||||||||||||||||||||||||||||||||||||||||||||||||||||||||||||||||||||||||||||
| DD | Arare | ✓ | ✓ | ✓ | ✓ | ✓ | ✓ | ✓ | |||||||||||||||||||||||||||||||||||||||||||||||||||||||||||||||||||||||||||||||||||||||||||
| DD | Kasumi | ✓ | ✓ | ✓ | ✓ | ✓ | ✓ | ✓ | |||||||||||||||||||||||||||||||||||||||||||||||||||||||||||||||||||||||||||||||||||||||||||
| DD | Kagerou | ✓ | ✓ | ✓ | ✓ | ✓ | ✓ | ||||||||||||||||||||||||||||||||||||||||||||||||||||||||||||||||||||||||||||||||||||||||||||
| DD | Shiranui | ✓ | ✓ | ✓ | ✓ | ✓ | ✓ | ||||||||||||||||||||||||||||||||||||||||||||||||||||||||||||||||||||||||||||||||||||||||||||
| DD | Kuroshio | ✓ | ✓ | ✓ | ✓ | ✓ | ✓ | ||||||||||||||||||||||||||||||||||||||||||||||||||||||||||||||||||||||||||||||||||||||||||||
| CL | Tenryuu | ✓ | ✓ | ✓ | ✓ | ✓ | |||||||||||||||||||||||||||||||||||||||||||||||||||||||||||||||||||||||||||||||||||||||||||||
| CL | Tatsuta | ✓ | |||||||||||||||||||||||||||||||||||||||||||||||||||||||||||||||||||||||||||||||||||||||||||||||||
| CL | Kuma | ✓ | |||||||||||||||||||||||||||||||||||||||||||||||||||||||||||||||||||||||||||||||||||||||||||||||||
| CL | Tama | ✓ | ✓ | ✓ | ✓ | ✓ | ✓ | ✓ | |||||||||||||||||||||||||||||||||||||||||||||||||||||||||||||||||||||||||||||||||||||||||||
| CL | Kiso | ✓ | ✓ | ✓ | ✓ | ✓ | ✓ | ✓ | |||||||||||||||||||||||||||||||||||||||||||||||||||||||||||||||||||||||||||||||||||||||||||
| CL | Isuzu | ✓ | ✓ | ✓ | ✓ | ✓ | ✓ | ✓ | |||||||||||||||||||||||||||||||||||||||||||||||||||||||||||||||||||||||||||||||||||||||||||
| CL | Natori | ✓ | ✓ | ✓ | ✓ | ✓ | ✓ | ✓ | |||||||||||||||||||||||||||||||||||||||||||||||||||||||||||||||||||||||||||||||||||||||||||
| CL | Yura | ✓ | ✓ | ✓ | ✓ | ✓ | ✓ | ✓ | |||||||||||||||||||||||||||||||||||||||||||||||||||||||||||||||||||||||||||||||||||||||||||
| CL | Jintsuu | ✓ | ✓ | ✓ | ✓ | ✓ | ✓ | ✓ | |||||||||||||||||||||||||||||||||||||||||||||||||||||||||||||||||||||||||||||||||||||||||||
| CL | Naka | ✓ | ✓ | ✓ | ✓ | ✓ | ✓ | ✓ | |||||||||||||||||||||||||||||||||||||||||||||||||||||||||||||||||||||||||||||||||||||||||||
| CA | Furutaka | ✓ | |||||||||||||||||||||||||||||||||||||||||||||||||||||||||||||||||||||||||||||||||||||||||||||||||
| CA | Kako | ✓ | |||||||||||||||||||||||||||||||||||||||||||||||||||||||||||||||||||||||||||||||||||||||||||||||||
| CA | Aoba | ✓ | |||||||||||||||||||||||||||||||||||||||||||||||||||||||||||||||||||||||||||||||||||||||||||||||||
| CA | Nachi | ✓ | ✓ | ✓ | ✓ | ✓ | ✓ | ✓ | |||||||||||||||||||||||||||||||||||||||||||||||||||||||||||||||||||||||||||||||||||||||||||
| CA | Ashigara | ✓ | ✓ | ✓ | ✓ | ✓ | ✓ | ✓ | |||||||||||||||||||||||||||||||||||||||||||||||||||||||||||||||||||||||||||||||||||||||||||
| CA | Haguro | ✓ | ✓ | ✓ | ✓ | ✓ | ✓ | ✓ | |||||||||||||||||||||||||||||||||||||||||||||||||||||||||||||||||||||||||||||||||||||||||||
| CA | Maya | ✓ | ✓ | ✓ | ✓ | ✓ | ✓ | ✓ | |||||||||||||||||||||||||||||||||||||||||||||||||||||||||||||||||||||||||||||||||||||||||||
| CA | Choukai | ✓ | ✓ | ✓ | ✓ | ✓ | ✓ | ✓ | |||||||||||||||||||||||||||||||||||||||||||||||||||||||||||||||||||||||||||||||||||||||||||
| SS | I-168 | ✓ | |||||||||||||||||||||||||||||||||||||||||||||||||||||||||||||||||||||||||||||||||||||||||||||||||
| AV | Chitose | ✓ | |||||||||||||||||||||||||||||||||||||||||||||||||||||||||||||||||||||||||||||||||||||||||||||||||
| AV | Chiyoda | ✓ | |||||||||||||||||||||||||||||||||||||||||||||||||||||||||||||||||||||||||||||||||||||||||||||||||