• Welcome to the Kancolle Wiki!
  • If you have any questions regarding site content, account registration, etc., please visit the KanColle Wiki Discord

Difference between revisions of "World 1"

From Kancolle Wiki
Jump to navigation Jump to search
m (Replaced content with "{{:{{BASEPAGENAME}}/1-1}} Category:Sortie")
Tag: Replaced
 
(25 intermediate revisions by 8 users not shown)
Line 1: Line 1:
=={{Anchor|1-1}}World 1-1: 鎮守府正面海域 Sea in Front of the Naval Base==
+
{{:{{BASEPAGENAME}}/1-1}}
{{LabSortieworld
 
| map = 1 01.png
 
| difficulty = ☆
 
| item = None
 
| exp = Varies
 
| code = 近海警備 (Coastal Waters Defense)
 
| jptext = 鎮守府正面近海の警備に出動せよ!
 
| entext = Mobilize for a patrol of the waters outside the naval base!
 
}}
 
  
===Stage Guide===
 
{{MapBranchingTable
 
|title = 1-1 Branching Rules
 
 
|order = B, C
 
 
|A -> B = * If Fleet consist of 1 ship, 20% chance
 
* If each additional ship, add 5% chance per ship
 
|A -> C = * If Fleet consist of 1 ship, 80% chance
 
* If each additional ship, subtract 5% chance per ship
 
}}
 
===Tips===
 
*This map is commonly used for [[Morale/Fatigue#Running_1-1_solo|sparkling ships]].
 
**This involves running the ship you want sparkled in the flagship position. Sometimes this is done alone, which minimizes MVP-theft (a rare problem); however, more commonly two fodder ships (destroyers picked up from 1-1 while you are sparkling) are placed in the second and third slots to minimize the chances of enemy vessels scratching your flagship. They are not refueled, and are scrapped or used as modernization fodder once they can no longer be deployed.
 
*After the HTML5 / Phase 2 update, single-ship fleets have an 80% chance of reaching the boss node, and the chance of reaching it decreases with every additional ship in your fleet. While this can be useful for completing [[Quests#Bw1|Bw1]], you may wish to sortie a fleet of multiple ships to help prevent your sparkle ships (the ships which will take up the flagship position) from taking damage at the boss node.
 
**You are recommended to sparkle ships (for expeditions or to improve their performance in battle) while completing Bw1.
 
 
===Nodes and Enemy Encounters===
 
{{#invoke:EnemyEncounters2|encounterTemplate
 
|A_label = 敵偵察艦 <br> Enemy Reconnaissance Ship
 
|A-1_node_info = dd_i-class
 
|A-1_form = line_ahead
 
|A-1_xp = 10
 
|A-1_enemy_air_power =
 
|A-2_node_info = dd_ro-class
 
|A-2_form = line_ahead
 
|A-2_xp = 15
 
|A-2_enemy_air_power =
 
|A-3_node_info = dd_ha-class
 
|A-3_form = line_ahead
 
|A-3_xp = 20
 
|A-3_enemy_air_power =
 
|
 
|B_label = 敵はぐれ艦隊 <br> Stray Enemy Fleet
 
|B-1_node_info = dd_i-class dd_i-class
 
|B-1_form = line_ahead
 
|B-1_xp = 20
 
|B-1_enemy_air_power =
 
|B-2_node_info = dd_ro-class dd_ro-class
 
|B-2_form = line_ahead
 
|B-2_xp = 30
 
|B-2_enemy_air_power =
 
|B-3_node_info = dd_ha-class dd_ha-class
 
|B-3_form = line_ahead
 
|B-3_xp = 40
 
|B-3_enemy_air_power =
 
|
 
|C_label = 敵主力艦隊 <br> Main Enemy Fleet
 
|C-1_node_info = cl_ho-class dd_i-class dd_i-class
 
|C-1_form = line_ahead
 
|C-1_xp = 50
 
|C-1_enemy_air_power =
 
|C-2_node_info = cl_ho-class dd_ro-class dd_ro-class
 
|C-2_form = line_ahead
 
|C-2_xp = 60
 
|C-2_enemy_air_power =
 
|C-3_node_info = cl_ho-class dd_ha-class dd_ro-class dd_ro-class
 
|C-3_form = line_ahead
 
|C-3_xp = 70
 
|C-3_enemy_air_power =
 
|
 
|final_form =
 
|boss_node = C
 
}}
 
 
===Drops===
 
<div class="mw-customtoggle-1-1-drop globalbutton">Show/Hide Drops</div>
 
{| class="mw-collapsible mw-collapsed wikitable" id="mw-customcollapsible-1-1-drop"
 
!Node
 
!Destroyers
 
!Light Cruisers
 
|-
 
| style="text-align:center;" |A
 
| style="text-align:center;" |[[Ooshio]], [[Michishio]], [[Arashio]], [[Arare]], [[Kasumi]], [[Shigure]], [[Murasame]], [[Yuudachi]], [[Samidare]], [[Suzukaze]], [[Hatsuharu]], [[Nenohi]], [[Wakaba]], [[Hatsushimo]], [[Akatsuki]], [[Hibiki]], [[Ikazuchi]], [[Inazuma]], [[Ayanami]], [[Shikinami]], [[Oboro]], [[Akebono]], [[Sazanami]], [[Ushio]], [[Shirayuki]], [[Hatsuyuki]], [[Miyuki]], [[Isonami]], [[Mutsuki]], [[Kisaragi]], [[Satsuki]], [[Fumizuki]], [[Nagatsuki]], [[Kikuzuki]], [[Mikazuki]], [[Mochizuki]]
 
| style="text-align:center;" |[[Jintsuu]], [[Naka]], [[Tenryuu]]
 
|-
 
| style="text-align:center;" |B
 
|
 
 
<p style="text-align:center;">[[Ooshio]], [[Arashio]], [[Kasumi]], [[Shigure]], [[Murasame]], [[Yuudachi]], [[Samidare]], [[Suzukaze]], [[Hatsuharu]], [[Nenohi]], [[Wakaba]], [[Hatsushimo]], [[Akatsuki]], [[Hibiki]], [[Inazuma]], [[Ayanami]], [[Shikinami]], [[Akebono]], [[Ushio]], [[Shirayuki]], [[Hatsuyuki]], [[Miyuki]], [[Isonami]], [[Kisaragi]], [[Satsuki]], [[Fumizuki]], [[Nagatsuki]], [[Mochizuki]]</p>
 
| style="text-align:center;" |[[Jintsuu]], [[Naka]], [[Kuma]], [[Tenryuu]]
 
|-
 
| style="text-align:center;" |'''<span class="wikicolor" style="color:Red">C</span>'''
 
| style="text-align:center;" |[[Kagerou]], [[Shiranui]], [[Kuroshio]], [[Asashio]], [[Ooshio]], [[Michishio]], [[Arashio]], [[Arare]], [[Kasumi]], [[Shiratsuyu]], [[Shigure]], [[Murasame]], [[Yuudachi]], [[Samidare]], [[Suzukaze]], [[Hatsuharu]], [[Nenohi]], [[Wakaba]], [[Hatsushimo]], [[Akatsuki]], [[Hibiki]], [[Ikazuchi]], [[Inazuma]], [[Ayanami]], [[Shikinami]], [[Oboro]], [[Akebono]], [[Sazanami]], [[Ushio]], [[Fubuki]], [[Shirayuki]], [[Hatsuyuki]], [[Miyuki]], [[Murakumo]], [[Isonami]], [[Mutsuki]], [[Kisaragi]], [[Satsuki]], [[Fumizuki]], [[Nagatsuki]], [[Kikuzuki]], [[Mikazuki]], [[Mochizuki]]
 
| style="text-align:center;" |[[Sendai]], [[Jintsuu]], [[Naka]], [[Kuma]], [[Tama]], [[Kiso]], [[Tenryuu]], [[Tatsuta]], [[Kitakami]]
 
|}
 
 
=={{Anchor|1-2}}World 1-2: 南西諸島沖 Sea around the Nansei Islands==
 
{{LabSortieworld
 
| map = 1 02.png
 
| difficulty = ☆
 
| item = {{Ammo}}
 
| exp = Varies
 
| code = 南西諸島沖警備 ([[wikipedia:Nansei_Islands|Nansei Islands]] Sea Defense)
 
| jptext = 南西諸島沖に接近する敵前衛艦隊を捕捉、迎撃せよ!
 
| entext = Intercept the enemy's vanguard fleet in the seas off the Nansei Islands!
 
}}
 
 
===Stage Guide===
 
{{MapBranchingTable
 
|title = 1-2 Branching Rules
 
|expand = true
 
|id = 1-2
 
|0 -> A, B/resource =
 
* Meet '''ALL''' of the following requirements to go to A:
 
** Fleet contains ≤ 5 ships.
 
** DD+DE = 4
 
* Otherwise, random between A and B
 
** 40% to A if fleet contains 6 ships
 
** 50% to A if fleet contains 5 ships
 
** 60% to A if fleet contains 4 ships
 
** 70% to A if fleet contains <= 3 ships
 
|A -> D,E =
 
*Go to D if fleet contains slow ships '''and''' DD+DE ≤ 3
 
*Meet '''ANY''' of the following to go to E
 
**Fast Fleet
 
**Fleet contains CL and DD >= 4
 
**CL = 1 and DD+DE = 5
 
*Otherwise, random routing
 
}}
 
 
===Tips===
 
*Sortie '''1 CL 4 DD''' for fixed routing towards the boss node via node A.
 
 
===Nodes and Enemy Encounters===
 
{{#invoke:EnemyEncounters2|encounterTemplate
 
|A_label = 敵前衛艦隊
 
|A-1_node_info = cl_ho-class dd_i-class dd_i-class
 
|A-1_form = line_ahead
 
|A-1_xp =
 
|A-1_enemy_air_power =
 
|A-2_node_info = dd_ro-class dd_i-class dd_i-class
 
|A-2_form = line_ahead
 
|A-2_xp =
 
|A-2_enemy_air_power =
 
|A-3_node_info = cl_he-class dd_i-class dd_i-class
 
|A-3_form = line_ahead
 
|A-3_xp =
 
|A-3_enemy_air_power =
 
|A-4_node_info = dd_ro-class dd_i-class
 
|A-4_form = line_ahead
 
|A-4_xp =
 
|A-4_enemy_air_power =
 
|A-5_node_info = cl_he-class dd_ro-class dd_ro-class
 
|A-5_form = line_ahead
 
|A-5_xp =
 
|A-5_enemy_air_power =
 
|
 
|B_label = '''<span style="color:green">Resource Node</span>'''
 
|B1_node_info = {{Template:Ammo}} + 10 15 20 40
 
|
 
|C_label = 敵前衛艦隊
 
|C-1_node_info = cl_ho-class dd_i-class dd_i-class
 
|C-1_form = line_ahead
 
|C-1_xp =
 
|C-1_enemy_air_power =
 
|C-2_node_info = dd_ro-class dd_i-class dd_i-class
 
|C-2_form = line_ahead
 
|C-2_xp =
 
|C-2_enemy_air_power =
 
|C-3_node_info = cl_he-class dd_i-class dd_i-class
 
|C-3_form = line_ahead
 
|C-3_xp =
 
|C-3_enemy_air_power =
 
|C-4_node_info = cl_he-class dd_ro-class dd_ro-class
 
|C-4_form = line_ahead
 
|C-4_xp =
 
|C-4_enemy_air_power =
 
|C-5_node_info = dd_ro-class dd_i-class
 
|C-5_form = line_ahead
 
|C-5_xp =
 
|C-5_enemy_air_power =
 
|
 
|D_label = 敵水雷戦隊
 
|D-1_node_info = cl_ho-class dd_ro-class dd_ro-class dd_ro-class
 
|D-1_form = line_ahead
 
|D-1_xp =
 
|D-1_enemy_air_power =
 
|D-2_node_info = cl_ho-class dd_i-class dd_i-class dd_i-class
 
|D-2_form = line_ahead
 
|D-2_xp =
 
|D-2_enemy_air_power =
 
|D-3_node_info = cl_he-class dd_ha-class dd_ro-class dd_ro-class
 
|D-3_form = line_ahead
 
|D-3_xp =
 
|D-3_enemy_air_power =
 
|D-4_node_info = cl_he-class dd_ro-class dd_ro-class dd_ro-class
 
|D-4_form = line_ahead
 
|D-4_xp =
 
|D-4_enemy_air_power =
 
|D-5_node_info = cl_ho-class dd_ro-class dd_i-class dd_i-class
 
|D-5_form = line_ahead
 
|D-5_xp =
 
|D-5_enemy_air_power =
 
|D-6_node_info = cl_ho-class dd_ro-class dd_ro-class dd_i-class
 
|D-6_form = line_ahead
 
|D-6_xp =
 
|D-6_enemy_air_power =
 
|
 
|E_label = 敵主力艦隊
 
|E-1_node_info = cl_he-class dd_i-class dd_i-class dd_i-class dd_i-class
 
|E-1_form = line_ahead
 
|E-1_xp =
 
|E-1_enemy_air_power =
 
|E-2_node_info = cl_he-class clt_chi-class clt_chi-class dd_ha-class dd_ha-class
 
|E-2_form = line_ahead
 
|E-2_xp =
 
|E-2_enemy_air_power =
 
|E-3_node_info = cl_he-class cl_ho-class clt_chi-class dd_i-class dd_i-class
 
|E-3_form = line_ahead
 
|E-3_xp =
 
|E-3_enemy_air_power =
 
|E-4_node_info = cl_ho-class dd_i-class dd_i-class dd_i-class dd_i-class
 
|E-4_form = line_ahead
 
|E-4_xp =
 
|E-4_enemy_air_power =
 
|E-5_node_info = cl_he-class cl_ho-class dd_i-class dd_i-class dd_i-class
 
|E-5_form = line_ahead
 
|E-5_xp =
 
|E-5_enemy_air_power =
 
|
 
|final_form =
 
|boss_node = E
 
}}
 
 
===Drops===
 
<div class="mw-customtoggle-1-2-drop globalbutton">Show/Hide Drops</div>
 
{| class="mw-collapsible mw-collapsed wikitable" id="mw-customcollapsible-1-2-drop"
 
!Node
 
!Destroyers
 
!Light Cruisers
 
!Heavy Cruisers
 
|-
 
| style="text-align:center;" |A
 
| style="text-align:center;" |[[Shirayuki]], [[Hatsuyuki]], [[Miyuki]], [[Isonami]], [[Ayanami]], [[Shikinami]], [[Mutsuki]], [[Kisaragi]], [[Fumizuki]], [[Kikuzuki]], [[Mikazuki]], [[Mochizuki]], [[Oboro]], [[Sazanami]], [[Ushio]], [[Akatsuki]], [[Hibiki]], [[Ikazuchi]], [[Inazuma]], [[Hatsuharu]], [[Nenohi]], [[Wakaba]], [[Hatsushimo]], [[Shiratsuyu]], [[Shigure]], [[Murasame]], [[Yuudachi]], [[Samidare]], [[Suzukaze]], [[Asashio]], [[Ooshio]], [[Michishio]], [[Arashio]], [[Kasumi]], [[Kuroshio]]
 
| style="text-align:center;" |[[Sendai]], [[Jintsuu]], [[Naka]], [[Natori]], [[Isuzu]], [[Yura]], [[Tama]], [[Kiso]], [[Tenryuu]]
 
|
 
|-
 
| style="text-align:center;" |'''<span class="wikicolor" style="color:Red">B</span>'''
 
| style="text-align:center;" |[[Shirayuki]], [[Hatsuyuki]], [[Miyuki]], [[Murakumo]], [[Isonami]], [[Ayanami]], [[Shikinami]], [[Mutsuki]], [[Kisaragi]], [[Nagatsuki]], [[Kikuzuki]], [[Oboro]], [[Akebono]], [[Sazanami]], [[Ushio]], [[Akatsuki]], [[Hibiki]], [[Ikazuchi]], [[Inazuma]], [[Hatsuharu]], [[Nenohi]], [[Wakaba]], [[Hatsushimo]], [[Shiratsuyu]], [[Shigure]], [[Murasame]], [[Yuudachi]], [[Samidare]], [[Suzukaze]], [[Asashio]], [[Ooshio]], [[Michishio]], [[Arashio]], [[Arare]], [[Kasumi]], [[Kagerou]], [[Shiranui]], [[Kuroshio]],
 
| style="text-align:center;" |[[Sendai]], [[Jintsuu]], [[Naka]], [[Isuzu]], [[Yuubari]], [[Nagara]], [[Natori]], [[Yura]], [[Kuma]], [[Tama]], [[Kitakami]], [[Kiso]], [[Tenryuu]], [[Tatsuta]]
 
| style="text-align:center;" | [[Choukai]]
 
|-
 
| style="text-align:center;" |D
 
| style="text-align:center;" |[[Hatsuyuki]], [[Miyuki]], [[Isonami]], [[Shikinami]], [[Mutsuki]], [[Kisaragi]], [[Fumizuki]], [[Kikuzuki]], [[Mikazuki]], [[Mochizuki]], [[Oboro]], [[Akebono]], [[Sazanami]], [[Ushio]], [[Akatsuki]], [[Hibiki]], [[Ikazuchi]], [[Inazuma]], [[Hatsuharu]], [[Nenohi]], [[Wakaba]], [[Hatsushimo]], [[Shiratsuyu]], [[Shigure]], [[Murasame]], [[Yuudachi]], [[Samidare]], [[Suzukaze]], [[Ooshio]], [[Arashio]], [[Kasumi]], [[Kuroshio]]
 
| style="text-align:center;" |[[Sendai]], [[Jintsuu]], [[Naka]], [[Isuzu]], [[Natori]], [[Yura]], [[Tama]], [[Kiso]], [[Tenryuu]], [[Tatsuta]]
 
|
 
|}
 
 
=={{Anchor|1-3}}World 1-3: 製油所地帯沿岸 Coastal Refinery Zone==
 
{{LabSortieworld
 
| map = 1 03.png
 
| difficulty = ☆ ☆
 
| item = {{Fuel}}
 
| exp = Varies
 
| code = 海上護衛作戦 (Maritime Escort Operation)
 
| jptext = 製油所地帯沿岸部の海上輸送ラインを防衛せよ!
 
| entext = Protect the supply lines around our coastal refineries!
 
}}
 
 
===Stage Guide===
 
{{MapBranchingTable
 
|title = 1-3 Branching Rules
 
|expand = true
 
|id = 1-3
 
|0 -> A/empty, C =
 
*Go to A if fleet contains AO or AV
 
*Go to C if fleet contains CV(L)
 
*Otherwise, random routing
 
 
|A -> D/resource, E =
 
*Meet '''ANY''' of the following to go to D
 
**Fleet contains AO
 
**DE >= 4
 
*Go to E if fleet only contains SS(V)
 
*80% to D if fleet contains AV and DD+DE >= 4
 
*Otherwise, random routing
 
 
|F -> H/storm, J =
 
*Go to H if fleet contains any CV(B), slow BBs (BBV doesn't count)
 
*Meet '''ANY''' of the following to go to J
 
**DD >= 4
 
**Fleet contains CL and DD+DE >= 4
 
*Otherwise, random routing (The more CV(L/B) you bring, the higher chance you will go to node H)
 
 
|H/storm -> G/resource, I/empty, J =
 
*Go to G if fleet contains AO
 
*Go to J if fleet contains CL and DD >= 2, or fleet contains AV
 
*Otherwise
 
**If DD >= 3, random routing (Very small chance for I)
 
**If DD <= 2, random routing (Very small chance for G)
 
}}
 
 
===Tips===
 
<br/>'''Recommended Fleet'''
 
*'''2 XX 4 DD (XX can't be any heavy ships such as (F)BB or CV, BBV and CVL are fine though)''' guarantees '''F-J branching'''
 
<br/>'''Oil Refinery Farming'''
 
*The Oil Refinery area is now the new hot spot for farming for {{fuel}} since the former '''"Orel Cruise"''' has become insufficient due to the increase difficulty subs will face on 2-3. As such '''Node D''' of this map now serves as a major area to farm for fuel.
 
**'''1 AV, 4-5 D, 0-1 SS / [[Kamoi]], 4-5 DD, SS ([[Luigi Torelli]] recommended)'''
 
***Requires [[Drum Canister]] and [[Daihatsu]] type equipment to increase fuel gain
 
***You will only have around 80% of reaching node D if you are using the AV comp. If the fleet you are using contains AO such as [[Kamoi]], however, will guarantee node D instead
 
***Node D will provide you with with a base amount of '''10/15/20''' {{fuel}}
 
***In addition to this, each {{Drum}} and {{LandingCraft}} you equip will give the following bonuses:
 
****+2 {{fuel}} per {{Drum}}
 
****+3 {{fuel}} per {{LandingCraft}}
 
***With enough {{Drum}} and {{LandingCraft}} it can become possible to gain a large amount of resources if you make constant trips to this spot.
 
***Once you complete your first battle, return to your base and refuel your fleet before going back out again.
 
***If done correctly, this can result in an alarming fuel gain that can end up possibly surpassing any fuel base [[expedition]] making this become the ideal location to farm for fuel.
 
***If you use throwaway DDs, remember to remove their [[Drum Canister]] once they run out of fuel and ammo or are critically damaged before scrapping them before proceeding to replace them with another DD that will use the [[Drum Canister]]s to run the map to continue the cycle.
 
 
===Nodes and Enemy Encounters===
 
{{#invoke:EnemyEncounters2|encounterTemplate
 
|A_label = '''<span style="color:blue">Battle Avoided</span>'''
 
|A1_node_info = "Must be my imagination" (battle avoided)
 
|
 
|B_label = '''<span style="color:blue">Battle Avoided</span>'''
 
|B1_node_info = "Must be my imagination" (battle avoided)
 
|
 
|C_label = 敵前衛艦隊
 
|C-1_node_info = cl_he-class dd_ha-class dd_ha-class
 
|C-1_form = line_ahead
 
|C-1_xp =
 
|C-1_enemy_air_power =
 
|C-2_node_info = cl_he-class dd_ha-class dd_ro-class dd_ro-class
 
|C-2_form = line_ahead
 
|C-2_xp =
 
|C-2_enemy_air_power =
 
|C-3_node_info = cl_ho-class dd_ro-class dd_ro-class
 
|C-3_form = line_ahead
 
|C-3_xp =
 
|C-3_enemy_air_power =
 
|C-4_node_info = cl_ho-class dd_i-class dd_i-class
 
|C-4_form = line_ahead
 
|C-4_xp =
 
|C-4_enemy_air_power =
 
|C-5_node_info = cl_he-class dd_ro-class dd_ro-class
 
|C-5_form = line_ahead
 
|C-5_xp =
 
|C-5_enemy_air_power =
 
|C-6_node_info = cl_ho-class dd_ha-class dd_ha-class
 
|C-6_form = line_ahead
 
|C-6_xp =
 
|C-6_enemy_air_power =
 
|
 
|D_label = '''<span style="color:green">Resource Node</span>'''
 
|D1_node_info = fuel + 10 20
 
|
 
|E_label = 敵前衛艦隊
 
|E-1_node_info = cl_he-class dd_ha-class dd_ro-class dd_ro-class
 
|E-1_form = line_ahead
 
|E-1_xp =
 
|E-1_enemy_air_power =
 
|E-2_node_info = cl_he-class dd_ha-class dd_ha-class
 
|E-2_form = line_ahead
 
|E-2_xp =
 
|E-2_enemy_air_power =
 
|E-3_node_info = cl_he-class dd_ro-class dd_ro-class
 
|E-3_form = line_ahead
 
|E-3_xp =
 
|E-3_enemy_air_power =
 
|E-4_node_info = cl_ho-class dd_ha-class dd_ha-class
 
|E-4_form = line_ahead
 
|E-4_xp =
 
|E-4_enemy_air_power =
 
|E-5_node_info = cl_ho-class dd_i-class dd_i-class
 
|E-5_form = line_ahead
 
|E-5_xp =
 
|E-5_enemy_air_power =
 
|E-6_node_info = cl_ho-class dd_ro-class dd_ro-class
 
|E-6_form = line_ahead
 
|E-6_xp =
 
|E-6_enemy_air_power =
 
|
 
|F_label = 敵支援艦隊
 
|F-1_node_info = ca_ri-class dd_ro-class dd_ro-class dd_ro-class
 
|F-1_form = double_line line_ahead
 
|F-1_xp =
 
|F-1_enemy_air_power =
 
|F-2_node_info = ca_ri-class ca_ri-class dd_ro-class dd_ro-class
 
|F-2_form = line_ahead double_line
 
|F-2_xp =
 
|F-2_enemy_air_power =
 
|F-3_node_info = ca_ri-class clt_chi-class dd_ro-class dd_ro-class
 
|F-3_form = double_line line_ahead
 
|F-3_xp =
 
|F-3_enemy_air_power =
 
|F-4_node_info = ca_ri-class dd_i-class dd_i-class dd_i-class
 
|F-4_form = double_line line_ahead
 
|F-4_xp =
 
|F-4_enemy_air_power =
 
|
 
|G_label = '''<span style="color:green">Resource Node</span>'''
 
|G1_node_info = fuel + ?
 
|
 
|H_label = '''<span style="color:purple">Maelstrom Node</span>'''
 
|H1_node_info = ammo - ?
 
|
 
|I_label = '''<span style="color:blue">Battle Avoided</span>'''
 
|I1_node_info = "Must be my imagination" (battle avoided)
 
|
 
|J_label = 敵主力艦隊
 
|J-1_node_info = bb_ru-class clt_chi-class cl_he-class dd_ro-class dd_ro-class
 
|J-1_form = line_ahead double_line
 
|J-1_xp =
 
|J-1_enemy_air_power =
 
|J-2_node_info = bb_ru-class clt_chi-class cl_he-class dd_i-class dd_i-class
 
|J-2_form = line_ahead double_line
 
|J-2_xp =
 
|J-2_enemy_air_power =
 
|J-3_node_info = bb_ru-class cl_he-class dd_i-class dd_i-class dd_i-class
 
|J-3_form = line_ahead double_line
 
|J-3_xp =
 
|J-3_enemy_air_power =
 
|
 
|final_form =
 
|boss_node = J
 
}}
 
 
===Drops===
 
<div class="mw-customtoggle-1-3-drop globalbutton">Show/Hide Drops</div>
 
{| class="mw-collapsible mw-collapsed wikitable" id="mw-customcollapsible-1-3-drop"
 
!Node
 
!Destroyers
 
!Light Cruisers
 
!Heavy Cruisers
 
!Seaplane Tender
 
!Aircraft Carrier
 
|-
 
| style="text-align:center;" |A
 
| style="text-align:center;" |[[Shirayuki]], [[Hatsuyuki]], [[Miyuki]], [[Isonami]], [[Ayanami]], [[Shikinami]], [[Mutsuki]], [[Kisaragi]], [[Satsuki]], [[Fumizuki]], [[Nagatsuki]], [[Kikuzuki]], [[Mikazuki]], [[Mochizuki]], [[Oboro]], [[Akebono]], [[Akatsuki]], [[Hibiki]], [[Ikazuchi]] [[Inazuma]], [[Hatsuharu]], [[Nenohi]], [[Wakaba]], [[Hatsushimo]], [[Shiratsuyu]], [[Shigure]], [[Murasame]], [[Yuudachi]], [[Suzukaze]], [[Ooshio]], [[Michishio]], [[Arashio]], [[Arare]], [[Kasumi]], [[Shiranui]], [[Kuroshio]]
 
| style="text-align:center;" |[[Sendai]], [[Jintsuu]], [[Naka]], [[Nagara]], [[Isuzu]], [[Natori]], [[Yura]], [[Tama]], [[Kiso]]
 
| style="text-align:center;" |[[Aoba]]
 
| style="text-align:center;" |[[Chitose]], [[Chiyoda]]
 
| style="text-align:center;" |[[Houshou]]
 
|-
 
| style="text-align:center;" |E
 
| style="text-align:center;" |[[Hatsuyuki]], [[Isonami]], [[Shikinami]], [[Mutsuki]], [[Kisaragi]], [[Satsuki]], [[Fumizuki]], [[Nagatsuki]], [[Kikuzuki]], [[Mikazuki]], [[Mochizuki]], [[Oboro]], [[Akebono]], [[Ushio]], [[Akatsuki]], [[Hibiki]], [[Ikazuchi]], [[Inazuma]], [[Hatsuharu]] [[Wakaba]], [[Hatsushimo]], [[Shiratsuyu]], [[Shigure]], [[Murasame]], [[Yuudachi]], [[Suzukaze]], [[Ooshio]], [[Michishio]], [[Arashio]], [[Arare]], [[Shiranui]], [[Kuroshio]]
 
| style="text-align:center;" |[[Sendai]], [[Jintsuu]], [[Naka]], [[Nagara]], [[Isuzu]], [[Natori]], [[Yura]], [[Tama]], [[Kiso]]
 
| style="text-align:center;" | -
 
| style="text-align:center;" |[[Chitose]], [[Chiyoda]]
 
| style="text-align:center;" | -
 
|-
 
| style="text-align:center;" |F
 
| style="text-align:center;" |[[Shirayuki]], [[Hatsuyuki]], [[Miyuki]], [[Isonami]], [[Shikinami]], [[Mutsuki]], [[Kisaragi]], [[Satsuki]], [[Fumizuki]], [[Nagatsuki]], [[Kikuzuki]], [[Mikazuki]], [[Mochizuki]], [[Akebono]], [[Akatsuki]], [[Hibiki]], [[Ikazuchi]], [[Inazuma]], [[Hatsuharu]], [[Nenohi]], [[Wakaba]], [[Hatsushimo]], [[Shiratsuyu]], [[Shigure]], [[Murasame]], [[Yuudachi]], [[Suzukaze]], [[Ooshio]], [[Michishio]], [[Arashio]], [[Arare]], [[Kasumi]], [[Shiranui]], [[Kuroshio]]
 
| style="text-align:center;" |[[Sendai]], [[Jintsuu]], [[Naka]], [[Nagara]], [[Isuzu]], [[Natori]], [[Yura]], [[Tama]], [[Kiso]]
 
| style="text-align:center;" | -
 
| style="text-align:center;" |[[Chitose]], [[Chiyoda]]
 
| style="text-align:center;" |[[Akagi]]
 
|-
 
| style="text-align:center;" |'''<span class="wikicolor" style="color:Red">G</span>'''
 
| style="text-align:center;" |[[Fubuki]], [[Shirayuki]], [[Miyuki]], [[Murakumo]], [[Isonami]], [[Ayanami]], [[Shikinami]], [[Kisaragi]], [[Kikuzuki]], [[Mikazuki]], [[Mochizuki]], [[Oboro]], [[Sazanami]], [[Ushio]], [[Hibiki]], [[Ikazuchi]], [[Inazuma]], [[Hatsuharu]], [[Nenohi]], [[Wakaba]], [[Hatsushimo]], [[Shiratsuyu]], [[Shigure]], [[Murasame]], [[Yuudachi]], [[Samidare]], [[Suzukaze]], [[Ooshio]], [[Arare]], [[Shiranui]], [[Kuroshio]]
 
| style="text-align:center;" |[[Sendai]], [[Jintsuu]], [[Naka]], [[Yuubari]], [[Nagara]], [[Isuzu]], [[Natori]], [[Yura]], [[Kuma]], [[Tama]], [[Kitakami]], [[Kiso]], [[Tenryuu]], [[Tatsuta]]
 
| style="text-align:center;" |[[Aoba]], [[Kinugasa]], [[Furutaka]], [[Kako]]
 
| style="text-align:center;" |[[Chitose]], [[Chiyoda]]
 
| style="text-align:center;" |[[Houshou]]
 
|}
 
 
=={{Anchor|1-4}}World 1-4: 南西諸島防衛線 Nansei Islands Defense Line==
 
{{LabSortieworld
 
| map = 1 04.png
 
| difficulty = ☆ ☆ ☆
 
| item = {{Ammo}} {{Steel}} {{Bauxite}}
 
| exp = Varies
 
| code = 南1号作戦 ([[wikipedia:ja:南号作戦|First Southern Operation]])
 
| jptext = 南西諸島の防衛ライン上の敵侵攻艦隊を捕捉、全力出撃でこれを撃滅せよ!
 
| entext = An enemy invasion fleet is pressing on the defensive line in the Nansei Islands.  Sail out in full force and destroy them!
 
}}
 
 
===Stage Guide===
 
{{MapBranchingTable
 
|title = 1-4 Branching Rules
 
|expand = true
 
|id = 1-4
 
|0 -> A/empty, B = * Random routing
 
 
|B -> C/resource, D =
 
*Meet '''ANY''' of the following to '''FORCE''' D
 
**Fleet contains no DD and DE
 
**CV(B/L) >= 3
 
**(F)BB(V) >= 3
 
*Go to C if DD+DE >= 3
 
*Otherwise, random routing
 
**If fleet contains CL, 80% to C
 
**Otherwise, 65% to C
 
 
|D -> E/resource, G/resource =
 
*Go to E if fleet contains AS
 
*Go to G if fleet contains AV
 
*Otherwise, random routing
 
 
|F/empty -> E/resource, H, I =
 
*Meet '''ANY''' of the following to go to E
 
**DD+DE ≥ 4
 
**Fleet contains AV and DD+DE ≥ 2
 
**BBV ≥ 2 and DD+DE ≥ 2
 
*Random between E and H if DD+DE ≥ 2
 
*Otherwise, random routing between H and I.
 
 
|J -> K/empty, L =
 
*Meet '''ANY''' of the following to go to L
 
**DD+DE ≥ 4 and SS(V) = 0
 
**Fleet contains both AV and CL, with DD+DE ≥ 2
 
*Otherwise, random routing
 
}}
 
{{AirControlSystem
 
| Map = 1-4
 
| AS = 30
 
}}
 
 
===Tips===
 
*This is the first map in which the enemy fleets possess carriers (with at least one node of carriers in every route). If you do not bring your own carriers, your ships must deal with aerial bombing prior to being able to counter-attack during the shelling phase(s). You have a few ways to deal with enemy carriers:
 
# Ignore the enemy carriers' bombing, which is possible with durable ships (at least CLs, preferably CAs or higher);
 
# Bring a submarine-only fleet (likely from construction as there are no submarine drops between 1-1 and 1-4) as only enemy CL and DDs can attack submarines; or
 
# Bring your own carriers, which can be obtained through either remodeling [[Chitose]] and/or [[Chiyoda]] at Level 15 to CVL or through normal construction.
 
*The third method will also help in completing the quest chain which rewards [[Akagi]]: [[Quests#A11|A11]] (have a CV(L) and 3 destroyers in your second fleet) and [[Quests#B10|B10]] (sink an enemy carrier).
 
*This map is also convenient for completing [[Quests#Bw2|Bw2]], preferably with a fleet of three subs. The echelon formations here hurt them far less than those in [[World 2|2-2]].
 
 
'''Recommended Fleet'''
 
*'''1 AV 1 CL 2 DD 2 XX'''
 
 
===Nodes and Enemy Encounters===
 
{{#invoke:EnemyEncounters2|encounterTemplate
 
|A_label = '''<span style="color:blue">Battle Avoided</span>'''
 
|A1_node_info = "Must be my imagination" (battle avoided)
 
|
 
|B_label = 敵偵察艦隊
 
|B-1_node_info = ca_ri-class cl_he-class dd_i-class dd_i-class dd_i-class
 
|B-1_form = double_line line_ahead
 
|B-1_xp =
 
|B-1_enemy_air_power =
 
|B-2_node_info = ca_ri-class cl_he-class dd_ro-class dd_ro-class
 
|B-2_form = line_ahead double_line
 
|B-2_xp =
 
|B-2_enemy_air_power =
 
|B-3_node_info = cl_he-class cl_he-class dd_ha-class dd_ha-class
 
|B-3_form = double_line line_ahead
 
|B-3_xp =
 
|B-3_enemy_air_power =
 
|
 
|C_label = '''<span style="color:green">Resource Node</span>'''
 
|C1_node_info = steel + 10 20
 
|
 
|D_label = 敵偵察艦隊
 
|D-1_node_info = ca_ri-class cl_he-class dd_i-class dd_i-class dd_i-class
 
|D-1_form = double_line line_ahead
 
|D-1_xp =
 
|D-1_enemy_air_power =
 
|D-2_node_info = ca_ri-class cl_he-class dd_ro-class dd_ro-class
 
|D-2_form = double_line line_ahead
 
|D-2_xp =
 
|D-2_enemy_air_power =
 
|D-3_node_info = cl_he-class cl_he-class dd_ha-class dd_ha-class
 
|D-3_form = line_ahead double_line
 
|D-3_xp =
 
|D-3_enemy_air_power =
 
|
 
|E_label = '''<span style="color:green">Resource Node</span>'''
 
|E1_node_info = ammo + 15 20
 
|
 
|F_label = '''<span style="color:blue">Battle Avoided</span>'''
 
|F1_node_info = "Must be my imagination" (battle avoided)
 
|
 
|G_label = '''<span style="color:green">Resource Node</span>'''
 
|G1_node_info = bauxite + 10 15 20
 
|
 
|H_label = 敵前衛任務部隊 I群
 
|H-1_node_info = cvl_nu-class cvl_nu-class ca_ri-class cl_he-class dd_ro-class dd_ro-class
 
|H-1_form = diamond
 
|H-1_xp =
 
|H-1_enemy_air_power = 16
 
|H-2_node_info = cvl_nu-class cvl_nu-class cl_he-class dd_ro-class dd_ro-class
 
|H-2_form = diamond
 
|H-2_xp =
 
|H-2_enemy_air_power = 16
 
|
 
|I_label = 敵前衛任務部隊 II群
 
|I-1_node_info = cvl_nu-class ca_ri-class cl_ho-class dd_i-class dd_i-class
 
|I-1_form = diamond
 
|I-1_xp =
 
|I-1_enemy_air_power = 8
 
|I-2_node_info = cvl_nu-class cvl_nu-class cl_ho-class dd_i-class dd_i-class
 
|I-2_form = diamond
 
|I-2_xp =
 
|I-2_enemy_air_power = 16
 
|I-3_node_info = cvl_nu-class cvl_nu-class ca_ri-class cl_ho-class dd_i-class dd_i-class
 
|I-3_form = diamond
 
|I-3_xp =
 
|I-3_enemy_air_power = 16
 
|
 
|J_label = 敵支援打撃任務群
 
|J-1_node_info = bb_ru-class cvl_nu-class cl_he-class cl_he-class dd_ro-class dd_ro-class
 
|J-1_form = double_line line_ahead
 
|J-1_xp =
 
|J-1_enemy_air_power = 8
 
|J-2_node_info = bb_ru-class cvl_nu-class cvl_nu-class cl_he-class dd_ro-class dd_ro-class
 
|J-2_form = line_ahead double_line
 
|J-2_xp =
 
|J-2_enemy_air_power = 16
 
|J-3_node_info = bb_ru-class clt_chi-class clt_chi-class cl_he-class dd_ro-class dd_ro-class
 
|J-3_form = line_ahead double_line
 
|J-3_xp =
 
|J-3_enemy_air_power =
 
|
 
|K_label = '''<span style="color:blue">Battle Avoided</span>'''
 
|K1_node_info = "Must be my imagination" (battle avoided)
 
|
 
|L_label = 敵機動部隊
 
|L-1_node_info = cv_wo-class cvl_nu-class ca_ri-class cl_he-class dd_ha-class dd_ha-class
 
|L-1_form = diamond
 
|L-1_xp =
 
|L-1_enemy_air_power = 18
 
|L-2_node_info = cv_wo-class cvl_nu-class ca_ri-class cl_he-class dd_ro-class dd_ro-class
 
|L-2_form = diamond
 
|L-2_xp =
 
|L-2_enemy_air_power = 18
 
|L-3_node_info = cv_wo-class ca_ri-class cl_he-class dd_ro-class dd_ro-class dd_ro-class
 
|L-3_form = diamond
 
|L-3_xp =
 
|L-3_enemy_air_power = 10
 
|L-4_node_info = cv_wo-class ca_ri-class cl_he-class dd_ha-class dd_ha-class dd_ha-class
 
|L-4_form = diamond
 
|L-4_xp =
 
|L-4_enemy_air_power = 10
 
|L-5_node_info = cv_wo-class cv_wo-class ca_ri-class cl_he-class dd_ni-class dd_ni-class
 
|L-5_form = diamond
 
|L-5_xp =
 
|L-5_enemy_air_power = 20
 
|L-6_node_info = cv_wo-class cv_wo-class ca_ri-class cl_he-class dd_ha-class dd_ha-class
 
|L-6_form = diamond
 
|L-6_xp =
 
|L-6_enemy_air_power = 20
 
|
 
|final_form =
 
|boss_node = L
 
}}
 
 
===Drops===
 
<div class="mw-customtoggle-1-4-drop globalbutton">Show/Hide Drops</div>
 
{| class="mw-collapsible mw-collapsed wikitable" id="mw-customcollapsible-1-4-drop"
 
!Node
 
!Destroyers
 
!Light Cruisers
 
!Heavy Cruisers
 
!Seaplane Tender
 
!Aircraft Carrier
 
!Battleship
 
|-
 
| style="text-align:center;" |A
 
| style="text-align:center;" |[[Shirayuki]], [[Hatsuyuki]], [[Miyuki]], [[Murakumo]], [[Isonami]], [[Mutsuki]], [[Kisaragi]], [[Satsuki]], [[Fumizuki]], [[Mikazuki]], [[Mochizuki]], [[Akatsuki]], [[Hibiki]], [[Ikazuchi]], [[Inazuma]], [[Hatsuharu]], [[Nenohi]], [[Hatsushimo]], [[Wakaba]] [[Shiratsuyu]], [[Shigure]], [[Yuudachi]], [[Samidare]], [[Suzukaze]], [[Asashio]], [[Ooshio]], [[Michishio]], [[Arashio]], [[Arare]], [[Kasumi]], [[Kagerou]], [[Shiranui]], [[Kuroshio]]
 
| style="text-align:center;" |[[Jintsuu]], [[Naka]], [[Nagara]], [[Isuzu]], [[Natori]], [[Yura]], [[Kuma]], [[Tama]], [[Kiso]], [[Tenryuu]], [[Tatsuta]]
 
| style="text-align:center;" |[[Myoukou]], [[Nachi]], [[Ashigara]], [[Haguro]], [[Aoba]], [[Furutaka]], [[Kako]]
 
| style="text-align:center;" |[[Chitose]], [[Chiyoda]]
 
| style="text-align:center;" |[[Houshou]]
 
|
 
|-
 
| style="text-align:center;" |B
 
| style="text-align:center;" |[[Fubuki]], [[Shirayuki]], [[Hatsuyuki]], [[Murakumo]], [[Isonami]], [[Ayanami]], [[Shikinami]], [[Mutsuki]], [[Satsuki]], [[Fumizuki]], [[Nagatsuki]], [[Kikuzuki]], [[Mikazuki]], [[Mochizuki]], [[Akatsuki]], [[Hibiki]], [[Ikazuchi]], [[Inazuma]], [[Nenohi]], [[Wakaba]], [[Shiratsuyu]], [[Shigure]], [[Murasame]], [[Yuudachi]], [[Samidare]], [[Suzukaze]], [[Ooshio]], [[Michishio]], [[Arare]], [[Kagerou]], [[Shiranui]]
 
| style="text-align:center;" |[[Jintsuu]], [[Naka]], [[Yura]], [[Kuma]], [[Tama]], [[Kiso]], [[Tenryuu]], [[Tatsuta]], [[Nagara]], [[Isuzu]]
 
| style="text-align:center;" |[[Myoukou]], [[Nachi]], [[Ashigara]], [[Haguro]], [[Furutaka]], [[Kako]], [[Aoba]]
 
| style="text-align:center;" |[[Chitose]], [[Chiyoda]]
 
| style="text-align:center;" |[[Houshou]]
 
|
 
|-
 
| style="text-align:center;" |E
 
| style="text-align:center;" |[[Samidare]], [[Fubuki]], [[Shirayuki]], [[Hatsuyuki]], [[Miyuki]], [[Isonami]], [[Ayanami]], [[Kisaragi]], [[Satsuki]], [[Fumizuki]], [[Hibiki]], [[Ikazuchi]], [[Inazuma]], [[Nenohi]], [[Wakaba]], [[Hatsushimo]], [[Shiratsuyu]], [[Yuudachi]], [[Michishio]], [[Arashio]], [[Arare]], [[Kasumi]], [[Kagerou]], [[Shiranui]]
 
| style="text-align:center;" |[[Tama]], [[Kuma]], [[Kiso]], [[Tenryuu]], [[Tatsuta]], [[Nagara]], [[Isuzu]], [[Natori]], [[Naka]]
 
| style="text-align:center;" |[[Myoukou]], [[Nachi]], [[Ashigara]], [[Haguro]], [[Furutaka]], [[Aoba]]
 
| style="text-align:center;" |[[Chitose]], [[Chiyoda]]
 
| style="text-align:center;" |[[Houshou]]
 
|
 
|-
 
| style="text-align:center;" |'''<span class="wikicolor" style="color:Red">F</span>'''
 
| style="text-align:center;" |[[Fubuki]], [[Hatsuyuki]], [[Miyuki]], [[Murakumo]], [[Isonami]], [[Mutsuki]], [[Kisaragi]], [[Fumizuki]], [[Nagatsuki]], [[Kikuzuki]], [[Mikazuki]], [[Akatsuki]], [[Hibiki]], [[Ikazuchi]], [[Inazuma]], [[Hatsuharu]], [[Nenohi]], [[Wakaba]], [[Hatsushimo]], [[Shiratsuyu]], [[Shigure]], [[Yuudachi]], [[Murasame]], [[Samidare]], [[Ooshio]], [[Michishio]], [[Arashio]], [[Arare]], [[Kasumi]], [[Kagerou]], [[Shiranui]], [[Kuroshio]], [[Makigumo|'''<span style="color:red">Makigumo</span>''']]
 
| style="text-align:center;" |[[Sendai]], [[Jintsuu]], [[Naka]], [[Natori]], [[Nagara]], [[Isuzu]], [[Yura]], [[Kuma]], [[Kiso]], [[Tenryuu]], [[Tatsuta]]
 
| style="text-align:center;" |[[Maya]], [[Choukai]], [[Myoukou]], [[Nachi]], [[Ashigara]], [[Haguro]], [[Aoba]], [[Kinugasa]], [[Furutaka]], [[Kako]]
 
| style="text-align:center;" |[[Chitose]], [[Chiyoda]]
 
| style="text-align:center;" |[[Akagi]], [[Shouhou]], [[Ryuujou]], [[Houshou]]
 
|
 
|-
 
| style="text-align:center;" |I
 
| style="text-align:center;" |[[Fubuki]], [[Hatsuyuki]], [[Miyuki]], [[Murakumo]], [[Isonami]], [[Shikinami]], [[Ayanami]], [[Mutsuki]], [[Kisaragi]], [[Satsuki]], [[Fumizuki]], [[Kikuzuki]], [[Mochizuki]], [[Akatsuki]], [[Hibiki]], [[Ikazuchi]], [[Hatsuharu]], [[Nenohi]], [[Wakaba]], [[Hatsushimo]], [[Shiratsuyu]], [[Shigure]], [[Murasame]], [[Yuudachi]], [[Samidare]], [[Suzukaze]], [[Ooshio]], [[Michishio]], [[Kasumi]], [[Kagerou]], [[Kuroshio]]
 
| style="text-align:center;" |[[Nagara]], [[Natori]], [[Kuma]], [[Tama]], [[Kiso]], [[Tatsuta]], [[Isuzu]], [[Yura]], [[Jintsuu]], [[Yuubari]]
 
| style="text-align:center;" |[[Myoukou]], [[Nachi]], [[Ashigara]], [[Haguro]], [[Aoba]], [[Furutaka]], [[Kako]]
 
| style="text-align:center;" |[[Chitose]], [[Chiyoda]]
 
| style="text-align:center;" |[[Akagi]], [[Shouhou]], [[Ryuujou]], [[Houshou]]
 
|
 
|-
 
| style="text-align:center;" |J
 
| style="text-align:center;" |[[Hatsuyuki]], [[Miyuki]], [[Isonami]], [[Murakumo]], [[Kisaragi]], [[Kikuzuki]], [[Nagatsuki]], [[Mikazuki]], [[Hibiki]], [[Ikazuchi]], [[Hatsushimo]], [[Hatsuharu]], [[Nenohi]], [[Wakaba]], [[Shiratsuyu]], [[Murasame]], [[Yuudachi]], [[Asashio]], [[Ooshio]], [[Michishio]], [[Arashio]], [[Arare]], [[Kagerou]], [[Shiranui]], [[Kuroshio]], [[Suzukaze]]
 
| style="text-align:center;" |[[Tenryuu]], [[Tatsuta]], [[Kuma]], [[Kiso]], [[Nagara]], [[Natori]], [[Jintsuu]], [[Naka]]
 
| style="text-align:center;" |[[Myoukou]], [[Nachi]], [[Ashigara]], [[Haguro]], [[Furutaka]], [[Kako]], [[Aoba]], [[Choukai]]
 
| style="text-align:center;" |[[Chitose]], [[Chiyoda]]
 
| style="text-align:center;" |[[Akagi]], [[Houshou]]
 
| style="text-align:center;" |[[Fusou]]
 
|}
 
 
=={{Anchor|1-5}}World 1-5: 【Extra Operation】 鎮守府近海 Seas Near the Naval Base==
 
{{LabSortieworld
 
| map = 1 05.png
 
| difficulty = ☆ ☆ ☆ ☆ ☆
 
| item = None
 
| exp = 150
 
| code = 鎮守府近海対潜哨戒 (Anti-submarine Patrol in Seas Near the Naval Base)
 
| jptext = なるべく小編成の対潜哨戒部隊を編成し、鎮守府近海に出没する敵潜水艦を捜索。これを捕捉制圧、近海の安全な航行を実現せよ!
 
| entext = Form a small anti-submarine patrol fleet, discover and suppress the enemy submarines deployed in seas near the naval base!}}
 
 
===Stage Guide===
 
{{MapBranchingTable
 
|title = 1-5 Branching Rules
 
|expand = true
 
|id = 1-5
 
|order = D,E,C,F,G
 
|D -> E, F =
 
 
*Meet '''ANY''' of the following to go to E
 
** Fleet only contains DEs
 
** Fleet contains AO
 
**Amount of ships in fleet = 1
 
*If Amount of ships in fleet >= 5 ('''Overrides E node branching''')
 
**Go to F if fleet also contains SS(V)
 
**Otherwise, random routing
 
*Otherwise, go to F
 
 
|E -> C =
 
*Amount of ships in fleet ≥ 5
 
*Fleets that don't meet the requirement to go to J
 
|E -> J = *Fleet only contains DE
 
 
|C -> B/empty, J =
 
*Meet '''ANY''' of the following to go to J
 
**Fleet only contains DE
 
**Amount of ships in fleet <= 4, fleet contains no (F)BB(V) and DD+DE >= 2
 
*Random if fleet contains AO
 
*Otherwise, go to B
 
 
|F -> G/empty = * Meet '''ALL''' of the following requirements:
 
** No (F)BB (BBV does not count)
 
** No SS(V)
 
** No CV(B)
 
** Amount of CVL ≤ 1
 
** Amount of CL ≤ 2
 
|F -> I =
 
* Do not meet the requirements to go to G.
 
 
|G/empty -> H = * Amount of ships in fleet is ≥ 5
 
|G/empty -> J = * Amount of ships in fleet is ≤ 4
 
}}
 
 
===Tips===
 
Clearing this map gives you '''75 points''' and a '''medal'''. At the beginning of each month, the boss HP bar will be reset, thus allowing you to obtain the medal and bonus points again.
 
*Unlike quests, the time limit for all Extra Operation is 11:59 PM JST on the last day of the month. Defeating the enemy flagship after the time limit will not count towards either the previous month or the next month.
 
*If the HP bar did not reset for you, re-logging into the game typically will fix the problem.
 
*Enemy fleets along the route to boss are composed purely of submarines.
 
**At various HQ level thresholds, enemy compositions will increase in difficulty, but if you train a fleet of Destroyers, Light Cruisers and Escorts and maintain strong ASW equipment it should be manageable.
 
***Using [[Isuzu|Isuzu Kai Ni]] or any DD/CL that has ASW stats that go over 100, or DE that has an ASW of 60 or higher will allow them to perform a [[Combat#Anti-Sub_Warfare|Preemptive ASW attack]], which can be very helpful on this map. It can easily turn this map to your advantage for the most part.
 
 
<br/>'''Recommended Fleet'''
 
*'''1CVL, 1 BBV, 2 DD/CL''' - recommended for beginners.
 
**Equipping the Saiun to the CVL will minimize the chance of <span style="color:red">Crossing the T - Disadvantage</span>
 
**At least 1 BBV is highly recommended as it is capable of performing ASW while also granting you a second shelling phase.
 
*If you happen to own [[Taiyou]], she is highly recommended for this map as she's the only light carrier capable of fighting submarines efficiently.
 
**At Kai, she's capable of [[Combat#Anti-Sub_Warfare|Preemptive ASW attack]] using any ASW plane, making her the most resourceful light carrier to take out submarines on that map.
 
** If you do not own [[Taiyou]], any other CVL can work, but their damage output will be limited in comparison to her's.
 
* 2-4 DD/DE, 0-2 CL capable of [[Combat#Anti-Sub_Warfare|Preemptive ASW attack]] is recommended for experienced players since the DD and CL will be able to perform two rounds of ASW attacks without the need for a BBV (useful if you want to save your resources).
 
**Do not use more than 2 CL (CT and CLT don't count as CLs) in your composition if you are attempting the above set-up, or you ''will'' get routed to I.
 
*DE can be used in place of DDs for this map and are economically efficient for your resources in the process.
 
**A full fleet of 4 DE will take a slightly different path (with easier sub enemies) over other compositions, but will still reach the boss node
 
 
<br/>'''Sparkling'''
 
*This map can now also double for [[Morale_and_Fatigue#Running_1-5|Flagship Sparkling]] for any DD / CL, preferably with [[Combat#Anti-Sub_Warfare|Preemptive ASW attack]].
 
*Recommended Sparkling Fleet: 1 DD/CL with ASW equipment ([[Combat#Anti-Sub_Warfare|Preemptive ASW attack]] is preferred, but not essential) as Flagship + 2-3 throwaway LV 1 DDs + Any other throwaway ships
 
**By doing this, you can basically sparkle your DD while taking far less damage, aside from the occasional bad targeting roll.
 
**Critically, this leveling method works best '''after''' level 80, as throwaway destroyers without ASW equipment are unable to defeat the armor of the most subs on the map, guaranteeing your flag an MVP.
 
**Most importantly, by covering three nodes, you gain far more morale per node than you would from sparkling at 1-1.
 
** If you plan to use throwaway DDs, be sure to not use DDs you plan to keep/train since you are likely to choose to scrap them afterward the sparkling process.
 
 
===Nodes and Enemy Encounters===
 
{{#invoke:EnemyEncounters2|encounterTemplate
 
|A_label = 敵偵察潜水艦
 
|A-1_node_info = ss_ka-class
 
|A-1_form = echelon
 
|A-1_xp =
 
|A-1_enemy_air_power =
 
|A-2_node_info = ss_ka-class_elite
 
|A-2_form = echelon
 
|A-2_xp =
 
|A-2_enemy_air_power =
 
|A-3_node_info = ss_ka-class_elite ss_ka-class
 
|A-3_form = echelon
 
|A-3_xp =
 
|A-3_enemy_air_power =
 
|A-4_node_info = ss_ka-class ss_ka-class ss_ka-class
 
|A-4_form = echelon
 
|A-4_xp =
 
|A-4_enemy_air_power =
 
|A-5_node_info = ss_ka-class_elite ss_ka-class ss_ka-class
 
|A-5_form = echelon
 
|A-5_xp =
 
|A-5_enemy_air_power =
 
|A-6_node_info = ss_ka-class ss_ka-class
 
|A-6_form = echelon
 
|A-6_xp =
 
|A-6_enemy_air_power =
 
|
 
|B_label = '''<span style="color:blue">Battle Avoided</span>'''
 
|B1_node_info = "Must be my imagination" (battle avoided)
 
|
 
|C_label = 敵通商破壊高速水上艦隊 A群
 
|C-1_node_info = cl_ho-class_flagship dd_i-class_late_model dd_i-class dd_i-class dd_i-class
 
|C-1_form = line_ahead
 
|C-1_xp =
 
|C-1_enemy_air_power =
 
|C-2_node_info = cl_he-class_flagship clt_chi-class_flagship dd_i-class_late_model dd_i-class_late_model dd_i-class_late_model
 
|C-2_form = line_ahead
 
|C-2_xp =
 
|C-2_enemy_air_power =
 
|C-3_node_info = cl_ho-class_flagship dd_i-class_late_model dd_i-class_late_model dd_i-class dd_i-class
 
|C-3_form = line_ahead
 
|C-3_xp =
 
|C-3_enemy_air_power =
 
|C-4_node_info = cl_he-class_flagship clt_chi-class_flagship dd_i-class_late_model dd_i-class dd_i-class
 
|C-4_form = line_ahead
 
|C-4_xp =
 
|C-4_enemy_air_power =
 
|C-5_node_info = cl_he-class_flagship clt_chi-class_flagship clt_chi-class_flagship dd_i-class_late_model dd_i-class_late_model dd_i-class_late_model
 
|C-5_form = line_ahead
 
|C-5_xp =
 
|C-5_enemy_air_power =
 
|C-6_node_info = cl_he-class_flagship clt_chi-class_flagship clt_chi-class_flagship dd_i-class_late_model dd_i-class_late_model
 
|C-6_form = line_ahead
 
|C-6_xp =
 
|C-6_enemy_air_power =
 
|
 
|D_label = 敵潜水艦隊B群
 
|D-1_node_info = ss_ka-class_elite ss_ka-class_elite
 
|D-1_form = echelon
 
|D-1_xp =
 
|D-1_enemy_air_power =
 
|D-2_node_info = ss_yo-class_elite ss_ka-class ss_ka-class
 
|D-2_form = echelon
 
|D-2_xp =
 
|D-2_enemy_air_power =
 
|D-3_node_info = ss_yo-class_elite ss_yo-class_elite
 
|D-3_form = echelon
 
|D-3_xp =
 
|D-3_enemy_air_power =
 
|D-4_node_info = ss_yo-class_elite ss_yo-class ss_yo-class
 
|D-4_form = echelon
 
|D-4_xp =
 
|D-4_enemy_air_power =
 
|D-5_node_info = ss_ka-class ss_ka-class
 
|D-5_form = echelon
 
|D-5_xp =
 
|D-5_enemy_air_power =
 
|D-6_node_info = ss_ka-class_elite ss_ka-class ss_ka-class
 
|D-6_form = echelon
 
|D-6_xp =
 
|D-6_enemy_air_power =
 
|
 
|E_label = 敵潜水艦隊C群
 
|E-1_node_info = ss_ka-class_elite ss_ka-class ss_ka-class
 
|E-1_form = echelon
 
|E-1_xp =
 
|E-1_enemy_air_power =
 
|E-2_node_info = ss_yo-class_elite ss_ka-class_elite ss_ka-class_elite
 
|E-2_form = echelon
 
|E-2_xp =
 
|E-2_enemy_air_power =
 
|E-3_node_info = ss_ka-class_elite ss_ka-class_elite ss_ka-class
 
|E-3_form = echelon
 
|E-3_xp =
 
|E-3_enemy_air_power =
 
|E-4_node_info = ss_ka-class_elite ss_ka-class_elite ss_ka-class_elite
 
|E-4_form = echelon
 
|E-4_xp =
 
|E-4_enemy_air_power =
 
|E-5_node_info = ss_ka-class ss_ka-class ss_ka-class
 
|E-5_form = echelon
 
|E-5_xp =
 
|E-5_enemy_air_power =
 
|E-6_node_info = ss_yo-class ss_ka-class ss_ka-class
 
|E-6_form = echelon
 
|E-6_xp =
 
|E-6_enemy_air_power =
 
|
 
|F_label = 敵潜水艦隊A群
 
|F-1_node_info = ss_yo-class_elite ss_ka-class_elite ss_ka-class ss_ka-class
 
|F-1_form = echelon
 
|F-1_xp =
 
|F-1_enemy_air_power =
 
|F-2_node_info = ss_yo-class_elite ss_ka-class ss_ka-class ss_ka-class
 
|F-2_form = echelon
 
|F-2_xp =
 
|F-2_enemy_air_power =
 
|F-3_node_info = ss_yo-class_elite ss_ka-class_elite ss_ka-class_elite ss_ka-class_elite
 
|F-3_form = echelon
 
|F-3_xp =
 
|F-3_enemy_air_power =
 
|F-4_node_info = ss_yo-class_elite ss_ka-class_elite ss_ka-class_elite ss_ka-class
 
|F-4_form = echelon
 
|F-4_xp =
 
|F-4_enemy_air_power =
 
|F-5_node_info = ss_yo-class ss_ka-class ss_ka-class
 
|F-5_form = echelon
 
|F-5_xp =
 
|F-5_enemy_air_power =
 
|F-6_node_info = ss_yo-class_elite ss_ka-class ss_ka-class
 
|F-6_form = echelon
 
|F-6_xp =
 
|F-6_enemy_air_power =
 
|
 
|G_label = '''<span style="color:blue">Battle Avoided</span>'''
 
|G1_node_info = "Must be my imagination" (battle avoided)
 
|
 
|H_label = 敵通商破壊高速水上艦隊 B群
 
|H-1_node_info = cl_ho-class_flagship dd_i-class_late_model dd_i-class dd_i-class dd_i-class
 
|H-1_form = line_ahead
 
|H-1_xp =
 
|H-1_enemy_air_power =
 
|H-2_node_info = cl_he-class_flagship clt_chi-class_flagship dd_i-class_late_model dd_i-class dd_i-class
 
|H-2_form = line_ahead
 
|H-2_xp =
 
|H-2_enemy_air_power =
 
|H-3_node_info = cl_ho-class_flagship dd_i-class_late_model dd_i-class_late_model dd_i-class dd_i-class
 
|H-3_form = line_ahead
 
|H-3_xp =
 
|H-3_enemy_air_power =
 
|H-4_node_info = cl_he-class_flagship clt_chi-class_flagship clt_chi-class_flagship dd_i-class_late_model dd_i-class_late_model dd_i-class_late_model
 
|H-4_form = line_ahead
 
|H-4_xp =
 
|H-4_enemy_air_power =
 
|H-5_node_info = cl_he-class_flagship clt_chi-class_flagship dd_i-class_late_model dd_i-class_late_model dd_i-class_late_model
 
|H-5_form = line_ahead
 
|H-5_xp =
 
|H-5_enemy_air_power =
 
|H-6_node_info = cl_he-class_flagship clt_chi-class_flagship clt_chi-class_flagship dd_i-class_late_model dd_i-Class_late_model
 
|H-6_form = line_ahead
 
|H-6_xp =
 
|H-6_enemy_air_power =
 
|
 
|I_label = 敵侵攻機動部隊
 
|I-1_node_info = cvl_nu-class_elite cl_he-class_flagship dd_i-class_late_model dd_i-class dd_i-class
 
|I-1_form = diamond
 
|I-1_xp =
 
|I-1_enemy_air_power = 24
 
|I-2_node_info = cv_wo-class_flagship cl_he-class_flagship dd_i-class_late_model dd_i-class dd_i-class
 
|I-2_form = diamond
 
|I-2_xp =
 
|I-2_enemy_air_power = 28
 
|I-3_node_info = cvl_nu-class_flagship cl_he-class_flagship dd_i-class_late_model dd_i-class_late_model dd_i-class_late_model
 
|I-3_form = diamond
 
|I-3_xp =
 
|I-3_enemy_air_power = 23
 
|I-4_node_info = cv_wo-class_flagship cl_he-class_flagship dd_i-class_late_model dd_i-class_late_model dd_i-class_late_model
 
|I-4_form = diamond
 
|I-4_xp =
 
|I-4_enemy_air_power = 28
 
|I-5_node_info = cvl_nu-class_flagship cl_he-class_flagship dd_i-class_late_model dd_i-class dd_i-class
 
|I-5_form = diamond
 
|I-5_xp =
 
|I-5_enemy_air_power = 23
 
|I-6_node_info = cv_wo-class_flagship cl_he-class_flagship cl_he-class_flagship dd_i-class_late_model dd_i-class_late_model
 
|I-6_form = diamond
 
|I-6_xp =
 
|I-6_enemy_air_power = 28
 
|
 
|J_label = 敵通商破壊主力潜水艦隊
 
|J-1_node_info = ss_yo-class_flagship ss_ka-class ss_ka-class ss_ka-class
 
|J-1_form = echelon
 
|J-1_xp =
 
|J-1_enemy_air_power =
 
|J-2_node_info = ss_yo-class_flagship ss_yo-class_elite ss_ka-class ss_ka-class
 
|J-2_form = echelon
 
|J-2_xp =
 
|J-2_enemy_air_power =
 
|J-3_node_info = ss_so-class_flagship ss_yo-class_elite ss_ka-class ss_ka-class
 
|J-3_form = echelon
 
|J-3_xp =
 
|J-3_enemy_air_power =
 
|J-4_node_info = ss_so-class_flagship ss_yo-class_elite ss_yo-class_elite ss_ka-class
 
|J-4_form = echelon
 
|J-4_xp =
 
|J-4_enemy_air_power =
 
|J-5_node_info = ss_yo-class_flagship ss_ka-class ss_ka-class
 
|J-5_form = echelon
 
|J-5_xp =
 
|J-5_enemy_air_power =
 
|J-6_node_info = ss_yo-class_elite ss_ka-class ss_ka-class
 
|J-6_form = echelon
 
|J-6_xp =
 
|J-6_enemy_air_power =
 
|J-7_node_info = ss_ka-class_elite ss_ka-class ss_ka-class
 
|J-7_form = echelon
 
|J-7_xp =
 
|J-7_enemy_air_power =
 
|
 
|final_form =
 
|boss_node = J
 
}}
 
 
===Drops===
 
 
<div class="mw-customtoggle-1-5-drop globalbutton">Show/Hide Drops</div>


{| class="mw-collapsible mw-collapsed wikitable" id="mw-customcollapsible-1-5-drop"
 
! style="text-align:center; width:5%;" |Node
 
! style="text-align:center; width:40%;" |Destroyers
 
! style="text-align:center; width:15%;" |Light Cruisers
 
! style="text-align:center; width:10%;" |Heavy Cruisers
 
! style="text-align:center; width:10%;" |Seaplane Tenders
 
! style="text-align:center; width:10%;" |Aircraft Carriers
 
! style="text-align:center; width:10%;" |Submarines
 
! style="text-align:center; width:10%;" |Auxiliary Ships
 
|-
 
| style="text-align:center;" |A
 
| style="text-align:center;" |[[Kisaragi]], [[Sazanami]], [[Hatsuyuki]], [[Samidare]], [[Arare]], [[Nagatsuki]], [[Miyuki]], [[Murakumo]], [[Shigure]], [[Mochizuki]], [[Shikinami]], [[Hatsushimo]], [[Yuudachi]], [[Ooshio]], [[Ushio]], [[Ikazuchi]], [[Hibiki]], [[Inazuma]], [[Murasame]], [[Kikuzuki]], [[Mikazuki]], [[Nagatsuki]], [[Shiranui]], [[Akebono]], [[Satsuki]], [[Isonami]], [[Nenohi]], [[Shirayuki]], [[Arashio]], [[Kasumi]]
 
| style="text-align:center;" |[[Naka]], [[Isuzu]]
 
|
 
| style="text-align:center;" |[[Chitose]], [[Chiyoda]]
 
|
 
|
 
|
 
|-
 
| style="text-align:center;" |B
 
| style="text-align:center;" |[[Shiranui]], [[Kuroshio]], [[Yuudachi]], [[Shigure]], [[Miyuki]], [[Kikuzuki]], [[Fumizuki]], [[Akebono]], [[Hatsuyuki]], [[Isonami]], [[Hibiki]], [[Samidare]], [[Oboro]], [[Michishio]], [[Wakaba]], [[Shikinami]], [[Arare]], [[Sazanami]], [[Mochizuki]], [[Ooshio]], [[Kisaragi]], [[Shirayuki]], [[Mikazuki]], [[Nenohi]], [[Arare]], [[Ikazuchi]], [[Murakumo]]
 
| style="text-align:center;" |[[Natori]], [[Jintsuu]], [[Naka]], [[Kitakami]], [[Isuzu]], [[Yura]]
 
|
 
| style="text-align:center;" |[[Chitose]], [[Chiyoda]]
 
| style="text-align:center;" |[[Houshou]]
 
|
 
|
 
|-
 
| style="text-align:center;" |C
 
| style="text-align:center;" |[[Kisaragi]], [[Mochizuki]], [[Hibiki]], [[Kuroshio]], [[Shiranui]], [[Oboro]], [[Ikazuchi]], [[Isonami]], [[Michishio]], [[Mutsuki]], [[Satsuki]], [[Mikazuki]], [[Nagatsuki]], [[Arashio]], [[Nenohi]], [[Sazanami]], [[Murasame]], [[Hatsushimo]], [[Kuroshio]], [[Kikuzuki]], [[Akebono]], [[Shirayuki]], [[Shigure]], [[Ushio]], [[Nenohi]], [[Hatsushimo]], [[Ooshio]], [[Shikinami]], [[Murakumo]], [[Kasumi]], [[Yayoi|'''<span style="color:red">Yayoi</span>''']]
 
| style="text-align:center;" |[[Kiso]], [[Jintsuu]], [[Kitakami]], [[Isuzu]], [[Naka]], [[Yura]], [[Natori]]
 
|
 
| style="text-align:center;" |[[Chitose]], [[Chiyoda]]
 
| style="text-align:center;" |[[Houshou]]
 
| style="text-align:center;" |
 
[[I-58|'''<span style="color:red">I-58</span>''']],[[I-168|'''<span style="color:red">I-168</span>''']]<br>
 
[[I-19|'''<span style="color:red">I-19</span>''']](HQ Lv80+?)
 
|
 
|-
 
| style="text-align:center;" |D
 
| style="text-align:center;" |[[Inazuma]], [[Akebono]], [[Wakaba]], [[Kuroshio]], [[Satsuki]], [[Hatsuyuki]], [[Shigure]], [[Arare]], [[Samidare]]
 
| style="text-align:center;" |[[Naka]], [[Kitakami]], [[Jintsuu]]
 
|
 
| style="text-align:center;" |[[Chitose]]
 
| style="text-align:center;" |[[Houshou]]
 
| style="text-align:center;" |
 
[[I-58|'''<span style="color:red">I-58</span>''']],[[I-168|'''<span style="color:red">I-168</span>''']]<br>
 
[[I-19|'''<span style="color:red">I-19</span>''']](HQ Lv80+?)
 
|
 
|-
 
| style="text-align:center;" |F
 
| style="text-align:center;" |[[Ikazuchi]], [[Shigure]], [[Hibiki]], [[Kisaragi]], [[Mochizuki]]
 
|
 
|
 
| style="text-align:center;" |[[Chitose]]
 
|
 
| style="text-align:center;" |[[I-58|'''<span style="color:red">I-58</span>''']]
 
|
 
|-
 
| style="text-align:center;" |G
 
|
 
|
 
|
 
|
 
| style="text-align:center;" |[[Houshou]]
 
|
 
|
 
|-
 
| style="text-align:center;" |'''<span class="wikicolor" style="color:Red">I<br> Boss Node</span>'''
 
| style="text-align:center;" |[[Akatsuki]], [[Oboro]], [[Kikuzuki]], [[Ayanami]], [[Sazanami]], [[Arashio]], [[Kisaragi]], [[Fubuki]], [[Hatsuyuki]], [[Miyuki]], [[Shiranui]], [[Shiratsuyu]], [[Ushio]], [[Samidare]], [[Suzukaze]], [[Murasame]], [[Murakumo]], [[Mochizuki]], [[Nagatsuki]], [[Asashio]], [[Shigure]], [[Isonami]], [[Fumizuki]], [[Mikazuki]], [[Shirayuki]], [[Shikinami]], [[Kuroshio]]
 
| style="text-align:center;" |[[Natori]], [[Isuzu]], [[Nagara]], [[Yura]], [[Sendai]], [[Naka]], [[Jintsuu]], [[Kuma]], [[Tama]], [[Kiso]]
 
| style="text-align:center;" |[[Kinugasa|'''<span style="color:red">Kinugasa</span>''']], [[Aoba]], [[Kako]], [[Furutaka]]
 
|
 
| style="text-align:center;" |[[Houshou]], [[Junyou]], [[Hiyou]], [[Ryuujou]]
 
| style="text-align:center;" |[[I-58|'''<span style="color:red">I-58</span>''']],[[I-168|'''<span style="color:red">I-168</span>''']]<br>
 
[[I-19|'''<span style="color:red">I-19</span>''']] (HQ Lv40+?)<br>
 
[[I-8|'''<span style="color:red">I-8</span>''']] (HQ LV80+?)
 
|[[Akashi|'''<span style="color:red">Akashi***</span>''']]
 
|}
 
 
===Notes===
 
Akashi will drop with a small chance in 1-5 only for Admirals who have do not have her in your base. If you already have her, she will not drop in this map anymore. However, Akashi is still obtainable in maps like 3-5 or 6-2.
 
 
=={{Anchor|1-6}}World 1-6: 【Extra Operation】 鎮守府近海航路 Sea Route Near Naval Base ==
 
 
{{LabSortieworld
 
| map = 1_06.png
 
| difficulty = ☆ ☆ ☆ ☆ ☆ ☆
 
| item = {{Fuel}} {{Ammo}} {{Steel}} {{Bauxite}}
 
| exp = Variable
 
| code = 輸送船団護衛作戦 (Convoy Escort Operation)
 
| jptext = 対潜及び防空能力に優れた艦艇を基幹戦力とした艦隊を編成、輸送船団航路の護衛にあたれ!
 
| entext = Form a fleet consisting of ships with excellent anti-submarine warfare and anti-aircraft capabilities, and protect the transport ship routes!}}
 
 
===Stage Guide===
 
{{MapBranchingTable
 
|id = 1-6
 
|0 -> A/empty =
 
* Meet '''ALL''' of the requirements
 
** Amount of DD+DE ≧ 4
 
** Fleet doesn't contain CA(V), BBV or CVL
 
|0 -> C/battle =
 
* Meet '''ANY''' of the requirements
 
** Fleet contains CA, BBV or CVL
 
** Amount of DD + DE in fleet is ≦ 3
 
 
|G/resource -> F/battle =
 
* Fleet consists of 1 CL + 5 [DD + DE]
 
* 75% chance if the requirement isn't met
 
|G/resource -> K/battle =
 
* 25% chance if the requirement to go to node F isn't met
 
 
|M/resource -> J/battle =
 
*Meet '''ALL''' of the following requirements:
 
** Fleet with at least 3 DD + DE
 
** CVL + BBV + CA + CAV ≦ 2
 
** Pass the LoS check by reaching 30 or higher with the F33 formula (C<sub>n</sub>=3)
 
|M/resource -> L/battle =
 
*Meet '''ANY''' of the following requirements:
 
** CVL + BBV + CA + CAV ≧ 3
 
** Fleet doesn't have 3 DD + DE
 
** Fail the LoS check
 
}}
 
{{AirControlSystem
 
| Map = 1-6 North
 
| AS = 150
 
| Notes= Assuming highest AS formations
 
}}
 
 
=== Tips ===
 
Reaching node N '''7 times''' clears the map.
 
* You are rewarded with a certain amount of resources upon reaching node N. The value depends on whether the resource bar is depleted or not.
 
* The resource bar will reset at midnight at the beginning of each month.
 
* The map will be locked at the beginning of each month until you have completed 1-5 for the month.
 
* Clearing this map rewards you with '''1 [[Seasonal/Present Box 2014|Present Box]] & 75 ranking points'''. No medal.
 
* Double-arrow nodes (D, F, L) are Air Battle Only nodes like those first appearing in the Summer 2014 Event. Daytime combat at these nodes have two Aerial Combat phases but no shelling.
 
** If your fleet has no ships that can attack during Aerial Combat, you will automatically get a D Defeat (see [[Combat#Victory_Conditions|1st D Defeat condition]]) unless you enter night combat (which is just a normal night battle).
 
There is no Boss node in this map. Instead you will receive a random amount of resources of either Fuel, Ammo, Steel, or Bauxite at the node with the Anchor symbol.
 
*Because Node N (the node after node B and D) is the End Node, you may advance with a heavily damaged ship (taiha) from node B or D without risk of sinking any of your ships.
 
**An exception would be when the flagship is heavily damaged. However, if the flagship is equipped with either [[Repair Team]] or [[Repair Goddess]], the player may choose to use it and continue. (There are reports that the item is not consumed if used this way?)
 
**Because Node N is not considered to be a boss node, it will not count towards certain quests (namely [[Quests#Bw1|Bw1]]) that requires you to reach a boss node.
 
*Using BBV, CA, CVL will take you to node C which leads to a route with harder enemies such as Flagship Wo-class and Flagship Ru-class. Submarine fleets with line ahead formation also appears at node I (3 out of 6 patterns).
 
**Generally speaking, the route through C is only taken if a player wishes to brute-force the map.
 
*The other route (A -> E -> G -> F -> B -> N) has 3 battles total.
 
**Node E is Submarine Node with Echelon formation. Because this node is so minor in nature, bringing Anti-Submarine equipments is not required.
 
**Node F is air-battle only.
 
***Having a ship with Anti-Air Cut-In equipment setup is highly recommended to reduce damage taken at node F.
 
***This node creates a dilemma for players as most fleets coming through this way have no air attack and so must take a defeat unless night battle is undertaken here (which consumes ammo and can be risky).
 
***You can bring either 2 AV or Akitsu Maru + CAV to have a chance at avoiding defeat at Node F, but this fleet can go from G to K which is hard for a light fleet.
 
 
<br/>'''Branching rules:'''
 
* The following ship types are not allowed on this map: (F)BB, CV, CLT, SS(V)
 
* You may only use BBV, CA(V), CVL, AV, CL, DD, [[Akitsumaru]], [[Katori]], [[Kashima]], [[Akashi]], and [[Taigei]].
 
**Using BBV, CA, CVL will take you to node C which leads to a route with harder enemies such as Flagship Wo-class and Flagship Ru-class. Submarine fleets with line ahead formation also appears at node I (3 out of 6 patterns).
 
***Generally speaking, the route through C is only taken if a player wishes to brute-force the map or completing very specific quests that involve using ships that are not just 1 CL , 5 DD.
 
**The other route (A -> E -> G -> F -> B -> N) has 3 battles total.
 
***Node E is a submarine node with Echelon formation. Because this node is so minor in nature, bringing ASW equipment is not required.
 
***Node F is an Air Battle node only.
 
***Having a ship with Anti-Air Cut-In equipment setup is highly recommended to reduce damage taken at node F.
 
****This node creates a dilemma for players as most fleets coming through this way have no air attack and so must take a defeat unless night battle is undertaken here (which consumes ammo and can be risky).
 
***You can bring either 2 AV or Akitsu Maru + CAV to have a chance at avoiding defeat at Node F, but this fleet can go from G to K which is hard for a light fleet.
 
 
<br/>'''Additional Notes'''
 
* Node E is a good place for players above Level 80 HQ to complete [[Quests#Bd8|Bd8]] (Sink 6 Submarines) and [[Quests#Bw5|Bw5]] (Sink 15 Submarines).
 
* Equipping a damecon (Repair Team) onto your flagship might be a good idea if by some chance the flagship takes heavy damage at node B, since it allows you to advance to the end node (Node N). Since the damecon is only used upon entering the next fight it'll remain in your inventory upon completing the stage.
 
<br/>'''Recommended Fleet'''
 
*'''1 CL 5 DD''' routes '''A-E-G-F-B-N'''
 
**The only composition that guarantees A -> E -> G -> F -> B -> N.
 
**However this fleet will not be able to fight back at node F, so expect your win rate to go down slightly.
 
**You can also use '''6 DD / 2 CL + 4 DD / Akitsu Maru + CAV + 4 DD / 2 AV + 4 DD / 2 AO + 4 DD''' as you maybe able to get B Victory at Node F with these fleets, but these can off-route G -> K.
 
*'''2 BBV 1 CL 3 DD''' routes '''C-H-K-M-J-D-N'''
 
**Should only be used for some quests such as '''Bq3'''
 
**Goes through a longer and much more dangerous route compared to the light fleet route above
 
**There is an LoS check at node M. You need to have '''LoS F33 Cn3 > 30''' in order to go M -> J
 
 
===Nodes and Enemy Encounters===
 
{{#invoke:EnemyEncounters2|encounterTemplate
 
|A_label = '''<span style="color:blue">Battle Avoided</span>'''
 
|A1_node_info = "Must be my imagination" (battle avoided)
 
|
 
|B_label = 任務部隊C群 前衛部隊
 
|B-1_node_info = cl_he-class_flagship cvl_nu-class_elite dd_i-class_late_model dd_i-class_late_model dd_i-class dd_i-class
 
|B-1_form = line_ahead
 
|B-1_xp =
 
|B-1_enemy_air_power = 24
 
|B-2_node_info = ca_ri-class_flagship cl_he-class_flagship dd_i-class_late_model dd_i-class_late_model dd_i-class dd_i-class
 
|B-2_form = line_ahead
 
|B-2_xp =
 
|B-2_enemy_air_power =
 
|B-3_node_info = cl_he-class_flagship dd_i-class_late_model dd_i-class_late_model dd_i-class_late_model dd_i-class dd_i-class
 
|B-3_form = line_ahead
 
|B-3_xp =
 
|B-3_enemy_air_power =
 
|B-4_node_info = cl_he-class_flagship dd_i-class_late_model dd_i-class dd_i-class dd_i-class dd_i-class
 
|B-4_form = line_ahead double_line
 
|B-4_xp =
 
|B-4_enemy_air_power =
 
|B-5_node_info = cl_he-class_flagship dd_i-class_late_model dd_i-class_late_model dd_i-class dd_i-class dd_i-class
 
|B-5_form = line_ahead
 
|B-5_xp =
 
|B-5_enemy_air_power =
 
|
 
|C_label = 通商破壊潜水艦隊 II群
 
|C-1_node_info = ss_ka-class_elite ss_ka-class_elite ss_ka-class ss_ka-class ss_ka-class
 
|C-1_form = echelon line_abreast
 
|C-1_xp =
 
|C-1_enemy_air_power =
 
|C-2_node_info = ss_ka-class_elite ss_ka-class ss_ka-class ss_ka-class
 
|C-2_form = line_abreast echelon
 
|C-2_xp =
 
|C-2_enemy_air_power =
 
|C-3_node_info = ss_ka-class_elite ss_ka-class ss_ka-class ss_ka-class ss_ka-class
 
|C-3_form = echelon
 
|C-3_xp =
 
|C-3_enemy_air_power =
 
|C-4_node_info = ss_ka-class_elite ss_ka-class ss_ka-class
 
|C-4_form = echelon
 
|C-4_xp =
 
|C-4_enemy_air_power =
 
|
 
|D_label = 任務部隊A群 機動部隊(第二波)<br>'''<span style="color:green">Air Raid Node</span>'''
 
|D-1_node_info = cv_wo-class_flagship_2 cvl_nu-class_elite cvl_nu-class_elite cl_tsu-class_elite dd_i-class_late_model dd_i-class_late_model
 
|D-1_form = diamond
 
|D-1_xp =
 
|D-1_enemy_air_power = 132
 
|D-2_node_info = cvl_nu-class_flagship cvl_nu-class_elite cvl_nu-class_elite cl_tsu-class_elite dd_i-class_late_model dd_i-class_late_model
 
|D-2_form = diamond
 
|D-2_xp =
 
|D-2_enemy_air_power = 71
 
|D-3_node_info = cv_wo-class_flagship cvl_nu-class_elite cvl_nu-class_elite cl_tsu-class_elite dd_i-class_late_model dd_i-class_late_model
 
|D-3_form = diamond
 
|D-3_xp =
 
|D-3_enemy_air_power = 76
 
|D-4_node_info = cvl_nu-class_flagship cvl_nu-class_elite cl_tsu-class_elite dd_i-class_late_model dd_i-class_late_model dd_i-class_late_model
 
|D-4_form = diamond
 
|D-4_xp =
 
|D-4_enemy_air_power = 47
 
|D-5_node_info = cvl_nu-class_elite cvl_nu-class_elite cl_tsu-class_elite dd_i-class_late_model dd_i-class dd_i-class
 
|D-5_form = diamond
 
|D-5_xp =
 
|D-5_enemy_air_power = 48
 
|D-6_node_info = cvl_nu-class_elite cvl_nu-class_elite cl_tsu-class_elite dd_i-class dd_i-class dd_i-class
 
|D-6_form = diamond
 
|D-6_xp =
 
|D-6_enemy_air_power = 48
 
|
 
|E_label = 通商破壊潜水艦隊 III群
 
|E-1_node_info = ss_ka-class_elite ss_ka-class ss_ka-class ss_ka-class ss_ka-class
 
|E-1_form = echelon
 
|E-1_xp =
 
|E-1_enemy_air_power =
 
|E-2_node_info = ss_ka-class_elite ss_ka-class_elite ss_ka-class ss_ka-class ss_ka-class
 
|E-2_form = echelon
 
|E-2_xp =
 
|E-2_enemy_air_power =
 
|E-3_node_info = ss_ka-class ss_ka-class ss_ka-class ss_ka-class ss_ka-class
 
|E-3_form = echelon
 
|E-3_xp =
 
|E-3_enemy_air_power =
 
|E-4_node_info = ss_ka-class_elite ss_ka-class ss_ka-class ss_ka-class
 
|E-4_form = echelon
 
|E-4_xp =
 
|E-4_enemy_air_power =
 
|E-5_node_info = ss_ka-class_elite ss_ka-class ss_ka-class
 
|E-5_form = echelon
 
|E-5_xp =
 
|E-5_enemy_air_power =
 
|E-6_node_info = ss_ka-class ss_ka-class ss_ka-class ss_ka-class
 
|E-6_form = echelon
 
|E-6_xp =
 
|E-6_enemy_air_power =
 
|
 
|F_label = 任務部隊C群 機動部隊<br>'''<span style="color:green">Air Raid Node</span>'''
 
|F-1_node_info = cv_wo-class_flagship cvl_nu-class_elite ca_ri-class_elite dd_i-class dd_i-class dd_i-class
 
|F-1_form = diamond
 
|F-1_xp =
 
|F-1_enemy_air_power = 52
 
|F-2_node_info = cv_wo-class_flagship cv_wo-class_elite cl_tsu-class_elite dd_i-class dd_i-class dd_i-class
 
|F-2_form = diamond
 
|F-2_xp =
 
|F-2_enemy_air_power = 55
 
|F-3_node_info = cvl_nu-class_flagship cvl_nu-class_elite ca_ri-class_elite dd_i-class dd_i-class dd_i-class
 
|F-3_form = diamond
 
|F-3_xp =
 
|F-3_enemy_air_power = 47
 
|F-4_node_info = cv_wo-class_flagship ca_ri-class_elite dd_i-class dd_i-class dd_i-class dd_i-class
 
|F-4_form = diamond
 
|F-4_xp =
 
|F-4_enemy_air_power = 28
 
|F-5_node_info = cv_wo-class_elite ca_ri-class_elite dd_i-class dd_i-class dd_i-class dd_i-class
 
|F-5_form = diamond
 
|F-5_xp =
 
|F-5_enemy_air_power = 27
 
|F-6_node_info = cvl_nu-class_elite cvl_nu-class_elite ca_ri-class_elite dd_i-class dd_i-class dd_i-class
 
|F-6_form = diamond
 
|F-6_xp =
 
|F-6_enemy_air_power = 48
 
|
 
|G_label = '''<span style="color:green">Resource Node</span>'''
 
|G1_node_info = ammo + 20 + ( daihatsu * 5) up to 35 max
 
|
 
|H_label = '''<span style="color:blue">Battle Avoided</span>'''
 
|H1_node_info = "Must be my imagination" (battle avoided)
 
|
 
|I_label = 通商破壊潜水艦隊 I群
 
|I-1_node_info = ss_ka-class_flagship ss_ka-class_elite ss_ka-class_elite ss_ka-class ss_ka-class
 
|I-1_form = line_ahead echelon
 
|I-1_xp =
 
|I-1_enemy_air_power =
 
|I-2_node_info = ss_yo-class_flagship ss_ka-class_elite ss_ka-class_elite ss_ka-class ss_ka-class
 
|I-2_form = echelon line_ahead
 
|I-2_xp =
 
|I-2_enemy_air_power =
 
|I-3_node_info = ss_ka-class_flagship ss_ka-class_elite ss_ka-class ss_ka-class
 
|I-3_form = line_ahead echelon
 
|I-3_xp =
 
|I-3_enemy_air_power =
 
|
 
|J_label = 任務部隊A群 機動部隊本隊
 
|J-1_node_info = cv_wo-class_flagship cvl_nu-class cvl_nu-class cl_tsu-class_elite dd_i-class_late_model dd_i-class_late_model
 
|J-1_form = diamond
 
|J-1_xp =
 
|J-1_enemy_air_power = 118
 
|J-2_node_info = cv_wo-class_flagship_2 cvl_nu-class cvl_nu-class cl_tsu-class_elite dd_i-class_late_model dd_i-class_late_model
 
|J-2_form = diamond
 
|J-2_xp =
 
|J-2_enemy_air_power = 100
 
|J-3_node_info = cv_wo-class_flagship_2 cvl_nu-class cvl_nu-class cvl_nu-class dd_i-class_late_model dd_i-class_late_model
 
|J-3_form = diamond
 
|J-3_xp =
 
|J-3_enemy_air_power = 108
 
|J-4_node_info = cv_wo-class_flagship cvl_nu-class cvl_nu-class cvl_nu-class dd_i-class_late_model dd_i-class_late_model
 
|J-4_form = diamond
 
|J-4_xp =
 
|J-4_enemy_air_power = 52
 
|J-5_node_info = cv_wo-class_flagship cvl_nu-class cvl_nu-class dd_i-class_late_model dd_i-class_late_model transport_wa-class
 
|J-5_form = diamond
 
|J-5_xp =
 
|J-5_enemy_air_power = 44
 
|J-6_node_info = cv_wo-class_flagship cl_he-class_elite dd_i-class_late_model dd_i-class_late_model dd_i-class dd_i-class
 
|J-6_form = diamond
 
|J-6_xp =
 
|J-6_enemy_air_power = 28
 
|
 
|K_label = 任務部隊支援 水上打撃部隊
 
|K-1_node_info = ca_ri-class_flagship bb_ru-class_elite cl_to-class_elite dd_i-class_late_model dd_i-class dd_i-class
 
|K-1_form = double_line line_ahead
 
|K-1_xp =
 
|K-1_enemy_air_power =
 
|K-2_node_info = ca_ri-class_flagship ca_ri-class_elite cl_to-class_elite dd_i-class_late_model dd_i-class dd_i-class
 
|K-2_form = double_line line_ahead
 
|K-2_xp =
 
|K-2_enemy_air_power =
 
|K-3_node_info = ca_ri-class_flagship cl_to-class_elite dd_i-class_late_model dd_i-class dd_i-class dd_i-class
 
|K-3_form = double_line line_ahead
 
|K-3_xp =
 
|K-3_enemy_air_power =
 
|
 
|L_label = 任務部隊A群 機動部隊(第一波)<br>'''<span style="color:green">Air Raid Node</span>'''
 
|L-1_node_info = cv_wo-class_flagship_2 cv_wo-class_flagship_2 cvl_nu-class_elite cl_tsu-class_elite dd_i-class dd_i-class
 
|L-1_form = diamond
 
|L-1_xp =
 
|L-1_enemy_air_power = 192
 
|L-2_node_info = cv_wo-class_flagship_2 cv_wo-class_elite cvl_nu-class_elite cl_tsu-class_elite dd_i-class dd_i-class
 
|L-2_form = diamond
 
|L-2_xp =
 
|L-2_enemy_air_power = 135
 
|L-3_node_info = cvl_nu-class_flagship cvl_nu-class_elite cvl_nu-class_elite cl_tsu-class_elite dd_i-class dd_i-class
 
|L-3_form = diamond
 
|L-3_xp =
 
|L-3_enemy_air_power = 71
 
|L-4_node_info = cv_wo-class_flagship_2 cvl_nu-class_elite cvl_nu-class_elite cl_tsu-class_elite dd_i-class dd_i-class
 
|L-4_form = diamond
 
|L-4_xp =
 
|L-4_enemy_air_power = 132
 
|L-5_node_info = cv_wo-class_flagship cvl_nu-class_elite cvl_nu-class_elite cl_tsu-class_elite dd_i-class dd_i-class
 
|L-5_form = diamond
 
|L-5_xp =
 
|L-5_enemy_air_power = 76
 
|L-6_node_info = cvl_nu-class_flagship cvl_nu-class_elite cl_tsu-class_elite dd_i-class dd_i-class dd_i-class
 
|L-6_form = diamond
 
|L-6_xp =
 
|L-6_enemy_air_power = 47
 
|
 
|M_label = '''<span style="color:green">Resource Node</span>'''
 
|M1_node_info = fuel + 40 + ( daihatsu * 10) up to 70 max
 
|
 
|N_label = '''<span style="color:green">Resource Node</span>'''
 
|N-1_node_info = '''pre-clear''' fuel + 300 500 700 1000
 
|N-1_form = anchor
 
|N-1_enemy_air_power =
 
|N-2_node_info = '''pre-clear''' ammo + 300 500
 
|N-2_form = anchor
 
|N-2_enemy_air_power =
 
|N-3_node_info = '''pre-clear''' steel + 100 300
 
|N-3_form = anchor
 
|N-3_enemy_air_power =
 
|N-4_node_info = '''pre-clear''' bauxite + 100 200
 
|N-4_form = anchor
 
|N-4_enemy_air_power =
 
|N-5_node_info = '''post-clear''' fuel + 30 50 70 100
 
|N-5_form = anchor
 
|N-5_enemy_air_power =
 
|N-6_node_info = '''post-clear''' ammo + 50 70 100
 
|N-6_form = anchor
 
|N-6_enemy_air_power =
 
|N-7_node_info = '''post-clear''' steel + 50 70 100
 
|N-7_form = anchor
 
|N-7_enemy_air_power =
 
|N-8_node_info = '''post-clear''' bauxite + 50
 
|N-8_form = anchor
 
|N-8_enemy_air_power =
 
|
 
|final_form =
 
|boss_node =
 
}}
 
 
===Drops===
 
 
<div class="mw-customtoggle-1-6-drop globalbutton">Show/Hide Drops</div>
 
 
{| class="mw-collapsible mw-collapsed wikitable" id="mw-customcollapsible-1-6-drop"
 
!Node
 
!Destroyers
 
!Light Cruisers
 
!Heavy Cruisers
 
!Seaplane Tender
 
!Aircraft Carrier
 
!Submarine
 
|-
 
| style="text-align:center;" |B
 
| style="text-align:center;" |[[Kisaragi]], [[Kikuzuki]], [[Hatsuyuki]], [[Nagatsuki]], [[Miyuki]], [[Fumizuki]], [[Mikazuki]], [[Murakumo]], [[Shikinami]], [[Nenohi]], [[Shiranui]], [[Wakaba]], [[Murasame]], [[Yuudachi]], [[Ooshio]], [[Hibiki]], [[Shigure]], [[Samidare]], [[Ushio]], [[Arare]], [[Oboro]], [[Akebono]], [[Sazanami]], [[Kasumi]], [[Hatsushimo]], [[Mochizuki]], [[Hamakaze]], [[Urakaze]], [[Asagumo|<font color="#ff0000">'''Asagumo'''</font>]]
 
| style="text-align:center;" |[[Kitakami]], [[Nagara]], [[Isuzu]], [[Yuubari]], [[Tatsuta]], [[Tenryuu]], [[Ooyodo|<font color="#ff0000">'''Ooyodo'''</font>]]
 
| style="text-align:center;" |[[Tone]], [[Aoba]]
 
| style="text-align:center;" |[[Chitose]], [[Chiyoda]]
 
| style="text-align:center;" |[[Jun'you]], [[Houshou]]
 
| style="text-align:center;" |
 
|-
 
| style="text-align:center;" |C
 
| style="text-align:center;" |[[Arare]], [[Ooshio]]
 
| style="text-align:center;" |
 
| style="text-align:center;" |
 
| style="text-align:center;" |
 
| style="text-align:center;" |
 
| style="text-align:center;" |
 
|-
 
| style="text-align:center;" |D
 
| style="text-align:center;" |[[Kisaragi]], [[Kikuzuki]], [[Hatsuyuki]], [[Nagatsuki]], [[Miyuki]], [[Fumizuki]], [[Mikazuki]], [[Murakumo]], [[Shikinami]], [[Nenohi]], [[Shiranui]], [[Wakaba]], [[Murasame]], [[Yuudachi]], [[Ooshio]], [[Hibiki]], [[Shigure]], [[Samidare]], [[Ushio]], [[Arare]], [[Oboro]], [[Akebono]], [[Sazanami]], [[Kasumi]], [[Hatsushimo]], [[Mochizuki]], [[Hamakaze]], [[Urakaze]], [[Asagumo|<font color="#ff0000">'''Asagumo'''</font>]]
 
| style="text-align:center;" |[[Kitakami]], [[Nagara]], [[Isuzu]], [[Yuubari]], [[Tatsuta]], [[Tenryuu]], [[Ooyodo|<font color="#ff0000">'''Ooyodo'''</font>]]
 
| style="text-align:center;" |[[Tone]], [[Aoba]]
 
| style="text-align:center;" |[[Chitose]], [[Chiyoda]]
 
| style="text-align:center;" |[[Jun'you]], [[Houshou]]
 
| style="text-align:center;" |
 
|-
 
| style="text-align:center;" |E
 
| style="text-align:center;" |[[Fumizuki]], [[Akebono]], [[Michishio]], [[Ooshio]], [[Kasumi]], [[Murasame]], [[Nagatsuki]], [[Mochizuki]], [[Kuroshio]], [[Shiranui]], [[Oboro]], [[Sazanami]], [[Yuudachi]], [[Kikuzuki]], [[Hatsushimo]], [[Wakaba|Wakaba,]] [[Satsuki]], [[Samidare]], [[Nenohi]], [[Arare]], [[Ushio]], [[Shigure]]
 
| style="text-align:center;" |
 
| style="text-align:center;" |
 
| style="text-align:center;" |
 
| style="text-align:center;" |
 
| style="text-align:center;" |
 
|-
 
| style="text-align:center;" |F
 
| style="text-align:center;" |
 
| style="text-align:center;" |
 
| style="text-align:center;" |
 
| style="text-align:center;" |
 
| style="text-align:center;" |
 
| style="text-align:center;" |
 
|-
 
| style="text-align:center;" |I
 
| style="text-align:center;" |
 
| style="text-align:center;" |
 
| style="text-align:center;" |
 
| style="text-align:center;" |
 
| style="text-align:center;" |
 
| style="text-align:center;" |
 
|-
 
| style="text-align:center;" |J
 
| style="text-align:center;" |
 
| style="text-align:center;" |
 
| style="text-align:center;" |
 
| style="text-align:center;" |
 
| style="text-align:center;" |[[Houshou]]
 
| style="text-align:center;" |
 
|-
 
| style="text-align:center;" |K
 
| style="text-align:center;" |[[Akebono]], [[Miyuki]]
 
| style="text-align:center;" |
 
| style="text-align:center;" |
 
| style="text-align:center;" |
 
| style="text-align:center;" |
 
| style="text-align:center;" |
 
|-
 
| style="text-align:center;" |L
 
| style="text-align:center;" |
 
| style="text-align:center;" |
 
| style="text-align:center;" |
 
| style="text-align:center;" |
 
| style="text-align:center;" |
 
| style="text-align:center;" |
 
|}
 
 
{{Navbox World}}
 
 
[[Category:Sortie]]
 
[[Category:Sortie]]
[[Category:World Map]]
 
[[Category:Drop List]]
 
[[ko:1해역]]
 
[[zh:镇守府海域]]
 

Latest revision as of 15:37, 6 November 2022

World 1-1: 鎮守府正面海域 Sea in Front of the Naval Base

World 1 1-1 Map.png
Strategy Name
近海警備 (Coastal Waters Defense)
Difficulty
Item
None
Strategy Content
鎮守府正面近海の警備に出動せよ!
Mobilize for a patrol of the waters outside the naval base!

Map Unlocking & Progression

1-1 is unlocked by default when starting the game.

To clear the map, the boss's flagship must be sunk once.
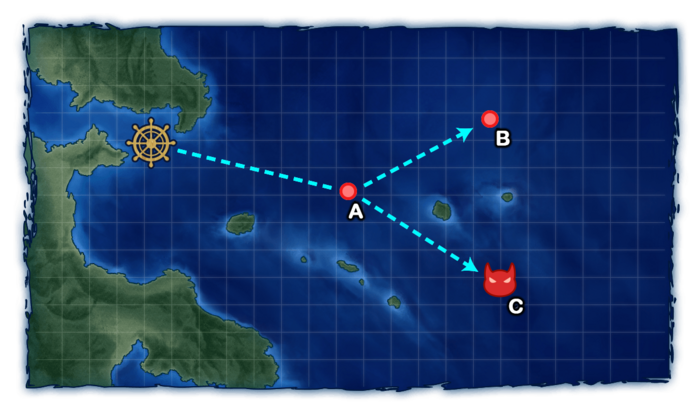
Stage Guide

1-1 Branching Rules
Nodes Rules
A
B
  • If fleet consists of 1 ship, 20% chance
  • If each additional ship, add 5% chance per ship
C
  • If fleet consists of 1 ship, 80% chance
  • If each additional ship, subtract 5% chance per ship


Tips

  • This map is commonly used for sparkling ships.
    • This involves running the ship you want to sparkle in the flagship position.
    • Sometimes this is done alone, which minimizes MVP-theft (a rare problem); however, more commonly two fodder ships (destroyers picked up from 1-1 while you are sparkling) are placed in the second and third slots to minimize the chances of enemy vessels scratching your flagship. They are not refueled and are scrapped or used as modernization fodder once they can no longer be deployed.
  • Single-ship fleets have an 80% chance of reaching the boss node, and the chance of reaching it decreases with every additional ship in your fleet.
    • While this can be useful for completing Bw1, you may wish to sortie a fleet of multiple ships to help prevent your sparkle ships (the ships which will take up the flagship position) from taking damage at the boss node.
    • You are recommended to sparkle ships (for expeditions or to improve their performance in battle) while completing Bw1.

Enemy Compositions

1-1 A: 敵偵察艦 (PoiDB)
# Enemy
Form.
Base EXP Normal Battle Node AD/AP
AS/AS+
A Line Ahead 10 Destroyer I-Class (1501): 5 Armor, 20 HPBattle Card Flagship Icon.png 0/0
0/0
Line Ahead 15 Destroyer Ro-Class (1502): 6 Armor, 22 HPBattle Card Flagship Icon.png 0/0
0/0
Line Ahead 20 Destroyer Ha-Class (1503): 7 Armor, 24 HPBattle Card Flagship Icon.png 0/0
0/0
# Enemy
Form.
Base EXP Normal Battle Node AD/AP
AS/AS+
1-1 B: 敵はぐれ艦隊 (PoiDB)
# Enemy
Form.
Base EXP Normal Battle Node AD/AP
AS/AS+
B Line Ahead 20 Destroyer I-Class (1501): 5 Armor, 20 HPBattle Card Flagship Icon.png Destroyer I-Class (1501): 5 Armor, 20 HP 0/0
0/0
Line Ahead 30 Destroyer Ro-Class (1502): 6 Armor, 22 HPBattle Card Flagship Icon.png Destroyer Ro-Class (1502): 6 Armor, 22 HP 0/0
0/0
Line Ahead 40 Destroyer Ha-Class (1503): 7 Armor, 24 HPBattle Card Flagship Icon.png Destroyer Ha-Class (1503): 7 Armor, 24 HP 0/0
0/0
# Enemy
Form.
Base EXP Normal Battle Node AD/AP
AS/AS+
1-1 C: 敵主力艦隊 (PoiDB)
# Enemy
Form.
Base EXP Boss Battle Node AD/AP
AS/AS+
C Line Ahead 50 Light Cruiser Ho-Class (1505): 15 Armor, 33 HPBattle Card Flagship Icon.png Destroyer I-Class (1501): 5 Armor, 20 HP Destroyer I-Class (1501): 5 Armor, 20 HP 0/0
0/0
Line Ahead 60 Light Cruiser Ho-Class (1505): 15 Armor, 33 HPBattle Card Flagship Icon.png Destroyer Ro-Class (1502): 6 Armor, 22 HP Destroyer Ro-Class (1502): 6 Armor, 22 HP 0/0
0/0
Line Ahead 70 Light Cruiser Ho-Class (1505): 15 Armor, 33 HPBattle Card Flagship Icon.png Destroyer Ha-Class (1503): 7 Armor, 24 HP Destroyer Ro-Class (1502): 6 Armor, 22 HP Destroyer Ro-Class (1502): 6 Armor, 22 HP 0/0
0/0
# Enemy
Form.
Base EXP Boss Battle Node AD/AP
AS/AS+

Ship Drops

Ship drops
Type Ship? A B C
CL Kitakami
CL Sendai
DD Mutsuki
DD Kisaragi
DD Satsuki
DD Fumizuki
DD Nagatsuki
DD Kikuzuki
DD Mikazuki
DD Mochizuki
DD Fubuki
DD Shirayuki
DD Hatsuyuki
DD Miyuki
DD Murakumo
DD Isonami
DD Ayanami
DD Shikinami
DD Oboro
DD Akebono
DD Sazanami
DD Ushio
DD Akatsuki
DD Hibiki
DD Ikazuchi
DD Inazuma
DD Hatsuharu
DD Nenohi
DD Wakaba
DD Hatsushimo
DD Shiratsuyu
DD Shigure
DD Murasame
DD Yuudachi
DD Samidare
DD Suzukaze
DD Asashio
DD Ooshio
DD Michishio
DD Arashio
DD Arare
DD Kasumi
DD Kagerou
DD Shiranui
DD Kuroshio
CL Tenryuu
CL Tatsuta
CL Kuma
CL Tama
CL Kiso
CL Jintsuu
CL Naka