- Welcome to the Kancolle Wiki!
- If you have any questions regarding site content, account registration, etc., please visit the KanColle Wiki Discord
User:Grunilg/Hishimochi Post Event Survey
Hishimochi Post Event Survey
This is the Page containing the Analysis of the Hishimochi-Mini-Event Post-Event Survey held by User:Grunilg, which can be found here. It's main goals were to answer the following questions:
- Map Difficulty Choice/Completion Status
- Quest Completion Status
- Main Method used to clear P3 Boss
- Average Clear Costs pre/post-FF
- Impact on individual map&quest Ratings on overall Rating of the Event
alongside some other metrics, which will also be outlined in this article.
First the source of the survey participants will be evaluated and in a second step the official map clear rates will be compared to the ones provided by the survey to determine how representative this survey is. The final difficulty choice will also be evaluated in that section.
The second section will be evaluating the quest progression, as there are no official statistics provided by the developers.
The third section will be evaluating the main methods employed to clear the P3 Boss.
The fourth section will be determining the average Event-Clear costs and will be comparing them across the respective difficulties. There will also be a comparison of the pre-Friend Fleet and post-Friend Fleet costs for Hard Mode.
The fifth and final section of the main part will be used to evaluate connections between the three ratings given in the survey: Map, Quests and Overall.
Survey Representation
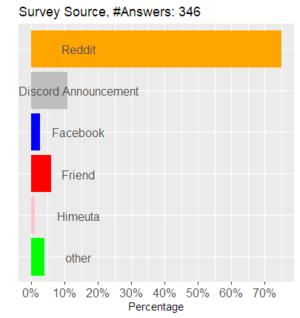
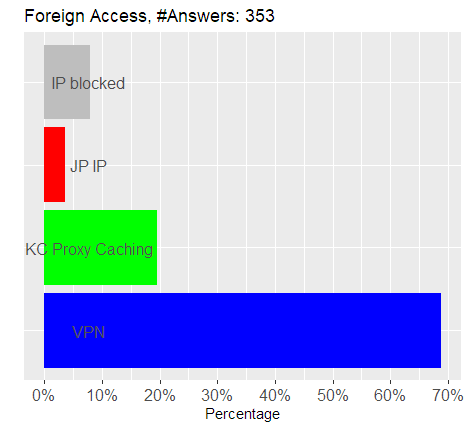
As of 11:41CEST 20/04/04 a total of 353 have been filled out and will be used for evaluation. The majority (75%) of participants accessed it via the initial reddit thread, followed by announcements on various discord servers. Unfortunatly it was not possible to persuade a certain big KC Facebook page to share the survey, so it seems to have been shared on rather localized groups. It should also be noted that the survey has been shared on the Kancolle Channel on vk.com and has been mentioned a couple of times under "others". In conclusion, this survey is mostly answered by the english speaking Kancolle reddit community.
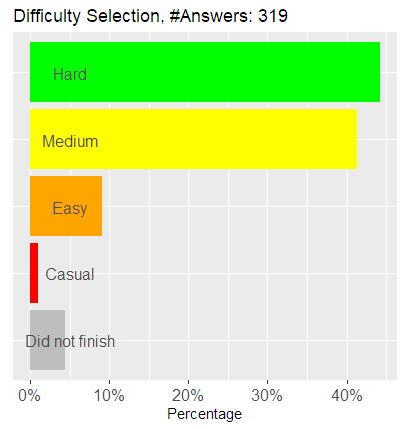
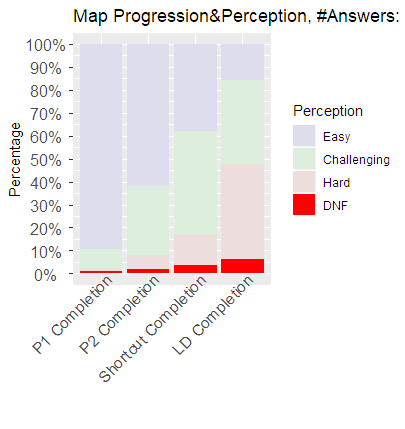
9,6% of those who filled out the survey did not participate in the Event. All evaluation concerning the Quests or the Map will be done with a Dataset that excludes their answers. The progression across the 4 Parts of the Map for those who participated in the Event can be seen in the following figure "Map Progression" alongside the perceived difficulty of that part. The completion and difficulty choice will also be compared to the official statistic. For Difficulty choice, the total percentage will be calculated without "Did not finish", as opposed to the figure "Difficulty Selection". The results can be seen in the tables following the two figures
| P1 | P2 | Unlock | P3 | |
|---|---|---|---|---|
| KC Twitter | 90% | 85% | 77% | 73% |
| EN Survey | 99% | 98% | 97% | 93% |
| Casual | Easy | Medium | Hard | |
|---|---|---|---|---|
| KC Twitter | ~10% | ~18% | 35% | 40% |
| EN Survey | 1% | 9% | 43% | 46% |
The completion rates are significantly higher than the official ones and on average higher difficulty settings have been selected. This is in tune with the last survey and expected result, as a higher engagement in the game is to be expected from players willing to fill out the survey (and deal with foreign IP Blockage, but more on that in Section 6: Misc).
Quest Progression
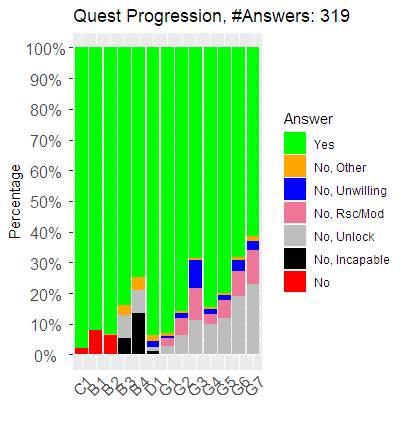
Without a doubt, the Quests were target of a fair bit of discussion this Event. In this section will be evaluating the figure "Quest Progression", which lists the quest completion as well as the reasons as to why the quest could not be completed. The Quest codes refer to the last two symbols of the Quests listed here. Quest B5 has been ommited from the survey due to its late introduction to the Event.
Quests C1, B1, B2, as well as D1 and G1 are all well completed with rates >90%. Quests B3 and B4 have worse completion rates as they either did not unlock (Quest B26 Requirement)or the players were incapable of completing the quests. This may be due to the fact of difficulties using a sub-par CTF in the context of this boss in case of B3 and untrained Yuugumo class DDs in case of B4. Quests G2-G7 all display an upwards trend of the quests not unlocking or players running out of the resources (Ships, Devmats) required to fullfill them. G3 deserves special examination here as it is the singular quest which has the highest ammount of people both in the "unwilling" and "Rsc/Mod" category. The reason as to why is appereant: paying 4 highly valuable destroyer escorts for 4 Hishimochi either didn't seem to be a worthy trade or one that could not be done at all due to shortage of DEs.
P3 Boss Clear
Airstates and Fleets used
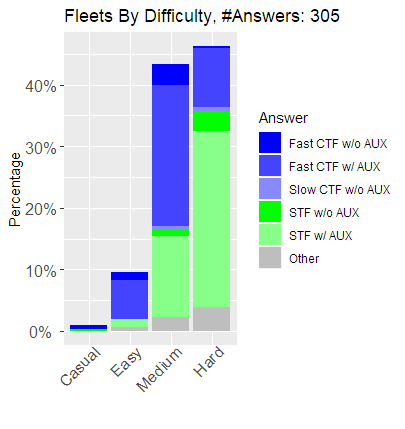
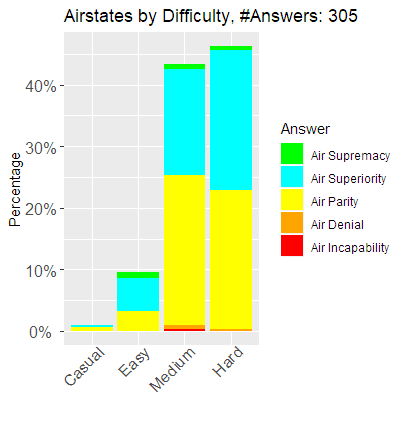
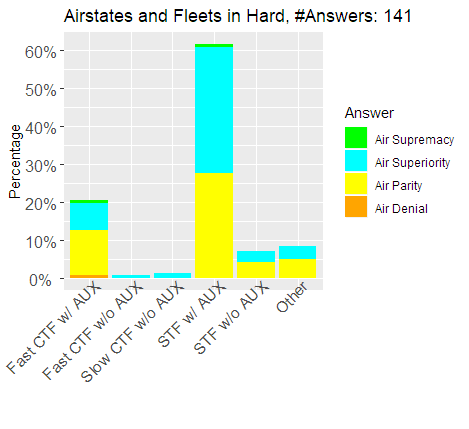
No singificant correlation between difficulty choice and aimed air state has been found (see figure "Airstates by Difficulty"). There was also no significant correlation between chosen Fleet Type and Airstate (see figure "Airstates and Fleets in Hard"). There is however, a significant trend towards STF utilisation with increasing difficulty (see figure "Fleets by Difficulty", with "others" being variants of CTF/STF survey participants were incapable of identifying belonging to another listed category). Of course STF usage on this Map implies Ammo penalty at the boss, therefore deployment of an fleet oiler would be required. The expenditure of Underway Replenishments will be further examined in the next section.
Choice of Anti-Air
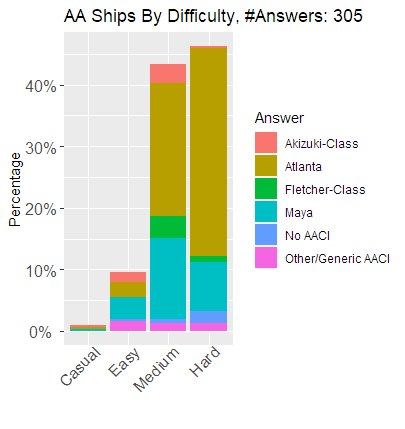
There is a definitive Trend of Atlanta utilisation for higher difficulties. It is also noteworthy that both Fletcher-class and Akizuki-class are cut off relativly harsh on the transition from Medium to Hard. This could be explained by the increased utilisation of Yuugumo-class instead of utility type destroyers within the confines of Hard, as can be seen in the later figure "LD Finishers".
LD Finishers
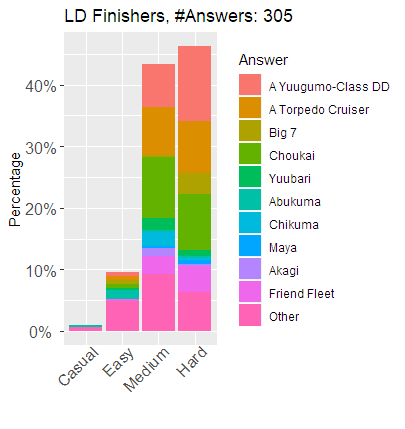
As already outlined previously, there is a significant increase in Yuugumo-Class utilisation for the LD finishers on Hard over Medium, taking over Fletcher- and Akizuki-Class. Torpedo Cruisers are still a major source of kills on Medium and Hard. Choukai seemed to be the preferred choice of historical CA over Chikuma in this operation, most likely due to her higher Yasen statline. It should also be mentioned that about 9% of all Hard Clears were obtained a result of Friend Fleet scoring the kill and about 7% Daytime through either a Big 7 Battleship (special) Attack or Akagi.
Friend Fleets
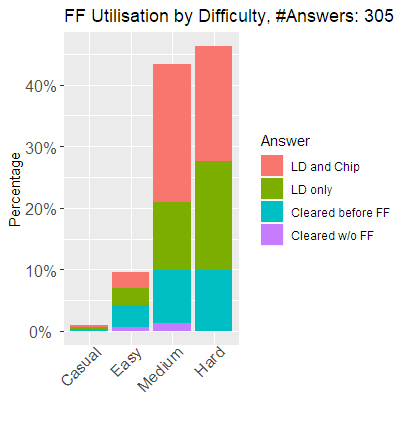
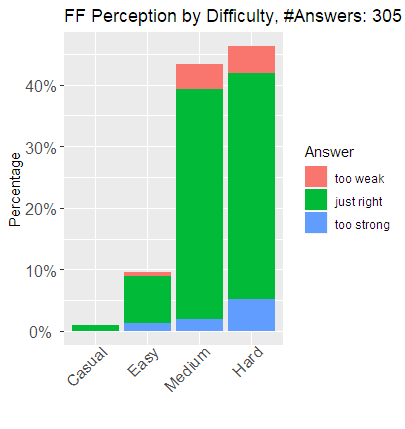
Friend Fleets have been utilized by the majority of players and were agreed upon being "just right" by them. There is however a significant increase of the opinion of them being "too strong" for Hard mode players in comparison to Medium clearers. Almost no one decided not to use FF despite them being aviable.
Average Clear Costs
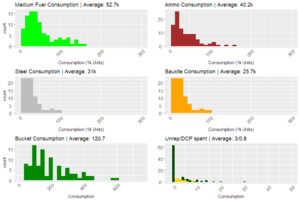
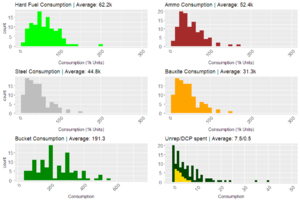
Clear Costs by Difficulty
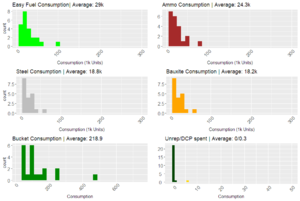
As expected, the average cost in Fuel/Ammo/Steel/Baux to clear increases with difficulty. Easy seems to be an outlier in Bucket consumption, this might be related to an unlucky induvidual and generally low sample size there. The most significant difference between Medium and Hard is the increased use of Underway replenishments with an average of 7.5 per clear for Hard Mode. This is explained by increased STF usage on hard as outlined in the previous section. Considering the most used fleet for Hard Mode was a STF w/ AUX (1 UnRep to fix Ammo pen), followed by Fast CTF w/ AUX (No UnRep required), it is possible to (albeit in a handwavy way) conclude that the average Hard clear probably took about 8 or more visits to the boss in LD form to complete. The deployment and usage of Emergency Repairs/Goddess seems to be rather limited this Event, but is higher on Medium than on Hard. This may be due to the higher utilisation of CTF on Medium, which does not hold up as well as STF on the Preboss nodes. There is no figure of Casual Consumption due to too low of a sample size to justify a histogram.
Easy
Medium
Hard
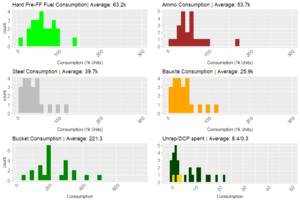
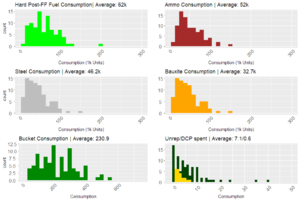
Clear Costs Post/Pre FF for Hard
For Examination of the Costs of a pre/post-FF clear Hard difficulty has been chosen as it has the most samples for a pre-FF clear. As the two Figures below show, the difference between both is rather neglegible.
pre-FF
post-FF
This may be explained by the following factors, be it a single one or combination of multiples, depending on what fits your narrative the best:
- Post-FF costs are inflated by people trying to get their first A-Class Medal on what they perceive to be an easy Event
- Post-FF costs are inflated by players trying to clear pre-FF, but having to step down
- Pre-FF costs are kept down because the players who attempt that are well equipped for the challenge
- Pre-FF submitters were all collectivly lying about the costs to low-key flex on this survey
Event final Rating
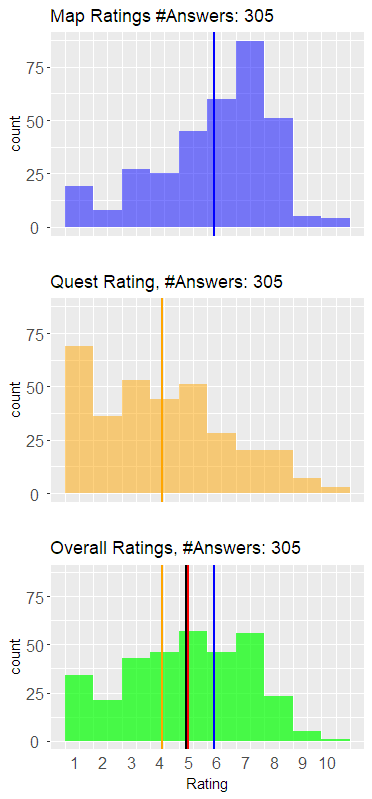
The following figure shows the respective ratings given to the map, the quests and the overall rating of the Event.
The map itself was rated a bit above average with 7 being the most common score. The average rating is marked by vertical blue line and is denoted to be 5.7. Players were hard pressed to give it a rating above 8 though.
The quests were universally received as the worse part of the Event. This is especially seen as the most common score given was 1 and scores beyond the halfway mark 5 being selected rarer. The average score marked by the vertical orange line is 3.9
The overall Event Rating is grouped rather evenly between 3 and 7, with 5 being the most common score. 1 has been chosen by a non-insignificant ammount of participants as well. There is a sharp dropoff after a rating of 7 and most players were hard pressed to give this event a rating of 9-10. The average is marked by the black vertical line and is 4.7, concluding this Event to be below average (5.5 would be the average score on a scale from 1-10). The red vertical line is the average of Map&Quest Rating and is 4.8 and therefore slightly higher than the overall rating. This may be explained to participants giving a bit more weight to the map and its rewards, rather than the Quests.
Miscellaneous
Foreign IP Access
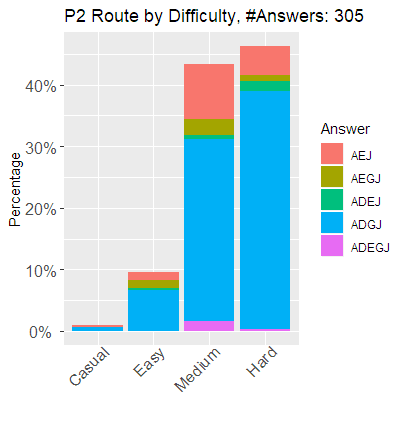
P2 Route
No big surprises here. The most common route chosen was ADGJ, avoiding the Ne-Class Kai at Node E. Medium seemed to be the most adventerous when it came to visiting that node.
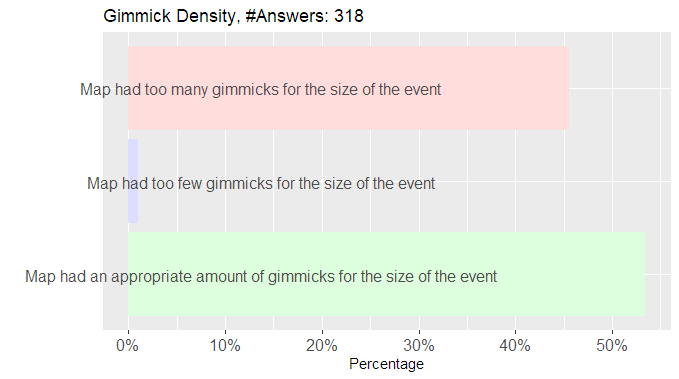
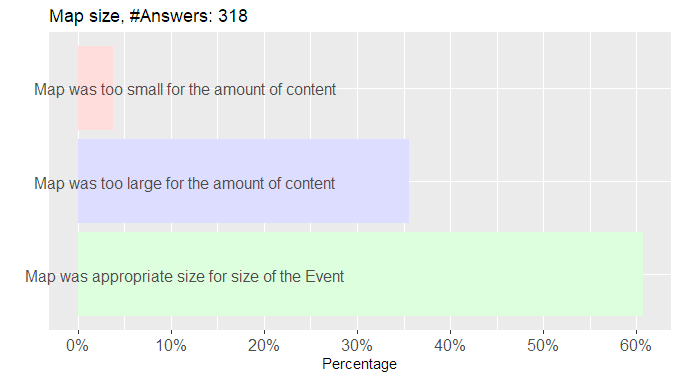
Map Size and Gimmick Density
The map was mostly received as of appropriate size and gimmick ammount. However, more than a third to almost half thought it was too large and too packed with gimmicks.
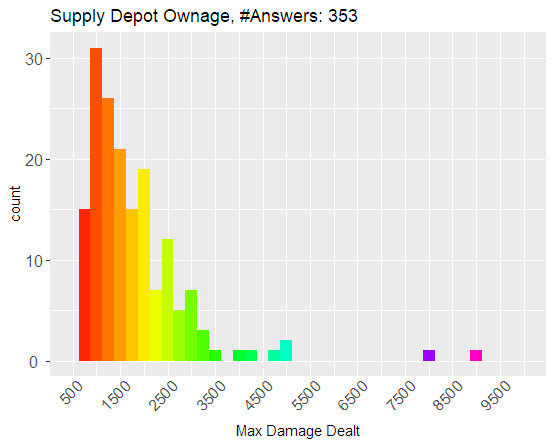
Supply Depot Damage
Improve your Anti-installation Gear. These are mostly rookie numbers.
