- Welcome to the Kancolle Wiki!
- If you have any questions regarding site content, account registration, etc., please visit the KanColle Wiki Discord
Difference between revisions of "Tutorial: How to Play"
m |
|||
| Line 3: | Line 3: | ||
|Page Adopted = Ravien | |Page Adopted = Ravien | ||
}} | }} | ||
| + | {{Tutorialportal}} | ||
This page assumes that you are already signed up for Kantai Collection and have successfully joined a server (i.e. you are not asked to select a server upon loading the game.) If you haven't done this, please go to the page [[Tutorial: How to Register]] and follow the instructions on it. | This page assumes that you are already signed up for Kantai Collection and have successfully joined a server (i.e. you are not asked to select a server upon loading the game.) If you haven't done this, please go to the page [[Tutorial: How to Register]] and follow the instructions on it. | ||
| Line 178: | Line 179: | ||
To do construction/development, you will need '''development''' '''materials''', which have an icon that looks like "two nails side by side and a gear". You can get them by completing some quests and expeditions. | To do construction/development, you will need '''development''' '''materials''', which have an icon that looks like "two nails side by side and a gear". You can get them by completing some quests and expeditions. | ||
| − | + | ||
[[Category:Help]] | [[Category:Help]] | ||
[[Category:Tutorial]] | [[Category:Tutorial]] | ||
Revision as of 02:02, 4 December 2015
| This article is currently undergoing major revisions The article is already being adopted and currently under renovation. |
| Page Adopted By: Ravien Please contact this person before making any major (non-grammar, typo correction, redesigning etc.) edits on this article. |
| Tutorial Portal |
|---|
| Setup and Registration (PC) · Kancolle Android Version · Connection · Troubleshooting · Basic Gameplay · FAQ · Glossary |
| Other Tutorials · Help pages |
This page assumes that you are already signed up for Kantai Collection and have successfully joined a server (i.e. you are not asked to select a server upon loading the game.) If you haven't done this, please go to the page Tutorial: How to Register and follow the instructions on it.
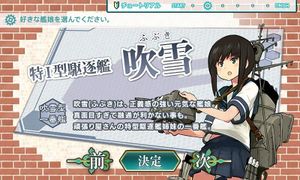
You should see the screen on the right when you are ready to begin playing also remember that this is a Japanese game and not American/English.
Selecting a Starter Ship
The very first thing the game will ask you to enter your name. After that you have to select your initial ship girl. Click the arrows to either side of the button at the bottom to see your five options.
次 = Next
前 = Previous
決定 = Decide
Don't struggle too much over this decision; the starter ships are all destroyers with fairly similar stats and you will soon have a full navy of other ships that can replace them if you so wish. Feel free to make your choice based on their appearance or voice.
The five starter ships are:
Tutorials
There are five tutorials to be completed before you dive into the game.
- Create a ship in the Factory/工廠 (see The Main Screen, below, for help finding this and other locations in the game): Simply use the default amount of resources to create a ship. Don't waste resources as at the tutorial level you cannot create anything powerful.
- Once you have your new ship, to add her to the fleet you use the Organize/編成 page to do so.
- Using the Quest/任務 page you must perform a quest (select the top quest with the ship icon) to gain resources and a new ship. 遂行中/達成! will be displayed by the quest indicating Quest in progress/Completed! respectively.
- It's time to Sortie/出撃. At this point you can participate in the first mission by clicking on the turret and plane icon and selecting the only available mission. It's probably safest if you participate in the first battle only as your ships will not be strong enough if the navigational compass sends you to the boss stage. To ensure this, select the right hand option (Retreat/撤退) after the battle is over.
- Finally, you must resupply your ships to ensure that they don't run out of fuel or munitions during a battle. Do this by using the Supply/補給 menu.
The Main Screen
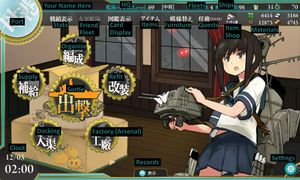
This screen is where you'll be spending most of your time in Kantai Collection. The ship girl on the right is the flagship of your first fleet and will speak if you click on her, also referred as your secretary.
- Main Functions
- Organize - Organize your fleets for sorties and expeditions
- Supply - Refuel your ships and resupply them with ammunition and planes
- Refit - Change the equipments on your ships, remodel or modernize them by sacrificing unwanted ships
- Docking - Repair your damaged ships
- Factory - This is where you go for ship construction, ship dismantle, equipment development and equipment discard
- Sortie - Send your fleets to battle or on an expedition to gather materials
- Top Bar
- Admiral Name - Your name here
- Headquarters Level - The level of your headquarters
- Fleets - The number of active fleets available, increased by completing certain quests to a maximum of 4
- Ships - The number of ships available for your fleets
- Instant Repairs - Consumable used to instantly repair a damaged ship in the docks (also called Buckets)
- Development Materials - Consumable used in Constructing new ships and Developing new equipment
- Top Menu
- Port - Return to your main screen
- Stats - See statistics about yourself and set your greeting message
- Friend Fleet - Not in the game yet
- Card Display - Display your collection of ships and equipments. You can also re-watch the marriage of your married ships here.
- Items - See your inventory of miscellaneous items such as medals, furniture boxes, buckets, instant build items and cash items.
- Furniture Makeover - Change the appearance of the room on your main screen
- Quests - Complete quests to receive materials, ships and other rewards
- Shop - Buy stuff with real money, or furniture with coins found in furniture boxes
- Materials - You need these to resupply, repair and create things in the Factory. They are:
Going on a Sortie
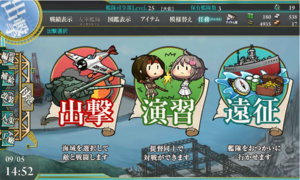
When you click the Sortie button you'll see three options. (The latter two may not be unlocked until certain quests are completed.)
From left to right, they are:
- Sortie (出撃) - Send your fleet on a mission to fight enemies and find new ship girls. The main game mode.
- Practice/exercise (演習) - Fight mock battles against other players. Unlike sortie, the damage taken in practice will be reverted after each battle, as in repair is not needed.
- Expedition (遠征) - Send your fleet to search for materials. They won't take damage or engage in fights, but there is an ammo/fuel cost and some expeditions can take quite a long time. Some expedition such as the support expedition available for world 5 onwards will cost bauxite.
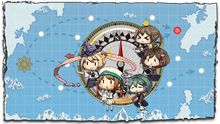
After choosing to sortie you'll be asked to choose a map, which your fleet will explore. Depending on the map, the path the fleet takes may be random or may depend on the ship types you have equipped; see the Sortie page about the individual maps for details.
The Battle
- Fatigue/morale affects the accuracy of your ships and the cap on damage they will take. It has no effect on ship sinking, but try not to sortie with fatigued ships.
Before the battle starts you can choose a formation if you have 4 or more ships in your fleet.
 Line ahead (単縦陣) - Offensive formation that maximizes torpedo damage, torpedo accuracy and shelling damage. Weak against submarines. Lowest chance of flagship protection. Default formation for 3 or less ships.
 Double line (複縦陣) - Balanced formation that gives the highest accuracy in shelling, but less damage than line ahead. Torpedoes have moderate accuracy and damage. Moderately weak against submarines. Available at 4 ships.
 Diamond (輪形陣) - Anti-air formation that decreases accuracy and shelling damage. Strong against submarines, and very strong against aircraft. Very bad for torpedoes. This formation also increases the chance that other ships will take damage instead of your flagship (flagship protection). Available at 5 ships.
 Echelon (梯形陣) - This formation is the least well-tested, but it is thought to be a defensive formation. Somewhat strong against submarines. Bad for torpedoes and surface combat. Available at 4 ships.
 Line abreast (単横陣) - The best anti-submarine formation, but greatly decreases shelling damage. Very bad for torpedoes. Available at 4 ships.
Unless you are fighting submarines, line ahead and double line are almost always good choices. Fleets heavily reliant on torpedoes for damage should choose line ahead.
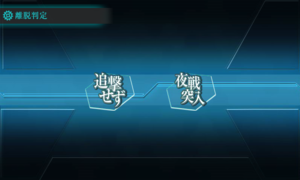
If you do not wipe out the enemy fleet during the day, after the first stage of the battle you will have the option to make a night attack (夜戦突入) . The damage of both your own ships and those of the enemy is greatly increased during a night attack, especially for ships that utilize torpedoes. Select stop pursuit (追撃せず) if you wish to end the battle.
After the battle, the battle result will be shown. You will receive a battle rank largely dependent on how badly you damaged the enemy fleet (the highest rank, 完全勝利 requires you to completely destroy all enemies while taking no damage.) You may have a chance to obtain a new ship girl at this time. The rarity of the ship girl you can obtain depends on the battle rank.
Damage Taken and Continuing a Sortie
Your ships have what is called sinking protection when either of the two following conditions are true:
- The ship is the flagship (i.e. in the 1st position) of the fleet (this is true for both fleets of Combined Fleet); or
- The ship entered the battle no worse than moderate damage/中破.
If either (or both) of the above conditions is true, no matter how much damage the ship takes, the game will cap the damage dealt to her so she will always have 1HP left.
- For more information on this topic, see Combat#Player_Damage_Taken.
You are allowed to enter a new battle with ships which have lost sinking protection (i.e. in the heavily damaged (大破) state), but they will be at risk of sinking, and when a ship sinks you lose the ship forever alongside all equipments carried by it.
Note: Day battle turned night battle does not count as a new battle for this purpose.
You are not allowed to enter a new battle is if your flagship is heavily damaged, unless either Repair Team or Repair Goddess is equipped on it. If either of the two items are equipped on it, you will be given the chance after the battle to choose to activate either or retreat. If neither is equipped, you will be forced to return to base.
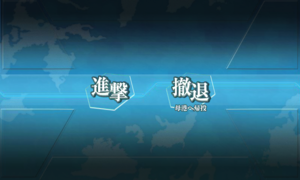
If the battle was not a dead end on the map, you will be given the option to advance (進撃), or retreat (撤退) to end the sortie. To unlock the next zone, you will need to obtain a victory against the boss fleet (the larger, horned red dot on the map.)
In further sorties such as all Extra Operation maps, 4-4, 5-2, 5-3, 5-4 and 6-2, a red gauge meter may shows up when starting a sortie. The amount of red bars inside gauge meter indicates that you will need to sink the flagship of the boss fleet for certain times to unlock the next zone or just clearing the map, instead of obtaining a victory. The gauge meter itself does not regenerate for all normal and Extra Operation maps.
Repair and Resupply
Chances are that one of your ship girls was damaged during your first sortie. If not, they certainly will be in short order, so you had better learn to repair.
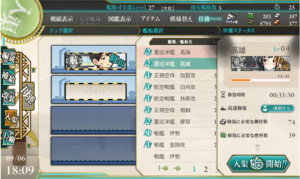
Click the Repair button (入渠) on the Main Screen. You will see your repair docks (two by default; more can be unlocked by purchasing the key from the cash shop.) Click a dock to see a list of your ships, by default ordered by the extent of damage taken. When you select a ship, you will see a screen similar to that on the right.
Every repair costs a large amount of steel and a smaller amount of fuel. By clicking the slider, you can also use an Instant Repair Item (also as "buckets"), which looks like a green bucket with the word 修復 on it. These are more abundant than you might expect- it may be possible to run out of them if you use one on every single repair, but don't hesitate to use them on particularly long ones.
Click the button on the bottom right (入渠開始!!) to start the repair. Unlike when building ships, there's no need to 'claim' a repaired ship. Also, there is a bug that may be of interest to KanColle addicts; if less than one minute remains on a repair timer, it will be completed immediately upon switching screens.
Finally, if you change your mind about waiting for a repair to finish, you can click the green button on the right (高速修復) at any time to use a bucket and complete the repair instantly.
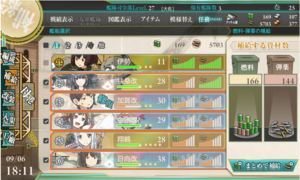
Even if your ships didn't take damage, you will need to resupply them. Click the Resupply button (補給) on the Main Screen.
The Resupply screen is sorted by fleet and appears fairly straightforward. Click on one or more ships to select them, then click on the bottom right button to refill their fuel and ammo.
Fuel+: Refuel only
まとめて補給: Resupply everything
Ammo+: Resupply ammo only
This is not clearly shown on the Resupply screen itself, but refilling fuel and ammo also refills other consumables attached to ships, most notably airplanes that were shot down. These also cost materials to refill- in the case of airplanes, bauxite is consumed. If you don't have enough bauxite, not all the airplanes on your ships will be refilled, and you'll be unable to refill those again until you spend some of the ship in question's fuel and ammo on an expedition or sortie.
In short, be careful of your bauxite level when resupplying carriers or other ships with airplanes.
Using the Factory
You'll probably want to build some more ship girls to bring your first fleet up to its maximum of 6 (this is one of your quest objectives, actually.) Click the Factory (工廠) button on the main screen.
The buttons on the left, in order, are:
- Construction (建造)
- Dismantle (解体), often called "scrapping"
- Development (開発)
- Discard (廃棄), "scrapping" of equipments
Selecting 建造/construction brings up the dialog on the right. You can fine tune the amount of materials you want to use to attempt to get a certain category of ship, with 30-60% accuracy. You can try your luck with random amounts (which is likely to result in a destroyer), see the Construction page or individual ship pages for details on ship formulas, or use these basic ones:
(Materials are in the order Fuel/Ammo/Steel/Bauxite)
- Destroyer/Light Cruiser: 30/30/30/30 (no rare ships)
- Rare Destroyer/Heavy Cruiser/Submarine: 250/30/200/30
- Aircraft Carrier: 300/30/400/300
- Battleship: 400/30/600/30
Please bear in mind that the result of ship construction is random. The actual rate to obtain a ship might be lower than the rate shown in the Construction page due to statistical errors. You can safely assume that the actual rate of obtaining a rare ship is far lower than the rate shown.
The slider will allow you to use a Fast Build Item, akin to Fast Repair. You are unlikely to run out of these unless you build ships nonstop. However, if attempting to build a specific type of ship, you may wish to begin the build first, compare the build time to those listed on Construction page to see what you're building, and then instantly complete the build if you so wish by clicking the button on the right of the dock.
解体/Scrapping ships will destroy a ship to give you a small portion of materials, and should be self-explanatory when performed in game. The amount of materials returned is meager enough that you should consider using unwanted ships for modernization instead. All equipment on a ship will be scrapped as well when you scrap a ship, so if you want to keep the equipment you may wish to remove it first.
開発/development is similar to building ships, but the result depends on the flagship of your main fleet as well as the materials used, and has a chance to fail completely which is rather high when not following a pre-tested formula. Upon a failure, you will lose all materials used except the development material.
廃棄/Scrapping of equipments works similarly to scrapping ships.
To do construction/development, you will need development materials, which have an icon that looks like "two nails side by side and a gear". You can get them by completing some quests and expeditions.
