- Welcome to the Kancolle Wiki!
- If you have any questions regarding site content, account registration, etc., please visit the KanColle Wiki Discord
Spring 2021 Event/E-4
E-4
Striking Force, Sortie!
ラバウル空襲!
遊撃部隊、出撃せり!
![]()
![]()
![]()
![]()


| Information | ||||
|---|---|---|---|---|
| Event Tag | Teal Tag: Striking Force Red Tag: Transportation Force Blue Tag: 3rd Fleet Green Tag: 2nd Fleet | |||
| Boss Gauges | Hard (甲): 3400 HP, 750 TP, 4000 HP, 5700HP | |||
| Medium (乙): ? | ||||
| Easy (丙): ? | ||||
| Casual (丁): ? | ||||
| Map Bosses | ||||
| Rewards | ||||
|---|---|---|---|---|
| Equipment/Item | 丁 Casual |
丙 Easy |
乙 Medium |
甲 Hard |
Medal |
1 | 1 | ||
Reinforcement Expansion |
1 | 1 | 1 | 1 |
New Model Aerial Armament Material |
1 | 2 | 3 | |
Submarine Supply Material |
1 | 2 | 2 | 3 |
 Type 0 Fighter Model 32 |
1 (★2) | |||
 Type 0 Fighter Model 32 (Skilled) |
1 (★2) | |||
 Type 0 Fighter Model 21 (Tainan Air Group) |
1 (★2) | 1 (★4) | ||
 Type 0 Fighter Model 32 (Tainan Air Group) |
1 (★3) | |||

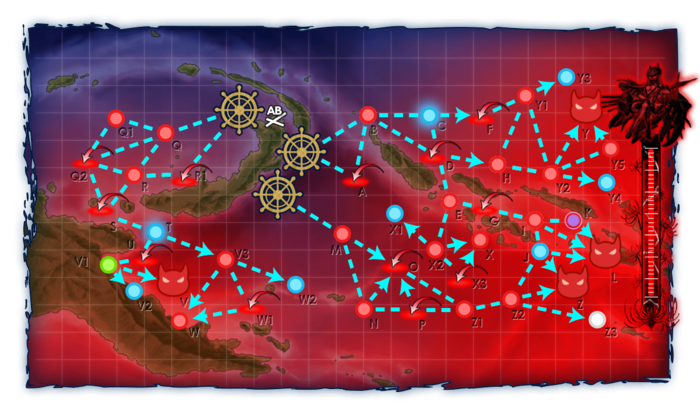
| E-4 Branching Rules | ||
|---|---|---|
| Nodes | Rules | |
| Start | 1 |
|
2 |
| |
3 |
| |
1 |
A |
|
B | ||
2 |
Q |
|
R1 |
| |
B |
C |
|
D |
| |
C |
F |
|
D | ||
D |
E |
|
H |
| |
E |
G |
|
X2 |
| |
H |
Y2 |
|
I |
J |
|
K | ||
L | ||
J |
L |
|
Z |
| |
M |
N |
|
O |
| |
N |
O |
|
P |
| |
O |
Z1 |
|
P |
O |
|
Z1 |
| |
Q |
Q1 |
|
Q2 |
| |
R |
| |
Q2 |
R |
|
S |
| |
R |
S |
|
T |
U |
|
V3 | ||
V1 |
V |
|
V2 |
| |
V3 |
W |
|
W1 |
??? | |
W2 |
| |
X2 |
X |
|
X1 | ||
X3 | ||
Y1 |
H |
|
Y2 |
| |
Y3 |
| |
Y2 |
Y |
|
Y4 | ||
Y5 | ||
Z2 |
J |
|
Z |
| |
Z3 |
| |
Branching compositions were reported over the course of the event.
Ship Bonuses (Tentative)
DISCLAIMER: This information is based on user submitted data and is subject to revisions as more data is gathered. Any version of the ship receives the bonus regardless of remodel.
| Ships | Nodes L |
Nodes Q/R/V/W | Nodes B/H/Y1/Y2/Y5/Y | Nodes M/Z1/Z2 | Nodes Z | ||
|---|---|---|---|---|---|---|---|
| 1.25x | |||||||
| 1.15x | |||||||
| - | |||||||
| Ships | L | Q/R/V/W | B/H/Y1/Y2/Y5/Y | M/Z1/Z2 | Z | ||
| Other IJN DD/CL | 1.1x | ||||||
| 1.15x | |||||||
| - | - | ||||||
| 1.15x | 1.27x | ||||||
| - | - | 1.3x | 1.25x | ||||
| US Ships | 1.15x | ||||||
| Debuff (Boss Flagship Only) | 1.17-1.18x | ||||||
The event guides are to be constructed through the respective Event map page guide and reviewed by editor staff / collaboration committee before being approved here. Do not under any circumstance update the guides through this page or attempt to fix them through this page. Please only update guides through their respective sandbox pages.
General Guideline
E4 is a long and complex map compared to the previous maps in the Main Operations. There are a total of 4 main phases/bosses and 4 different tags in this map, although 2 tags are shared with other maps:
- Teal (Striking Force)
- Red (TCF)
- Blue (CTF; shared with E2-2)
- Green (STF; shared with E5-2).
Phase 1: Defeat Lycoris Hime
This phase will pit you against Lycoris and Supply Depot Hime. The key to successfully clearing this phase is to bring lots of anti-installation equipment to kill the boss as quickly as possible. The route you take will pit you against 2 ASW Node and 2 Air raid node. Make sure you have adequate AACI, ASW, and anti-installation equipment to tackle this phase.
- Composition: Strike Force Fleet with 7 ships: 2CA(V), 1-2 CL, 3-4 DD OR 0-1 AV, 2-3 CA(V), 1 CL, 2-3 DD (Teal Tag)
- A fleet with AV will off-route to J which is a repair node.
- You can also route to J if you have 3 CA(V)
- Route: B D E G I L with 0 AV or less than 2 CA(V)
- B D E G I J L with 1 AV or 3 CA(V)
- LBAS: Range 8 AP/AS: 264/594 (HARD)
- Note: It is recommended that you use a LBAS with toukai in order to help increase your passing rate through the node contain submarines. Split the strike between node B and E as they contain
- LoS Requirement: About Cn3 56+/42+/38+/32+ is required on Hard/Medium/Easy/Casual to route from I to L.
- LOS requirement for if you are using the AV or 3 CA(V) method is about: Cn3 60+/45+/40+/40+ is required on Hard/Medium/Easy/Casual to route from I to J
Phase 2: TP Phase
- Composition: Transport Combined Fleet (TCF): 1 CVE, 1 AV/CL 4 DD + 1-2 CL, 4-5 DD FAST Fleet (Red Tag)
- Route: Q Q2 S T U V1 V
- LBAS Range: 4 No Airpower at the boss. You will be facing 3 Air raid total on the way to the boss
- Note: It is essential to have AACI as you will be passing through the air raid node and make sure your CVE, AV have lots of air to counter the air raid node along the way
- Bringing a CA in your fleet will off route you to another combat node along the way.
- Bring at least 1-2 DDs capable of equipping full anti-installation set-ups as they will be needed for unlocking purposes later on.
Phase 2.5: Unlock Node Y
There are 4 different requirements in order to unlock Node Y for Phase 3: Defeat Jellyfish Hime
- AS Node O
- S rank W twice
- S rank X twice
- AS LBAS Defense
- Composition STF: 3(F)BB, 1 BBV/CVL 1-2 CA(V), 0-1 CL + 1-2 CA(V), 1-2 CLT, 1 CL, 2-3 DD (Green tag)
- Route: M O
- LBAS: Range = 4
- Note: You will plan to lock for your P4 and E5 fleet for this segment. Mule your CV and CAV to achieve AS otherwise, bring an LBAS with fighters to help with the node also.
- A full fleet is not strictly necessary for this part; a skeleton fleet with sufficient FP to achieve AS will also suffice.
- Composition TCF: 0-1 CVE, 0-1 CL, 0-1 CAV/AV, 4 DD + 1-2 CL 4-5 DD (Red Tag)
- Route: Q Q2 S T V3 W
- LBAS: Range = 5
- Note: The node composes of Supply Depot Hime in the main fleet and PT Imp pack following in the escort fleet. It is highly recommended to bring along Nuke setup (Kami Tank, WG42, and Type 89 Daihatsu with Medium tank) in the main and escot fleet and HA gun/AA guns / skilled lookout to kill PT imp in the escort.
- Composition Strike Force: 1 CL, 4-6 DD (Teal Tag)
- Route: B D E X2 X
- LBAS: Range = 5
- TCI may be considered for taking out the Light Cruiser Princess, preffeably with someone you already locked on this fleet.
Phase 3: Defeat Jellyfish Hime
- Composition CTF: 2-3 CV(B), 0-1 CV(L), 2-3 CA(V), 0-1 CL + 1 CA, 1 CLT, 1 CL, 3 DD (Blue tag). Maximum of 3 CV(B/L) can be use in the fleet.
- Route: B C F Y1 Y2 Y
- LBAS: Range = 7 AP/AS 280/630 (HARD)
- Note: This phase features a lot of air spreading throughout the route getting to the boss and fighting Jellyfish Hime herself. Make sure you have plenty of air and AACI DD to help make this phase easier.
- Tag is shared with E2 Phase 2 (blue).
Phase 3.5
This phase is ONLY REQUIRED ON HARD to unlock the last boss of this map. All other difficulties can skip this phase altogether. For this phase, you are required to S rank L
- Composition: Use the same fleet you used in Phase 1 with the strike force fleet.
- Route: B D E G I L
- LBAS: Range = 8
Phase 4: Defeat New Southern Battleship Hime
- Composition STF: 2-3 (F)BB, 0-1 BBV or CVL (2 CVL), 1-2 CA(V), 0-1 CL + 1-2 CA(V), 1-2 CLT, 1 CL, 2-3 DD (Green locks)
- Route: M O Z1 Z2 Z
- LBAS: Range = 8 AP/AS: 176/396 for Hard
- Note: This phase lock will be reused in E5 for Phase 2. You have the option to bring Nelson or Nagato and make use of the touch mechanics here.
Debuff Phase
You can do all these steps in any order. There are 5 requirements that must be met once Last Dance threshold has been reached:
- AS LBAS Defense Once
- S rank node I
- AS at node G
- S rank at node L
- A rank at node Y
- S rank at node Z2
Enemy Compositions
| # | Formation | Air Raids | AD/AP AS/AS+ |
|---|---|---|---|
| AB | Diamond | 67/133 297/594 | |
| Diamond | 76/151 338/675 | ||
| Diamond | 80/160 359/717 | ||
| Diamond | 85/169 380/759 | ||
| Diamond | 96/192 431/861 | ||
| # | Formation | Air Raids | AD/AP AS/AS+ |
| # | Formation | Air Defense Node | AD/AP AS/AS+ |
|---|---|---|---|
| A | Diamond Phases: 1, 3, 4 |
138/275 618/1236 | |
| Diamond Phases: 1, 2, 3, 4 |
141/281 630/1260 | ||
| Diamond Phases: 1, 3, 4 |
161/321 722/1443 | ||
| # | Formation | Air Defense Node | AD/AP AS/AS+ |
| # | Formation | Normal Battle Node | AD/AP AS/AS+ |
|---|---|---|---|
| B | Echelon Line Abreast Phases: 1, 2, 3, 4 |
0/0 0/0 | |
| Echelon Line Abreast Phases: 1, 3, 4 |
0/0 0/0 | ||
| Echelon Line Abreast Phases: 1, 3, 4 |
0/0 0/0 | ||
| # | Formation | Normal Battle Node | AD/AP AS/AS+ |
| # | Selection Node | ||
|---|---|---|---|
| C | 艦隊の針路を選択できます。提督、どちらの針路をとられますか? You can decide the fleet's course. Admiral, which heading should we take? | ||
| # | Selection Node | ||
| # | Formation | Air Defense Node | AD/AP AS/AS+ |
|---|---|---|---|
| D | Diamond Phases: 1, 3, 4 |
138/275 618/1236 | |
| Diamond Phases: 1, 3, 4 |
141/281 630/1260 | ||
| Diamond Phases: 1, 2, 3, 4 |
161/321 722/1443 | ||
| # | Formation | Air Defense Node | AD/AP AS/AS+ |
| # | Formation | Normal Battle Node | AD/AP AS/AS+ |
|---|---|---|---|
| E | Echelon Line Abreast Phases: 1, 3, 4 |
0/0 0/0 | |
| Echelon Line Abreast Phases: 1, 3, 4 |
0/0 0/0 | ||
| Echelon Line Abreast Phases: 1, 3, 4 |
0/0 0/0 | ||
| # | Formation | Normal Battle Node | AD/AP AS/AS+ |
| # | Formation | Air Defense Node | AD/AP AS/AS+ |
|---|---|---|---|
| F | Diamond Phases: 3, 4 |
138/275 618/1236 | |
| Diamond Phases: 3, 4 |
141/281 630/1260 | ||
| Diamond Phases: 3, 4 |
161/321 722/1443 | ||
| # | Formation | Air Defense Node | AD/AP AS/AS+ |
| # | Formation | Air Defense Node | AD/AP AS/AS+ |
|---|---|---|---|
| G | Diamond Phases: 1, 3, 4 |
69/137 308/615 | |
| Diamond Phases: 1, 3, 4 |
67/133 297/594 | ||
| Diamond Phases: 1, 3, 4 |
76/151 338/675 | ||
| Diamond Phases: 1, 3, 4 |
80/160 359/717 | ||
| Diamond Phases: 1, 3, 4 |
85/169 380/759 | ||
| # | Formation | Air Defense Node | AD/AP AS/AS+ |
| # | Formation | Normal Battle Node | AD/AP AS/AS+ |
|---|---|---|---|
| H | Cruising Formation 3 Phases: 1, 3, 4 |
52/103 231/462 | |
| Cruising Formation 3 Phases: 3 |
72/143 321/642 | ||
| # | Formation | Normal Battle Node | AD/AP AS/AS+ |
| # | Formation | Normal Battle Node | AD/AP AS/AS+ |
|---|---|---|---|
| I | Line Ahead Vanguard Phases: 1, 3, 4 |
0/0 0/0 | |
| Line Ahead Phases: 1 |
0/0 0/0 | ||
| # | Formation | Normal Battle Node | AD/AP AS/AS+ |
| # | Empty Node | ||
|---|---|---|---|
| J | 気のせいだった。 大規模艦隊の……応急修理に適した泊地です。 Must be my imagination. This is... a suitable anchorage for emergency repairs on large fleets. | ||
| # | Empty Node | ||
| # | Formation | Night Battle Node | AD/AP AS/AS+ |
|---|---|---|---|
| K | Line Ahead Echelon Phases: 1, 3, 4 |
0/0 0/0 | |
| Line Ahead Phases: 1 |
0/0 0/0 | ||
| # | Formation | Night Battle Node | AD/AP AS/AS+ |
| # | Formation | Boss Battle Node | AD/AP AS/AS+ |
|---|---|---|---|
| L | Cruising Formation 4 Phases: 1, 3, 4 |
133/265 594/1188 | |
| Cruising Formation 4 Phases: 1 (Final)
|
149/297 666/1332 | ||
| # | Formation | Boss Battle Node | AD/AP AS/AS+ |
| # | Formation | Normal Battle Node | AD/AP AS/AS+ |
|---|---|---|---|
| M | Echelon Line Abreast Phases: 3, 4 |
0/0 0/0 | |
| Echelon Line Abreast Phases: 3, 4 |
0/0 0/0 | ||
| Echelon Line Abreast Phases: 2, 3, 4 |
0/0 0/0 | ||
| # | Formation | Normal Battle Node | AD/AP AS/AS+ |
| # | Formation | Normal Battle Node | AD/AP AS/AS+ |
|---|---|---|---|
| N | Line Ahead Double Line Vanguard Phases: 3, 4 |
0/0 0/0 | |
| # | Formation | Normal Battle Node | AD/AP AS/AS+ |
| # | Formation | Air Defense Node | AD/AP AS/AS+ |
|---|---|---|---|
| O | Diamond Phases: 3, 4 |
69/137 308/615 | |
| Diamond Phases: 3, 4 |
67/133 297/594 | ||
| Diamond Phases: 3, 4 |
76/151 338/675 | ||
| Diamond Phases: 2, 3, 4 |
80/160 359/717 | ||
| Diamond Phases: 3, 4 |
85/169 380/759 | ||
| # | Formation | Air Defense Node | AD/AP AS/AS+ |
| # | Formation | Air Defense Node | AD/AP AS/AS+ |
|---|---|---|---|
| P | Diamond Phases: 3, 4 |
69/137 308/615 | |
| Diamond Phases: 3, 4 |
67/133 297/594 | ||
| Diamond | 76/151 338/675 | ||
| Diamond Phases: 3, 4 |
80/160 359/717 | ||
| Diamond Phases: 3 |
85/169 380/759 | ||
| # | Formation | Air Defense Node | AD/AP AS/AS+ |
| # | Formation | Normal Battle Node | AD/AP AS/AS+ |
|---|---|---|---|
| Q | Echelon Line Abreast Phases: 2, 3, 4 |
0/0 0/0 | |
| Echelon Line Abreast Phases: 2, 3, 4 |
0/0 0/0 | ||
| Echelon Line Abreast Phases: 2, 3, 4 |
0/0 0/0 | ||
| # | Formation | Normal Battle Node | AD/AP AS/AS+ |
| # | Formation | Normal Battle Node | AD/AP AS/AS+ |
|---|---|---|---|
| # | Formation | Normal Battle Node | AD/AP AS/AS+ |
| # | Formation | Air Defense Node | AD/AP AS/AS+ |
|---|---|---|---|
| Q2 | Diamond Phases: 2, 3, 4 |
35/69 153/306 | |
| Diamond Phases: 2, 3, 4 |
39/78 174/348 | ||
| Diamond Phases: 2, 3, 4 |
44/87 195/390 | ||
| Diamond Phases: 2, 3, 4 |
49/97 216/432 | ||
| Diamond Phases: 2, 3, 4 |
60/119 267/534 | ||
| # | Formation | Air Defense Node | AD/AP AS/AS+ |
| # | Formation | Normal Battle Node | AD/AP AS/AS+ |
|---|---|---|---|
| R | Diamond Phases: 3 |
0/0 0/0 | |
| Line Ahead Vanguard Phases: 2 |
0/0 0/0 | ||
| # | Formation | Normal Battle Node | AD/AP AS/AS+ |
| # | Formation | Air Defense Node | AD/AP AS/AS+ |
|---|---|---|---|
| R1 | Diamond Phases: 2 |
39/78 174/348 | |
| Diamond | 44/87 195/390 | ||
| # | Formation | Air Defense Node | AD/AP AS/AS+ |
| # | Formation | Air Defense Node | AD/AP AS/AS+ |
|---|---|---|---|
| S | Diamond Phases: 2, 3, 4 |
35/69 153/306 | |
| Diamond Phases: 2, 3, 4 |
39/78 174/348 | ||
| Diamond Phases: 2, 3, 4 |
44/87 195/390 | ||
| Diamond Phases: 2, 3, 4 |
49/97 216/432 | ||
| Diamond Phases: 2, 3, 4 |
60/119 267/534 | ||
| # | Formation | Air Defense Node | AD/AP AS/AS+ |
| # | Selection Node | ||
|---|---|---|---|
| T | 艦隊の針路を選択できます。提督、どちらの針路をとられますか? You can decide the fleet's course. Admiral, which heading should we take? | ||
| # | Selection Node | ||
| # | Formation | Air Defense Node | AD/AP AS/AS+ |
|---|---|---|---|
| U | Diamond Phases: 2, 3, 4 |
35/69 153/306 | |
| Diamond Phases: 2 |
39/78 174/348 | ||
| Diamond Phases: 2, 3, 4 |
44/87 195/390 | ||
| Diamond Phases: 2, 4 |
49/97 216/432 | ||
| Diamond Phases: 2, 3, 4 |
60/119 267/534 | ||
| # | Formation | Air Defense Node | AD/AP AS/AS+ |
| # | Formation | Boss Battle Node | AD/AP AS/AS+ |
|---|---|---|---|
| V | Line Ahead Echelon Vanguard Phases: 2, 4 |
0/0 0/0 | |
| # | Formation | Boss Battle Node | AD/AP AS/AS+ |
| # | Landing Node | ||
|---|---|---|---|
| # | Landing Node | ||
| # | Empty Node | ||
|---|---|---|---|
| V2 | 敵影を見ず。 No enemy spotted. | ||
| # | Empty Node | ||
| # | Formation | Normal Battle Node | AD/AP AS/AS+ |
|---|---|---|---|
| V3 | Diamond Phases: 3, 4 |
45/89 198/396 | |
| Diamond Phases: 3, 4 |
45/89 198/396 | ||
| Diamond Phases: 3, 4 |
51/101 225/450 | ||
| # | Formation | Normal Battle Node | AD/AP AS/AS+ |
| # | Formation | Normal Battle Node | AD/AP AS/AS+ |
|---|---|---|---|
| W | Cruising Formation 4 Phases: 3 |
50/99 222/444 | |
| Cruising Formation 4 Phases: 4 |
61/121 270/540 | ||
| # | Formation | Normal Battle Node | AD/AP AS/AS+ |
| # | Empty Node | ||
|---|---|---|---|
| W2 | 敵影を見ず。 No enemy spotted. | ||
| # | Empty Node | ||
| # | Formation | Normal Battle Node | AD/AP AS/AS+ |
|---|---|---|---|
| X | Line Ahead Double Line Vanguard Phases: 3, 4 |
0/0 0/0 | |
| # | Formation | Normal Battle Node | AD/AP AS/AS+ |
| # | Empty Node | ||
|---|---|---|---|
| X1 | 敵影を見ず。 No enemy spotted. | ||
| # | Empty Node | ||
| # | Formation | Normal Battle Node | AD/AP AS/AS+ |
|---|---|---|---|
| X2 | Line Ahead Double Line Vanguard Phases: 3, 4 |
0/0 0/0 | |
| # | Formation | Normal Battle Node | AD/AP AS/AS+ |
| # | Formation | Air Defense Node | AD/AP AS/AS+ |
|---|---|---|---|
| X3 | Diamond | 69/137 308/615 | |
| Diamond Phases: 3 |
67/133 297/594 | ||
| Diamond Phases: 3 |
76/151 338/675 | ||
| Diamond Phases: 3 |
80/160 359/717 | ||
| Diamond | 85/169 380/759 | ||
| # | Formation | Air Defense Node | AD/AP AS/AS+ |
| # | Formation | Boss Battle Node | AD/AP AS/AS+ |
|---|---|---|---|
| Y | Cruising Formation 4 Phases: 3, 4 |
141/281 630/1260 | |
| Cruising Formation 4 Phases: 3 (Final)
|
161/321 720/1440 | ||
| # | Formation | Boss Battle Node | AD/AP AS/AS+ |
| # | Formation | Normal Battle Node | AD/AP AS/AS+ |
|---|---|---|---|
| Y1 | Line Ahead Vanguard Phases: 3, 4 |
0/0 0/0 | |
| Line Ahead Phases: 3 |
0/0 0/0 | ||
| # | Formation | Normal Battle Node | AD/AP AS/AS+ |
| # | Formation | Normal Battle Node | AD/AP AS/AS+ |
|---|---|---|---|
| Y2 | Cruising Formation 3 Phases: 3, 4 |
96/191 429/858 | |
| Cruising Formation 3 Phases: 3 |
116/231 519/1038 | ||
| # | Formation | Normal Battle Node | AD/AP AS/AS+ |
| # | Empty Node | ||
|---|---|---|---|
| Y3 | 敵影を見ず。 No enemy spotted. | ||
| # | Empty Node | ||
| # | Empty Node | ||
|---|---|---|---|
| Y4 | 敵影を見ず。 No enemy spotted. | ||
| # | Empty Node | ||
| # | Formation | Normal Battle Node | AD/AP AS/AS+ |
|---|---|---|---|
| Y5 | Line Ahead Diamond Phases: 3, 4 |
0/0 0/0 | |
| Line Ahead Phases: 3 |
0/0 0/0 | ||
| # | Formation | Normal Battle Node | AD/AP AS/AS+ |
| # | Formation | Boss Battle Node | AD/AP AS/AS+ |
|---|---|---|---|
| Z | Cruising Formation 4 Phases: 4 |
89/177 396/792 | |
| Cruising Formation 4 Phases: 4 (Final)
|
101/201 450/900 | ||
| # | Formation | Boss Battle Node | AD/AP AS/AS+ |
| # | Formation | Normal Battle Node | AD/AP AS/AS+ |
|---|---|---|---|
| Z1 | Line Ahead Diamond Vanguard Phases: 4 |
51/101 225/450 | |
| # | Formation | Normal Battle Node | AD/AP AS/AS+ |
| # | Formation | Normal Battle Node | AD/AP AS/AS+ |
|---|---|---|---|
| Z2 | Cruising Formation 4 Phases: 4 |
89/177 396/792 | |
| Cruising Formation 4 Phases: 4 |
101/201 450/900 | ||
| # | Formation | Normal Battle Node | AD/AP AS/AS+ |
| # | Formation | Air Raids | AD/AP AS/AS+ |
|---|---|---|---|
| AB | Diamond | 55/110 246/492 | |
| Diamond | 60/119 267/534 | ||
| Diamond | 67/133 297/594 | ||
| Diamond | 76/151 338/675 | ||
| Diamond | 80/160 359/717 | ||
| # | Formation | Air Raids | AD/AP AS/AS+ |
| # | Formation | Air Defense Node | AD/AP AS/AS+ |
|---|---|---|---|
| A | Diamond Phases: 3, 4 |
109/217 486/972 | |
| Diamond Phases: 1, 3, 4 |
132/263 590/1179 | ||
| Diamond Phases: 1, 3, 4 |
155/309 693/1386 | ||
| # | Formation | Air Defense Node | AD/AP AS/AS+ |
| # | Formation | Normal Battle Node | AD/AP AS/AS+ |
|---|---|---|---|
| B | Echelon Line Abreast Phases: 1, 3, 4 |
0/0 0/0 | |
| Echelon Line Abreast Phases: 1, 3, 4 |
0/0 0/0 | ||
| Echelon Line Abreast Phases: 1, 3, 4 |
0/0 0/0 | ||
| # | Formation | Normal Battle Node | AD/AP AS/AS+ |
| # | Selection Node | ||
|---|---|---|---|
| C | 艦隊の針路を選択できます。提督、どちらの針路をとられますか? You can decide the fleet's course. Admiral, which heading should we take? | ||
| # | Selection Node | ||
| # | Formation | Air Defense Node | AD/AP AS/AS+ |
|---|---|---|---|
| D | Diamond Phases: 1, 3, 4 |
109/217 486/972 | |
| Diamond Phases: 1, 3, 4 |
132/263 590/1179 | ||
| Diamond Phases: 1, 3, 4 |
155/309 693/1386 | ||
| # | Formation | Air Defense Node | AD/AP AS/AS+ |
| # | Formation | Normal Battle Node | AD/AP AS/AS+ |
|---|---|---|---|
| E | Echelon Line Abreast Phases: 1, 3, 4 |
0/0 0/0 | |
| Echelon Line Abreast Phases: 1, 3, 4 |
0/0 0/0 | ||
| Echelon Line Abreast Phases: 1, 3, 4 |
0/0 0/0 | ||
| # | Formation | Normal Battle Node | AD/AP AS/AS+ |
| # | Formation | Air Defense Node | AD/AP AS/AS+ |
|---|---|---|---|
| F | Diamond Phases: 3, 4 |
109/217 486/972 | |
| Diamond Phases: 3, 4 |
132/263 590/1179 | ||
| Diamond Phases: 3, 4 |
155/309 693/1386 | ||
| # | Formation | Air Defense Node | AD/AP AS/AS+ |
| # | Formation | Air Defense Node | AD/AP AS/AS+ |
|---|---|---|---|
| G | Diamond Phases: 1, 3, 4 |
55/110 246/492 | |
| Diamond Phases: 1, 3, 4 |
60/119 267/534 | ||
| Diamond Phases: 1, 3, 4 |
69/137 308/615 | ||
| Diamond Phases: 1, 3, 4 |
67/133 297/594 | ||
| # | Formation | Air Defense Node | AD/AP AS/AS+ |
| # | Formation | Normal Battle Node | AD/AP AS/AS+ |
|---|---|---|---|
| H | Cruising Formation 3 | 32/63 140/279 | |
| Cruising Formation 3 | 47/93 207/414 | ||
| # | Formation | Normal Battle Node | AD/AP AS/AS+ |
| # | Formation | Normal Battle Node | AD/AP AS/AS+ |
|---|---|---|---|
| I | Line Ahead Vanguard Phases: 1, 3, 4 |
0/0 0/0 | |
| Line Ahead Phases: 1 |
0/0 0/0 | ||
| # | Formation | Normal Battle Node | AD/AP AS/AS+ |
| # | Empty Node | ||
|---|---|---|---|
| J | 気のせいだった。 大規模艦隊の……応急修理に適した泊地です。 Must be my imagination. This is... a suitable anchorage for emergency repairs on large fleets. | ||
| # | Empty Node | ||
| # | Formation | Night Battle Node | AD/AP AS/AS+ |
|---|---|---|---|
| K | Line Ahead Echelon Phases: 1 |
0/0 0/0 | |
| Line Ahead Phases: 1 |
0/0 0/0 | ||
| # | Formation | Night Battle Node | AD/AP AS/AS+ |
| # | Formation | Boss Battle Node | AD/AP AS/AS+ |
|---|---|---|---|
| L | Cruising Formation 4 Phases: 1, 3, 4 |
73/146 327/654 | |
| Cruising Formation 4 Phases: 1 (Final)
|
93/186 417/834 | ||
| # | Formation | Boss Battle Node | AD/AP AS/AS+ |
| # | Formation | Normal Battle Node | AD/AP AS/AS+ |
|---|---|---|---|
| M | Echelon Line Abreast Phases: 3, 4 |
0/0 0/0 | |
| Echelon Line Abreast Phases: 3, 4 |
0/0 0/0 | ||
| Echelon Line Abreast Phases: 3, 4 |
0/0 0/0 | ||
| # | Formation | Normal Battle Node | AD/AP AS/AS+ |
| # | Formation | Normal Battle Node | AD/AP AS/AS+ |
|---|---|---|---|
| N | Line Ahead Double Line Vanguard Phases: 3, 4 |
0/0 0/0 | |
| # | Formation | Normal Battle Node | AD/AP AS/AS+ |
| # | Formation | Air Defense Node | AD/AP AS/AS+ |
|---|---|---|---|
| O | Diamond Phases: 3, 4 |
55/110 246/492 | |
| Diamond Phases: 3, 4 |
60/119 267/534 | ||
| Diamond Phases: 3, 4 |
69/137 308/615 | ||
| Diamond Phases: 3, 4 |
67/133 297/594 | ||
| # | Formation | Air Defense Node | AD/AP AS/AS+ |
| # | Formation | Air Defense Node | AD/AP AS/AS+ |
|---|---|---|---|
| P | Diamond | 60/119 267/534 | |
| Diamond | 69/137 308/615 | ||
| # | Formation | Air Defense Node | AD/AP AS/AS+ |
| # | Formation | Normal Battle Node | AD/AP AS/AS+ |
|---|---|---|---|
| Q | Echelon Line Abreast Phases: 2, 3, 4 |
0/0 0/0 | |
| Echelon Line Abreast Phases: 2, 3, 4 |
0/0 0/0 | ||
| Echelon Line Abreast Phases: 2, 3, 4 |
0/0 0/0 | ||
| # | Formation | Normal Battle Node | AD/AP AS/AS+ |
| # | Formation | Normal Battle Node | AD/AP AS/AS+ |
|---|---|---|---|
| # | Formation | Normal Battle Node | AD/AP AS/AS+ |
| # | Formation | Air Defense Node | AD/AP AS/AS+ |
|---|---|---|---|
| Q2 | Diamond Phases: 2, 3, 4 |
23/46 102/204 | |
| Diamond Phases: 2, 3, 4 |
28/55 123/246 | ||
| Diamond Phases: 2, 3, 4 |
35/69 153/306 | ||
| Diamond Phases: 2, 3, 4 |
39/78 174/348 | ||
| Diamond Phases: 2, 3, 4 |
44/87 195/390 | ||
| # | Formation | Air Defense Node | AD/AP AS/AS+ |
| # | Formation | Normal Battle Node | AD/AP AS/AS+ |
|---|---|---|---|
| R | Diamond Phases: 3 |
0/0 0/0 | |
| Line Ahead Vanguard Phases: 2 |
0/0 0/0 | ||
| # | Formation | Normal Battle Node | AD/AP AS/AS+ |
| # | Formation | Air Defense Node | AD/AP AS/AS+ |
|---|---|---|---|
| # | Formation | Air Defense Node | AD/AP AS/AS+ |
| # | Formation | Air Defense Node | AD/AP AS/AS+ |
|---|---|---|---|
| S | Diamond Phases: 2, 3, 4 |
23/46 102/204 | |
| Diamond Phases: 2, 3, 4 |
28/55 123/246 | ||
| Diamond Phases: 2, 3, 4 |
35/69 153/306 | ||
| Diamond Phases: 2, 3, 4 |
39/78 174/348 | ||
| Diamond Phases: 2, 3, 4 |
44/87 195/390 | ||
| # | Formation | Air Defense Node | AD/AP AS/AS+ |
| # | Selection Node | ||
|---|---|---|---|
| T | 艦隊の針路を選択できます。提督、どちらの針路をとられますか? You can decide the fleet's course. Admiral, which heading should we take? | ||
| # | Selection Node | ||
| # | Formation | Air Defense Node | AD/AP AS/AS+ |
|---|---|---|---|
| U | Diamond Phases: 2 |
23/46 102/204 | |
| Diamond Phases: 2 |
28/55 123/246 | ||
| Diamond Phases: 2 |
35/69 153/306 | ||
| Diamond Phases: 2 |
39/78 174/348 | ||
| Diamond Phases: 2 |
44/87 195/390 | ||
| # | Formation | Air Defense Node | AD/AP AS/AS+ |
| # | Formation | Boss Battle Node | AD/AP AS/AS+ |
|---|---|---|---|
| V | Line Ahead Echelon Vanguard Phases: 2 |
0/0 0/0 | |
| # | Formation | Boss Battle Node | AD/AP AS/AS+ |
| # | Landing Node | ||
|---|---|---|---|
| # | Landing Node | ||
| # | Empty Node | ||
|---|---|---|---|
| V2 | 敵影を見ず。 No enemy spotted. | ||
| # | Empty Node | ||
| # | Formation | Normal Battle Node | AD/AP AS/AS+ |
|---|---|---|---|
| V3 | Diamond Phases: 3, 4 |
43/85 189/378 | |
| Diamond Phases: 3, 4 |
36/72 161/321 | ||
| Diamond Phases: 3, 4 |
45/89 198/396 | ||
| # | Formation | Normal Battle Node | AD/AP AS/AS+ |
| # | Formation | Normal Battle Node | AD/AP AS/AS+ |
|---|---|---|---|
| W | Cruising Formation 4 Phases: 3 |
25/49 108/216 | |
| Cruising Formation 4 Phases: 4 |
45/89 198/396 | ||
| # | Formation | Normal Battle Node | AD/AP AS/AS+ |
| # | Empty Node | ||
|---|---|---|---|
| W2 | 敵影を見ず。 No enemy spotted. | ||
| # | Empty Node | ||
| # | Formation | Normal Battle Node | AD/AP AS/AS+ |
|---|---|---|---|
| X | Line Ahead Double Line Vanguard Phases: 3 |
0/0 0/0 | |
| # | Formation | Normal Battle Node | AD/AP AS/AS+ |
| # | Empty Node | ||
|---|---|---|---|
| X1 | 敵影を見ず。 No enemy spotted. | ||
| # | Empty Node | ||
| # | Formation | Normal Battle Node | AD/AP AS/AS+ |
|---|---|---|---|
| X2 | Line Ahead Double Line Vanguard Phases: 3 |
0/0 0/0 | |
| # | Formation | Normal Battle Node | AD/AP AS/AS+ |
| # | Formation | Air Defense Node | AD/AP AS/AS+ |
|---|---|---|---|
| X3 | Diamond | 55/110 246/492 | |
| Diamond | 69/137 308/615 | ||
| # | Formation | Air Defense Node | AD/AP AS/AS+ |
| # | Formation | Boss Battle Node | AD/AP AS/AS+ |
|---|---|---|---|
| Y | Cruising Formation 4 Phases: 3, 4 |
117/233 522/1044 | |
| Cruising Formation 4 Phases: 3 (Final)
|
132/263 590/1179 | ||
| # | Formation | Boss Battle Node | AD/AP AS/AS+ |
| # | Formation | Normal Battle Node | AD/AP AS/AS+ |
|---|---|---|---|
| Y1 | Line Ahead Vanguard Phases: 3, 4 |
0/0 0/0 | |
| Line Ahead Phases: 3 |
0/0 0/0 | ||
| # | Formation | Normal Battle Node | AD/AP AS/AS+ |
| # | Formation | Normal Battle Node | AD/AP AS/AS+ |
|---|---|---|---|
| Y2 | Cruising Formation 3 Phases: 3, 4 |
74/147 329/657 | |
| Cruising Formation 3 Phases: 3 |
89/177 396/792 | ||
| # | Formation | Normal Battle Node | AD/AP AS/AS+ |
| # | Empty Node | ||
|---|---|---|---|
| Y3 | 敵影を見ず。 No enemy spotted. | ||
| # | Empty Node | ||
| # | Empty Node | ||
|---|---|---|---|
| Y4 | 敵影を見ず。 No enemy spotted. | ||
| # | Empty Node | ||
| # | Formation | Normal Battle Node | AD/AP AS/AS+ |
|---|---|---|---|
| Y5 | Line Ahead Diamond |
0/0 0/0 | |
| # | Formation | Normal Battle Node | AD/AP AS/AS+ |
| # | Formation | Boss Battle Node | AD/AP AS/AS+ |
|---|---|---|---|
| Z | Cruising Formation 4 Phases: 4 |
72/143 321/642 | |
| Cruising Formation 4 Phases: 4 (Final)
|
89/177 396/792 | ||
| # | Formation | Boss Battle Node | AD/AP AS/AS+ |
| # | Formation | Normal Battle Node | AD/AP AS/AS+ |
|---|---|---|---|
| Z1 | Line Ahead Diamond Vanguard Phases: 4 |
45/89 198/396 | |
| # | Formation | Normal Battle Node | AD/AP AS/AS+ |
| # | Formation | Normal Battle Node | AD/AP AS/AS+ |
|---|---|---|---|
| Z2 | Cruising Formation 4 Phases: 4 |
72/143 321/642 | |
| Cruising Formation 4 Phases: 4 |
89/177 396/792 | ||
| # | Formation | Normal Battle Node | AD/AP AS/AS+ |
| # | Formation | Air Raids | AD/AP AS/AS+ |
|---|---|---|---|
| AB | Diamond | 44/87 195/390 | |
| Diamond | 55/110 246/492 | ||
| Diamond | 60/119 267/534 | ||
| Diamond | 23/46 102/204 | ||
| Diamond | 67/133 297/594 | ||
| # | Formation | Air Raids | AD/AP AS/AS+ |
| # | Formation | Air Defense Node | AD/AP AS/AS+ |
|---|---|---|---|
| A | Diamond Phases: 1, 3, 4 |
46/92 206/411 | |
| Diamond Phases: 1, 3, 4 |
69/138 309/618 | ||
| Diamond Phases: 1, 3, 4 |
109/217 486/972 | ||
| Diamond Phases: 1, 3, 4 |
92/184 413/825 | ||
| # | Formation | Air Defense Node | AD/AP AS/AS+ |
| # | Formation | Normal Battle Node | AD/AP AS/AS+ |
|---|---|---|---|
| B | Echelon Line Abreast Phases: 1, 2, 3, 4 |
0/0 0/0 | |
| Echelon Line Abreast Phases: 1, 3, 4 |
0/0 0/0 | ||
| Echelon Line Abreast Phases: 1, 3, 4 |
0/0 0/0 | ||
| # | Formation | Normal Battle Node | AD/AP AS/AS+ |
| # | Selection Node | ||
|---|---|---|---|
| C | 艦隊の針路を選択できます。提督、どちらの針路をとられますか? You can decide the fleet's course. Admiral, which heading should we take? | ||
| # | Selection Node | ||
| # | Formation | Air Defense Node | AD/AP AS/AS+ |
|---|---|---|---|
| D | Diamond Phases: 1, 3, 4 |
46/92 206/411 | |
| Diamond Phases: 1, 3, 4 |
69/138 309/618 | ||
| Diamond Phases: 1, 3, 4 |
109/217 486/972 | ||
| Diamond Phases: 1, 3, 4 |
92/184 413/825 | ||
| # | Formation | Air Defense Node | AD/AP AS/AS+ |
| # | Formation | Normal Battle Node | AD/AP AS/AS+ |
|---|---|---|---|
| E | Echelon Line Abreast Phases: 1, 3 |
0/0 0/0 | |
| Echelon Line Abreast Phases: 1, 3, 4 |
0/0 0/0 | ||
| Echelon Line Abreast Phases: 1, 3, 4 |
0/0 0/0 | ||
| # | Formation | Normal Battle Node | AD/AP AS/AS+ |
| # | Formation | Air Defense Node | AD/AP AS/AS+ |
|---|---|---|---|
| F | Diamond Phases: 3, 4 |
46/92 206/411 | |
| Diamond Phases: 3 |
69/138 309/618 | ||
| Diamond Phases: 3, 4 |
109/217 486/972 | ||
| Diamond Phases: 3, 4 |
92/184 413/825 | ||
| # | Formation | Air Defense Node | AD/AP AS/AS+ |
| # | Formation | Air Defense Node | AD/AP AS/AS+ |
|---|---|---|---|
| G | Diamond Phases: 1, 3, 4 |
44/87 195/390 | |
| Diamond Phases: 1 |
17/33 72/144 | ||
| Diamond Phases: 1, 3 |
55/110 246/492 | ||
| Diamond Phases: 1, 3, 4 |
60/119 267/534 | ||
| Diamond Phases: 1, 3 |
67/133 297/594 | ||
| # | Formation | Air Defense Node | AD/AP AS/AS+ |
| # | Formation | Normal Battle Node | AD/AP AS/AS+ |
|---|---|---|---|
| H | Cruising Formation 3 Phases: 1, 3 |
32/63 140/279 | |
| Cruising Formation 3 Phases: 3 |
32/63 140/279 | ||
| # | Formation | Normal Battle Node | AD/AP AS/AS+ |
| # | Formation | Normal Battle Node | AD/AP AS/AS+ |
|---|---|---|---|
| I | Line Ahead Vanguard Phases: 1, 3, 4 |
0/0 0/0 | |
| Line Ahead Phases: 1 |
0/0 0/0 | ||
| # | Formation | Normal Battle Node | AD/AP AS/AS+ |
| # | Empty Node | ||
|---|---|---|---|
| J | 気のせいだった。 大規模艦隊の……応急修理に適した泊地です。 Must be my imagination. This is... a suitable anchorage for emergency repairs on large fleets. | ||
| # | Empty Node | ||
| # | Formation | Night Battle Node | AD/AP AS/AS+ |
|---|---|---|---|
| K | Line Ahead Echelon Phases: 1 |
0/0 0/0 | |
| Line Ahead Phases: 1 |
0/0 0/0 | ||
| # | Formation | Night Battle Node | AD/AP AS/AS+ |
| # | Formation | Boss Battle Node | AD/AP AS/AS+ |
|---|---|---|---|
| L | Cruising Formation 4 Phases: 1, 4 |
65/129 288/576 | |
| Cruising Formation 4 Phases: 1 (Final)
|
85/169 378/756 | ||
| # | Formation | Boss Battle Node | AD/AP AS/AS+ |
| # | Formation | Normal Battle Node | AD/AP AS/AS+ |
|---|---|---|---|
| M | Echelon Line Abreast Phases: 3, 4 |
0/0 0/0 | |
| Echelon Line Abreast Phases: 3, 4 |
0/0 0/0 | ||
| Echelon Line Abreast Phases: 3, 4 |
0/0 0/0 | ||
| # | Formation | Normal Battle Node | AD/AP AS/AS+ |
| # | Formation | Normal Battle Node | AD/AP AS/AS+ |
|---|---|---|---|
| N | Line Ahead Double Line Vanguard Phases: 3, 4 |
0/0 0/0 | |
| # | Formation | Normal Battle Node | AD/AP AS/AS+ |
| # | Formation | Air Defense Node | AD/AP AS/AS+ |
|---|---|---|---|
| O | Diamond Phases: 3, 4 |
44/87 195/390 | |
| Diamond Phases: 3, 4 |
55/110 246/492 | ||
| Diamond Phases: 3, 4 |
60/119 267/534 | ||
| Diamond Phases: 3, 4 |
67/133 297/594 | ||
| # | Formation | Air Defense Node | AD/AP AS/AS+ |
| # | Formation | Air Defense Node | AD/AP AS/AS+ |
|---|---|---|---|
| P | Diamond Phases: 4 |
44/87 195/390 | |
| Diamond Phases: 4 |
17/33 72/144 | ||
| Diamond Phases: 4 |
55/110 246/492 | ||
| Diamond Phases: 3 |
60/119 267/534 | ||
| Diamond Phases: 3, 4 |
67/133 297/594 | ||
| # | Formation | Air Defense Node | AD/AP AS/AS+ |
| # | Formation | Normal Battle Node | AD/AP AS/AS+ |
|---|---|---|---|
| Q | Echelon Line Abreast Phases: 2, 3 |
0/0 0/0 | |
| Echelon Line Abreast Phases: 2, 3, 4 |
0/0 0/0 | ||
| Echelon Line Abreast Phases: 2, 3 |
0/0 0/0 | ||
| # | Formation | Normal Battle Node | AD/AP AS/AS+ |
| # | Formation | Normal Battle Node | AD/AP AS/AS+ |
|---|---|---|---|
| Q1 | Line Abreast | 0/0 0/0 | |
| Echelon Line Abreast |
0/0 0/0 | ||
| # | Formation | Normal Battle Node | AD/AP AS/AS+ |
| # | Formation | Air Defense Node | AD/AP AS/AS+ |
|---|---|---|---|
| Q2 | Diamond Phases: 2, 3 |
12/23 51/102 | |
| Diamond Phases: 2, 3 |
17/33 72/144 | ||
| Diamond Phases: 2, 3, 4 |
23/46 102/204 | ||
| Diamond Phases: 2, 3 |
28/55 123/246 | ||
| # | Formation | Air Defense Node | AD/AP AS/AS+ |
| # | Formation | Normal Battle Node | AD/AP AS/AS+ |
|---|---|---|---|
| R | Diamond Phases: 3 |
0/0 0/0 | |
| Line Ahead Vanguard Phases: 2 |
0/0 0/0 | ||
| # | Formation | Normal Battle Node | AD/AP AS/AS+ |
| # | Formation | Air Defense Node | AD/AP AS/AS+ |
|---|---|---|---|
| # | Formation | Air Defense Node | AD/AP AS/AS+ |
| # | Formation | Air Defense Node | AD/AP AS/AS+ |
|---|---|---|---|
| S | Diamond Phases: 2, 3 |
12/23 51/102 | |
| Diamond Phases: 2, 3 |
17/33 72/144 | ||
| Diamond Phases: 2, 3, 4 |
23/46 102/204 | ||
| Diamond Phases: 2, 3 |
28/55 123/246 | ||
| # | Formation | Air Defense Node | AD/AP AS/AS+ |
| # | Selection Node | ||
|---|---|---|---|
| T | 艦隊の針路を選択できます。提督、どちらの針路をとられますか? You can decide the fleet's course. Admiral, which heading should we take? | ||
| # | Selection Node | ||
| # | Formation | Air Defense Node | AD/AP AS/AS+ |
|---|---|---|---|
| U | Diamond Phases: 2 |
12/23 51/102 | |
| Diamond Phases: 2 |
17/33 72/144 | ||
| Diamond Phases: 2 |
23/46 102/204 | ||
| Diamond Phases: 2 |
28/55 123/246 | ||
| # | Formation | Air Defense Node | AD/AP AS/AS+ |
| # | Formation | Boss Battle Node | AD/AP AS/AS+ |
|---|---|---|---|
| V | Line Ahead Echelon Vanguard Phases: 2 |
0/0 0/0 | |
| # | Formation | Boss Battle Node | AD/AP AS/AS+ |
| # | Landing Node | ||
|---|---|---|---|
| # | Landing Node | ||
| # | Empty Node | ||
|---|---|---|---|
| V2 | 敵影を見ず。 No enemy spotted. | ||
| # | Empty Node | ||
| # | Formation | Normal Battle Node | AD/AP AS/AS+ |
|---|---|---|---|
| V3 | Diamond Phases: 3 |
36/72 161/321 | |
| Diamond Phases: 3, 4 |
43/85 189/378 | ||
| Diamond Phases: 3 |
36/72 161/321 | ||
| # | Formation | Normal Battle Node | AD/AP AS/AS+ |
| # | Formation | Normal Battle Node | AD/AP AS/AS+ |
|---|---|---|---|
| W | Cruising Formation 4 Phases: 3 |
25/49 108/216 | |
| Cruising Formation 4 Phases: 4 |
45/89 198/396 | ||
| # | Formation | Normal Battle Node | AD/AP AS/AS+ |
| # | Empty Node | ||
|---|---|---|---|
| W2 | 敵影を見ず。 No enemy spotted. | ||
| # | Empty Node | ||
| # | Formation | Normal Battle Node | AD/AP AS/AS+ |
|---|---|---|---|
| X | Line Ahead Double Line Vanguard Phases: 3 |
0/0 0/0 | |
| # | Formation | Normal Battle Node | AD/AP AS/AS+ |
| # | Empty Node | ||
|---|---|---|---|
| X1 | 敵影を見ず。 No enemy spotted. | ||
| # | Empty Node | ||
| # | Formation | Normal Battle Node | AD/AP AS/AS+ |
|---|---|---|---|
| X2 | Line Ahead Double Line Vanguard Phases: 3, 4 |
0/0 0/0 | |
| # | Formation | Normal Battle Node | AD/AP AS/AS+ |
| # | Formation | Air Defense Node | AD/AP AS/AS+ |
|---|---|---|---|
| X3 | Diamond Phases: 3 |
44/87 195/390 | |
| Diamond | 17/33 72/144 | ||
| Diamond Phases: 3 |
60/119 267/534 | ||
| Diamond | 67/133 297/594 | ||
| # | Formation | Air Defense Node | AD/AP AS/AS+ |
| # | Formation | Boss Battle Node | AD/AP AS/AS+ |
|---|---|---|---|
| Y | Cruising Formation 4 Phases: 3, 4 |
62/124 278/555 | |
| Cruising Formation 4 Phases: 3 (Final)
|
77/154 345/690 | ||
| # | Formation | Boss Battle Node | AD/AP AS/AS+ |
| # | Formation | Normal Battle Node | AD/AP AS/AS+ |
|---|---|---|---|
| Y1 | Line Ahead Vanguard Phases: 3, 4 |
0/0 0/0 | |
| Line Ahead Phases: 3 |
0/0 0/0 | ||
| # | Formation | Normal Battle Node | AD/AP AS/AS+ |
| # | Formation | Normal Battle Node | AD/AP AS/AS+ |
|---|---|---|---|
| Y2 | Cruising Formation 3 Phases: 3, 4 |
53/105 234/468 | |
| Cruising Formation 3 Phases: 3 |
68/135 302/603 | ||
| # | Formation | Normal Battle Node | AD/AP AS/AS+ |
| # | Empty Node | ||
|---|---|---|---|
| Y3 | 敵影を見ず。 No enemy spotted. | ||
| # | Empty Node | ||
| # | Empty Node | ||
|---|---|---|---|
| Y4 | 敵影を見ず。 No enemy spotted. | ||
| # | Empty Node | ||
| # | Formation | Normal Battle Node | AD/AP AS/AS+ |
|---|---|---|---|
| Y5 | Line Ahead Diamond Phases: 3 |
0/0 0/0 | |
| Line Ahead | 0/0 0/0 | ||
| # | Formation | Normal Battle Node | AD/AP AS/AS+ |
| # | Formation | Boss Battle Node | AD/AP AS/AS+ |
|---|---|---|---|
| Z | Cruising Formation 4 Phases: 4 |
44/88 197/393 | |
| Cruising Formation 4 Phases: 4 (Final)
|
72/143 321/642 | ||
| # | Formation | Boss Battle Node | AD/AP AS/AS+ |
| # | Formation | Normal Battle Node | AD/AP AS/AS+ |
|---|---|---|---|
| Z1 | Line Ahead Diamond Vanguard Phases: 4 |
45/89 198/396 | |
| # | Formation | Normal Battle Node | AD/AP AS/AS+ |
| # | Formation | Normal Battle Node | AD/AP AS/AS+ |
|---|---|---|---|
| Z2 | Cruising Formation 4 Phases: 4 |
44/88 197/393 | |
| Cruising Formation 4 Phases: 4 |
72/143 321/642 | ||
| # | Formation | Normal Battle Node | AD/AP AS/AS+ |
| # | Formation | Air Raids | AD/AP AS/AS+ |
|---|---|---|---|
| AB | Diamond | 44/87 195/390 | |
| Diamond | 55/110 246/492 | ||
| Diamond | 23/46 102/204 | ||
| # | Formation | Air Raids | AD/AP AS/AS+ |
| # | Formation | Air Defense Node | AD/AP AS/AS+ |
|---|---|---|---|
| A | Diamond Phases: 1, 3, 4 |
46/92 206/411 | |
| Diamond Phases: 1, 3, 4 |
69/138 309/618 | ||
| # | Formation | Air Defense Node | AD/AP AS/AS+ |
| # | Formation | Normal Battle Node | AD/AP AS/AS+ |
|---|---|---|---|
| B | Echelon Line Abreast Phases: 1, 3, 4 |
0/0 0/0 | |
| Echelon Line Abreast Phases: 1, 2, 3, 4 |
0/0 0/0 | ||
| # | Formation | Normal Battle Node | AD/AP AS/AS+ |
| # | Selection Node | ||
|---|---|---|---|
| C | 艦隊の針路を選択できます。提督、どちらの針路をとられますか? You can decide the fleet's course. Admiral, which heading should we take? | ||
| # | Selection Node | ||
| # | Formation | Air Defense Node | AD/AP AS/AS+ |
|---|---|---|---|
| D | Diamond Phases: 1, 3, 4 |
46/92 206/411 | |
| Diamond Phases: 1, 3 |
69/138 309/618 | ||
| # | Formation | Air Defense Node | AD/AP AS/AS+ |
| # | Formation | Normal Battle Node | AD/AP AS/AS+ |
|---|---|---|---|
| E | Echelon Line Abreast Phases: 1, 3, 4 |
0/0 0/0 | |
| Echelon Line Abreast Phases: 1, 3 |
0/0 0/0 | ||
| # | Formation | Normal Battle Node | AD/AP AS/AS+ |
| # | Formation | Air Defense Node | AD/AP AS/AS+ |
|---|---|---|---|
| F | Diamond Phases: 3, 4 |
46/92 206/411 | |
| Diamond Phases: 3, 4 |
69/138 309/618 | ||
| # | Formation | Air Defense Node | AD/AP AS/AS+ |
| # | Formation | Air Defense Node | AD/AP AS/AS+ |
|---|---|---|---|
| G | Diamond Phases: 1, 3 |
44/87 195/390 | |
| Diamond Phases: 1, 4 |
17/33 72/144 | ||
| Diamond Phases: 1 |
55/110 246/492 | ||
| # | Formation | Air Defense Node | AD/AP AS/AS+ |
| # | Formation | Normal Battle Node | AD/AP AS/AS+ |
|---|---|---|---|
| H | Cruising Formation 3 Phases: 1, 3 |
24/47 104/207 | |
| Cruising Formation 3 | 32/63 140/279 | ||
| # | Formation | Normal Battle Node | AD/AP AS/AS+ |
| # | Formation | Normal Battle Node | AD/AP AS/AS+ |
|---|---|---|---|
| I | Line Ahead Vanguard Phases: 1, 3, 4 |
0/0 0/0 | |
| Line Ahead Phases: 1 |
0/0 0/0 | ||
| # | Formation | Normal Battle Node | AD/AP AS/AS+ |
| # | Empty Node | ||
|---|---|---|---|
| J | 気のせいだった。 大規模艦隊の……応急修理に適した泊地です。 Must be my imagination. This is... a suitable anchorage for emergency repairs on large fleets. | ||
| # | Empty Node | ||
| # | Formation | Night Battle Node | AD/AP AS/AS+ |
|---|---|---|---|
| K | Line Ahead Echelon Phases: 1, 3 |
0/0 0/0 | |
| Line Ahead Phases: 1 |
0/0 0/0 | ||
| # | Formation | Night Battle Node | AD/AP AS/AS+ |
| # | Formation | Boss Battle Node | AD/AP AS/AS+ |
|---|---|---|---|
| L | Cruising Formation 4 Phases: 1, 3, 4 |
51/102 228/456 | |
| Cruising Formation 4 Phases: 1 (Final)
|
55/109 243/486 | ||
| # | Formation | Boss Battle Node | AD/AP AS/AS+ |
| # | Formation | Normal Battle Node | AD/AP AS/AS+ |
|---|---|---|---|
| M | Echelon Line Abreast Phases: 3, 4 |
0/0 0/0 | |
| Echelon Line Abreast Phases: 4 |
0/0 0/0 | ||
| # | Formation | Normal Battle Node | AD/AP AS/AS+ |
| # | Formation | Normal Battle Node | AD/AP AS/AS+ |
|---|---|---|---|
| N | Line Ahead Double Line Vanguard Phases: 4 |
0/0 0/0 | |
| # | Formation | Normal Battle Node | AD/AP AS/AS+ |
| # | Formation | Air Defense Node | AD/AP AS/AS+ |
|---|---|---|---|
| O | Diamond Phases: 3, 4 |
44/87 195/390 | |
| Diamond Phases: 3, 4 |
17/33 72/144 | ||
| Diamond Phases: 4 |
55/110 246/492 | ||
| # | Formation | Air Defense Node | AD/AP AS/AS+ |
| # | Formation | Air Defense Node | AD/AP AS/AS+ |
|---|---|---|---|
| # | Formation | Air Defense Node | AD/AP AS/AS+ |
| # | Formation | Normal Battle Node | AD/AP AS/AS+ |
|---|---|---|---|
| Q | Echelon Line Abreast Phases: 2, 3 |
0/0 0/0 | |
| Echelon Line Abreast Phases: 2, 3 |
0/0 0/0 | ||
| # | Formation | Normal Battle Node | AD/AP AS/AS+ |
| # | Formation | Normal Battle Node | AD/AP AS/AS+ |
|---|---|---|---|
| Q1 | Echelon Line Abreast Phases: 2 |
0/0 0/0 | |
| # | Formation | Normal Battle Node | AD/AP AS/AS+ |
| # | Formation | Air Defense Node | AD/AP AS/AS+ |
|---|---|---|---|
| Q2 | Diamond Phases: 2, 3 |
12/23 51/102 | |
| Diamond Phases: 2, 3 |
17/33 72/144 | ||
| Diamond Phases: 2, 3 |
23/46 102/204 | ||
| # | Formation | Air Defense Node | AD/AP AS/AS+ |
| # | Formation | Normal Battle Node | AD/AP AS/AS+ |
|---|---|---|---|
| R | Diamond Phases: 3 |
0/0 0/0 | |
| Line Ahead Vanguard Phases: 2 |
0/0 0/0 | ||
| # | Formation | Normal Battle Node | AD/AP AS/AS+ |
| # | Formation | Air Defense Node | AD/AP AS/AS+ |
|---|---|---|---|
| # | Formation | Air Defense Node | AD/AP AS/AS+ |
| # | Formation | Air Defense Node | AD/AP AS/AS+ |
|---|---|---|---|
| S | Diamond Phases: 2, 3 |
12/23 51/102 | |
| Diamond Phases: 2, 3 |
17/33 72/144 | ||
| Diamond Phases: 2, 3 |
23/46 102/204 | ||
| # | Formation | Air Defense Node | AD/AP AS/AS+ |
| # | Selection Node | ||
|---|---|---|---|
| T | 艦隊の針路を選択できます。提督、どちらの針路をとられますか? You can decide the fleet's course. Admiral, which heading should we take? | ||
| # | Selection Node | ||
| # | Formation | Air Defense Node | AD/AP AS/AS+ |
|---|---|---|---|
| U | Diamond Phases: 2 |
12/23 51/102 | |
| Diamond Phases: 2 |
17/33 72/144 | ||
| Diamond Phases: 2 |
23/46 102/204 | ||
| # | Formation | Air Defense Node | AD/AP AS/AS+ |
| # | Formation | Boss Battle Node | AD/AP AS/AS+ |
|---|---|---|---|
| V | Line Ahead Echelon Vanguard Phases: 2 |
0/0 0/0 | |
| # | Formation | Boss Battle Node | AD/AP AS/AS+ |
| # | Landing Node | ||
|---|---|---|---|
| # | Landing Node | ||
| # | Empty Node | ||
|---|---|---|---|
| V2 | 敵影を見ず。 No enemy spotted. | ||
| # | Empty Node | ||
| # | Formation | Normal Battle Node | AD/AP AS/AS+ |
|---|---|---|---|
| V3 | Diamond Phases: 3 |
36/72 161/321 | |
| Diamond Phases: 3 |
43/85 189/378 | ||
| Diamond Phases: 3 |
36/72 161/321 | ||
| # | Formation | Normal Battle Node | AD/AP AS/AS+ |
| # | Formation | Normal Battle Node | AD/AP AS/AS+ |
|---|---|---|---|
| W | Cruising Formation 4 Phases: 3 |
11/22 48/96 | |
| Cruising Formation 4 | 15/29 63/126 | ||
| # | Formation | Normal Battle Node | AD/AP AS/AS+ |
| # | Empty Node | ||
|---|---|---|---|
| W2 | 敵影を見ず。 No enemy spotted. | ||
| # | Empty Node | ||
| # | Formation | Normal Battle Node | AD/AP AS/AS+ |
|---|---|---|---|
| X | Line Ahead Double Line Vanguard Phases: 3 |
0/0 0/0 | |
| # | Formation | Normal Battle Node | AD/AP AS/AS+ |
| # | Empty Node | ||
|---|---|---|---|
| X1 | 敵影を見ず。 No enemy spotted. | ||
| # | Empty Node | ||
| # | Formation | Normal Battle Node | AD/AP AS/AS+ |
|---|---|---|---|
| X2 | Line Ahead Double Line Vanguard Phases: 3 |
0/0 0/0 | |
| # | Formation | Normal Battle Node | AD/AP AS/AS+ |
| # | Formation | Air Defense Node | AD/AP AS/AS+ |
|---|---|---|---|
| X3 | Diamond | 44/87 195/390 | |
| Diamond | 55/110 246/492 | ||
| # | Formation | Air Defense Node | AD/AP AS/AS+ |
| # | Formation | Boss Battle Node | AD/AP AS/AS+ |
|---|---|---|---|
| Y | Cruising Formation 4 Phases: 3, 4 |
46/92 206/411 | |
| Cruising Formation 4 Phases: 3 (Final)
|
52/103 230/459 | ||
| # | Formation | Boss Battle Node | AD/AP AS/AS+ |
| # | Formation | Normal Battle Node | AD/AP AS/AS+ |
|---|---|---|---|
| Y1 | Line Ahead Vanguard Phases: 3, 4 |
0/0 0/0 | |
| Line Ahead Phases: 3 |
0/0 0/0 | ||
| # | Formation | Normal Battle Node | AD/AP AS/AS+ |
| # | Formation | Normal Battle Node | AD/AP AS/AS+ |
|---|---|---|---|
| Y2 | Cruising Formation 3 Phases: 3, 4 |
15/30 66/132 | |
| Cruising Formation 3 Phases: 3 |
21/41 90/180 | ||
| # | Formation | Normal Battle Node | AD/AP AS/AS+ |
| # | Empty Node | ||
|---|---|---|---|
| Y3 | 敵影を見ず。 No enemy spotted. | ||
| # | Empty Node | ||
| # | Empty Node | ||
|---|---|---|---|
| Y4 | 敵影を見ず。 No enemy spotted. | ||
| # | Empty Node | ||
| # | Formation | Normal Battle Node | AD/AP AS/AS+ |
|---|---|---|---|
| Y5 | Line Ahead Diamond |
0/0 0/0 | |
| Line Ahead | 0/0 0/0 | ||
| # | Formation | Normal Battle Node | AD/AP AS/AS+ |
| # | Formation | Boss Battle Node | AD/AP AS/AS+ |
|---|---|---|---|
| Z | Cruising Formation 4 Phases: 4 |
6/11 24/48 | |
| Cruising Formation 4 Phases: 4 (Final)
|
17/33 72/144 | ||
| # | Formation | Boss Battle Node | AD/AP AS/AS+ |
| # | Formation | Normal Battle Node | AD/AP AS/AS+ |
|---|---|---|---|
| Z1 | Line Ahead Diamond Vanguard Phases: 4 |
36/72 161/321 | |
| # | Formation | Normal Battle Node | AD/AP AS/AS+ |
| # | Formation | Normal Battle Node | AD/AP AS/AS+ |
|---|---|---|---|
| Z2 | Cruising Formation 4 Phases: 4 |
6/11 24/48 | |
| Cruising Formation 4 Phases: 4 |
17/33 72/144 | ||
| # | Formation | Normal Battle Node | AD/AP AS/AS+ |
Ship Drops:
| Ship drops | |||||||||||||||||||||||||||||||||||||||||||||||||||||||||||||||||||||||||||||||||||||||||||||||||||
|---|---|---|---|---|---|---|---|---|---|---|---|---|---|---|---|---|---|---|---|---|---|---|---|---|---|---|---|---|---|---|---|---|---|---|---|---|---|---|---|---|---|---|---|---|---|---|---|---|---|---|---|---|---|---|---|---|---|---|---|---|---|---|---|---|---|---|---|---|---|---|---|---|---|---|---|---|---|---|---|---|---|---|---|---|---|---|---|---|---|---|---|---|---|---|---|---|---|---|---|
| Type | Ship? | H | L | V | V3 | W | Y | Y2 | Z | Z1 | Z2 | ||||||||||||||||||||||||||||||||||||||||||||||||||||||||||||||||||||||||||||||||||||||||
| DE | Hirato | Casual+ | Casual+ | ||||||||||||||||||||||||||||||||||||||||||||||||||||||||||||||||||||||||||||||||||||||||||||||||
| DE | Yashiro | Easy+ | Casual+ | ||||||||||||||||||||||||||||||||||||||||||||||||||||||||||||||||||||||||||||||||||||||||||||||||
| DD | Uzuki | Medium+ | Casual+ | ||||||||||||||||||||||||||||||||||||||||||||||||||||||||||||||||||||||||||||||||||||||||||||||||
| DD | Amagiri | Casual+ | Casual+ | ||||||||||||||||||||||||||||||||||||||||||||||||||||||||||||||||||||||||||||||||||||||||||||||||
| DD | Sagiri | Casual+ | Casual+ | ||||||||||||||||||||||||||||||||||||||||||||||||||||||||||||||||||||||||||||||||||||||||||||||||
| DD | Harusame | Medium+ | Casual+ | Casual+ | Casual+ | Casual+ | Casual+ | Hard+ | Casual+ | ||||||||||||||||||||||||||||||||||||||||||||||||||||||||||||||||||||||||||||||||||||||||||
| DD | Umikaze | Casual+ | |||||||||||||||||||||||||||||||||||||||||||||||||||||||||||||||||||||||||||||||||||||||||||||||||
| DD | Kawakaze | Casual+ | |||||||||||||||||||||||||||||||||||||||||||||||||||||||||||||||||||||||||||||||||||||||||||||||||
| DD | Minegumo | Casual+ | Casual+ | ||||||||||||||||||||||||||||||||||||||||||||||||||||||||||||||||||||||||||||||||||||||||||||||||
| DD | Hatsukaze | Casual+ | |||||||||||||||||||||||||||||||||||||||||||||||||||||||||||||||||||||||||||||||||||||||||||||||||
| DD | Amatsukaze | Hard+ | Casual+ | ||||||||||||||||||||||||||||||||||||||||||||||||||||||||||||||||||||||||||||||||||||||||||||||||
| DD | Suzunami | Easy+ | Easy+ | Casual+ | |||||||||||||||||||||||||||||||||||||||||||||||||||||||||||||||||||||||||||||||||||||||||||||||
| CA | Mikuma | Casual+ | Hard+ | Casual+ | |||||||||||||||||||||||||||||||||||||||||||||||||||||||||||||||||||||||||||||||||||||||||||||||
| FBB | South Dakota | Medium+ | Casual+ | ||||||||||||||||||||||||||||||||||||||||||||||||||||||||||||||||||||||||||||||||||||||||||||||||
| CV | Graf Zeppelin | Hard+ | Casual+ | ||||||||||||||||||||||||||||||||||||||||||||||||||||||||||||||||||||||||||||||||||||||||||||||||
| CV | Saratoga | Hard+ | Casual+ | ||||||||||||||||||||||||||||||||||||||||||||||||||||||||||||||||||||||||||||||||||||||||||||||||
| CV | Ark Royal | Medium+ | Casual+ | ||||||||||||||||||||||||||||||||||||||||||||||||||||||||||||||||||||||||||||||||||||||||||||||||
| CL | Kitakami | Hard+ | Casual+ | Casual+ | Casual+ | Casual+ | Casual+ | Casual+ | Casual+ | ||||||||||||||||||||||||||||||||||||||||||||||||||||||||||||||||||||||||||||||||||||||||||
| CL | Ooi | Hard+ | Casual+ | Casual+ | Easy+ | Casual+ | Casual+ | Casual+ | Casual+ | ||||||||||||||||||||||||||||||||||||||||||||||||||||||||||||||||||||||||||||||||||||||||||
| CL | Nagara | Casual+ | Casual+ | Casual+ | Casual+ | Casual+ | Casual+ | Casual+ | Casual+ | Easy+ | Casual+ | ||||||||||||||||||||||||||||||||||||||||||||||||||||||||||||||||||||||||||||||||||||||||
| CL | Kinu | Casual+ | Easy+ | Casual+ | Hard+ | Hard+ | |||||||||||||||||||||||||||||||||||||||||||||||||||||||||||||||||||||||||||||||||||||||||||||
| CL | Abukuma | Casual+ | Casual+ | Casual+ | Medium+ | Medium+ | |||||||||||||||||||||||||||||||||||||||||||||||||||||||||||||||||||||||||||||||||||||||||||||
| CL | Sendai | Easy+ | Casual+ | Casual+ | Casual+ | Casual+ | Casual+ | Casual+ | Casual+ | Medium+ | Casual+ | ||||||||||||||||||||||||||||||||||||||||||||||||||||||||||||||||||||||||||||||||||||||||
| CL | Yuubari | Casual+ | Casual+ | Hard+ | Casual+ | Medium+ | Easy+ | ||||||||||||||||||||||||||||||||||||||||||||||||||||||||||||||||||||||||||||||||||||||||||||
| CA | Myoukou | Casual+ | Casual+ | Hard+ | Casual+ | Casual+ | Easy+ | Casual+ | Casual+ | ||||||||||||||||||||||||||||||||||||||||||||||||||||||||||||||||||||||||||||||||||||||||||
| CA | Atago | Casual+ | Casual+ | ||||||||||||||||||||||||||||||||||||||||||||||||||||||||||||||||||||||||||||||||||||||||||||||||
| CA | Suzuya | Casual+ | Casual+ | Medium+ | Casual+ | Casual+ | Casual+ | Casual+ | Casual+ | ||||||||||||||||||||||||||||||||||||||||||||||||||||||||||||||||||||||||||||||||||||||||||
| CA | Kumano | Casual+ | Casual+ | Easy+ | Casual+ | Casual+ | Casual+ | Casual+ | Casual+ | ||||||||||||||||||||||||||||||||||||||||||||||||||||||||||||||||||||||||||||||||||||||||||
| CA | Chikuma | Easy+ | Casual+ | ||||||||||||||||||||||||||||||||||||||||||||||||||||||||||||||||||||||||||||||||||||||||||||||||
| FBB | Kongou | Casual+ | Casual+ | ||||||||||||||||||||||||||||||||||||||||||||||||||||||||||||||||||||||||||||||||||||||||||||||||
| FBB | Hiei | Casual+ | Hard+ | Medium+ | Casual+ | Casual+ | |||||||||||||||||||||||||||||||||||||||||||||||||||||||||||||||||||||||||||||||||||||||||||||
| FBB | Haruna | Casual+ | Casual+ | ||||||||||||||||||||||||||||||||||||||||||||||||||||||||||||||||||||||||||||||||||||||||||||||||
| FBB | Kirishima | Casual+ | Easy+ | Casual+ | |||||||||||||||||||||||||||||||||||||||||||||||||||||||||||||||||||||||||||||||||||||||||||||||
| BB | Fusou | Casual+ | Casual+ | ||||||||||||||||||||||||||||||||||||||||||||||||||||||||||||||||||||||||||||||||||||||||||||||||
| BB | Yamashiro | Easy+ | Casual+ | ||||||||||||||||||||||||||||||||||||||||||||||||||||||||||||||||||||||||||||||||||||||||||||||||
| BB | Ise | Casual+ | Casual+ | ||||||||||||||||||||||||||||||||||||||||||||||||||||||||||||||||||||||||||||||||||||||||||||||||
| BB | Hyuuga | Casual+ | Casual+ | ||||||||||||||||||||||||||||||||||||||||||||||||||||||||||||||||||||||||||||||||||||||||||||||||
| BB | Nagato | Casual+ | |||||||||||||||||||||||||||||||||||||||||||||||||||||||||||||||||||||||||||||||||||||||||||||||||
| BB | Mutsu | Casual+ | |||||||||||||||||||||||||||||||||||||||||||||||||||||||||||||||||||||||||||||||||||||||||||||||||
| CV | Akagi | Casual+ | |||||||||||||||||||||||||||||||||||||||||||||||||||||||||||||||||||||||||||||||||||||||||||||||||
| CV | Kaga | Casual+ | |||||||||||||||||||||||||||||||||||||||||||||||||||||||||||||||||||||||||||||||||||||||||||||||||
| CV | Souryuu | Casual+ | |||||||||||||||||||||||||||||||||||||||||||||||||||||||||||||||||||||||||||||||||||||||||||||||||
| CV | Hiryuu | Casual+ | |||||||||||||||||||||||||||||||||||||||||||||||||||||||||||||||||||||||||||||||||||||||||||||||||
| E-4 Clear Message |
|---|