- Welcome to the Kancolle Wiki!
- If you have any questions regarding site content, account registration, etc., please visit the KanColle Wiki Discord
Difference between revisions of "Spring 2021 Event/E-3"
m (Structuring) |
(→E3-1) |
||
| Line 167: | Line 167: | ||
Phase 1 is a TP Phase, with 350/350/500/750 points required on Casual/Easy/Medium/Hard at HQ 120 | Phase 1 is a TP Phase, with 350/350/500/750 points required on Casual/Easy/Medium/Hard at HQ 120 | ||
| − | *Composition: 0-1 CL, 5-6 DD | + | *Composition: 0-1 CL, 5-6 DD (Orange Tag) |
**A fleet with CL will off-route to {{MapRoute|E|red}} | **A fleet with CL will off-route to {{MapRoute|E|red}} | ||
*Route: {{MapRoute|A|blue|C|red|G|red|F|blue|I|blue|J|red|L|purple|M|green|N|red}} with 0 CL | *Route: {{MapRoute|A|blue|C|red|G|red|F|blue|I|blue|J|red|L|purple|M|green|N|red}} with 0 CL | ||
Revision as of 14:51, 25 May 2021
E-3
off Lunga Point
ルンガ沖夜戦
![]()
![]()
![]()


| Information | ||||
|---|---|---|---|---|
| Event Tag | Orange Tag: 2nd Torpedo Squadron Yellow Tag: Combined Fleet Grey Tag: 8th Fleet | |||
| Boss Gauges | Hard (甲): 750 TP, 800 HP, 5220 HP | |||
| Medium (乙): 500 TP, 800 HP, 4620 HP | ||||
| Easy (丙): 350 TP, 800 HP, 4020 HP | ||||
| Casual (丁): 350 TP, 800 HP, 4020 HP | ||||
| Map Bosses | ||||
| Rewards | ||||
|---|---|---|---|---|
| All | ||||

| ||||
| Equipment/Item | 丁 Casual |
丙 Easy |
乙 Medium |
甲 Hard |
Medal |
1 | 1 | 2 | |
Improvement Material |
5 | 8 | ||
 Torpedo Squadron Skilled Lookouts |
1 | 1 (★4) | 1 (★8) | |
 SOC Seagull |
1 (★8) | 1 (★10) | ||
 SO3C Seamew Kai |
1 | |||

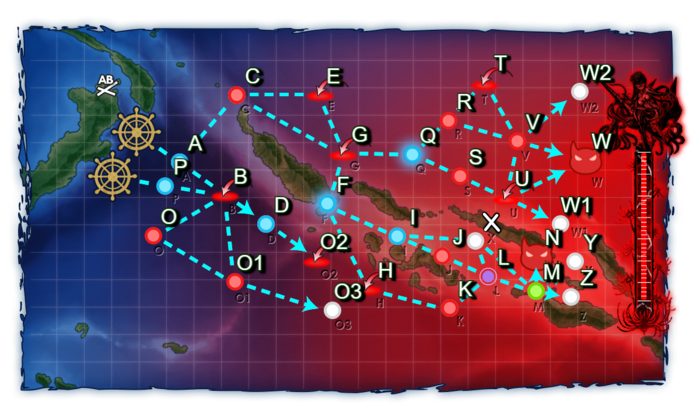
| E-3 Branching Rules | ||
|---|---|---|
| Nodes | Rules | |
| Start | 1 |
|
2 |
| |
A |
B |
|
C | ||
B |
D |
|
O | ||
O1 | ||
C |
E |
|
G |
| |
F |
H |
|
I | ||
G |
F |
|
Q |
| |
I |
J |
|
X |
| |
M |
N |
|
Y |
| |
Z |
| |
Q |
R |
|
S | ||
R |
T |
|
V |
| |
U |
V |
|
W |
| |
W1 |
| |
V |
W |
|
W2 |
| |
X |
L |
??? |
M | ||
Branching compositions were reported over the course of the event.
The event guides are to be constructed through the respective Event map page guide and reviewed by editor staff / collaboration committee before being approved here. Do not under any circumstance update the guides through this page or attempt to fix them through this page. Please only update guides through their respective sandbox pages.
Ship Bonuses (Tentative)
DISCLAIMER: This information is based on user submitted data and is subject to revisions as more data is gathered. Any version of the ship receives the bonus regardless of remodel.
| Ships | Nodes J/X/L | Nodes N | Nodes Z | ||
|---|---|---|---|---|---|
| 1.35x | 1.7x | 1.55x | |||
| - | - | 1.25x | |||
| 1.15x | 1.3225x | 1.3x | |||
| - | - | ||||
| IJN Light Cruisers/Destroyers (CL/DD) | - | 1.15x | |||
| Debuff Modifier (Only against Boss Flagship) | 1.12-1.14x | ||||
| Ships | Nodes R/V/W | ||
|---|---|---|---|
| 1.15x | |||
| - | - | ||
| - | - | 1.1x | |
| Ships | Nodes O/O1 | Nodes O3 | ||
|---|---|---|---|---|
| 1.2x | 1.38x | |||
| IJN Light Cruisers/Destroyers (CL/DD) | - | 1.15x | ||
General Information
This map has three ship locks:
- Orange Tag: 2nd Torpedo Squadron (Single Fleet)
- Grey Tag: 8th Fleet (Single Fleet, with CA(V) flagship)
- Starting point unlocks after Phase 1 is cleared
- Only really used for one unlocking gimmick
- Yellow Tag: Combined Fleet (Combined Fleet)
- Same starting point as Orange Tag, but tagged with Combined Fleet Tag when sortied as a Combined Fleet (STF or CTF)
E3-1
Phase 1 is a TP Phase, with 350/350/500/750 points required on Casual/Easy/Medium/Hard at HQ 120
- Composition: 0-1 CL, 5-6 DD (Orange Tag)
- A fleet with CL will off-route to E
- Route: A C G F I J L M N with 0 CL
- A C E G F I J L M N with 1 CL
- A total of 0/?/3/4 drum-equipped ships are required on Casual/Easy/Medium/Hard for this route.
- LBAS:
- 2 LBAS with 4x LBAA each to boss (7 Range); OR
- 1 LBAS with 4x Toukai/ASW to C (2 Range), 1 LBAS with 4x LBAA to Boss; OR
- Fighter sweep E G
- Notes:
- Support expeditions are optional, vanguard formation can be used to increase passing rate. Generic AACI is sufficient for the Air Raids.
- S-Ranking the boss is not strictly necessary, but if desired, the new Torpedo/SLO+/Torpedo and/or Torpedo/SLO+/Drum cut-ins may be useful.
- With a Reinforcement Expansion unlocked, a Torpedo/Torpedo/Drum/[SLO+] set-up may be utilised.
- SLO+ refers to Torpedo Squadron Skilled Lookouts.
- This phase has no LoS check.
E3-1.5
Unlocking W has 2 requirements:
- AS Node B & O2
- S rank Node O3 & O1
- A rank O1 on EASY/CASUAL only
- This is only required on MEDIUM+ only
- Composition: Combined Fleet (CTF): 2 CV(L) + 1 CL, 2 DD
- This composition will receive a Yellow Tag
- Route: A B D O2
- LBAS: AP/AS O2 Hard: 169/380 @ 4Range; AP/AS B Hard: 160/359 @ Range 2
- Required for all difficulties
- Composition: Single Fleet: 2 CA(V), 1-2 CL, 2-3 DD
- A CA(V) must be flagship; this composition will receive a Grey Tag
- Route: P B O1 O3
- LBAS: Range 3, no airpower O1; Range 4, no air power O3
- Note: O1 contains a New Submarine Princess along with 2 other submarines. Bring Toukai/ASW Aircraft as well as OASW. O3 is a surface combat node.
E3-2
The objective here is to take down the enemy combined fleet at Node W
- Composition: Surface Task Force: 2 CVL, 2 FBB, 1-2 CA(V), 1-2 CL + 1 CA, 1 CL, 4 DD
- Route: A C E G Q R V W
- LBAS: Range 7. AD/AP/AS for Hard: 90/180/405. LD: 96/191/429.
Goes Q S instead of Q R
- Composition: Carrier Task Force (CTF): 2 CV, 1 FBB, 2 CA(V), CL + 1 CA, 1 CL, 4 DD
- Route: A C E G Q S U W
- LBAS: Range 7. AD/AP/AS for Hard: 90/180/405. LD: 96/191/429.
- Composition: 2 CV, 2 CVL, 1 CAV, 1 CL + 1 CA, 1 CL, 4 DD
- Speed does not matter for this composition and route (i.e. use of Slow CVLs is acceptable).
- Route: A C E G Q R V W
- LBAS: Range 6 V & 7 W.
- AD/AP/AS for V Hard: 62/124/279.
- AD/AP/AS for W Hard: 90/180/405. LD: 96/191/429.
E3-2.5
To unlock Z, you will only need to AS H
- Composition: Transport Combined Fleet (TCF): 0-1 CVE, 1CAV/AV, 4-5 DD + 1 CL, 3 DD (Yellow Tag)
- Route: A C E G F H
- Alternatively you can run 1 AV 5 DD (Orange Tag) in order to save locks as the fleet is similar to Phase 1 and 3.
- If using the single fleet method, you need to use a 4-slot AV like Commandant Teste or Nisshin. 3-slot girls will struggle to take AS against all but the weakest enemy composition.
- Route: A C E G F H
- LBAS: Range 5, AP/AS for Hard: 160/359
- Note: Set up your LBAS with fighters only and send them to Node H to help secure AS.
- 1 CVE and 1 CAV with full fighter & SPF set-ups can almost certainly attain AS without the need for LBAS swapping.
- Note: EASY/CASUAL will have node Z unlocked as soon as you beaten phase 2 without doing this steps
E3-3
This is the final phase for this map and the MO. The objective is to sink the Lungga princess at Z. There is a boss debuff available for unlocking once LD is reached, if so desired.
- Composition: Single Fleet: 6 DD OR 1 CL 5 DD (EASY AND CASUAL ONLY) (Orange tag)
- A fleet with CL will off-route to E
- Route: A C G F I X M Z with 0 CL
- A C E G F I X M Z with 1 CL
- LBAS: Range 8, no Airpower
- Note: Fleet must have 0/3/4/5 drum-equipped ships on Casual/Easy/Medium/Hard.
- LoS Requirement: About Cn3 48+/38+/29+/23+ is required on Hard/Medium/Easy/Casual to route from M to Z.
Lungga Hime Debuff Phase
You can do all these steps in any order. There are 6 requirements that must be met once Last Dance threshold has been reached:
- LBAS raid - AS x1
- O3 - S rank x1
- E - AS x1
- W - S rank x1
- K - S rank x1
- N - S rank x1 (use TCF to reach)
Enemy Compositions
| # | Formation | Air Raids | AD/AP AS/AS+ |
|---|---|---|---|
| AB | Diamond | 60/119 267/534 | |
| Diamond | 67/133 297/594 | ||
| Diamond | 76/151 338/675 | ||
| Diamond | 80/160 359/717 | ||
| Diamond | 85/169 380/759 | ||
| # | Formation | Air Raids | AD/AP AS/AS+ |
| # | Empty Node | ||
|---|---|---|---|
| A | 気のせいだった。 精鋭第二水雷戦隊、出撃! Must be my imagination. Elite 2nd Torpedo Squadron, sortie! | ||
| # | Empty Node | ||
| # | Formation | Air Defense Node | AD/AP AS/AS+ |
|---|---|---|---|
| B | Diamond Phases: 1, 2, 3 |
55/110 246/492 | |
| Diamond Phases: 1, 2, 3 |
60/119 267/534 | ||
| Diamond Phases: 1, 2, 3 |
67/133 297/594 | ||
| Diamond Phases: 1, 2, 3 |
76/151 338/675 | ||
| Diamond Phases: 1, 2, 3 |
80/160 359/717 | ||
| # | Formation | Air Defense Node | AD/AP AS/AS+ |
| # | Formation | Normal Battle Node | AD/AP AS/AS+ |
|---|---|---|---|
| C | Echelon Line Abreast Phases: 1, 2, 3 |
0/0 0/0 | |
| Echelon Line Abreast Phases: 1, 2, 3 |
0/0 0/0 | ||
| Echelon Line Abreast Phases: 1, 2, 3 |
0/0 0/0 | ||
| # | Formation | Normal Battle Node | AD/AP AS/AS+ |
| # | Empty Node | ||
|---|---|---|---|
| D | 敵影を見ず。 精鋭第二水雷戦隊、出撃! No enemy spotted. Elite 2nd Torpedo Squadron, sortie! | ||
| # | Empty Node | ||
| # | Formation | Air Defense Node | AD/AP AS/AS+ |
|---|---|---|---|
| E | Diamond Phases: 1, 2, 3 |
55/110 246/492 | |
| Diamond Phases: 1, 2, 3 |
60/119 267/534 | ||
| Diamond Phases: 1, 2, 3 |
67/133 297/594 | ||
| Diamond Phases: 1, 2, 3 |
76/151 338/675 | ||
| Diamond Phases: 1, 2, 3 |
80/160 359/717 | ||
| # | Formation | Air Defense Node | AD/AP AS/AS+ |
| # | Selection Node | ||
|---|---|---|---|
| F | 精鋭第二水雷戦隊、出撃! Elite 2nd Torpedo Squadron, sortie! | ||
| # | Selection Node | ||
| # | Formation | Air Defense Node | AD/AP AS/AS+ |
|---|---|---|---|
| G | Diamond Phases: 1, 2, 3 |
55/110 246/492 | |
| Diamond Phases: 1, 2, 3 |
60/119 267/534 | ||
| Diamond Phases: 1, 2, 3 |
67/133 297/594 | ||
| Diamond Phases: 1, 2, 3 |
76/151 338/675 | ||
| Diamond Phases: 1, 2, 3 |
80/160 359/717 | ||
| # | Formation | Air Defense Node | AD/AP AS/AS+ |
| # | Formation | Air Defense Node | AD/AP AS/AS+ |
|---|---|---|---|
| H | Diamond Phases: 1, 2, 3 |
55/110 246/492 | |
| Diamond Phases: 3 |
60/119 267/534 | ||
| Diamond Phases: 3 |
67/133 297/594 | ||
| Diamond Phases: 1, 2, 3 |
76/151 338/675 | ||
| Diamond Phases: 1, 3 |
80/160 359/717 | ||
| # | Formation | Air Defense Node | AD/AP AS/AS+ |
| # | Empty Node | ||
|---|---|---|---|
| I | 気のせいだった。 二水戦、鉄底海峡に突入する!合戦用意! Must be my imagination. DesRon2, entering Iron Bottom Strait! Battle stations! | ||
| # | Empty Node | ||
| # | Formation | Normal Battle Node | AD/AP AS/AS+ |
|---|---|---|---|
| J | Line Ahead Double Line Echelon Phases: 1, 3 |
0/0 0/0 | |
| # | Formation | Normal Battle Node | AD/AP AS/AS+ |
| # | Formation | Normal Battle Node | AD/AP AS/AS+ |
|---|---|---|---|
| K | Line Ahead Echelon Line Abreast Phases: 1, 2, 3 |
0/0 0/0 | |
| # | Formation | Normal Battle Node | AD/AP AS/AS+ |
| # | Formation | Night Battle Node | AD/AP AS/AS+ |
|---|---|---|---|
| L | Line Ahead Echelon Phases: 1, 2, 3 |
0/0 0/0 | |
| Line Ahead Phases: 3 |
0/0 0/0 | ||
| # | Formation | Night Battle Node | AD/AP AS/AS+ |
| # | Empty Node | ||
|---|---|---|---|
| M | 気のせいだった。 敵巡洋艦部隊、発見!揚陸止め!全軍、戦闘準備!突撃せよ! Must be my imagination. Enemy cruiser force spotted! Stop the landing! All troops, prepare for battle! Charge! | ||
| # | Empty Node | ||
| # | Formation | Boss Battle Node | AD/AP AS/AS+ |
|---|---|---|---|
| N | Line Ahead Phases: 3 |
0/0 0/0 | |
| Line Ahead Phases: 1 |
0/0 0/0 | ||
| Line Ahead Phases: 1 |
0/0 0/0 | ||
| # | Formation | Boss Battle Node | AD/AP AS/AS+ |
| # | Formation | Normal Battle Node | AD/AP AS/AS+ |
|---|---|---|---|
| O | Echelon Line Abreast Phases: 2, 3 |
0/0 0/0 | |
| Echelon Line Abreast Phases: 2, 3 |
0/0 0/0 | ||
| Echelon Line Abreast Phases: 2, 3 |
0/0 0/0 | ||
| # | Formation | Normal Battle Node | AD/AP AS/AS+ |
| # | Formation | Normal Battle Node | AD/AP AS/AS+ |
|---|---|---|---|
| O1 | Echelon Line Abreast Phases: 2, 3 |
0/0 0/0 | |
| Echelon Line Abreast Phases: 2, 3 |
0/0 0/0 | ||
| # | Formation | Normal Battle Node | AD/AP AS/AS+ |
| # | Formation | Air Defense Node | AD/AP AS/AS+ |
|---|---|---|---|
| O2 | Diamond Phases: 2, 3 |
60/119 267/534 | |
| Diamond Phases: 2, 3 |
67/133 297/594 | ||
| Diamond Phases: 2, 3 |
76/151 338/675 | ||
| Diamond Phases: 2, 3 |
80/160 359/717 | ||
| Diamond Phases: 2, 3 |
85/169 380/759 | ||
| # | Formation | Air Defense Node | AD/AP AS/AS+ |
| # | Formation | Normal Battle Node | AD/AP AS/AS+ |
|---|---|---|---|
| O3 | Line Ahead Echelon Vanguard Phases: 2, 3 |
0/0 0/0 | |
| # | Formation | Normal Battle Node | AD/AP AS/AS+ |
| # | Empty Node | ||
|---|---|---|---|
| P | 気のせいだった。 第八艦隊、抜錨!出撃する! Must be my imagination. 8th Fleet, weigh anchors! Sortie! | ||
| # | Empty Node | ||
| # | Selection Node | ||
|---|---|---|---|
| Q | 精鋭第二水雷戦隊、出撃! Elite 2nd Torpedo Squadron, sortie! | ||
| # | Selection Node | ||
| # | Formation | Normal Battle Node | AD/AP AS/AS+ |
|---|---|---|---|
| R | Echelon Line Abreast Phases: 2, 3 |
0/0 0/0 | |
| Echelon Line Abreast Phases: 2, 3 |
0/0 0/0 | ||
| Echelon Line Abreast Phases: 2, 3 |
0/0 0/0 | ||
| # | Formation | Normal Battle Node | AD/AP AS/AS+ |
| # | Formation | Normal Battle Node | AD/AP AS/AS+ |
|---|---|---|---|
| S | Line Ahead Echelon Vanguard Phases: 2, 3 |
0/0 0/0 | |
| # | Formation | Normal Battle Node | AD/AP AS/AS+ |
| # | Formation | Air Defense Node | AD/AP AS/AS+ |
|---|---|---|---|
| T | Diamond Phases: 2 |
91/181 405/810 | |
| Diamond Phases: 2 |
96/191 429/858 | ||
| Diamond Phases: 2 |
116/232 521/1041 | ||
| # | Formation | Air Defense Node | AD/AP AS/AS+ |
| # | Formation | Air Defense Node | AD/AP AS/AS+ |
|---|---|---|---|
| U | Diamond Phases: 2, 3 |
91/181 405/810 | |
| Diamond Phases: 2, 3 |
96/191 429/858 | ||
| Diamond Phases: 2 |
116/232 521/1041 | ||
| # | Formation | Air Defense Node | AD/AP AS/AS+ |
| # | Formation | Normal Battle Node | AD/AP AS/AS+ |
|---|---|---|---|
| V | Diamond Phases: 2, 3 |
47/93 207/414 | |
| Diamond Phases: 2, 3 |
55/109 243/486 | ||
| Diamond Phases: 2, 3 |
63/125 279/558 | ||
| # | Formation | Normal Battle Node | AD/AP AS/AS+ |
| # | Formation | Boss Battle Node | AD/AP AS/AS+ |
|---|---|---|---|
| W | Cruising Formation 4 Phases: 2, 3 |
91/181 405/810 | |
| Cruising Formation 4 Phases: 2 (Final)
|
96/191 429/858 | ||
| # | Formation | Boss Battle Node | AD/AP AS/AS+ |
| # | Empty Node | ||
|---|---|---|---|
| W1 | 敵影を見ず。 精鋭第二水雷戦隊、出撃! No enemy spotted. Elite 2nd Torpedo Squadron, sortie! | ||
| # | Empty Node | ||
| # | Empty Node | ||
|---|---|---|---|
| W2 | 敵影を見ず。 精鋭第二水雷戦隊、出撃! No enemy spotted. Elite 2nd Torpedo Squadron, sortie! | ||
| # | Empty Node | ||
| # | Formation | Normal Battle Node | AD/AP AS/AS+ |
|---|---|---|---|
| X | Line Ahead Echelon Line Abreast Phases: 3 |
0/0 0/0 | |
| # | Formation | Normal Battle Node | AD/AP AS/AS+ |
| # | Empty Node | ||
|---|---|---|---|
| Y | 敵影を見ず。 敵巡洋艦部隊、発見!揚陸止め!全軍、戦闘準備!突撃せよ! No enemy spotted. Enemy cruiser force spotted! Stop the landing! All troops, prepare for battle! Charge! | ||
| # | Empty Node | ||
| # | Formation | Boss Battle Node | AD/AP AS/AS+ |
|---|---|---|---|
| Z | Line Ahead Phases: 3 |
0/0 0/0 | |
| Line Ahead Phases: 3 |
0/0 0/0 | ||
| Line Ahead Phases: 3 (Final)
|
0/0 0/0 | ||
| # | Formation | Boss Battle Node | AD/AP AS/AS+ |
| # | Formation | Air Raids | AD/AP AS/AS+ |
|---|---|---|---|
| AB | Diamond | 55/110 246/492 | |
| Diamond | 60/119 267/534 | ||
| Diamond | 23/46 102/204 | ||
| Diamond | 67/133 297/594 | ||
| # | Formation | Air Raids | AD/AP AS/AS+ |
| # | Empty Node | ||
|---|---|---|---|
| A | 気のせいだった。 精鋭第二水雷戦隊、出撃! Must be my imagination. Elite 2nd Torpedo Squadron, sortie! | ||
| # | Empty Node | ||
| # | Formation | Air Defense Node | AD/AP AS/AS+ |
|---|---|---|---|
| B | Diamond Phases: 1, 2, 3 |
44/87 195/390 | |
| Diamond Phases: 1, 2, 3 |
55/110 246/492 | ||
| Diamond Phases: 1, 2, 3 |
60/119 267/534 | ||
| Diamond Phases: 1, 2, 3 |
23/46 102/204 | ||
| # | Formation | Air Defense Node | AD/AP AS/AS+ |
| # | Formation | Normal Battle Node | AD/AP AS/AS+ |
|---|---|---|---|
| C | Echelon Line Abreast Phases: 1, 2, 3 |
0/0 0/0 | |
| Echelon Line Abreast Phases: 1, 2, 3 |
0/0 0/0 | ||
| Echelon Line Abreast Phases: 1, 2, 3 |
0/0 0/0 | ||
| # | Formation | Normal Battle Node | AD/AP AS/AS+ |
| # | Empty Node | ||
|---|---|---|---|
| D | 敵影を見ず。 精鋭第二水雷戦隊、出撃! No enemy spotted. Elite 2nd Torpedo Squadron, sortie! | ||
| # | Empty Node | ||
| # | Formation | Air Defense Node | AD/AP AS/AS+ |
|---|---|---|---|
| E | Diamond Phases: 1, 2, 3 |
44/87 195/390 | |
| Diamond Phases: 1, 2, 3 |
55/110 246/492 | ||
| Diamond Phases: 1, 2, 3 |
60/119 267/534 | ||
| Diamond Phases: 1, 2, 3 |
23/46 102/204 | ||
| # | Formation | Air Defense Node | AD/AP AS/AS+ |
| # | Selection Node | ||
|---|---|---|---|
| F | 精鋭第二水雷戦隊、出撃! Elite 2nd Torpedo Squadron, sortie! | ||
| # | Selection Node | ||
| # | Formation | Air Defense Node | AD/AP AS/AS+ |
|---|---|---|---|
| G | Diamond Phases: 1, 2, 3 |
44/87 195/390 | |
| Diamond Phases: 1, 2, 3 |
55/110 246/492 | ||
| Diamond Phases: 1, 2, 3 |
60/119 267/534 | ||
| Diamond Phases: 1, 2, 3 |
23/46 102/204 | ||
| # | Formation | Air Defense Node | AD/AP AS/AS+ |
| # | Formation | Air Defense Node | AD/AP AS/AS+ |
|---|---|---|---|
| H | Diamond Phases: 1, 3 |
44/87 195/390 | |
| Diamond Phases: 1, 3 |
55/110 246/492 | ||
| Diamond Phases: 1, 3 |
60/119 267/534 | ||
| Diamond Phases: 1, 3 |
23/46 102/204 | ||
| # | Formation | Air Defense Node | AD/AP AS/AS+ |
| # | Empty Node | ||
|---|---|---|---|
| I | 気のせいだった。 二水戦、鉄底海峡に突入する!合戦用意! Must be my imagination. DesRon2, entering Iron Bottom Strait! Battle stations! | ||
| # | Empty Node | ||
| # | Formation | Normal Battle Node | AD/AP AS/AS+ |
|---|---|---|---|
| J | Line Ahead Double Line Echelon Phases: 1, 3 |
0/0 0/0 | |
| # | Formation | Normal Battle Node | AD/AP AS/AS+ |
| # | Formation | Normal Battle Node | AD/AP AS/AS+ |
|---|---|---|---|
| K | Line Ahead Echelon Line Abreast Phases: 1, 3 |
0/0 0/0 | |
| # | Formation | Normal Battle Node | AD/AP AS/AS+ |
| # | Formation | Night Battle Node | AD/AP AS/AS+ |
|---|---|---|---|
| L | Line Ahead Echelon Phases: 1, 3 |
0/0 0/0 | |
| Line Ahead Phases: 3 |
0/0 0/0 | ||
| # | Formation | Night Battle Node | AD/AP AS/AS+ |
| # | Empty Node | ||
|---|---|---|---|
| M | 気のせいだった。 敵巡洋艦部隊、発見!揚陸止め!全軍、戦闘準備!突撃せよ! Must be my imagination. Enemy cruiser force spotted! Stop the landing! All troops, prepare for battle! Charge! | ||
| # | Empty Node | ||
| # | Formation | Boss Battle Node | AD/AP AS/AS+ |
|---|---|---|---|
| N | Line Ahead Phases: 3 |
0/0 0/0 | |
| Line Ahead Phases: 1 |
0/0 0/0 | ||
| Line Ahead Phases: 1 |
0/0 0/0 | ||
| # | Formation | Boss Battle Node | AD/AP AS/AS+ |
| # | Formation | Normal Battle Node | AD/AP AS/AS+ |
|---|---|---|---|
| O | Echelon Line Abreast Phases: 2 |
0/0 0/0 | |
| Echelon Line Abreast Phases: 2, 3 |
0/0 0/0 | ||
| Echelon Line Abreast Phases: 2 |
0/0 0/0 | ||
| # | Formation | Normal Battle Node | AD/AP AS/AS+ |
| # | Formation | Normal Battle Node | AD/AP AS/AS+ |
|---|---|---|---|
| O1 | Echelon Line Abreast Phases: 2, 3 |
0/0 0/0 | |
| Echelon Line Abreast Phases: 2, 3 |
0/0 0/0 | ||
| Echelon Line Abreast Phases: 2, 3 |
0/0 0/0 | ||
| # | Formation | Normal Battle Node | AD/AP AS/AS+ |
| # | Formation | Air Defense Node | AD/AP AS/AS+ |
|---|---|---|---|
| O2 | Diamond Phases: 2 |
55/110 246/492 | |
| Diamond Phases: 2, 3 |
60/119 267/534 | ||
| Diamond Phases: 2, 3 |
23/46 102/204 | ||
| Diamond Phases: 2, 3 |
67/133 297/594 | ||
| # | Formation | Air Defense Node | AD/AP AS/AS+ |
| # | Formation | Normal Battle Node | AD/AP AS/AS+ |
|---|---|---|---|
| O3 | Line Ahead Echelon Vanguard Phases: 2, 3 |
0/0 0/0 | |
| # | Formation | Normal Battle Node | AD/AP AS/AS+ |
| # | Empty Node | ||
|---|---|---|---|
| P | 気のせいだった。 第八艦隊、抜錨!出撃する! Must be my imagination. 8th Fleet, weigh anchors! Sortie! | ||
| # | Empty Node | ||
| # | Selection Node | ||
|---|---|---|---|
| Q | 精鋭第二水雷戦隊、出撃! Elite 2nd Torpedo Squadron, sortie! | ||
| # | Selection Node | ||
| # | Formation | Normal Battle Node | AD/AP AS/AS+ |
|---|---|---|---|
| R | Echelon Line Abreast Phases: 2 |
0/0 0/0 | |
| Echelon Line Abreast Phases: 2 |
0/0 0/0 | ||
| Echelon Line Abreast Phases: 2, 3 |
0/0 0/0 | ||
| # | Formation | Normal Battle Node | AD/AP AS/AS+ |
| # | Formation | Normal Battle Node | AD/AP AS/AS+ |
|---|---|---|---|
| S | Line Ahead Echelon Vanguard Phases: 2, 3 |
0/0 0/0 | |
| # | Formation | Normal Battle Node | AD/AP AS/AS+ |
| # | Formation | Air Defense Node | AD/AP AS/AS+ |
|---|---|---|---|
| T | Diamond | 66/131 293/585 | |
| Diamond | 89/177 396/792 | ||
| Diamond | 112/223 500/999 | ||
| # | Formation | Air Defense Node | AD/AP AS/AS+ |
| # | Formation | Air Defense Node | AD/AP AS/AS+ |
|---|---|---|---|
| U | Diamond Phases: 2, 3 |
66/131 293/585 | |
| Diamond Phases: 2 |
89/177 396/792 | ||
| Diamond Phases: 2 |
112/223 500/999 | ||
| # | Formation | Air Defense Node | AD/AP AS/AS+ |
| # | Formation | Normal Battle Node | AD/AP AS/AS+ |
|---|---|---|---|
| V | Diamond Phases: 2, 3 |
24/47 104/207 | |
| Diamond Phases: 2 |
32/63 140/279 | ||
| Diamond Phases: 2 |
47/93 207/414 | ||
| # | Formation | Normal Battle Node | AD/AP AS/AS+ |
| # | Formation | Boss Battle Node | AD/AP AS/AS+ |
|---|---|---|---|
| W | Cruising Formation 4 Phases: 2, 3 |
66/131 293/585 | |
| Cruising Formation 4 Phases: 2 (Final)
|
89/177 396/792 | ||
| # | Formation | Boss Battle Node | AD/AP AS/AS+ |
| # | Empty Node | ||
|---|---|---|---|
| W1 | 敵影を見ず。 精鋭第二水雷戦隊、出撃! No enemy spotted. Elite 2nd Torpedo Squadron, sortie! | ||
| # | Empty Node | ||
| # | Empty Node | ||
|---|---|---|---|
| W2 | 敵影を見ず。 精鋭第二水雷戦隊、出撃! No enemy spotted. Elite 2nd Torpedo Squadron, sortie! | ||
| # | Empty Node | ||
| # | Formation | Normal Battle Node | AD/AP AS/AS+ |
|---|---|---|---|
| X | Line Ahead Echelon Line Abreast Phases: 3 |
0/0 0/0 | |
| # | Formation | Normal Battle Node | AD/AP AS/AS+ |
| # | Empty Node | ||
|---|---|---|---|
| Y | 敵影を見ず。 敵巡洋艦部隊、発見!揚陸止め!全軍、戦闘準備!突撃せよ! No enemy spotted. Enemy cruiser force spotted! Stop the landing! All troops, prepare for battle! Charge! | ||
| # | Empty Node | ||
| # | Formation | Boss Battle Node | AD/AP AS/AS+ |
|---|---|---|---|
| Z | Line Ahead Phases: 3 |
0/0 0/0 | |
| Line Ahead Phases: 3 |
0/0 0/0 | ||
| Line Ahead Phases: 3 (Final)
|
0/0 0/0 | ||
| # | Formation | Boss Battle Node | AD/AP AS/AS+ |
| # | Formation | Air Raids | AD/AP AS/AS+ |
|---|---|---|---|
| AB | Diamond | 44/87 195/390 | |
| Diamond | 17/33 72/144 | ||
| Diamond | 55/110 246/492 | ||
| Diamond | 60/119 267/534 | ||
| Diamond | 23/46 102/204 | ||
| # | Formation | Air Raids | AD/AP AS/AS+ |
| # | Empty Node | ||
|---|---|---|---|
| A | 気のせいだった。 精鋭第二水雷戦隊、出撃! Must be my imagination. Elite 2nd Torpedo Squadron, sortie! | ||
| # | Empty Node | ||
| # | Formation | Air Defense Node | AD/AP AS/AS+ |
|---|---|---|---|
| B | Diamond Phases: 1, 2, 3 |
44/87 195/390 | |
| Diamond Phases: 1, 2, 3 |
12/23 51/102 | ||
| Diamond Phases: 1, 2, 3 |
17/33 72/144 | ||
| Diamond Phases: 1, 2, 3 |
55/110 246/492 | ||
| Diamond Phases: 1, 2, 3 |
23/46 102/204 | ||
| # | Formation | Air Defense Node | AD/AP AS/AS+ |
| # | Formation | Normal Battle Node | AD/AP AS/AS+ |
|---|---|---|---|
| C | Echelon Line Abreast Phases: 1, 2, 3 |
0/0 0/0 | |
| Echelon Line Abreast Phases: 1, 2, 3 |
0/0 0/0 | ||
| Echelon Line Abreast Phases: 1, 2, 3 |
0/0 0/0 | ||
| # | Formation | Normal Battle Node | AD/AP AS/AS+ |
| # | Empty Node | ||
|---|---|---|---|
| D | 敵影を見ず。 精鋭第二水雷戦隊、出撃! No enemy spotted. Elite 2nd Torpedo Squadron, sortie! | ||
| # | Empty Node | ||
| # | Formation | Air Defense Node | AD/AP AS/AS+ |
|---|---|---|---|
| E | Diamond Phases: 1, 2, 3 |
44/87 195/390 | |
| Diamond Phases: 1, 2, 3 |
12/23 51/102 | ||
| Diamond Phases: 1, 2, 3 |
17/33 72/144 | ||
| Diamond Phases: 1, 2, 3 |
55/110 246/492 | ||
| Diamond Phases: 1, 2, 3 |
23/46 102/204 | ||
| # | Formation | Air Defense Node | AD/AP AS/AS+ |
| # | Selection Node | ||
|---|---|---|---|
| F | 精鋭第二水雷戦隊、出撃! Elite 2nd Torpedo Squadron, sortie! | ||
| # | Selection Node | ||
| # | Formation | Air Defense Node | AD/AP AS/AS+ |
|---|---|---|---|
| G | Diamond Phases: 1, 2, 3 |
44/87 195/390 | |
| Diamond Phases: 1, 2, 3 |
12/23 51/102 | ||
| Diamond Phases: 1, 2, 3 |
17/33 72/144 | ||
| Diamond Phases: 1, 2, 3 |
55/110 246/492 | ||
| Diamond Phases: 1, 2, 3 |
23/46 102/204 | ||
| # | Formation | Air Defense Node | AD/AP AS/AS+ |
| # | Formation | Air Defense Node | AD/AP AS/AS+ |
|---|---|---|---|
| H | Diamond Phases: 1, 3 |
44/87 195/390 | |
| Diamond Phases: 3 |
12/23 51/102 | ||
| Diamond Phases: 1, 3 |
17/33 72/144 | ||
| Diamond Phases: 1, 2, 3 |
55/110 246/492 | ||
| Diamond Phases: 1, 3 |
23/46 102/204 | ||
| # | Formation | Air Defense Node | AD/AP AS/AS+ |
| # | Empty Node | ||
|---|---|---|---|
| I | 気のせいだった。 二水戦、鉄底海峡に突入する!合戦用意! Must be my imagination. DesRon2, entering Iron Bottom Strait! Battle stations! | ||
| # | Empty Node | ||
| # | Formation | Normal Battle Node | AD/AP AS/AS+ |
|---|---|---|---|
| J | Line Ahead Echelon Phases: 1, 2, 3 |
0/0 0/0 | |
| # | Formation | Normal Battle Node | AD/AP AS/AS+ |
| # | Formation | Normal Battle Node | AD/AP AS/AS+ |
|---|---|---|---|
| K | Line Ahead Echelon Line Abreast Phases: 1, 2, 3 |
0/0 0/0 | |
| # | Formation | Normal Battle Node | AD/AP AS/AS+ |
| # | Formation | Night Battle Node | AD/AP AS/AS+ |
|---|---|---|---|
| L | Line Ahead Echelon Phases: 1, 3 |
0/0 0/0 | |
| Line Ahead Phases: 3 |
0/0 0/0 | ||
| # | Formation | Night Battle Node | AD/AP AS/AS+ |
| # | Empty Node | ||
|---|---|---|---|
| M | 気のせいだった。 敵巡洋艦部隊、発見!揚陸止め!全軍、戦闘準備!突撃せよ! Must be my imagination. Enemy cruiser force spotted! Stop the landing! All troops, prepare for battle! Charge! | ||
| # | Empty Node | ||
| # | Formation | Boss Battle Node | AD/AP AS/AS+ |
|---|---|---|---|
| N | Line Ahead Phases: 3 |
0/0 0/0 | |
| Line Ahead Phases: 1 |
0/0 0/0 | ||
| Line Ahead Phases: 1 |
0/0 0/0 | ||
| # | Formation | Boss Battle Node | AD/AP AS/AS+ |
| # | Formation | Normal Battle Node | AD/AP AS/AS+ |
|---|---|---|---|
| O | Echelon Line Abreast Phases: 2 |
0/0 0/0 | |
| Echelon Line Abreast Phases: 2 |
0/0 0/0 | ||
| Echelon Line Abreast Phases: 2 |
0/0 0/0 | ||
| # | Formation | Normal Battle Node | AD/AP AS/AS+ |
| # | Formation | Normal Battle Node | AD/AP AS/AS+ |
|---|---|---|---|
| O1 | Echelon Line Abreast Phases: 2, 3 |
0/0 0/0 | |
| Echelon Line Abreast Phases: 2, 3 |
0/0 0/0 | ||
| Echelon Line Abreast Phases: 2, 3 |
0/0 0/0 | ||
| # | Formation | Normal Battle Node | AD/AP AS/AS+ |
| # | Formation | Air Defense Node | AD/AP AS/AS+ |
|---|---|---|---|
| O2 | Diamond Phases: 2, 3 |
44/87 195/390 | |
| Diamond Phases: 2, 3 |
17/33 72/144 | ||
| Diamond Phases: 2, 3 |
55/110 246/492 | ||
| Diamond Phases: 2, 3 |
60/119 267/534 | ||
| Diamond Phases: 2, 3 |
23/46 102/204 | ||
| # | Formation | Air Defense Node | AD/AP AS/AS+ |
| # | Formation | Normal Battle Node | AD/AP AS/AS+ |
|---|---|---|---|
| O3 | Line Ahead Echelon Vanguard Phases: 2, 3 |
0/0 0/0 | |
| # | Formation | Normal Battle Node | AD/AP AS/AS+ |
| # | Empty Node | ||
|---|---|---|---|
| P | 気のせいだった。 第八艦隊、抜錨!出撃する! Must be my imagination. 8th Fleet, weigh anchors! Sortie! | ||
| # | Empty Node | ||
| # | Selection Node | ||
|---|---|---|---|
| Q | 精鋭第二水雷戦隊、出撃! Elite 2nd Torpedo Squadron, sortie! | ||
| # | Selection Node | ||
| # | Formation | Normal Battle Node | AD/AP AS/AS+ |
|---|---|---|---|
| R | Echelon Line Abreast Phases: 2, 3 |
0/0 0/0 | |
| Echelon Line Abreast Phases: 2, 3 |
0/0 0/0 | ||
| Echelon Line Abreast Phases: 2, 3 |
0/0 0/0 | ||
| # | Formation | Normal Battle Node | AD/AP AS/AS+ |
| # | Formation | Normal Battle Node | AD/AP AS/AS+ |
|---|---|---|---|
| S | Line Ahead Echelon Vanguard Phases: 2, 3 |
0/0 0/0 | |
| # | Formation | Normal Battle Node | AD/AP AS/AS+ |
| # | Formation | Air Defense Node | AD/AP AS/AS+ |
|---|---|---|---|
| T | Diamond | 37/73 162/324 | |
| Diamond | 60/119 266/531 | ||
| Diamond | 66/131 293/585 | ||
| Diamond | 83/165 369/738 | ||
| # | Formation | Air Defense Node | AD/AP AS/AS+ |
| # | Formation | Air Defense Node | AD/AP AS/AS+ |
|---|---|---|---|
| U | Diamond Phases: 2, 3 |
37/73 162/324 | |
| Diamond Phases: 2, 3 |
60/119 266/531 | ||
| Diamond Phases: 2, 3 |
66/131 293/585 | ||
| Diamond Phases: 2, 3 |
83/165 369/738 | ||
| # | Formation | Air Defense Node | AD/AP AS/AS+ |
| # | Formation | Normal Battle Node | AD/AP AS/AS+ |
|---|---|---|---|
| V | Diamond Phases: 2, 3 |
24/47 104/207 | |
| Diamond Phases: 2, 3 |
32/63 140/279 | ||
| Diamond Phases: 2, 3 |
32/63 140/279 | ||
| # | Formation | Normal Battle Node | AD/AP AS/AS+ |
| # | Formation | Boss Battle Node | AD/AP AS/AS+ |
|---|---|---|---|
| W | Cruising Formation 4 Phases: 2, 3 |
45/89 198/396 | |
| Cruising Formation 4 Phases: 2 (Final)
|
68/135 302/603 | ||
| # | Formation | Boss Battle Node | AD/AP AS/AS+ |
| # | Empty Node | ||
|---|---|---|---|
| W1 | 敵影を見ず。 精鋭第二水雷戦隊、出撃! No enemy spotted. Elite 2nd Torpedo Squadron, sortie! | ||
| # | Empty Node | ||
| # | Empty Node | ||
|---|---|---|---|
| W2 | 敵影を見ず。 精鋭第二水雷戦隊、出撃! No enemy spotted. Elite 2nd Torpedo Squadron, sortie! | ||
| # | Empty Node | ||
| # | Formation | Normal Battle Node | AD/AP AS/AS+ |
|---|---|---|---|
| X | Line Ahead Echelon Line Abreast Phases: 3 |
0/0 0/0 | |
| # | Formation | Normal Battle Node | AD/AP AS/AS+ |
| # | Empty Node | ||
|---|---|---|---|
| Y | 敵影を見ず。 敵巡洋艦部隊、発見!揚陸止め!全軍、戦闘準備!突撃せよ! No enemy spotted. Enemy cruiser force spotted! Stop the landing! All troops, prepare for battle! Charge! | ||
| # | Empty Node | ||
| # | Formation | Boss Battle Node | AD/AP AS/AS+ |
|---|---|---|---|
| Z | Line Ahead Phases: 3 |
0/0 0/0 | |
| Line Ahead Phases: 3 |
0/0 0/0 | ||
| Line Ahead Phases: 3 (Final)
|
0/0 0/0 | ||
| # | Formation | Boss Battle Node | AD/AP AS/AS+ |
| # | Formation | Air Raids | AD/AP AS/AS+ |
|---|---|---|---|
| AB | Diamond | 44/87 195/390 | |
| Diamond | 17/33 72/144 | ||
| Diamond | 23/46 102/204 | ||
| # | Formation | Air Raids | AD/AP AS/AS+ |
| # | Empty Node | ||
|---|---|---|---|
| A | 気のせいだった。 精鋭第二水雷戦隊、出撃! Must be my imagination. Elite 2nd Torpedo Squadron, sortie! | ||
| # | Empty Node | ||
| # | Formation | Air Defense Node | AD/AP AS/AS+ |
|---|---|---|---|
| B | Diamond Phases: 1, 2, 3 |
44/87 195/390 | |
| Diamond Phases: 1, 2 |
12/23 51/102 | ||
| Diamond Phases: 1, 2 |
17/33 72/144 | ||
| # | Formation | Air Defense Node | AD/AP AS/AS+ |
| # | Formation | Normal Battle Node | AD/AP AS/AS+ |
|---|---|---|---|
| C | Echelon Line Abreast Phases: 1, 2, 3 |
0/0 0/0 | |
| Echelon Line Abreast Phases: 1, 2, 3 |
0/0 0/0 | ||
| # | Formation | Normal Battle Node | AD/AP AS/AS+ |
| # | Empty Node | ||
|---|---|---|---|
| D | 敵影を見ず。 精鋭第二水雷戦隊、出撃! No enemy spotted. Elite 2nd Torpedo Squadron, sortie! | ||
| # | Empty Node | ||
| # | Formation | Air Defense Node | AD/AP AS/AS+ |
|---|---|---|---|
| E | Diamond Phases: 1, 2, 3 |
44/87 195/390 | |
| Diamond Phases: 1, 2, 3 |
12/23 51/102 | ||
| Diamond Phases: 1, 2, 3 |
17/33 72/144 | ||
| # | Formation | Air Defense Node | AD/AP AS/AS+ |
| # | Selection Node | ||
|---|---|---|---|
| F | 精鋭第二水雷戦隊、出撃! Elite 2nd Torpedo Squadron, sortie! | ||
| # | Selection Node | ||
| # | Formation | Air Defense Node | AD/AP AS/AS+ |
|---|---|---|---|
| G | Diamond Phases: 1, 2, 3 |
44/87 195/390 | |
| Diamond Phases: 1, 2, 3 |
12/23 51/102 | ||
| Diamond Phases: 1, 2, 3 |
17/33 72/144 | ||
| # | Formation | Air Defense Node | AD/AP AS/AS+ |
| # | Formation | Air Defense Node | AD/AP AS/AS+ |
|---|---|---|---|
| H | Diamond Phases: 1, 3 |
44/87 195/390 | |
| Diamond Phases: 1, 3 |
12/23 51/102 | ||
| Diamond Phases: 1, 3 |
17/33 72/144 | ||
| # | Formation | Air Defense Node | AD/AP AS/AS+ |
| # | Empty Node | ||
|---|---|---|---|
| I | 気のせいだった。 二水戦、鉄底海峡に突入する!合戦用意! Must be my imagination. DesRon2, entering Iron Bottom Strait! Battle stations! | ||
| # | Empty Node | ||
| # | Formation | Normal Battle Node | AD/AP AS/AS+ |
|---|---|---|---|
| J | Line Ahead Echelon Phases: 1 |
0/0 0/0 | |
| # | Formation | Normal Battle Node | AD/AP AS/AS+ |
| # | Formation | Normal Battle Node | AD/AP AS/AS+ |
|---|---|---|---|
| K | Line Ahead Echelon Line Abreast Phases: 1, 3 |
0/0 0/0 | |
| # | Formation | Normal Battle Node | AD/AP AS/AS+ |
| # | Formation | Night Battle Node | AD/AP AS/AS+ |
|---|---|---|---|
| L | Line Ahead Echelon Phases: 1, 3 |
0/0 0/0 | |
| Line Ahead Phases: 3 |
0/0 0/0 | ||
| # | Formation | Night Battle Node | AD/AP AS/AS+ |
| # | Empty Node | ||
|---|---|---|---|
| M | 気のせいだった。 敵巡洋艦部隊、発見!揚陸止め!全軍、戦闘準備!突撃せよ! Must be my imagination. Enemy cruiser force spotted! Stop the landing! All troops, prepare for battle! Charge! | ||
| # | Empty Node | ||
| # | Formation | Boss Battle Node | AD/AP AS/AS+ |
|---|---|---|---|
| N | Line Ahead Phases: 3 |
0/0 0/0 | |
| Line Ahead Phases: 1 |
0/0 0/0 | ||
| Line Ahead Phases: 1 |
0/0 0/0 | ||
| # | Formation | Boss Battle Node | AD/AP AS/AS+ |
| # | Formation | Normal Battle Node | AD/AP AS/AS+ |
|---|---|---|---|
| O | Echelon Line Abreast Phases: 2 |
0/0 0/0 | |
| Echelon Line Abreast Phases: 2 |
0/0 0/0 | ||
| Echelon Line Abreast Phases: 2 |
0/0 0/0 | ||
| # | Formation | Normal Battle Node | AD/AP AS/AS+ |
| # | Formation | Normal Battle Node | AD/AP AS/AS+ |
|---|---|---|---|
| O1 | Echelon Line Abreast Phases: 2 |
0/0 0/0 | |
| Echelon Line Abreast Phases: 2 |
0/0 0/0 | ||
| # | Formation | Normal Battle Node | AD/AP AS/AS+ |
| # | Formation | Air Defense Node | AD/AP AS/AS+ |
|---|---|---|---|
| O2 | Diamond Phases: 2 |
44/87 195/390 | |
| Diamond Phases: 2 |
17/33 72/144 | ||
| Diamond Phases: 2 |
23/46 102/204 | ||
| # | Formation | Air Defense Node | AD/AP AS/AS+ |
| # | Formation | Normal Battle Node | AD/AP AS/AS+ |
|---|---|---|---|
| O3 | Line Ahead Echelon Vanguard Phases: 2 |
0/0 0/0 | |
| # | Formation | Normal Battle Node | AD/AP AS/AS+ |
| # | Empty Node | ||
|---|---|---|---|
| P | 気のせいだった。 第八艦隊、抜錨!出撃する! Must be my imagination. 8th Fleet, weigh anchors! Sortie! | ||
| # | Empty Node | ||
| # | Selection Node | ||
|---|---|---|---|
| Q | 精鋭第二水雷戦隊、出撃! Elite 2nd Torpedo Squadron, sortie! | ||
| # | Selection Node | ||
| # | Formation | Normal Battle Node | AD/AP AS/AS+ |
|---|---|---|---|
| R | Echelon Line Abreast Phases: 2 |
0/0 0/0 | |
| Echelon Line Abreast Phases: 2 |
0/0 0/0 | ||
| # | Formation | Normal Battle Node | AD/AP AS/AS+ |
| # | Formation | Normal Battle Node | AD/AP AS/AS+ |
|---|---|---|---|
| S | Line Ahead Echelon Vanguard Phases: 2 |
0/0 0/0 | |
| # | Formation | Normal Battle Node | AD/AP AS/AS+ |
| # | Formation | Air Defense Node | AD/AP AS/AS+ |
|---|---|---|---|
| T | Diamond Phases: 2 |
37/73 162/324 | |
| Diamond Phases: 2 |
60/119 266/531 | ||
| Diamond Phases: 2 |
83/165 369/738 | ||
| # | Formation | Air Defense Node | AD/AP AS/AS+ |
| # | Formation | Air Defense Node | AD/AP AS/AS+ |
|---|---|---|---|
| U | Diamond Phases: 2 |
37/73 162/324 | |
| Diamond Phases: 2 |
60/119 266/531 | ||
| Diamond Phases: 2 |
83/165 369/738 | ||
| # | Formation | Air Defense Node | AD/AP AS/AS+ |
| # | Formation | Normal Battle Node | AD/AP AS/AS+ |
|---|---|---|---|
| V | Diamond Phases: 2 |
9/17 36/72 | |
| Diamond Phases: 2 |
24/47 104/207 | ||
| Diamond Phases: 2 |
32/63 140/279 | ||
| # | Formation | Normal Battle Node | AD/AP AS/AS+ |
| # | Formation | Boss Battle Node | AD/AP AS/AS+ |
|---|---|---|---|
| W | Cruising Formation 4 Phases: 2 |
37/73 162/324 | |
| Cruising Formation 4 Phases: 2 (Final)
|
45/89 198/396 | ||
| # | Formation | Boss Battle Node | AD/AP AS/AS+ |
| # | Empty Node | ||
|---|---|---|---|
| W1 | 敵影を見ず。 精鋭第二水雷戦隊、出撃! No enemy spotted. Elite 2nd Torpedo Squadron, sortie! | ||
| # | Empty Node | ||
| # | Empty Node | ||
|---|---|---|---|
| W2 | 敵影を見ず。 精鋭第二水雷戦隊、出撃! No enemy spotted. Elite 2nd Torpedo Squadron, sortie! | ||
| # | Empty Node | ||
| # | Formation | Normal Battle Node | AD/AP AS/AS+ |
|---|---|---|---|
| X | Line Ahead Echelon Line Abreast Phases: 3 |
0/0 0/0 | |
| # | Formation | Normal Battle Node | AD/AP AS/AS+ |
| # | Empty Node | ||
|---|---|---|---|
| Y | 敵影を見ず。 敵巡洋艦部隊、発見!揚陸止め!全軍、戦闘準備!突撃せよ! No enemy spotted. Enemy cruiser force spotted! Stop the landing! All troops, prepare for battle! Charge! | ||
| # | Empty Node | ||
| # | Formation | Boss Battle Node | AD/AP AS/AS+ |
|---|---|---|---|
| Z | Line Ahead Phases: 3 |
0/0 0/0 | |
| Line Ahead Phases: 3 |
0/0 0/0 | ||
| Line Ahead Phases: 3 (Final)
|
0/0 0/0 | ||
| # | Formation | Boss Battle Node | AD/AP AS/AS+ |
Ship Drops:
| Ship drops | |||||||||||||||||||||||||||||||||||||||||||||||||||||||||||||||||||||||||||||||||||||||||||||||||||
|---|---|---|---|---|---|---|---|---|---|---|---|---|---|---|---|---|---|---|---|---|---|---|---|---|---|---|---|---|---|---|---|---|---|---|---|---|---|---|---|---|---|---|---|---|---|---|---|---|---|---|---|---|---|---|---|---|---|---|---|---|---|---|---|---|---|---|---|---|---|---|---|---|---|---|---|---|---|---|---|---|---|---|---|---|---|---|---|---|---|---|---|---|---|---|---|---|---|---|---|
| Type | Ship? | N | O3 | V | W | Z | |||||||||||||||||||||||||||||||||||||||||||||||||||||||||||||||||||||||||||||||||||||||||||||
| DE | Shimushu | Casual+ | |||||||||||||||||||||||||||||||||||||||||||||||||||||||||||||||||||||||||||||||||||||||||||||||||
| DE | Kunashiri | Casual+ | |||||||||||||||||||||||||||||||||||||||||||||||||||||||||||||||||||||||||||||||||||||||||||||||||
| DE | Etorofu | Easy+ | Easy+ | Casual+ | |||||||||||||||||||||||||||||||||||||||||||||||||||||||||||||||||||||||||||||||||||||||||||||||
| DD | Minazuki | Casual+ | |||||||||||||||||||||||||||||||||||||||||||||||||||||||||||||||||||||||||||||||||||||||||||||||||
| DD | Harusame | Casual+ | Easy+ | Casual+ | Casual+ | ||||||||||||||||||||||||||||||||||||||||||||||||||||||||||||||||||||||||||||||||||||||||||||||
| DD | Umikaze | Casual+ | Casual+ | ||||||||||||||||||||||||||||||||||||||||||||||||||||||||||||||||||||||||||||||||||||||||||||||||
| DD | Kawakaze | Casual+ | Casual+ | Casual+ | Casual+ | ||||||||||||||||||||||||||||||||||||||||||||||||||||||||||||||||||||||||||||||||||||||||||||||
| DD | Oyashio | Casual+ | Easy+ | Medium+ | Casual+ | ||||||||||||||||||||||||||||||||||||||||||||||||||||||||||||||||||||||||||||||||||||||||||||||
| DD | Hatsukaze | Casual+ | |||||||||||||||||||||||||||||||||||||||||||||||||||||||||||||||||||||||||||||||||||||||||||||||||
| DD | Arashi | Medium+ | Casual+ | ||||||||||||||||||||||||||||||||||||||||||||||||||||||||||||||||||||||||||||||||||||||||||||||||
| DD | Hagikaze | Hard+ | Medium+ | Casual+ | |||||||||||||||||||||||||||||||||||||||||||||||||||||||||||||||||||||||||||||||||||||||||||||||
| DD | Makinami | Casual+ | |||||||||||||||||||||||||||||||||||||||||||||||||||||||||||||||||||||||||||||||||||||||||||||||||
| DD | Takanami | Casual+ | Easy+ | Casual+ | Casual+ | ||||||||||||||||||||||||||||||||||||||||||||||||||||||||||||||||||||||||||||||||||||||||||||||
| DD | Fujinami | Casual+ | |||||||||||||||||||||||||||||||||||||||||||||||||||||||||||||||||||||||||||||||||||||||||||||||||
| DD | Hayanami | Casual+ | |||||||||||||||||||||||||||||||||||||||||||||||||||||||||||||||||||||||||||||||||||||||||||||||||
| DD | Akishimo | Hard+ | Casual+ | ||||||||||||||||||||||||||||||||||||||||||||||||||||||||||||||||||||||||||||||||||||||||||||||||
| CL | Noshiro | Casual+ | |||||||||||||||||||||||||||||||||||||||||||||||||||||||||||||||||||||||||||||||||||||||||||||||||
| CL | Yahagi | Casual+ | |||||||||||||||||||||||||||||||||||||||||||||||||||||||||||||||||||||||||||||||||||||||||||||||||
| CL | Ooyodo | Casual+ | Easy+ | Casual+ | Casual+ | ||||||||||||||||||||||||||||||||||||||||||||||||||||||||||||||||||||||||||||||||||||||||||||||
| CL | Perth | Casual+ | |||||||||||||||||||||||||||||||||||||||||||||||||||||||||||||||||||||||||||||||||||||||||||||||||
| FBB | Washington | Casual+ | |||||||||||||||||||||||||||||||||||||||||||||||||||||||||||||||||||||||||||||||||||||||||||||||||
| BB | Colorado | Casual+ | |||||||||||||||||||||||||||||||||||||||||||||||||||||||||||||||||||||||||||||||||||||||||||||||||
| CV | Hornet | Medium+ | Casual+ | ||||||||||||||||||||||||||||||||||||||||||||||||||||||||||||||||||||||||||||||||||||||||||||||||
| DD | Yukikaze | Casual+ | |||||||||||||||||||||||||||||||||||||||||||||||||||||||||||||||||||||||||||||||||||||||||||||||||
| DD | Yuugumo | Casual+ | |||||||||||||||||||||||||||||||||||||||||||||||||||||||||||||||||||||||||||||||||||||||||||||||||
| DD | Makigumo | Casual+ | |||||||||||||||||||||||||||||||||||||||||||||||||||||||||||||||||||||||||||||||||||||||||||||||||
| DD | Naganami | Casual+ | Easy+ | Casual+ | Casual+ | ||||||||||||||||||||||||||||||||||||||||||||||||||||||||||||||||||||||||||||||||||||||||||||||
| CL | Kitakami | Casual+ | |||||||||||||||||||||||||||||||||||||||||||||||||||||||||||||||||||||||||||||||||||||||||||||||||
| CL | Ooi | Casual+ | |||||||||||||||||||||||||||||||||||||||||||||||||||||||||||||||||||||||||||||||||||||||||||||||||
| CL | Nagara | Casual+ | Easy+ | Casual+ | Casual+ | Casual+ | |||||||||||||||||||||||||||||||||||||||||||||||||||||||||||||||||||||||||||||||||||||||||||||
| CL | Sendai | Casual+ | Easy+ | Casual+ | Casual+ | Casual+ | |||||||||||||||||||||||||||||||||||||||||||||||||||||||||||||||||||||||||||||||||||||||||||||
| CA | Myoukou | Casual+ | |||||||||||||||||||||||||||||||||||||||||||||||||||||||||||||||||||||||||||||||||||||||||||||||||
| CA | Atago | Casual+ | |||||||||||||||||||||||||||||||||||||||||||||||||||||||||||||||||||||||||||||||||||||||||||||||||
| CA | Suzuya | Casual+ | |||||||||||||||||||||||||||||||||||||||||||||||||||||||||||||||||||||||||||||||||||||||||||||||||
| CA | Kumano | Casual+ | |||||||||||||||||||||||||||||||||||||||||||||||||||||||||||||||||||||||||||||||||||||||||||||||||
| CA | Chikuma | Casual+ | |||||||||||||||||||||||||||||||||||||||||||||||||||||||||||||||||||||||||||||||||||||||||||||||||
| CVL | Ryuujou | Casual+ | Casual+ | Casual+ | Casual+ | ||||||||||||||||||||||||||||||||||||||||||||||||||||||||||||||||||||||||||||||||||||||||||||||
| CVL | Shouhou | Casual+ | Easy+ | Easy+ | Casual+ | ||||||||||||||||||||||||||||||||||||||||||||||||||||||||||||||||||||||||||||||||||||||||||||||
| CVL | Zuihou | Easy+ | Casual+ | ||||||||||||||||||||||||||||||||||||||||||||||||||||||||||||||||||||||||||||||||||||||||||||||||
| CVL | Junyou | Casual+ | Easy+ | Casual+ | Casual+ | ||||||||||||||||||||||||||||||||||||||||||||||||||||||||||||||||||||||||||||||||||||||||||||||
| FBB | Hiei | Casual+ | |||||||||||||||||||||||||||||||||||||||||||||||||||||||||||||||||||||||||||||||||||||||||||||||||
| FBB | Kirishima | Easy+ | |||||||||||||||||||||||||||||||||||||||||||||||||||||||||||||||||||||||||||||||||||||||||||||||||
| BB | Fusou | Casual+ | |||||||||||||||||||||||||||||||||||||||||||||||||||||||||||||||||||||||||||||||||||||||||||||||||
| BB | Yamashiro | Casual+ | |||||||||||||||||||||||||||||||||||||||||||||||||||||||||||||||||||||||||||||||||||||||||||||||||
| BB | Nagato | Casual+ | |||||||||||||||||||||||||||||||||||||||||||||||||||||||||||||||||||||||||||||||||||||||||||||||||
| BB | Mutsu | Casual+ | |||||||||||||||||||||||||||||||||||||||||||||||||||||||||||||||||||||||||||||||||||||||||||||||||
| CV | Shoukaku | Medium+ | Casual+ | ||||||||||||||||||||||||||||||||||||||||||||||||||||||||||||||||||||||||||||||||||||||||||||||||
| CV | Zuikaku | Hard+ | |||||||||||||||||||||||||||||||||||||||||||||||||||||||||||||||||||||||||||||||||||||||||||||||||
| E-3 Clear Message |
|---|