• Welcome to the Kancolle Wiki!
  • If you have any questions regarding site content, account registration, etc., please visit the KanColle Wiki Discord

Difference between revisions of "Spring 2021 Event/E-2"

From Kancolle Wiki
Jump to navigation Jump to search
m
Line 167: Line 167:
 
* Notes: Support expeditions are optional. You can use vanguard formation to pass the surface nodes
 
* Notes: Support expeditions are optional. You can use vanguard formation to pass the surface nodes
 
* LoS: About '''44+/34+/27+/23+ Cn3''' on '''Hard/Medium/Easy/Casual''' is required to route from {{MapRoute|J| green}} to {{MapRoute|Q|red}} with this comp.
 
* LoS: About '''44+/34+/27+/23+ Cn3''' on '''Hard/Medium/Easy/Casual''' is required to route from {{MapRoute|J| green}} to {{MapRoute|Q|red}} with this comp.
 +
* Will deplete the TP Gauge fast compared to the Submarine Composition.
 +
* May result in extra bucket being spent while doing the runs.
 +
* Will also result in additional ship being locked the map.
 
|-|Submarine Comp=
 
|-|Submarine Comp=
 
* Recommended Fleet: 6SS(V)
 
* Recommended Fleet: 6SS(V)
Line 175: Line 178:
 
* However, the amount of TP drain per run will be very low, requiring more runs to be taken (Around 40-50 runs depending on the equipment you have).
 
* However, the amount of TP drain per run will be very low, requiring more runs to be taken (Around 40-50 runs depending on the equipment you have).
 
* This can be ideal if you plan to conserve ships for tagging in later sections of the event.
 
* This can be ideal if you plan to conserve ships for tagging in later sections of the event.
 +
* This can also be helpful in conserving buckets that would otherwise be spent in this map using a surface related composition.
 
* LoS: The LoS check from {{MapRoute|J| green}} to {{MapRoute|Q|red}} is ignored if using a full fleet of 6 SS(V).
 
* LoS: The LoS check from {{MapRoute|J| green}} to {{MapRoute|Q|red}} is ignored if using a full fleet of 6 SS(V).
 
**Based on current data, using less than 3-4 SS(V) in a fleet may result in off-routing to {{MapRoute|L|blue}} regardless.
 
**Based on current data, using less than 3-4 SS(V) in a fleet may result in off-routing to {{MapRoute|L|blue}} regardless.

Revision as of 04:27, 18 May 2021

E-2

Spring2021E-2Map.png

Spring2021E-2MapP1.png

Spring2021E-2MapP2.png

Spring2021E-2MapP3.png

Spring2021E-2LBASMap.png

Information
Event Tag Purple Tag: 6th Fleet
Blue Tag: 3rd Fleet
Boss Gauges Hard (): 500 TP, 1950 HP, 1750 HP
Medium (): 400 TP, 1850 HP, 1750 HP
Easy (): 280 TP, 1750 HP, 1750 HP
Casual (): 280 TP, 1750 HP, 1750 HP
Map Bosses
Rewards
All
Equipment/Item
Casual

Easy

Medium

Hard
Item Icon Medal.png
Medal
1
Item Icon Reinforcement Expansion.png
Reinforcement Expansion
1 1 1
Equipment Card Emergency Repair Goddess.png
Emergency Repair Goddess
1 2 2
Item Icon Submarine Supply Material.png
Submarine Supply Material
1 2 3 4
Equipment Card SOC Seagull.png
SOC Seagull
1 (★5) 1 (★8)
Equipment Card Elite Torpedo Squadron Command Facility.png
Elite Torpedo Squadron Command Facility
1 1 1 (★2) 1 (★4)
OoyodoE-2Spring2021.png


E-2 Branching Rules
Nodes Rules
Start
1
  • Fleet does not contain SS(V) (only if start point 3 is unlocked)
  • Does not meet the requirements for start point 1 or 3
2
  • Meet ANY of the following requirements:
3
  • Start point 3 is unlocked
  • Meet ANY of the following requirements:
    • CL = 2 and DD = 4 (only for Casual)
    • Fleet contains only SS(V)
    • Fleet contains AS
    • Fleet contains CL
    • DD ≥ 2
3
V
  • Does not meet the requirements to go to W
W
  • Meet ANY of the following requirements:
    • Fleet contains only SS(V)
    • Fleet contains AS
    • Fleet contains CL and DD ≥ 3 and does not contain (F)BB(V)
B
D
  • Force D if fleet contains only SS(V)
  • Meet ALL of the following requirements:
E
  • Does not meet the requirements to go to D
D
F
  • Active branching
H
H
I
  • Force J if fleet contains only SS(V), or if DD = 6
  • Meet ALL the following requirements to go to J
    • Fleet does not contain (F)BB(V)
    • CL + CT + CLT < 2
    • Fast fleet (ignored for Casual)
    • Fleet contains CL (ignored for Casual)
  • On Easy, other fleets go to J
  • Otherwise, go to I
J
J
L
  • Fail the LoS check
Q
  • Ignore the LoS check if fleet contains only SS(V) and SS(V) ≥ 3(?)
  • Pass the LoS check
K
L
  • If using Single Fleet:
    • Route to M if CV(B) ≥ 3
    • Otherwise, route to N
  • If using Combined Fleet:
    • Pass the LoS check to go to M
    • Fail the LoS check to go to L
M
N
N
O
  • Does not meet the requirements to go to P
P
  • Meet ALL of the following requirements:
    • (F)BB(V) ≤ 2
    • If fleet is Slow, (F)BB(V) + CV(B/L) ≤ 5
P
R
  • Does not meet the requirements to go to T
T
  • Meet ALL of the following requirements:
    • CV(B/L) ≤ 3 and CV(B) ≤ 2
    • (F)BB(V) ≤ 2
    • (F)BB(V) + CV(B) ≤ 5
    • Fast fleet
T
S
  • Fail the LoS check
U
  • Pass the LoS check
W
X
  • Does not meet the requirements to go to Z
Z
  • Meet ANY of the following requirements:
    • Fleet contains only SS(V) or AS
    • AS + SS(V) ≥ 5
    • AS + SS(V) = 4 and CL = 1 and DD = 1
Y
Q
  • Active branching
Z
ZI
S
  • Fail the LoS check
ZII
  • Pass the LoS check


Branching compositions were reported over the course of the event.

The event guides are to be constructed through the respective Event map page guide and reviewed by editor staff / collaboration committee before being approved here. Do not under any circumstance update the guides through this page or attempt to fix them through this page. Please only update guides through their respective sandbox pages.

Ship Bonuses (Tentative)

DISCLAIMER: This information is based on user submitted data and is subject to revisions as more data is gathered. Any version of the ship receives the bonus regardless of remodel.

Ships Nodes E/H/I/Q
Ship Banner Isuzu Kai Ni.png 1.35x
(1.6875x)
Submarines (SS/SSV) 1.35x
IJN Light Cruisers (CL) 1.25x
IJN Destroyers (DD) 1.15x
Ships Nodes M/P/U
Ship Banner Isuzu Kai Ni.png 1.35x
Ship Banner Hiei Kai Ni C.png Ship Banner Kirishima Kai Ni.png Ship Banner Zuikaku Kai Ni A.png 1.2x
Ship Banner Shoukaku Kai Ni A.png Ship Banner Suzuya Kai Ni.png Ship Banner Kumano Kai Ni.png
Ship Banner Zuihou Kai Ni.png - -
Ship Banner Yuugumo Kai Ni.png Ship Banner Makigumo Kai Ni.png Ship Banner Kazagumo Kai Ni.png
Ship Banner Isokaze B Kai.png Ship Banner Hamakaze B Kai.png Ship Banner Tanikaze D Kai.png
Ship Banner Teruzuki Kai.png Ship Banner Yukikaze Kai Ni.png Ship Banner Arashi Kai.png
Ship Banner Hatsukaze Kai.png Ship Banner Amatsukaze Kai.png -
Ships Nodes Z1/Z2
Ship Banner Isuzu Kai Ni.png 1.35x
Ship Banner Akigumo Kai Ni.png Ship Banner Yuudachi Kai Ni.png Ship Banner Shigure Kai Ni.png 1.15x
Ship Banner Asashio Kai Ni.png Ship Banner Kasumi Kai Ni.png Ship Banner Michishio Kai Ni.png
Ship Banner Kagerou Kai Ni.png Ship Banner Yukikaze Kai Ni.png Ship Banner Verniy.png
Ship Banner Ayanami Kai Ni.png Ship Banner Akizuki Kai.png Ship Banner Shimakaze Kai.png
Ship Banner Satsuki Kai Ni.png - -
Submarines (SS/SSV)
Multiplicative with below
1.35x
Ship Banner I-19 Kai.png 1.25x (1.6875x)
Ship Banner I-26 Kai.png 1.15x (1.5525x)

General Information

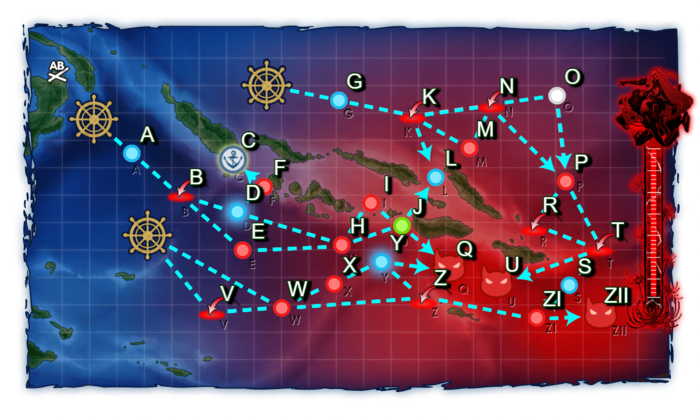
  • There are 2 different tags for this map:
    • Blue Tag: 3rd Fleet (Requirement: Combined Fleet or Single Fleet with CV) (Northern Start)
    • Purple Tag: 6th Fleet (Requirements: Single Fleet with no CV) (2 Southern Starts)

Phase 1: TP Phase

This phase will require you to run a Single Fleet to deplete the TP bar at Q, consisting of a Ne-Class Kai and light escorts There are currently two known compositions to complete this phase:

  • Recommended Fleet: 1 CL 1 CAV/AV 4 DD (FAST)
  • Route: A B E H J Q
  • LBAS: Q 5 Range (no Airpower)
  • Notes: Support expeditions are optional. You can use vanguard formation to pass the surface nodes
  • LoS: About 44+/34+/27+/23+ Cn3 on Hard/Medium/Easy/Casual is required to route from J to Q with this comp.
  • Will deplete the TP Gauge fast compared to the Submarine Composition.
  • May result in extra bucket being spent while doing the runs.
  • Will also result in additional ship being locked the map.

  • Recommended Fleet: 6SS(V)
  • Route: A B D H J Q
  • LBAS: H 4 Range (no Airpower), Q 5 Range (no Airpower)
  • Notes: Only recommended if you have some Type 2 Ka-Mi Tanks and Drum Canister carrying Subs (Luigi Torelli Kai or higher).
  • Sub Fleet will be almost safe from any harm through the map as long as a land base is placed in Node H and Q.
  • However, the amount of TP drain per run will be very low, requiring more runs to be taken (Around 40-50 runs depending on the equipment you have).
  • This can be ideal if you plan to conserve ships for tagging in later sections of the event.
  • This can also be helpful in conserving buckets that would otherwise be spent in this map using a surface related composition.
  • LoS: The LoS check from J to Q is ignored if using a full fleet of 6 SS(V).
    • Based on current data, using less than 3-4 SS(V) in a fleet may result in off-routing to L regardless.

Phase 1.5: Unlock the route to Node U

Unlocking U has two requirements:

  • Reach C
  • S rank P twice (Hard), once (Medium)

    • Composition: 1SS (You can equip a damage control fairy on your submarine in case of taiha on F)
    • Route: A B D F C
    • LBAS: N/A

    • Composition: 2 FBB 2 CV 2 CA + 1 CL 5 DD (Fast Carrier Task Force)
    • Route: G K M N P
    • Alternatively, you can use a single fleet comprised of 3 CV(L), 2 (FBB or CA(V)), and a DD with a maximum of 2 CV to route G K N P
    • LBAS: Range 7, AP/AS on Hard: 124/279

Phase 2: Defeat CA Hime at Node U

You can use the same fleet you used in the previous unlocking phase

    • Composition: 2 FBB 2 CV 2 CA + 1 CL 5 DD (Fast Carrier Task Force)
    • Route: G K M N P T U
    • Alternatively, you can use a single fleet comprised of 3 CV(L), 2 (FBB or CA(V)), and a DD with a maximum of 2 CV to route G K N P T U
    • LBAS: Range 6, no Air Power
    • Notes: AACI is heavily recommended due to three airstrikes on route. Support Expeditions are optional

Phase 3: Defeat CV Hime at Node ZII

In this phase, you will need to take out an Aircraft Carrier Princess. There are several compositions availabe depending on selected difficulty:

  • Composition: 6 SS
    • The recommended composition for all difficulties
  • Route: W Z ZI ZII
  • LBAS Range: 8 Range, AP/AS on Hard 103/231
  • Notes: Node Support is recommended to help you pass through the 2 surface battle nodes. Boss Support Expedition is optional if you send LBAS to the Boss.
  • LoS: 29+/23+/21+/18+ Cn3 on Hard/Medium/Easy/Casual is required to route from ZI to ZII.

  • Composition: CL, AV/CAV, DD, 3 SS
    • Only should be considered if you lack submarines
  • Route: V W X Y Z ZI ZII
  • LBAS Range: 8 Range, AP/AS on Hard 103/231
  • Notes: Node Support is recommended. Boss Support is also recommended.
  • LoS: 29+/23+/21+/18+ Cn3 on Hard/Medium/Easy/Casual is required to route from ZI to ZII.

  • Composition: AS, BBV, 2CLT, 2SS(V)
    • Easy and Casual Difficulty Only (Use this Composition in case of a lack of Submarines)
  • Route: V W X Y Z ZI ZII
  • LBAS Range: 8 Range, AP/AS on Easy/Casual 88/197
  • Notes: Node Support is recommended. Boss Support is also recommended.
  • LoS: 29+/23+/21+/18+ Cn3 on Hard/Medium/Easy/Casual is required to route from ZI to ZII.

  • Composition: 2CL, 4DD
    • Casual Only (Use this Composition in case of a lack of Submarines)
  • Route: W X Y Z ZI ZII
  • LBAS Range: 8 Range, AP/AS on Easy 88/197
  • Notes: Vanguard formation can be utilized to help with passing rate. Boss Support is optional but recommended.
  • LoS: 29+/23+/21+/18+ Cn3 on Hard/Medium/Easy/Casual is required to route from ZI to ZII.

Enemy Compositions

E-2 Hard A
# Empty Node
A 気のせいだった。
ソロモン最前線へ、鼠輸送を敢行する!

Must be my imagination.
To the front lines of the Solomons,
carrying out a Rat Transport Operation!
# Empty Node
E-2 Hard B: 深海ソロモン方面 基地航空隊 (PoiDB)
# Formation Air Defense Node AD/AP
AS/AS+
B Diamond
Phases: 1, 2, 3
Lycoris Princess IV (1682): 100 Armor, 600 HP, 130 APBattle Card Flagship Icon.png Airfield Princess V (1650): 140 Armor, 500 HP, 34 APAbyssal Liberation Land-based Dive Bomber 561 Equipment.png
55/110
246/492
Diamond
Phases: 1, 2, 3
Lycoris Princess IV (1682): 100 Armor, 600 HP, 130 APBattle Card Flagship Icon.png Airfield Princess VI (1651): 140 Armor, 500 HP, 48 APAbyssal Liberation Land-based Dive Bomber Ace 562 Equipment.pngAbyssal Liberation Land-based Dive Bomber 561 Equipment.png
60/119
267/534
Diamond
Phases: 1, 2, 3
Lycoris Princess IV (1682): 100 Armor, 600 HP, 130 APBattle Card Flagship Icon.png Airfield Princess V (1650): 140 Armor, 500 HP, 34 APAbyssal Liberation Land-based Dive Bomber 561 Equipment.png Airfield Princess V (1650): 140 Armor, 500 HP, 34 APAbyssal Liberation Land-based Dive Bomber 561 Equipment.png
67/133
297/594
Diamond
Phases: 1, 2, 3
Lycoris Princess V (1683): 100 Armor, 600 HP, 157 APBattle Card Flagship Icon.png Airfield Princess V (1650): 140 Armor, 500 HP, 34 APAbyssal Liberation Land-based Dive Bomber 561 Equipment.png Airfield Princess V (1650): 140 Armor, 500 HP, 34 APAbyssal Liberation Land-based Dive Bomber 561 Equipment.png
76/151
338/675
Diamond
Phases: 1, 2, 3
Lycoris Princess V (1683): 100 Armor, 600 HP, 157 APBattle Card Flagship Icon.png Airfield Princess VI (1651): 140 Armor, 500 HP, 48 APAbyssal Liberation Land-based Dive Bomber Ace 562 Equipment.pngAbyssal Liberation Land-based Dive Bomber 561 Equipment.png Airfield Princess V (1650): 140 Armor, 500 HP, 34 APAbyssal Liberation Land-based Dive Bomber 561 Equipment.png
80/160
359/717
# Formation Air Defense Node AD/AP
AS/AS+
E-2 Hard C
# Resource Node
# Resource Node
E-2 Hard D
# Selection Node
D ソロモン最前線へ、鼠輸送を敢行する!
To the front lines of the Solomons,
carrying out a Rat Transport Operation!
# Selection Node
E-2 Hard E: 深海艦隊 前方展開警戒部隊 (PoiDB)
# Formation Normal Battle Node AD/AP
AS/AS+
E Line Ahead
Phases: 1, 2
Destroyer Ro-Class Late Model Elite (1622): 36 Armor, 43 HPBattle Card Flagship Icon.png Destroyer Ro-Class Late Model (1576): 26 Armor, 37 HP Destroyer Ro-Class Late Model (1576): 26 Armor, 37 HP Destroyer Ro-Class Late Model (1576): 26 Armor, 37 HP Destroyer Ro-Class Late Model (1576): 26 Armor, 37 HP
0/0
0/0
Line Ahead
Echelon
Phases: 1, 2, 3
Light Cruiser Ho-Class Flagship (1554): 36 Armor, 53 HPBattle Card Flagship Icon.png Destroyer Ro-Class Late Model (1576): 26 Armor, 37 HP Destroyer Ro-Class Late Model (1576): 26 Armor, 37 HP Destroyer Ro-Class Late Model (1576): 26 Armor, 37 HP Submarine Ka-Class Elite (1532): 21 Armor, 27 HP
0/0
0/0
# Formation Normal Battle Node AD/AP
AS/AS+
E-2 Hard F: 深海艦隊 泊地待伏部隊 (PoiDB)
# Formation Normal Battle Node AD/AP
AS/AS+
F Echelon
Phases: 1, 2
Submarine Ka-Class Elite (1532): 21 Armor, 27 HPBattle Card Flagship Icon.png Submarine Ka-Class Elite (1532): 21 Armor, 27 HP Destroyer Ro-Class Late Model (1576): 26 Armor, 37 HP Destroyer Ro-Class Late Model (1576): 26 Armor, 37 HP
0/0
0/0
Line Ahead
Phases: 1, 2
Submarine Ka-Class Elite (1532): 21 Armor, 27 HPBattle Card Flagship Icon.png Destroyer Ro-Class Late Model Elite (1622): 36 Armor, 43 HP Destroyer Ro-Class Late Model (1576): 26 Armor, 37 HP Destroyer Ro-Class Late Model (1576): 26 Armor, 37 HP
0/0
0/0
Echelon
Phases: 1, 2
Submarine Ka-Class Elite (1532): 21 Armor, 27 HPBattle Card Flagship Icon.png Submarine Ka-Class Elite (1532): 21 Armor, 27 HP Submarine Ka-Class Elite (1532): 21 Armor, 27 HP Destroyer Ro-Class Late Model Elite (1622): 36 Armor, 43 HP
0/0
0/0
# Formation Normal Battle Node AD/AP
AS/AS+
E-2 Hard G
# Empty Node
G 気のせいだった。
第三艦隊、出撃する!対空警戒を厳に!

Must be my imagination.
3rd Fleet, sortieing!
Maintain high anti-aircraft alert!
# Empty Node
E-2 Hard H: 深海艦隊 東京急行阻止線 (PoiDB)
# Formation Normal Battle Node AD/AP
AS/AS+
H Line Ahead
Phases: 1, 2
Destroyer Ro-Class Late Model Elite (1622): 36 Armor, 43 HPBattle Card Flagship Icon.png Destroyer Ro-Class Late Model Elite (1622): 36 Armor, 43 HP Destroyer Ro-Class Late Model (1576): 26 Armor, 37 HP Destroyer Ro-Class Late Model (1576): 26 Armor, 37 HP Destroyer I-Class (1501): 5 Armor, 20 HP Destroyer I-Class (1501): 5 Armor, 20 HP
0/0
0/0
Line Ahead
Phases: 1, 2
Destroyer Ro-Class Late Model Elite (1622): 36 Armor, 43 HPBattle Card Flagship Icon.png Destroyer Ro-Class Late Model Elite (1622): 36 Armor, 43 HP Destroyer Ro-Class Late Model (1576): 26 Armor, 37 HP Destroyer Ro-Class Late Model (1576): 26 Armor, 37 HP Destroyer Ro-Class Late Model (1576): 26 Armor, 37 HP Destroyer I-Class (1501): 5 Armor, 20 HP
0/0
0/0
Line Ahead
Phases: 1, 2
Light Cruiser Tsu-Class Elite (1592): 68 Armor, 66 HPBattle Card Flagship Icon.png Destroyer Ro-Class Late Model Elite (1622): 36 Armor, 43 HP Destroyer Ro-Class Late Model (1576): 26 Armor, 37 HP Destroyer Ro-Class Late Model (1576): 26 Armor, 37 HP Destroyer Ro-Class Late Model (1576): 26 Armor, 37 HP Destroyer I-Class (1501): 5 Armor, 20 HP
0/0
0/0
# Formation Normal Battle Node AD/AP
AS/AS+
E-2 Hard I: 深海艦隊 東京急行阻止増援部隊 (PoiDB)
# Formation Normal Battle Node AD/AP
AS/AS+
I Line Ahead
Phases: 1
Battleship Ta-Class Elite (1542): 88 Armor, 88 HPBattle Card Flagship Icon.png Destroyer Ro-Class Late Model (1576): 26 Armor, 37 HP Destroyer Ro-Class Late Model (1576): 26 Armor, 37 HP Destroyer Ro-Class Late Model (1576): 26 Armor, 37 HP Destroyer Ro-Class Late Model (1576): 26 Armor, 37 HP
0/0
0/0
Line Ahead
Phases: 1
Battleship Ta-Class Elite (1542): 88 Armor, 88 HPBattle Card Flagship Icon.png Battleship Ta-Class Elite (1542): 88 Armor, 88 HP Destroyer Ro-Class Late Model (1576): 26 Armor, 37 HP Destroyer Ro-Class Late Model (1576): 26 Armor, 37 HP Destroyer Ro-Class Late Model (1576): 26 Armor, 37 HP
0/0
0/0
Line Ahead
Phases: 1
Battleship Ta-Class Elite (1542): 88 Armor, 88 HPBattle Card Flagship Icon.png Battleship Ta-Class Elite (1542): 88 Armor, 88 HP Destroyer Ro-Class Late Model (1576): 26 Armor, 37 HP Destroyer Ro-Class Late Model (1576): 26 Armor, 37 HP Destroyer Ro-Class Late Model (1576): 26 Armor, 37 HP Destroyer Ro-Class Late Model (1576): 26 Armor, 37 HP
0/0
0/0
# Formation Normal Battle Node AD/AP
AS/AS+
E-2 Hard J
# Landing Node
# Landing Node
E-2 Hard K: 深海ソロモン方面 基地航空隊 (PoiDB)
# Formation Air Defense Node AD/AP
AS/AS+
K Diamond
Phases: 1, 2, 3
Lycoris Princess IV (1682): 100 Armor, 600 HP, 130 APBattle Card Flagship Icon.png Airfield Princess V (1650): 140 Armor, 500 HP, 34 APAbyssal Liberation Land-based Dive Bomber 561 Equipment.png
55/110
246/492
Diamond
Phases: 1, 2, 3
Lycoris Princess IV (1682): 100 Armor, 600 HP, 130 APBattle Card Flagship Icon.png Airfield Princess VI (1651): 140 Armor, 500 HP, 48 APAbyssal Liberation Land-based Dive Bomber Ace 562 Equipment.pngAbyssal Liberation Land-based Dive Bomber 561 Equipment.png
60/119
267/534
Diamond
Phases: 1, 2, 3
Lycoris Princess IV (1682): 100 Armor, 600 HP, 130 APBattle Card Flagship Icon.png Airfield Princess V (1650): 140 Armor, 500 HP, 34 APAbyssal Liberation Land-based Dive Bomber 561 Equipment.png Airfield Princess V (1650): 140 Armor, 500 HP, 34 APAbyssal Liberation Land-based Dive Bomber 561 Equipment.png
67/133
297/594
Diamond
Phases: 1, 2, 3
Lycoris Princess V (1683): 100 Armor, 600 HP, 157 APBattle Card Flagship Icon.png Airfield Princess V (1650): 140 Armor, 500 HP, 34 APAbyssal Liberation Land-based Dive Bomber 561 Equipment.png Airfield Princess V (1650): 140 Armor, 500 HP, 34 APAbyssal Liberation Land-based Dive Bomber 561 Equipment.png
76/151
338/675
Diamond
Phases: 1, 2, 3
Lycoris Princess V (1683): 100 Armor, 600 HP, 157 APBattle Card Flagship Icon.png Airfield Princess VI (1651): 140 Armor, 500 HP, 48 APAbyssal Liberation Land-based Dive Bomber Ace 562 Equipment.pngAbyssal Liberation Land-based Dive Bomber 561 Equipment.png Airfield Princess V (1650): 140 Armor, 500 HP, 34 APAbyssal Liberation Land-based Dive Bomber 561 Equipment.png
80/160
359/717
# Formation Air Defense Node AD/AP
AS/AS+
E-2 Hard L
# Empty Node
L 敵影を見ず。
第三艦隊、出撃する!対空警戒を厳に!

No enemy spotted.
3rd Fleet, sortieing!
Maintain high anti-aircraft alert!
# Empty Node
E-2 Hard M: 深海潜水艦隊 ソロモン哨戒線 I群 (PoiDB)
# Formation Normal Battle Node AD/AP
AS/AS+
M Echelon
Line Abreast
Phases: 2, 3
Submarine Ka-Class Flagship (1534): 30 Armor, 37 HPBattle Card Flagship Icon.png Submarine Ka-Class Elite (1532): 21 Armor, 27 HP Submarine Ka-Class Elite (1532): 21 Armor, 27 HP
0/0
0/0
Echelon
Line Abreast
Phases: 2, 3
Submarine Ka-Class Flagship (1534): 30 Armor, 37 HPBattle Card Flagship Icon.png Submarine Ka-Class Elite (1532): 21 Armor, 27 HP Submarine Ka-Class Elite (1532): 21 Armor, 27 HP Submarine Ka-Class Elite (1532): 21 Armor, 27 HP
0/0
0/0
# Formation Normal Battle Node AD/AP
AS/AS+
E-2 Hard N: 深海任務部隊 空母艦載機群 (PoiDB)
# Formation Air Defense Node AD/AP
AS/AS+
N Diamond
Phases: 1, 2, 3
Aircraft Carrier Princess III (1781): 180 Armor, 350 HP, 154 APAbyssal Hell Dive Bomber Kai.pngAbyssal Night Revenge Torpedo Bomber 583 Equipment.pngBattle Card Flagship Icon.png Light Carrier Nu-Class Elite II (1762): 35 Armor, 70 HP, 69 APHell plane 1.png Light Carrier Nu-Class Elite II (1762): 35 Armor, 70 HP, 69 APHell plane 1.png
98/195
438/876
Diamond
Phases: 1, 2, 3
Aircraft Carrier Princess IV (1782): 220 Armor, 350 HP, 154 APAbyssal Night Cat Fighter 581 Equipment.pngAbyssal Night Revenge Torpedo Bomber 583 Equipment.pngBattle Card Flagship Icon.png Light Carrier Nu-Class Elite II (1762): 35 Armor, 70 HP, 69 APHell plane 1.png Light Carrier Nu-Class Elite II (1762): 35 Armor, 70 HP, 69 APHell plane 1.png
98/195
438/876
Diamond
Phases: 1, 2, 3
Aircraft Carrier Princess IV (1782): 220 Armor, 350 HP, 154 APAbyssal Night Cat Fighter 581 Equipment.pngAbyssal Night Revenge Torpedo Bomber 583 Equipment.pngBattle Card Flagship Icon.png Light Carrier Nu-Class Flagship II (1763): 70 Armor, 84 HP, 77 APHell plane 1.png Light Carrier Nu-Class Elite II (1762): 35 Armor, 70 HP, 69 APHell plane 1.png
101/201
450/900
Diamond
Phases: 1, 2, 3
Aircraft Carrier Princess IV (1782): 220 Armor, 350 HP, 154 APAbyssal Night Cat Fighter 581 Equipment.pngAbyssal Night Revenge Torpedo Bomber 583 Equipment.pngBattle Card Flagship Icon.png Light Carrier Nu-Class Flagship II (1763): 70 Armor, 84 HP, 77 APHell plane 1.png Light Carrier Nu-Class Flagship II (1763): 70 Armor, 84 HP, 77 APHell plane 1.png
103/206
462/924
Diamond
Phases: 2
Aircraft Carrier Princess IV (1782): 220 Armor, 350 HP, 154 APAbyssal Night Cat Fighter 581 Equipment.pngAbyssal Night Revenge Torpedo Bomber 583 Equipment.pngBattle Card Flagship Icon.png Light Carrier Nu-Class Flagship II (1763): 70 Armor, 84 HP, 77 APHell plane 1.png Light Carrier Nu-Class Elite II (1762): 35 Armor, 70 HP, 69 APHell plane 1.png Light Carrier Nu-Class Elite II (1762): 35 Armor, 70 HP, 69 APHell plane 1.png
124/247
554/1107
# Formation Air Defense Node AD/AP
AS/AS+
E-2 Hard O: 深海潜水艦隊 増援封鎖部隊 II群 (PoiDB)
# Formation Normal Battle Node AD/AP
AS/AS+
O Echelon
Phases: 2
Submarine Ka-Class Flagship (1534): 30 Armor, 37 HPBattle Card Flagship Icon.png Submarine Ka-Class Elite (1532): 21 Armor, 27 HP Submarine Ka-Class Elite (1532): 21 Armor, 27 HP Submarine Ka-Class Elite (1532): 21 Armor, 27 HP
0/0
0/0
Line Abreast
Submarine Ka-Class Flagship (1534): 30 Armor, 37 HPBattle Card Flagship Icon.png Submarine Ka-Class Flagship (1534): 30 Armor, 37 HP Submarine Ka-Class Elite (1532): 21 Armor, 27 HP Submarine Ka-Class Elite (1532): 21 Armor, 27 HP
0/0
0/0
# Formation Normal Battle Node AD/AP
AS/AS+
E-2 Hard P: 深海艦隊 機動部隊 前衛空母群 (PoiDB)
# Formation Normal Battle Node AD/AP
AS/AS+
P Diamond
Phases: 1, 2
Light Carrier Nu-Class Flagship II (1763): 70 Armor, 84 HP, 77 APHell plane 1.pngBattle Card Flagship Icon.png Light Carrier Nu-Class Flagship II (1763): 70 Armor, 84 HP, 77 APHell plane 1.png Heavy Cruiser Ri-Class B Flagship (1999): 72 Armor, 80 HP Light Cruiser He-Class Flagship (1555): 39 Armor, 57 HP Destroyer Ro-Class Late Model (1576): 26 Armor, 37 HP Destroyer Ro-Class Late Model (1576): 26 Armor, 37 HP
52/103
231/462
Diamond
Phases: 1, 2, 3
Light Carrier Nu-Class Flagship III (1764): 70 Armor, 84 HP, 93 APAbyssal Cat Fighter Kai 556 Equipment.pngBattle Card Flagship Icon.png Light Carrier Nu-Class Flagship II (1763): 70 Armor, 84 HP, 77 APHell plane 1.png Heavy Cruiser Ri-Class B Flagship (1999): 72 Armor, 80 HP Light Cruiser He-Class Flagship (1555): 39 Armor, 57 HP Destroyer Ro-Class Late Model (1576): 26 Armor, 37 HP Destroyer Ro-Class Late Model (1576): 26 Armor, 37 HP
57/114
255/510
Diamond
Phases: 1, 2, 3
Light Carrier Nu-Class Flagship III (1764): 70 Armor, 84 HP, 93 APAbyssal Cat Fighter Kai 556 Equipment.pngBattle Card Flagship Icon.png Light Carrier Nu-Class Flagship III (1764): 70 Armor, 84 HP, 93 APAbyssal Cat Fighter Kai 556 Equipment.png Heavy Cruiser Ri-Class B Flagship (1999): 72 Armor, 80 HP Light Cruiser He-Class Kai Flagship (1904): 69 Armor, 115 HP Destroyer Ro-Class Late Model (1576): 26 Armor, 37 HP Destroyer Ro-Class Late Model (1576): 26 Armor, 37 HP
63/125
279/558
# Formation Normal Battle Node AD/AP
AS/AS+
E-2 Hard Q: 深海艦隊 東京急行阻止主力部隊 (PoiDB)
# Formation Boss Battle Node AD/AP
AS/AS+
Q Line Ahead
Phases: 3
Heavy Cruiser Ne-Class Kai III (1897): 255 Armor, 390 HPBattle Card Flagship Icon.png Heavy Cruiser Ri-Class Flagship (1527): 70 Armor, 76 HP Destroyer Ro-Class Late Model (1576): 26 Armor, 37 HP Destroyer Ro-Class Late Model (1576): 26 Armor, 37 HP Destroyer I-Class (1501): 5 Armor, 20 HP Destroyer I-Class (1501): 5 Armor, 20 HP
0/0
0/0
Line Ahead
Phases: 1
Heavy Cruiser Ne-Class Kai III (1897): 255 Armor, 390 HPBattle Card Flagship Icon.png Heavy Cruiser Ri-Class Flagship (1527): 70 Armor, 76 HP Heavy Cruiser Ri-Class Flagship (1527): 70 Armor, 76 HP Heavy Cruiser Ri-Class Flagship (1527): 70 Armor, 76 HP Destroyer Ro-Class Late Model (1576): 26 Armor, 37 HP Destroyer Ro-Class Late Model (1576): 26 Armor, 37 HP
0/0
0/0
Line Ahead
Phases: 1
(Final)
Heavy Cruiser Ne-Class Kai III (1897): 255 Armor, 390 HPBattle Card Flagship Icon.png Heavy Cruiser Ne-Class Elite (1595): 89 Armor, 88 HP Heavy Cruiser Ri-Class Flagship (1527): 70 Armor, 76 HP Heavy Cruiser Ri-Class Flagship (1527): 70 Armor, 76 HP Destroyer Ro-Class Late Model (1576): 26 Armor, 37 HP Destroyer Ro-Class Late Model (1576): 26 Armor, 37 HP
0/0
0/0
# Formation Boss Battle Node AD/AP
AS/AS+
E-2 Hard R: 深海任務部隊 空母艦載機群 (PoiDB)
# Formation Air Defense Node AD/AP
AS/AS+
R Diamond
Phases: 2
Aircraft Carrier Princess III (1781): 180 Armor, 350 HP, 154 APAbyssal Hell Dive Bomber Kai.pngAbyssal Night Revenge Torpedo Bomber 583 Equipment.pngBattle Card Flagship Icon.png Light Carrier Nu-Class Elite II (1762): 35 Armor, 70 HP, 69 APHell plane 1.png Light Carrier Nu-Class Elite II (1762): 35 Armor, 70 HP, 69 APHell plane 1.png
98/195
438/876
Diamond
Phases: 2
Aircraft Carrier Princess IV (1782): 220 Armor, 350 HP, 154 APAbyssal Night Cat Fighter 581 Equipment.pngAbyssal Night Revenge Torpedo Bomber 583 Equipment.pngBattle Card Flagship Icon.png Light Carrier Nu-Class Elite II (1762): 35 Armor, 70 HP, 69 APHell plane 1.png Light Carrier Nu-Class Elite II (1762): 35 Armor, 70 HP, 69 APHell plane 1.png
98/195
438/876
Diamond
Phases: 2
Aircraft Carrier Princess IV (1782): 220 Armor, 350 HP, 154 APAbyssal Night Cat Fighter 581 Equipment.pngAbyssal Night Revenge Torpedo Bomber 583 Equipment.pngBattle Card Flagship Icon.png Light Carrier Nu-Class Flagship II (1763): 70 Armor, 84 HP, 77 APHell plane 1.png Light Carrier Nu-Class Elite II (1762): 35 Armor, 70 HP, 69 APHell plane 1.png
101/201
450/900
Diamond
Phases: 2
Aircraft Carrier Princess IV (1782): 220 Armor, 350 HP, 154 APAbyssal Night Cat Fighter 581 Equipment.pngAbyssal Night Revenge Torpedo Bomber 583 Equipment.pngBattle Card Flagship Icon.png Light Carrier Nu-Class Flagship II (1763): 70 Armor, 84 HP, 77 APHell plane 1.png Light Carrier Nu-Class Flagship II (1763): 70 Armor, 84 HP, 77 APHell plane 1.png
103/206
462/924
Diamond
Phases: 2
Aircraft Carrier Princess IV (1782): 220 Armor, 350 HP, 154 APAbyssal Night Cat Fighter 581 Equipment.pngAbyssal Night Revenge Torpedo Bomber 583 Equipment.pngBattle Card Flagship Icon.png Light Carrier Nu-Class Flagship II (1763): 70 Armor, 84 HP, 77 APHell plane 1.png Light Carrier Nu-Class Elite II (1762): 35 Armor, 70 HP, 69 APHell plane 1.png Light Carrier Nu-Class Elite II (1762): 35 Armor, 70 HP, 69 APHell plane 1.png
124/247
554/1107
# Formation Air Defense Node AD/AP
AS/AS+
E-2 Hard S
# Empty Node
S 敵影を見ず。
第三艦隊、出撃する!対空警戒を厳に!

No enemy spotted.
3rd Fleet, sortieing!
Maintain high anti-aircraft alert!
# Empty Node
E-2 Hard T: 深海任務部隊 空母艦載機群 (PoiDB)
# Formation Air Defense Node AD/AP
AS/AS+
T Diamond
Phases: 2, 3
Aircraft Carrier Princess III (1781): 180 Armor, 350 HP, 154 APAbyssal Hell Dive Bomber Kai.pngAbyssal Night Revenge Torpedo Bomber 583 Equipment.pngBattle Card Flagship Icon.png Light Carrier Nu-Class Elite II (1762): 35 Armor, 70 HP, 69 APHell plane 1.png Light Carrier Nu-Class Elite II (1762): 35 Armor, 70 HP, 69 APHell plane 1.png
98/195
438/876
Diamond
Phases: 2, 3
Aircraft Carrier Princess IV (1782): 220 Armor, 350 HP, 154 APAbyssal Night Cat Fighter 581 Equipment.pngAbyssal Night Revenge Torpedo Bomber 583 Equipment.pngBattle Card Flagship Icon.png Light Carrier Nu-Class Elite II (1762): 35 Armor, 70 HP, 69 APHell plane 1.png Light Carrier Nu-Class Elite II (1762): 35 Armor, 70 HP, 69 APHell plane 1.png
98/195
438/876
Diamond
Phases: 2, 3
Aircraft Carrier Princess IV (1782): 220 Armor, 350 HP, 154 APAbyssal Night Cat Fighter 581 Equipment.pngAbyssal Night Revenge Torpedo Bomber 583 Equipment.pngBattle Card Flagship Icon.png Light Carrier Nu-Class Flagship II (1763): 70 Armor, 84 HP, 77 APHell plane 1.png Light Carrier Nu-Class Elite II (1762): 35 Armor, 70 HP, 69 APHell plane 1.png
101/201
450/900
Diamond
Phases: 2
Aircraft Carrier Princess IV (1782): 220 Armor, 350 HP, 154 APAbyssal Night Cat Fighter 581 Equipment.pngAbyssal Night Revenge Torpedo Bomber 583 Equipment.pngBattle Card Flagship Icon.png Light Carrier Nu-Class Flagship II (1763): 70 Armor, 84 HP, 77 APHell plane 1.png Light Carrier Nu-Class Flagship II (1763): 70 Armor, 84 HP, 77 APHell plane 1.png
103/206
462/924
Diamond
Phases: 2, 3
Aircraft Carrier Princess IV (1782): 220 Armor, 350 HP, 154 APAbyssal Night Cat Fighter 581 Equipment.pngAbyssal Night Revenge Torpedo Bomber 583 Equipment.pngBattle Card Flagship Icon.png Light Carrier Nu-Class Flagship II (1763): 70 Armor, 84 HP, 77 APHell plane 1.png Light Carrier Nu-Class Elite II (1762): 35 Armor, 70 HP, 69 APHell plane 1.png Light Carrier Nu-Class Elite II (1762): 35 Armor, 70 HP, 69 APHell plane 1.png
124/247
554/1107
# Formation Air Defense Node AD/AP
AS/AS+
E-2 Hard U: 深海艦隊 任務部隊 巡洋艦戦隊 (PoiDB)
# Formation Boss Battle Node AD/AP
AS/AS+
U Line Ahead
Phases: 3
Heavy Cruiser Princess VI (1664): 208 Armor, 390 HPBattle Card Flagship Icon.png Heavy Cruiser Ri-Class B Flagship (1999): 72 Armor, 80 HP Light Cruiser Tsu-Class (1591): 55 Armor, 48 HP Destroyer Ro-Class Late Model (1576): 26 Armor, 37 HP Destroyer Ro-Class Late Model (1576): 26 Armor, 37 HP Transport Ship Wa-Class Elite (1526): 35 Armor, 80 HP
0/0
0/0
Line Ahead
Phases: 2
Heavy Cruiser Princess III (1661): 195 Armor, 390 HPBattle Card Flagship Icon.png Heavy Cruiser Ri-Class B Flagship (1999): 72 Armor, 80 HP Heavy Cruiser Ri-Class B Flagship (1999): 72 Armor, 80 HP Light Cruiser Tsu-Class (1591): 55 Armor, 48 HP Destroyer Ro-Class Late Model (1576): 26 Armor, 37 HP Destroyer Ro-Class Late Model (1576): 26 Armor, 37 HP
0/0
0/0
Line Ahead
Phases: 2
(Final)
Heavy Cruiser Princess VI (1664): 208 Armor, 390 HPBattle Card Flagship Icon.png Heavy Cruiser Ri-Class B Flagship (1999): 72 Armor, 80 HP Heavy Cruiser Ri-Class B Flagship (1999): 72 Armor, 80 HP Light Cruiser Tsu-Class Elite (1592): 68 Armor, 66 HP Destroyer Ro-Class Late Model Elite (1622): 36 Armor, 43 HP Destroyer Ro-Class Late Model Elite (1622): 36 Armor, 43 HP
0/0
0/0
# Formation Boss Battle Node AD/AP
AS/AS+
E-2 Hard V: 深海ソロモン方面 基地航空隊 (PoiDB)
# Formation Air Defense Node AD/AP
AS/AS+
V Diamond
Phases: 3
Lycoris Princess IV (1682): 100 Armor, 600 HP, 130 APBattle Card Flagship Icon.png Airfield Princess VI (1651): 140 Armor, 500 HP, 48 APAbyssal Liberation Land-based Dive Bomber Ace 562 Equipment.pngAbyssal Liberation Land-based Dive Bomber 561 Equipment.png
60/119
267/534
Diamond
Phases: 3
Lycoris Princess IV (1682): 100 Armor, 600 HP, 130 APBattle Card Flagship Icon.png Airfield Princess V (1650): 140 Armor, 500 HP, 34 APAbyssal Liberation Land-based Dive Bomber 561 Equipment.png Airfield Princess V (1650): 140 Armor, 500 HP, 34 APAbyssal Liberation Land-based Dive Bomber 561 Equipment.png
67/133
297/594
Diamond
Phases: 3
Lycoris Princess V (1683): 100 Armor, 600 HP, 157 APBattle Card Flagship Icon.png Airfield Princess V (1650): 140 Armor, 500 HP, 34 APAbyssal Liberation Land-based Dive Bomber 561 Equipment.png Airfield Princess V (1650): 140 Armor, 500 HP, 34 APAbyssal Liberation Land-based Dive Bomber 561 Equipment.png
76/151
338/675
Diamond
Phases: 3
Lycoris Princess V (1683): 100 Armor, 600 HP, 157 APBattle Card Flagship Icon.png Airfield Princess VI (1651): 140 Armor, 500 HP, 48 APAbyssal Liberation Land-based Dive Bomber Ace 562 Equipment.pngAbyssal Liberation Land-based Dive Bomber 561 Equipment.png Airfield Princess V (1650): 140 Armor, 500 HP, 34 APAbyssal Liberation Land-based Dive Bomber 561 Equipment.png
80/160
359/717
# Formation Air Defense Node AD/AP
AS/AS+
E-2 Hard W: 深海艦隊 前衛重巡戦隊 (PoiDB)
# Formation Normal Battle Node AD/AP
AS/AS+
W Double Line
Phases: 3
Heavy Cruiser Ri-Class Flagship (1527): 70 Armor, 76 HPBattle Card Flagship Icon.png Heavy Cruiser Ri-Class Elite (1522): 60 Armor, 60 HP Destroyer Ro-Class Late Model (1576): 26 Armor, 37 HP Destroyer Ro-Class Late Model (1576): 26 Armor, 37 HP Destroyer I-Class (1501): 5 Armor, 20 HP Destroyer I-Class (1501): 5 Armor, 20 HP
0/0
0/0
Double Line
Phases: 3
Heavy Cruiser Ri-Class Flagship (1527): 70 Armor, 76 HPBattle Card Flagship Icon.png Heavy Cruiser Ri-Class Flagship (1527): 70 Armor, 76 HP Destroyer Ro-Class Late Model (1576): 26 Armor, 37 HP Destroyer Ro-Class Late Model (1576): 26 Armor, 37 HP Destroyer I-Class (1501): 5 Armor, 20 HP Destroyer I-Class (1501): 5 Armor, 20 HP
0/0
0/0
Double Line
Phases: 3
Heavy Cruiser Ri-Class Flagship (1527): 70 Armor, 76 HPBattle Card Flagship Icon.png Heavy Cruiser Ri-Class Flagship (1527): 70 Armor, 76 HP Heavy Cruiser Ri-Class Flagship (1527): 70 Armor, 76 HP Light Cruiser Tsu-Class (1591): 55 Armor, 48 HP Destroyer Ro-Class Late Model (1576): 26 Armor, 37 HP Destroyer Ro-Class Late Model (1576): 26 Armor, 37 HP
0/0
0/0
# Formation Normal Battle Node AD/AP
AS/AS+
E-2 Hard X: 深海艦隊 ソロモン南方任務部隊 (PoiDB)
# Formation Normal Battle Node AD/AP
AS/AS+
X Line Ahead
Vanguard
Phases: 3
Heavy Cruiser Ri-Class Flagship (1527): 70 Armor, 76 HPBattle Card Flagship Icon.png Heavy Cruiser Ri-Class Flagship (1527): 70 Armor, 76 HP Light Cruiser Ho-Class Flagship (1554): 36 Armor, 53 HP Light Cruiser Tsu-Class (1591): 55 Armor, 48 HP Destroyer Ro-Class Late Model (1576): 26 Armor, 37 HP Destroyer Ro-Class Late Model (1576): 26 Armor, 37 HP
0/0
0/0
Line Ahead
Phases: 3
Heavy Cruiser Ri-Class Flagship (1527): 70 Armor, 76 HPBattle Card Flagship Icon.png Heavy Cruiser Ri-Class Flagship (1527): 70 Armor, 76 HP Light Cruiser Ho-Class Flagship (1554): 36 Armor, 53 HP Light Cruiser Tsu-Class Elite (1592): 68 Armor, 66 HP Destroyer Ro-Class Late Model Elite (1622): 36 Armor, 43 HP Destroyer Ro-Class Late Model Elite (1622): 36 Armor, 43 HP
0/0
0/0
# Formation Normal Battle Node AD/AP
AS/AS+
E-2 Hard Y
# Selection Node
Y 艦隊の針路を選択できます。提督、どちらの針路をとられますか?
You can decide the fleet's course. Admiral, which heading should we take?
# Selection Node
E-2 Hard Z: 深海ソロモン方面 基地航空隊 (PoiDB)
# Formation Air Defense Node AD/AP
AS/AS+
Z Diamond
Phases: 3
Lycoris Princess IV (1682): 100 Armor, 600 HP, 130 APBattle Card Flagship Icon.png Airfield Princess V (1650): 140 Armor, 500 HP, 34 APAbyssal Liberation Land-based Dive Bomber 561 Equipment.png
55/110
246/492
Diamond
Phases: 3
Lycoris Princess IV (1682): 100 Armor, 600 HP, 130 APBattle Card Flagship Icon.png Airfield Princess VI (1651): 140 Armor, 500 HP, 48 APAbyssal Liberation Land-based Dive Bomber Ace 562 Equipment.pngAbyssal Liberation Land-based Dive Bomber 561 Equipment.png
60/119
267/534
Diamond
Phases: 3
Lycoris Princess IV (1682): 100 Armor, 600 HP, 130 APBattle Card Flagship Icon.png Airfield Princess V (1650): 140 Armor, 500 HP, 34 APAbyssal Liberation Land-based Dive Bomber 561 Equipment.png Airfield Princess V (1650): 140 Armor, 500 HP, 34 APAbyssal Liberation Land-based Dive Bomber 561 Equipment.png
67/133
297/594
Diamond
Phases: 3
Lycoris Princess V (1683): 100 Armor, 600 HP, 157 APBattle Card Flagship Icon.png Airfield Princess V (1650): 140 Armor, 500 HP, 34 APAbyssal Liberation Land-based Dive Bomber 561 Equipment.png Airfield Princess V (1650): 140 Armor, 500 HP, 34 APAbyssal Liberation Land-based Dive Bomber 561 Equipment.png
76/151
338/675
Diamond
Phases: 3
Lycoris Princess V (1683): 100 Armor, 600 HP, 157 APBattle Card Flagship Icon.png Airfield Princess VI (1651): 140 Armor, 500 HP, 48 APAbyssal Liberation Land-based Dive Bomber Ace 562 Equipment.pngAbyssal Liberation Land-based Dive Bomber 561 Equipment.png Airfield Princess V (1650): 140 Armor, 500 HP, 34 APAbyssal Liberation Land-based Dive Bomber 561 Equipment.png
80/160
359/717
# Formation Air Defense Node AD/AP
AS/AS+
E-2 Hard ZI: 深海艦隊 機動部隊外周護衛部隊 (PoiDB)
# Formation Normal Battle Node AD/AP
AS/AS+
ZI Line Ahead
Phases: 3
Heavy Cruiser Ri-Class Flagship (1527): 70 Armor, 76 HPBattle Card Flagship Icon.png Heavy Cruiser Ri-Class Flagship (1527): 70 Armor, 76 HP Light Cruiser Tsu-Class (1591): 55 Armor, 48 HP Destroyer Ro-Class Late Model (1576): 26 Armor, 37 HP Destroyer I-Class (1501): 5 Armor, 20 HP Destroyer I-Class (1501): 5 Armor, 20 HP
0/0
0/0
Line Ahead
Phases: 3
Heavy Cruiser Ri-Class Flagship (1527): 70 Armor, 76 HPBattle Card Flagship Icon.png Heavy Cruiser Ri-Class Flagship (1527): 70 Armor, 76 HP Light Cruiser Tsu-Class (1591): 55 Armor, 48 HP Destroyer Ro-Class Late Model (1576): 26 Armor, 37 HP Destroyer Ro-Class Late Model (1576): 26 Armor, 37 HP Destroyer I-Class (1501): 5 Armor, 20 HP
0/0
0/0
Line Ahead
Phases: 3
Heavy Cruiser Ri-Class B Flagship (1999): 72 Armor, 80 HPBattle Card Flagship Icon.png Heavy Cruiser Ri-Class Flagship (1527): 70 Armor, 76 HP Heavy Cruiser Ri-Class Flagship (1527): 70 Armor, 76 HP Light Cruiser Tsu-Class (1591): 55 Armor, 48 HP Destroyer Ro-Class Late Model (1576): 26 Armor, 37 HP Destroyer Ro-Class Late Model (1576): 26 Armor, 37 HP
0/0
0/0
# Formation Normal Battle Node AD/AP
AS/AS+
E-2 Hard ZII: 深海艦隊 機動部隊 旗艦空母 (PoiDB)
# Formation Boss Battle Node AD/AP
AS/AS+
ZII Diamond
Phases: 3
Aircraft Carrier Princess IV (1782): 220 Armor, 350 HP, 154 APAbyssal Night Cat Fighter 581 Equipment.pngAbyssal Night Revenge Torpedo Bomber 583 Equipment.pngBattle Card Flagship Icon.png Heavy Cruiser Ri-Class B Flagship (1999): 72 Armor, 80 HP Light Cruiser He-Class Flagship (1555): 39 Armor, 57 HP Light Cruiser Tsu-Class (1591): 55 Armor, 48 HP Destroyer Ro-Class Late Model (1576): 26 Armor, 37 HP Destroyer Ro-Class Late Model (1576): 26 Armor, 37 HP
52/103
231/462
Diamond
Phases: 3
Aircraft Carrier Princess IV (1782): 220 Armor, 350 HP, 154 APAbyssal Night Cat Fighter 581 Equipment.pngAbyssal Night Revenge Torpedo Bomber 583 Equipment.pngBattle Card Flagship Icon.png Heavy Cruiser Ri-Class B Flagship (1999): 72 Armor, 80 HP Light Cruiser He-Class Flagship (1555): 39 Armor, 57 HP Destroyer Ro-Class Late Model (1576): 26 Armor, 37 HP Destroyer Ro-Class Late Model (1576): 26 Armor, 37 HP Transport Ship Wa-Class Elite (1526): 35 Armor, 80 HP
52/103
231/462
Diamond
Phases: 3
(Final)
Aircraft Carrier Princess IV (1782): 220 Armor, 350 HP, 154 APAbyssal Night Cat Fighter 581 Equipment.pngAbyssal Night Revenge Torpedo Bomber 583 Equipment.pngBattle Card Flagship Icon.png Heavy Cruiser Ri-Class B Flagship (1999): 72 Armor, 80 HP Light Cruiser He-Class Flagship (1555): 39 Armor, 57 HP Light Cruiser Tsu-Class Elite (1592): 68 Armor, 66 HP Destroyer Ro-Class Late Model Elite (1622): 36 Armor, 43 HP Destroyer Ro-Class Late Model Elite (1622): 36 Armor, 43 HP
52/103
231/462
# Formation Boss Battle Node AD/AP
AS/AS+

E-2 Medium A
# Empty Node
A 気のせいだった。
ソロモン最前線へ、鼠輸送を敢行する!

Must be my imagination.
To the front lines of the Solomons,
carrying out a Rat Transport Operation!
# Empty Node
E-2 Medium B: 深海ソロモン方面 基地航空隊 (PoiDB)
# Formation Air Defense Node AD/AP
AS/AS+
B Diamond
Phases: 1, 2, 3
Lycoris Princess IV (1682): 100 Armor, 600 HP, 130 APBattle Card Flagship Icon.png
44/87
195/390
Diamond
Phases: 1, 2, 3
Lycoris Princess IV (1682): 100 Armor, 600 HP, 130 APBattle Card Flagship Icon.png Airfield Princess V (1650): 140 Armor, 500 HP, 34 APAbyssal Liberation Land-based Dive Bomber 561 Equipment.png
55/110
246/492
Diamond
Phases: 1, 2, 3
Lycoris Princess IV (1682): 100 Armor, 600 HP, 130 APBattle Card Flagship Icon.png Airfield Princess VI (1651): 140 Armor, 500 HP, 48 APAbyssal Liberation Land-based Dive Bomber Ace 562 Equipment.pngAbyssal Liberation Land-based Dive Bomber 561 Equipment.png
60/119
267/534
Diamond
Phases: 1, 2, 3
Airfield Princess V (1650): 140 Armor, 500 HP, 34 APAbyssal Liberation Land-based Dive Bomber 561 Equipment.pngBattle Card Flagship Icon.png Airfield Princess V (1650): 140 Armor, 500 HP, 34 APAbyssal Liberation Land-based Dive Bomber 561 Equipment.png
23/46
102/204
# Formation Air Defense Node AD/AP
AS/AS+
E-2 Medium C
# Resource Node
# Resource Node
E-2 Medium D
# Selection Node
D ソロモン最前線へ、鼠輸送を敢行する!
To the front lines of the Solomons,
carrying out a Rat Transport Operation!
# Selection Node
E-2 Medium E: 深海艦隊 前方展開警戒部隊 (PoiDB)
# Formation Normal Battle Node AD/AP
AS/AS+
E Line Ahead
Phases: 1, 3
Destroyer Ro-Class Late Model Elite (1622): 36 Armor, 43 HPBattle Card Flagship Icon.png Destroyer Ro-Class Late Model (1576): 26 Armor, 37 HP Destroyer Ro-Class Late Model (1576): 26 Armor, 37 HP Destroyer I-Class (1501): 5 Armor, 20 HP Destroyer I-Class (1501): 5 Armor, 20 HP
0/0
0/0
Line Ahead
Echelon
Phases: 1
Light Cruiser Ho-Class Flagship (1554): 36 Armor, 53 HPBattle Card Flagship Icon.png Destroyer Ro-Class Late Model (1576): 26 Armor, 37 HP Destroyer Ro-Class Late Model (1576): 26 Armor, 37 HP Destroyer I-Class (1501): 5 Armor, 20 HP Submarine Ka-Class (1530): 7 Armor, 19 HP
0/0
0/0
# Formation Normal Battle Node AD/AP
AS/AS+
E-2 Medium F: 深海艦隊 泊地待伏部隊 (PoiDB)
# Formation Normal Battle Node AD/AP
AS/AS+
F Line Ahead
Phases: 2
Submarine Ka-Class (1530): 7 Armor, 19 HPBattle Card Flagship Icon.png Destroyer Ro-Class Late Model (1576): 26 Armor, 37 HP Destroyer Ro-Class Late Model (1576): 26 Armor, 37 HP Destroyer I-Class (1501): 5 Armor, 20 HP
0/0
0/0
Echelon
Phases: 1, 2
Submarine Ka-Class Elite (1532): 21 Armor, 27 HPBattle Card Flagship Icon.png Submarine Ka-Class (1530): 7 Armor, 19 HP Destroyer Ro-Class Late Model (1576): 26 Armor, 37 HP Destroyer I-Class (1501): 5 Armor, 20 HP
0/0
0/0
Echelon
Phases: 1, 2
Submarine Ka-Class Elite (1532): 21 Armor, 27 HPBattle Card Flagship Icon.png Submarine Ka-Class Elite (1532): 21 Armor, 27 HP Submarine Ka-Class (1530): 7 Armor, 19 HP Destroyer Ro-Class Late Model (1576): 26 Armor, 37 HP
0/0
0/0
# Formation Normal Battle Node AD/AP
AS/AS+
E-2 Medium G
# Empty Node
G 気のせいだった。
第三艦隊、出撃する!対空警戒を厳に!

Must be my imagination.
3rd Fleet, sortieing!
Maintain high anti-aircraft alert!
# Empty Node
E-2 Medium H: 深海艦隊 東京急行阻止線 (PoiDB)
# Formation Normal Battle Node AD/AP
AS/AS+
H Line Ahead
Phases: 1, 3
Destroyer Ro-Class Late Model (1576): 26 Armor, 37 HPBattle Card Flagship Icon.png Destroyer Ro-Class Late Model (1576): 26 Armor, 37 HP Destroyer I-Class (1501): 5 Armor, 20 HP Destroyer I-Class (1501): 5 Armor, 20 HP Destroyer I-Class (1501): 5 Armor, 20 HP
0/0
0/0
Line Ahead
Phases: 1, 2
Destroyer Ro-Class Late Model (1576): 26 Armor, 37 HPBattle Card Flagship Icon.png Destroyer Ro-Class Late Model (1576): 26 Armor, 37 HP Destroyer Ro-Class Late Model (1576): 26 Armor, 37 HP Destroyer I-Class (1501): 5 Armor, 20 HP Destroyer I-Class (1501): 5 Armor, 20 HP
0/0
0/0
Line Ahead
Phases: 1, 2, 3
Light Cruiser Tsu-Class (1591): 55 Armor, 48 HPBattle Card Flagship Icon.png Destroyer Ro-Class Late Model (1576): 26 Armor, 37 HP Destroyer Ro-Class Late Model (1576): 26 Armor, 37 HP Destroyer Ro-Class Late Model (1576): 26 Armor, 37 HP Destroyer I-Class (1501): 5 Armor, 20 HP
0/0
0/0
# Formation Normal Battle Node AD/AP
AS/AS+
E-2 Medium I: 深海艦隊 東京急行阻止増援部隊 (PoiDB)
# Formation Normal Battle Node AD/AP
AS/AS+
I Line Ahead
Phases: 1
Battleship Ta-Class (1541): 80 Armor, 84 HPBattle Card Flagship Icon.png Destroyer Ro-Class Late Model (1576): 26 Armor, 37 HP Destroyer Ro-Class Late Model (1576): 26 Armor, 37 HP Destroyer I-Class (1501): 5 Armor, 20 HP Destroyer I-Class (1501): 5 Armor, 20 HP
0/0
0/0
Line Ahead
Phases: 1
Battleship Ta-Class (1541): 80 Armor, 84 HPBattle Card Flagship Icon.png Battleship Ta-Class (1541): 80 Armor, 84 HP Destroyer Ro-Class Late Model (1576): 26 Armor, 37 HP Destroyer Ro-Class Late Model (1576): 26 Armor, 37 HP Destroyer I-Class (1501): 5 Armor, 20 HP
0/0
0/0
Line Ahead
Phases: 1
Battleship Ta-Class (1541): 80 Armor, 84 HPBattle Card Flagship Icon.png Battleship Ta-Class (1541): 80 Armor, 84 HP Destroyer Ro-Class Late Model (1576): 26 Armor, 37 HP Destroyer Ro-Class Late Model (1576): 26 Armor, 37 HP Destroyer Ro-Class Late Model (1576): 26 Armor, 37 HP
0/0
0/0
# Formation Normal Battle Node AD/AP
AS/AS+
E-2 Medium J
# Landing Node
# Landing Node
E-2 Medium K: 深海ソロモン方面 基地航空隊 (PoiDB)
# Formation Air Defense Node AD/AP
AS/AS+
K Diamond
Phases: 2, 3
Lycoris Princess IV (1682): 100 Armor, 600 HP, 130 APBattle Card Flagship Icon.png
44/87
195/390
Diamond
Phases: 2, 3
Lycoris Princess IV (1682): 100 Armor, 600 HP, 130 APBattle Card Flagship Icon.png Airfield Princess V (1650): 140 Armor, 500 HP, 34 APAbyssal Liberation Land-based Dive Bomber 561 Equipment.png
55/110
246/492
Diamond
Phases: 2, 3
Lycoris Princess IV (1682): 100 Armor, 600 HP, 130 APBattle Card Flagship Icon.png Airfield Princess VI (1651): 140 Armor, 500 HP, 48 APAbyssal Liberation Land-based Dive Bomber Ace 562 Equipment.pngAbyssal Liberation Land-based Dive Bomber 561 Equipment.png
60/119
267/534
Diamond
Phases: 1, 2, 3
Airfield Princess V (1650): 140 Armor, 500 HP, 34 APAbyssal Liberation Land-based Dive Bomber 561 Equipment.pngBattle Card Flagship Icon.png Airfield Princess V (1650): 140 Armor, 500 HP, 34 APAbyssal Liberation Land-based Dive Bomber 561 Equipment.png
23/46
102/204
# Formation Air Defense Node AD/AP
AS/AS+
E-2 Medium L
# Empty Node
L 敵影を見ず。
第三艦隊、出撃する!対空警戒を厳に!

No enemy spotted.
3rd Fleet, sortieing!
Maintain high anti-aircraft alert!
# Empty Node
E-2 Medium M: 深海潜水艦隊 ソロモン哨戒線 I群 (PoiDB)
# Formation Normal Battle Node AD/AP
AS/AS+
M Echelon
Line Abreast
Phases: 2
Submarine Ka-Class Elite (1532): 21 Armor, 27 HPBattle Card Flagship Icon.png Submarine Ka-Class (1530): 7 Armor, 19 HP Submarine Ka-Class (1530): 7 Armor, 19 HP
0/0
0/0
Echelon
Line Abreast
Phases: 2
Submarine Ka-Class Elite (1532): 21 Armor, 27 HPBattle Card Flagship Icon.png Submarine Ka-Class Elite (1532): 21 Armor, 27 HP Submarine Ka-Class (1530): 7 Armor, 19 HP
0/0
0/0
Echelon
Line Abreast
Phases: 2
Submarine Ka-Class Elite (1532): 21 Armor, 27 HPBattle Card Flagship Icon.png Submarine Ka-Class Elite (1532): 21 Armor, 27 HP Submarine Ka-Class Elite (1532): 21 Armor, 27 HP
0/0
0/0
Echelon
Line Abreast
Phases: 2, 3
Submarine Ka-Class Flagship (1534): 30 Armor, 37 HPBattle Card Flagship Icon.png Submarine Ka-Class Elite (1532): 21 Armor, 27 HP Submarine Ka-Class Elite (1532): 21 Armor, 27 HP
0/0
0/0
# Formation Normal Battle Node AD/AP
AS/AS+
E-2 Medium N: 深海任務部隊 空母艦載機群 (PoiDB)
# Formation Air Defense Node AD/AP
AS/AS+
N Diamond
Phases: 2, 3
Aircraft Carrier Princess II (1620): 150 Armor, 350 HP, 129 APAbyssal Hell Dive Bomber Kai.pngAbyssal Revenge Torpedo Bomber Kai.pngBattle Card Flagship Icon.png
44/87
194/387
Diamond
Phases: 1, 2, 3
Aircraft Carrier Princess II (1620): 150 Armor, 350 HP, 129 APAbyssal Hell Dive Bomber Kai.pngAbyssal Revenge Torpedo Bomber Kai.pngBattle Card Flagship Icon.png Light Carrier Nu-Class Elite II (1762): 35 Armor, 70 HP, 69 APHell plane 1.png
67/133
297/594
Diamond
Phases: 2, 3
Aircraft Carrier Princess III (1781): 180 Armor, 350 HP, 154 APAbyssal Hell Dive Bomber Kai.pngAbyssal Night Revenge Torpedo Bomber 583 Equipment.pngBattle Card Flagship Icon.png Light Carrier Nu-Class Elite II (1762): 35 Armor, 70 HP, 69 APHell plane 1.png
75/149
335/669
Diamond
Phases: 2, 3
Aircraft Carrier Princess III (1781): 180 Armor, 350 HP, 154 APAbyssal Hell Dive Bomber Kai.pngAbyssal Night Revenge Torpedo Bomber 583 Equipment.pngBattle Card Flagship Icon.png Light Carrier Nu-Class Elite II (1762): 35 Armor, 70 HP, 69 APHell plane 1.png Light Carrier Nu-Class Elite II (1762): 35 Armor, 70 HP, 69 APHell plane 1.png
98/195
438/876
Diamond
Phases: 2
Aircraft Carrier Princess IV (1782): 220 Armor, 350 HP, 154 APAbyssal Night Cat Fighter 581 Equipment.pngAbyssal Night Revenge Torpedo Bomber 583 Equipment.pngBattle Card Flagship Icon.png Light Carrier Nu-Class Elite II (1762): 35 Armor, 70 HP, 69 APHell plane 1.png Light Carrier Nu-Class Elite II (1762): 35 Armor, 70 HP, 69 APHell plane 1.png
98/195
438/876
# Formation Air Defense Node AD/AP
AS/AS+
E-2 Medium O (PoiDB)
# Formation Normal Battle Node AD/AP
AS/AS+
# Formation Normal Battle Node AD/AP
AS/AS+
E-2 Medium P: 深海艦隊 機動部隊 前衛空母群 (PoiDB)
# Formation Normal Battle Node AD/AP
AS/AS+
P Diamond
Phases: 2, 3
Light Carrier Nu-Class Elite II (1762): 35 Armor, 70 HP, 69 APHell plane 1.pngBattle Card Flagship Icon.png Light Carrier Nu-Class Elite II (1762): 35 Armor, 70 HP, 69 APHell plane 1.png Heavy Cruiser Ri-Class Flagship (1527): 70 Armor, 76 HP Light Cruiser Ho-Class Flagship (1554): 36 Armor, 53 HP Destroyer Ro-Class Late Model (1576): 26 Armor, 37 HP Destroyer Ro-Class Late Model (1576): 26 Armor, 37 HP
47/93
207/414
Diamond
Phases: 1, 2, 3
Light Carrier Nu-Class Flagship II (1763): 70 Armor, 84 HP, 77 APHell plane 1.pngBattle Card Flagship Icon.png Light Carrier Nu-Class Elite II (1762): 35 Armor, 70 HP, 69 APHell plane 1.png Heavy Cruiser Ri-Class Flagship (1527): 70 Armor, 76 HP Light Cruiser Ho-Class Flagship (1554): 36 Armor, 53 HP Destroyer Ro-Class Late Model (1576): 26 Armor, 37 HP Destroyer Ro-Class Late Model (1576): 26 Armor, 37 HP
49/98
219/438
Diamond
Phases: 2, 3
Light Carrier Nu-Class Flagship II (1763): 70 Armor, 84 HP, 77 APHell plane 1.pngBattle Card Flagship Icon.png Light Carrier Nu-Class Flagship II (1763): 70 Armor, 84 HP, 77 APHell plane 1.png Heavy Cruiser Ri-Class Flagship (1527): 70 Armor, 76 HP Light Cruiser He-Class Flagship (1555): 39 Armor, 57 HP Destroyer Ro-Class Late Model (1576): 26 Armor, 37 HP Destroyer Ro-Class Late Model (1576): 26 Armor, 37 HP
52/103
231/462
# Formation Normal Battle Node AD/AP
AS/AS+
E-2 Medium Q: 深海艦隊 東京急行阻止主力部隊 (PoiDB)
# Formation Boss Battle Node AD/AP
AS/AS+
Q Line Ahead
Phases: 2, 3
Heavy Cruiser Ne-Class Kai II (1896): 222 Armor, 360 HPBattle Card Flagship Icon.png Heavy Cruiser Ri-Class Elite (1522): 60 Armor, 60 HP Destroyer Ro-Class Late Model (1576): 26 Armor, 37 HP Destroyer Ro-Class Late Model (1576): 26 Armor, 37 HP Destroyer I-Class (1501): 5 Armor, 20 HP Destroyer I-Class (1501): 5 Armor, 20 HP
0/0
0/0
Line Ahead
Phases: 1, 3
Heavy Cruiser Ne-Class Kai II (1896): 222 Armor, 360 HPBattle Card Flagship Icon.png Heavy Cruiser Ne-Class (1594): 82 Armor, 80 HP Heavy Cruiser Ri-Class Elite (1522): 60 Armor, 60 HP Heavy Cruiser Ri-Class Elite (1522): 60 Armor, 60 HP Destroyer Ro-Class Late Model (1576): 26 Armor, 37 HP Destroyer Ro-Class Late Model (1576): 26 Armor, 37 HP
0/0
0/0
Line Ahead
Phases: 1
(Final)
Heavy Cruiser Ne-Class Kai II (1896): 222 Armor, 360 HPBattle Card Flagship Icon.png Heavy Cruiser Ri-Class Elite (1522): 60 Armor, 60 HP Heavy Cruiser Ri-Class Elite (1522): 60 Armor, 60 HP Heavy Cruiser Ri-Class Elite (1522): 60 Armor, 60 HP Destroyer Ro-Class Late Model (1576): 26 Armor, 37 HP Destroyer Ro-Class Late Model (1576): 26 Armor, 37 HP
0/0
0/0
# Formation Boss Battle Node AD/AP
AS/AS+
E-2 Medium R: 深海任務部隊 空母艦載機群 (PoiDB)
# Formation Air Defense Node AD/AP
AS/AS+
R Diamond
Phases: 2
Aircraft Carrier Princess II (1620): 150 Armor, 350 HP, 129 APAbyssal Hell Dive Bomber Kai.pngAbyssal Revenge Torpedo Bomber Kai.pngBattle Card Flagship Icon.png
44/87
194/387
Diamond
Phases: 2
Aircraft Carrier Princess II (1620): 150 Armor, 350 HP, 129 APAbyssal Hell Dive Bomber Kai.pngAbyssal Revenge Torpedo Bomber Kai.pngBattle Card Flagship Icon.png Light Carrier Nu-Class Elite II (1762): 35 Armor, 70 HP, 69 APHell plane 1.png
67/133
297/594
Diamond
Phases: 2
Aircraft Carrier Princess III (1781): 180 Armor, 350 HP, 154 APAbyssal Hell Dive Bomber Kai.pngAbyssal Night Revenge Torpedo Bomber 583 Equipment.pngBattle Card Flagship Icon.png Light Carrier Nu-Class Elite II (1762): 35 Armor, 70 HP, 69 APHell plane 1.png
75/149
335/669
Diamond
Phases: 2
Aircraft Carrier Princess III (1781): 180 Armor, 350 HP, 154 APAbyssal Hell Dive Bomber Kai.pngAbyssal Night Revenge Torpedo Bomber 583 Equipment.pngBattle Card Flagship Icon.png Light Carrier Nu-Class Elite II (1762): 35 Armor, 70 HP, 69 APHell plane 1.png Light Carrier Nu-Class Elite II (1762): 35 Armor, 70 HP, 69 APHell plane 1.png
98/195
438/876
Diamond
Phases: 2
Aircraft Carrier Princess IV (1782): 220 Armor, 350 HP, 154 APAbyssal Night Cat Fighter 581 Equipment.pngAbyssal Night Revenge Torpedo Bomber 583 Equipment.pngBattle Card Flagship Icon.png Light Carrier Nu-Class Elite II (1762): 35 Armor, 70 HP, 69 APHell plane 1.png Light Carrier Nu-Class Elite II (1762): 35 Armor, 70 HP, 69 APHell plane 1.png
98/195
438/876
# Formation Air Defense Node AD/AP
AS/AS+
E-2 Medium S
# Empty Node
S 敵影を見ず。
第三艦隊、出撃する!対空警戒を厳に!

No enemy spotted.
3rd Fleet, sortieing!
Maintain high anti-aircraft alert!
# Empty Node
E-2 Medium T: 深海任務部隊 空母艦載機群 (PoiDB)
# Formation Air Defense Node AD/AP
AS/AS+
T Diamond
Phases: 2, 3
Aircraft Carrier Princess II (1620): 150 Armor, 350 HP, 129 APAbyssal Hell Dive Bomber Kai.pngAbyssal Revenge Torpedo Bomber Kai.pngBattle Card Flagship Icon.png
44/87
194/387
Diamond
Phases: 2, 3
Aircraft Carrier Princess II (1620): 150 Armor, 350 HP, 129 APAbyssal Hell Dive Bomber Kai.pngAbyssal Revenge Torpedo Bomber Kai.pngBattle Card Flagship Icon.png Light Carrier Nu-Class Elite II (1762): 35 Armor, 70 HP, 69 APHell plane 1.png
67/133
297/594
Diamond
Phases: 2, 3
Aircraft Carrier Princess III (1781): 180 Armor, 350 HP, 154 APAbyssal Hell Dive Bomber Kai.pngAbyssal Night Revenge Torpedo Bomber 583 Equipment.pngBattle Card Flagship Icon.png Light Carrier Nu-Class Elite II (1762): 35 Armor, 70 HP, 69 APHell plane 1.png
75/149
335/669
Diamond
Phases: 2, 3
Aircraft Carrier Princess III (1781): 180 Armor, 350 HP, 154 APAbyssal Hell Dive Bomber Kai.pngAbyssal Night Revenge Torpedo Bomber 583 Equipment.pngBattle Card Flagship Icon.png Light Carrier Nu-Class Elite II (1762): 35 Armor, 70 HP, 69 APHell plane 1.png Light Carrier Nu-Class Elite II (1762): 35 Armor, 70 HP, 69 APHell plane 1.png
98/195
438/876
Diamond
Phases: 2, 3
Aircraft Carrier Princess IV (1782): 220 Armor, 350 HP, 154 APAbyssal Night Cat Fighter 581 Equipment.pngAbyssal Night Revenge Torpedo Bomber 583 Equipment.pngBattle Card Flagship Icon.png Light Carrier Nu-Class Elite II (1762): 35 Armor, 70 HP, 69 APHell plane 1.png Light Carrier Nu-Class Elite II (1762): 35 Armor, 70 HP, 69 APHell plane 1.png
98/195
438/876
# Formation Air Defense Node AD/AP
AS/AS+
E-2 Medium U: 深海艦隊 任務部隊 巡洋艦戦隊 (PoiDB)
# Formation Boss Battle Node AD/AP
AS/AS+
U Line Ahead
Phases: 3
Heavy Cruiser Princess V (1663): 188 Armor, 370 HPBattle Card Flagship Icon.png Heavy Cruiser Ri-Class Flagship (1527): 70 Armor, 76 HP Light Cruiser Tsu-Class (1591): 55 Armor, 48 HP Destroyer Ro-Class Late Model (1576): 26 Armor, 37 HP Destroyer Ro-Class Late Model (1576): 26 Armor, 37 HP Transport Ship Wa-Class (1513): 10 Armor, 70 HP
0/0
0/0
Line Ahead
Phases: 2
Heavy Cruiser Princess II (1660): 175 Armor, 370 HPBattle Card Flagship Icon.png Heavy Cruiser Ri-Class Flagship (1527): 70 Armor, 76 HP Heavy Cruiser Ri-Class Elite (1522): 60 Armor, 60 HP Light Cruiser Tsu-Class (1591): 55 Armor, 48 HP Destroyer Ro-Class Late Model (1576): 26 Armor, 37 HP Destroyer Ro-Class Late Model (1576): 26 Armor, 37 HP
0/0
0/0
Line Ahead
Phases: 2
(Final)
Heavy Cruiser Princess V (1663): 188 Armor, 370 HPBattle Card Flagship Icon.png Heavy Cruiser Ri-Class Flagship (1527): 70 Armor, 76 HP Heavy Cruiser Ri-Class Flagship (1527): 70 Armor, 76 HP Light Cruiser Tsu-Class (1591): 55 Armor, 48 HP Destroyer Ro-Class Late Model (1576): 26 Armor, 37 HP Destroyer Ro-Class Late Model (1576): 26 Armor, 37 HP
0/0
0/0
# Formation Boss Battle Node AD/AP
AS/AS+
E-2 Medium V: 深海ソロモン方面 基地航空隊 (PoiDB)
# Formation Air Defense Node AD/AP
AS/AS+
V Diamond
Phases: 3
Lycoris Princess IV (1682): 100 Armor, 600 HP, 130 APBattle Card Flagship Icon.png
44/87
195/390
Diamond
Phases: 3
Lycoris Princess IV (1682): 100 Armor, 600 HP, 130 APBattle Card Flagship Icon.png Airfield Princess V (1650): 140 Armor, 500 HP, 34 APAbyssal Liberation Land-based Dive Bomber 561 Equipment.png
55/110
246/492
Diamond
Phases: 3
Lycoris Princess IV (1682): 100 Armor, 600 HP, 130 APBattle Card Flagship Icon.png Airfield Princess VI (1651): 140 Armor, 500 HP, 48 APAbyssal Liberation Land-based Dive Bomber Ace 562 Equipment.pngAbyssal Liberation Land-based Dive Bomber 561 Equipment.png
60/119
267/534
Diamond
Phases: 3
Airfield Princess V (1650): 140 Armor, 500 HP, 34 APAbyssal Liberation Land-based Dive Bomber 561 Equipment.pngBattle Card Flagship Icon.png Airfield Princess V (1650): 140 Armor, 500 HP, 34 APAbyssal Liberation Land-based Dive Bomber 561 Equipment.png
23/46
102/204
# Formation Air Defense Node AD/AP
AS/AS+
E-2 Medium W: 深海艦隊 前衛重巡戦隊 (PoiDB)
# Formation Normal Battle Node AD/AP
AS/AS+
W Double Line
Phases: 3
Heavy Cruiser Ri-Class Elite (1522): 60 Armor, 60 HPBattle Card Flagship Icon.png Heavy Cruiser Ri-Class Elite (1522): 60 Armor, 60 HP Destroyer Ro-Class Late Model (1576): 26 Armor, 37 HP Destroyer I-Class (1501): 5 Armor, 20 HP Destroyer I-Class (1501): 5 Armor, 20 HP Destroyer I-Class (1501): 5 Armor, 20 HP
0/0
0/0
Double Line
Phases: 3
Heavy Cruiser Ri-Class Elite (1522): 60 Armor, 60 HPBattle Card Flagship Icon.png Heavy Cruiser Ri-Class Elite (1522): 60 Armor, 60 HP Destroyer Ro-Class Late Model (1576): 26 Armor, 37 HP Destroyer Ro-Class Late Model (1576): 26 Armor, 37 HP Destroyer I-Class (1501): 5 Armor, 20 HP Destroyer I-Class (1501): 5 Armor, 20 HP
0/0
0/0
Double Line
Phases: 3
Heavy Cruiser Ri-Class Elite (1522): 60 Armor, 60 HPBattle Card Flagship Icon.png Heavy Cruiser Ri-Class Elite (1522): 60 Armor, 60 HP Heavy Cruiser Ri-Class Elite (1522): 60 Armor, 60 HP Destroyer Ro-Class Late Model (1576): 26 Armor, 37 HP Destroyer Ro-Class Late Model (1576): 26 Armor, 37 HP Destroyer I-Class (1501): 5 Armor, 20 HP
0/0
0/0
# Formation Normal Battle Node AD/AP
AS/AS+
E-2 Medium X: 深海艦隊 ソロモン南方任務部隊 (PoiDB)
# Formation Normal Battle Node AD/AP
AS/AS+
X Line Ahead
Vanguard
Phases: 3
Heavy Cruiser Ri-Class Elite (1522): 60 Armor, 60 HPBattle Card Flagship Icon.png Heavy Cruiser Ri-Class Elite (1522): 60 Armor, 60 HP Light Cruiser Ho-Class Flagship (1554): 36 Armor, 53 HP Destroyer Ro-Class Late Model (1576): 26 Armor, 37 HP Destroyer Ro-Class Late Model (1576): 26 Armor, 37 HP Destroyer Ro-Class (1502): 6 Armor, 22 HP
0/0
0/0
Line Ahead
Phases: 3
Heavy Cruiser Ri-Class Elite (1522): 60 Armor, 60 HPBattle Card Flagship Icon.png Heavy Cruiser Ri-Class Elite (1522): 60 Armor, 60 HP Light Cruiser Ho-Class Flagship (1554): 36 Armor, 53 HP Light Cruiser Tsu-Class (1591): 55 Armor, 48 HP Destroyer Ro-Class Late Model (1576): 26 Armor, 37 HP Destroyer Ro-Class Late Model (1576): 26 Armor, 37 HP
0/0
0/0
# Formation Normal Battle Node AD/AP
AS/AS+
E-2 Medium Y
# Selection Node
Y 艦隊の針路を選択できます。提督、どちらの針路をとられますか?
You can decide the fleet's course. Admiral, which heading should we take?
# Selection Node
E-2 Medium Z: 深海ソロモン方面 基地航空隊 (PoiDB)
# Formation Air Defense Node AD/AP
AS/AS+
Z Diamond
Phases: 3
Lycoris Princess IV (1682): 100 Armor, 600 HP, 130 APBattle Card Flagship Icon.png
44/87
195/390
Diamond
Phases: 3
Lycoris Princess IV (1682): 100 Armor, 600 HP, 130 APBattle Card Flagship Icon.png Airfield Princess V (1650): 140 Armor, 500 HP, 34 APAbyssal Liberation Land-based Dive Bomber 561 Equipment.png
55/110
246/492
Diamond
Phases: 3
Lycoris Princess IV (1682): 100 Armor, 600 HP, 130 APBattle Card Flagship Icon.png Airfield Princess VI (1651): 140 Armor, 500 HP, 48 APAbyssal Liberation Land-based Dive Bomber Ace 562 Equipment.pngAbyssal Liberation Land-based Dive Bomber 561 Equipment.png
60/119
267/534
Diamond
Phases: 3
Airfield Princess V (1650): 140 Armor, 500 HP, 34 APAbyssal Liberation Land-based Dive Bomber 561 Equipment.pngBattle Card Flagship Icon.png Airfield Princess V (1650): 140 Armor, 500 HP, 34 APAbyssal Liberation Land-based Dive Bomber 561 Equipment.png
23/46
102/204
# Formation Air Defense Node AD/AP
AS/AS+
E-2 Medium ZI: 深海艦隊 機動部隊外周護衛部隊 (PoiDB)
# Formation Normal Battle Node AD/AP
AS/AS+
ZI Line Ahead
Phases: 3
Heavy Cruiser Ri-Class Elite (1522): 60 Armor, 60 HPBattle Card Flagship Icon.png Heavy Cruiser Ri-Class Elite (1522): 60 Armor, 60 HP Light Cruiser Tsu-Class (1591): 55 Armor, 48 HP Destroyer Ro-Class Late Model (1576): 26 Armor, 37 HP Destroyer I-Class (1501): 5 Armor, 20 HP Destroyer I-Class (1501): 5 Armor, 20 HP
0/0
0/0
Line Ahead
Phases: 3
Heavy Cruiser Ri-Class Elite (1522): 60 Armor, 60 HPBattle Card Flagship Icon.png Heavy Cruiser Ri-Class Elite (1522): 60 Armor, 60 HP Light Cruiser Tsu-Class (1591): 55 Armor, 48 HP Destroyer Ro-Class Late Model (1576): 26 Armor, 37 HP Destroyer Ro-Class Late Model (1576): 26 Armor, 37 HP Destroyer I-Class (1501): 5 Armor, 20 HP
0/0
0/0
Line Ahead
Phases: 3
Heavy Cruiser Ri-Class Flagship (1527): 70 Armor, 76 HPBattle Card Flagship Icon.png Heavy Cruiser Ri-Class Elite (1522): 60 Armor, 60 HP Heavy Cruiser Ri-Class Elite (1522): 60 Armor, 60 HP Light Cruiser Tsu-Class (1591): 55 Armor, 48 HP Destroyer Ro-Class Late Model (1576): 26 Armor, 37 HP Destroyer Ro-Class Late Model (1576): 26 Armor, 37 HP
0/0
0/0
# Formation Normal Battle Node AD/AP
AS/AS+
E-2 Medium ZII: 深海艦隊 機動部隊 旗艦空母 (PoiDB)
# Formation Boss Battle Node AD/AP
AS/AS+
ZII Diamond
Phases: 3
Aircraft Carrier Princess III (1781): 180 Armor, 350 HP, 154 APAbyssal Hell Dive Bomber Kai.pngAbyssal Night Revenge Torpedo Bomber 583 Equipment.pngBattle Card Flagship Icon.png Heavy Cruiser Ri-Class Flagship (1527): 70 Armor, 76 HP Destroyer Ro-Class Late Model (1576): 26 Armor, 37 HP Destroyer Ro-Class Late Model (1576): 26 Armor, 37 HP Destroyer Ro-Class (1502): 6 Armor, 22 HP Transport Ship Wa-Class (1513): 10 Armor, 70 HP
52/103
231/462
Diamond
Phases: 3
Aircraft Carrier Princess III (1781): 180 Armor, 350 HP, 154 APAbyssal Hell Dive Bomber Kai.pngAbyssal Night Revenge Torpedo Bomber 583 Equipment.pngBattle Card Flagship Icon.png Heavy Cruiser Ri-Class Flagship (1527): 70 Armor, 76 HP Light Cruiser Tsu-Class (1591): 55 Armor, 48 HP Destroyer Ro-Class Late Model (1576): 26 Armor, 37 HP Destroyer Ro-Class Late Model (1576): 26 Armor, 37 HP Destroyer Ro-Class (1502): 6 Armor, 22 HP
52/103
231/462
Diamond
Phases: 3
(Final)
Aircraft Carrier Princess III (1781): 180 Armor, 350 HP, 154 APAbyssal Hell Dive Bomber Kai.pngAbyssal Night Revenge Torpedo Bomber 583 Equipment.pngBattle Card Flagship Icon.png Heavy Cruiser Ri-Class Flagship (1527): 70 Armor, 76 HP Light Cruiser He-Class Flagship (1555): 39 Armor, 57 HP Light Cruiser Tsu-Class (1591): 55 Armor, 48 HP Destroyer Ro-Class Late Model (1576): 26 Armor, 37 HP Destroyer Ro-Class Late Model (1576): 26 Armor, 37 HP
52/103
231/462
# Formation Boss Battle Node AD/AP
AS/AS+

E-2 Easy A
# Empty Node
A 気のせいだった。
ソロモン最前線へ、鼠輸送を敢行する!

Must be my imagination.
To the front lines of the Solomons,
carrying out a Rat Transport Operation!
# Empty Node
E-2 Easy B: 深海ソロモン方面 基地航空隊 (PoiDB)
# Formation Air Defense Node AD/AP
AS/AS+
B Diamond
Phases: 1, 2, 3
Lycoris Princess IV (1682): 100 Armor, 600 HP, 130 APBattle Card Flagship Icon.png
44/87
195/390
Diamond
Phases: 1, 2, 3
Airfield Princess V (1650): 140 Armor, 500 HP, 34 APAbyssal Liberation Land-based Dive Bomber 561 Equipment.pngBattle Card Flagship Icon.png
12/23
51/102
Diamond
Phases: 1, 2, 3
Airfield Princess VI (1651): 140 Armor, 500 HP, 48 APAbyssal Liberation Land-based Dive Bomber Ace 562 Equipment.pngAbyssal Liberation Land-based Dive Bomber 561 Equipment.pngBattle Card Flagship Icon.png
17/33
72/144
Diamond
Phases: 1, 2, 3
Lycoris Princess IV (1682): 100 Armor, 600 HP, 130 APBattle Card Flagship Icon.png Airfield Princess V (1650): 140 Armor, 500 HP, 34 APAbyssal Liberation Land-based Dive Bomber 561 Equipment.png
55/110
246/492
Diamond
Phases: 1, 2, 3
Airfield Princess V (1650): 140 Armor, 500 HP, 34 APAbyssal Liberation Land-based Dive Bomber 561 Equipment.pngBattle Card Flagship Icon.png Airfield Princess V (1650): 140 Armor, 500 HP, 34 APAbyssal Liberation Land-based Dive Bomber 561 Equipment.png
23/46
102/204
# Formation Air Defense Node AD/AP
AS/AS+
E-2 Easy C
# Resource Node
# Resource Node
E-2 Easy D
# Selection Node
D ソロモン最前線へ、鼠輸送を敢行する!
To the front lines of the Solomons,
carrying out a Rat Transport Operation!
# Selection Node
E-2 Easy E: 深海艦隊 前方展開警戒部隊 (PoiDB)
# Formation Normal Battle Node AD/AP
AS/AS+
E Line Ahead
Phases: 1, 2, 3
Destroyer Ro-Class Late Model (1576): 26 Armor, 37 HPBattle Card Flagship Icon.png Destroyer Ro-Class Late Model (1576): 26 Armor, 37 HP Destroyer I-Class (1501): 5 Armor, 20 HP Destroyer I-Class (1501): 5 Armor, 20 HP Destroyer I-Class (1501): 5 Armor, 20 HP
0/0
0/0
Line Ahead
Echelon
Phases: 1, 2, 3
Light Cruiser Ho-Class Flagship (1554): 36 Armor, 53 HPBattle Card Flagship Icon.png Destroyer Ro-Class Late Model (1576): 26 Armor, 37 HP Destroyer I-Class (1501): 5 Armor, 20 HP Destroyer I-Class (1501): 5 Armor, 20 HP Destroyer I-Class (1501): 5 Armor, 20 HP
0/0
0/0
# Formation Normal Battle Node AD/AP
AS/AS+
E-2 Easy F: 深海艦隊 泊地待伏部隊 (PoiDB)
# Formation Normal Battle Node AD/AP
AS/AS+
F Echelon
Phases: 2
Submarine Ka-Class (1530): 7 Armor, 19 HPBattle Card Flagship Icon.png Submarine Ka-Class (1530): 7 Armor, 19 HP Destroyer Ro-Class Late Model (1576): 26 Armor, 37 HP Destroyer I-Class (1501): 5 Armor, 20 HP
0/0
0/0
Line Ahead
Phases: 1, 2
Submarine Ka-Class (1530): 7 Armor, 19 HPBattle Card Flagship Icon.png Destroyer Ro-Class Late Model (1576): 26 Armor, 37 HP Destroyer I-Class (1501): 5 Armor, 20 HP Destroyer I-Class (1501): 5 Armor, 20 HP
0/0
0/0
Echelon
Phases: 1, 2
Submarine Ka-Class Elite (1532): 21 Armor, 27 HPBattle Card Flagship Icon.png Submarine Ka-Class (1530): 7 Armor, 19 HP Submarine Ka-Class (1530): 7 Armor, 19 HP Destroyer Ro-Class Late Model (1576): 26 Armor, 37 HP
0/0
0/0
# Formation Normal Battle Node AD/AP
AS/AS+
E-2 Easy G
# Empty Node
G 気のせいだった。
第三艦隊、出撃する!対空警戒を厳に!

Must be my imagination.
3rd Fleet, sortieing!
Maintain high anti-aircraft alert!
# Empty Node
E-2 Easy H: 深海艦隊 東京急行阻止線 (PoiDB)
# Formation Normal Battle Node AD/AP
AS/AS+
H Line Ahead
Phases: 1, 2, 3
Destroyer Ro-Class Late Model (1576): 26 Armor, 37 HPBattle Card Flagship Icon.png Destroyer I-Class (1501): 5 Armor, 20 HP Destroyer I-Class (1501): 5 Armor, 20 HP
0/0
0/0
Line Ahead
Phases: 1, 2, 3
Destroyer Ro-Class Late Model (1576): 26 Armor, 37 HPBattle Card Flagship Icon.png Destroyer I-Class (1501): 5 Armor, 20 HP Destroyer I-Class (1501): 5 Armor, 20 HP Destroyer I-Class (1501): 5 Armor, 20 HP
0/0
0/0
Line Ahead
Phases: 1, 2, 3
Destroyer Ro-Class Late Model (1576): 26 Armor, 37 HPBattle Card Flagship Icon.png Destroyer Ro-Class Late Model (1576): 26 Armor, 37 HP Destroyer I-Class (1501): 5 Armor, 20 HP Destroyer I-Class (1501): 5 Armor, 20 HP Destroyer I-Class (1501): 5 Armor, 20 HP
0/0
0/0
Line Ahead
Phases: 1, 2, 3
Light Cruiser Tsu-Class (1591): 55 Armor, 48 HPBattle Card Flagship Icon.png Destroyer Ro-Class Late Model (1576): 26 Armor, 37 HP Destroyer Ro-Class Late Model (1576): 26 Armor, 37 HP Destroyer I-Class (1501): 5 Armor, 20 HP Destroyer I-Class (1501): 5 Armor, 20 HP
0/0
0/0
# Formation Normal Battle Node AD/AP
AS/AS+
E-2 Easy I: 深海艦隊 東京急行阻止増援部隊 (PoiDB)
# Formation Normal Battle Node AD/AP
AS/AS+
I Line Ahead
Phases: 1
Battleship Ta-Class (1541): 80 Armor, 84 HPBattle Card Flagship Icon.png Destroyer Ro-Class Late Model (1576): 26 Armor, 37 HP Destroyer I-Class (1501): 5 Armor, 20 HP Destroyer I-Class (1501): 5 Armor, 20 HP
0/0
0/0
Line Ahead
Phases: 1
Battleship Ta-Class (1541): 80 Armor, 84 HPBattle Card Flagship Icon.png Destroyer Ro-Class Late Model (1576): 26 Armor, 37 HP Destroyer I-Class (1501): 5 Armor, 20 HP Destroyer I-Class (1501): 5 Armor, 20 HP Destroyer I-Class (1501): 5 Armor, 20 HP
0/0
0/0
Line Ahead
Phases: 1, 3
Battleship Ta-Class (1541): 80 Armor, 84 HPBattle Card Flagship Icon.png Battleship Ta-Class (1541): 80 Armor, 84 HP Destroyer Ro-Class Late Model (1576): 26 Armor, 37 HP Destroyer I-Class (1501): 5 Armor, 20 HP Destroyer I-Class (1501): 5 Armor, 20 HP
0/0
0/0
# Formation Normal Battle Node AD/AP
AS/AS+
E-2 Easy J
# Landing Node
# Landing Node
E-2 Easy K: 深海ソロモン方面 基地航空隊 (PoiDB)
# Formation Air Defense Node AD/AP
AS/AS+
K Diamond
Phases: 2, 3
Lycoris Princess IV (1682): 100 Armor, 600 HP, 130 APBattle Card Flagship Icon.png
44/87
195/390
Diamond
Phases: 2, 3
Airfield Princess V (1650): 140 Armor, 500 HP, 34 APAbyssal Liberation Land-based Dive Bomber 561 Equipment.pngBattle Card Flagship Icon.png
12/23
51/102
Diamond
Phases: 1, 2, 3
Airfield Princess VI (1651): 140 Armor, 500 HP, 48 APAbyssal Liberation Land-based Dive Bomber Ace 562 Equipment.pngAbyssal Liberation Land-based Dive Bomber 561 Equipment.pngBattle Card Flagship Icon.png
17/33
72/144
Diamond
Phases: 1, 2, 3
Lycoris Princess IV (1682): 100 Armor, 600 HP, 130 APBattle Card Flagship Icon.png Airfield Princess V (1650): 140 Armor, 500 HP, 34 APAbyssal Liberation Land-based Dive Bomber 561 Equipment.png
55/110
246/492
Diamond
Phases: 2, 3
Airfield Princess V (1650): 140 Armor, 500 HP, 34 APAbyssal Liberation Land-based Dive Bomber 561 Equipment.pngBattle Card Flagship Icon.png Airfield Princess V (1650): 140 Armor, 500 HP, 34 APAbyssal Liberation Land-based Dive Bomber 561 Equipment.png
23/46
102/204
# Formation Air Defense Node AD/AP
AS/AS+
E-2 Easy L
# Empty Node
L 敵影を見ず。
第三艦隊、出撃する!対空警戒を厳に!

No enemy spotted.
3rd Fleet, sortieing!
Maintain high anti-aircraft alert!
# Empty Node
E-2 Easy M: 深海潜水艦隊 ソロモン哨戒線 I群 (PoiDB)
# Formation Normal Battle Node AD/AP
AS/AS+
M Echelon
Line Abreast
Phases: 2
Submarine Ka-Class (1530): 7 Armor, 19 HPBattle Card Flagship Icon.png Submarine Ka-Class (1530): 7 Armor, 19 HP Submarine Ka-Class (1530): 7 Armor, 19 HP
0/0
0/0
Echelon
Line Abreast
Phases: 2
Submarine Ka-Class Elite (1532): 21 Armor, 27 HPBattle Card Flagship Icon.png Submarine Ka-Class (1530): 7 Armor, 19 HP Submarine Ka-Class (1530): 7 Armor, 19 HP
0/0
0/0
Echelon
Line Abreast
Phases: 2, 3
Submarine Ka-Class Elite (1532): 21 Armor, 27 HPBattle Card Flagship Icon.png Submarine Ka-Class Elite (1532): 21 Armor, 27 HP Submarine Ka-Class (1530): 7 Armor, 19 HP
0/0
0/0
Echelon
Line Abreast
Phases: 2
Submarine Ka-Class Elite (1532): 21 Armor, 27 HPBattle Card Flagship Icon.png Submarine Ka-Class Elite (1532): 21 Armor, 27 HP Submarine Ka-Class Elite (1532): 21 Armor, 27 HP
0/0
0/0
# Formation Normal Battle Node AD/AP
AS/AS+
E-2 Easy N: 深海任務部隊 空母艦載機群 (PoiDB)
# Formation Air Defense Node AD/AP
AS/AS+
N Diamond
Phases: 2, 3
Light Carrier Nu-Class Elite II (1762): 35 Armor, 70 HP, 69 APHell plane 1.pngBattle Card Flagship Icon.png
24/47
104/207
Diamond
Phases: 2, 3
Aircraft Carrier Princess II (1620): 150 Armor, 350 HP, 129 APAbyssal Hell Dive Bomber Kai.pngAbyssal Revenge Torpedo Bomber Kai.pngBattle Card Flagship Icon.png
44/87
194/387
Diamond
Phases: 1, 2, 3
Aircraft Carrier Princess II (1620): 150 Armor, 350 HP, 129 APAbyssal Hell Dive Bomber Kai.pngAbyssal Revenge Torpedo Bomber Kai.pngBattle Card Flagship Icon.png Light Carrier Nu-Class Elite II (1762): 35 Armor, 70 HP, 69 APHell plane 1.png
67/133
297/594
Diamond
Phases: 2, 3
Aircraft Carrier Princess III (1781): 180 Armor, 350 HP, 154 APAbyssal Hell Dive Bomber Kai.pngAbyssal Night Revenge Torpedo Bomber 583 Equipment.pngBattle Card Flagship Icon.png Light Carrier Nu-Class Elite II (1762): 35 Armor, 70 HP, 69 APHell plane 1.png
75/149
335/669
# Formation Air Defense Node AD/AP
AS/AS+
E-2 Easy O: 深海潜水艦隊 増援封鎖部隊 II群 (PoiDB)
# Formation Normal Battle Node AD/AP
AS/AS+
O Echelon
Line Abreast
Phases: 2
Submarine Ka-Class (1530): 7 Armor, 19 HPBattle Card Flagship Icon.png Submarine Ka-Class (1530): 7 Armor, 19 HP Submarine Ka-Class (1530): 7 Armor, 19 HP
0/0
0/0
Echelon
Line Abreast
Submarine Ka-Class Elite (1532): 21 Armor, 27 HPBattle Card Flagship Icon.png Submarine Ka-Class Elite (1532): 21 Armor, 27 HP Submarine Ka-Class Elite (1532): 21 Armor, 27 HP
0/0
0/0
# Formation Normal Battle Node AD/AP
AS/AS+
E-2 Easy P: 深海艦隊 機動部隊 前衛空母群 (PoiDB)
# Formation Normal Battle Node AD/AP
AS/AS+
P Diamond
Phases: 1, 2, 3
Light Carrier Nu-Class Elite II (1762): 35 Armor, 70 HP, 69 APHell plane 1.pngBattle Card Flagship Icon.png Light Carrier Nu-Class Elite (1523): 35 Armor, 70 HP, 24 AP Heavy Cruiser Ri-Class Elite (1522): 60 Armor, 60 HP Destroyer Ro-Class Late Model (1576): 26 Armor, 37 HP Destroyer Ro-Class Late Model (1576): 26 Armor, 37 HP Destroyer I-Class (1501): 5 Armor, 20 HP
32/63
140/279
Diamond
Phases: 2, 3
Light Carrier Nu-Class Elite II (1762): 35 Armor, 70 HP, 69 APHell plane 1.pngBattle Card Flagship Icon.png Light Carrier Nu-Class Elite II (1762): 35 Armor, 70 HP, 69 APHell plane 1.png Heavy Cruiser Ri-Class Elite (1522): 60 Armor, 60 HP Destroyer Ro-Class Late Model (1576): 26 Armor, 37 HP Destroyer Ro-Class Late Model (1576): 26 Armor, 37 HP Destroyer I-Class (1501): 5 Armor, 20 HP
47/93
207/414
Diamond
Phases: 2, 3
Light Carrier Nu-Class Elite II (1762): 35 Armor, 70 HP, 69 APHell plane 1.pngBattle Card Flagship Icon.png Light Carrier Nu-Class Elite II (1762): 35 Armor, 70 HP, 69 APHell plane 1.png Heavy Cruiser Ri-Class Elite (1522): 60 Armor, 60 HP Light Cruiser Ho-Class Flagship (1554): 36 Armor, 53 HP Destroyer Ro-Class Late Model (1576): 26 Armor, 37 HP Destroyer Ro-Class Late Model (1576): 26 Armor, 37 HP
47/93
207/414
# Formation Normal Battle Node AD/AP
AS/AS+
E-2 Easy Q: 深海艦隊 東京急行阻止主力部隊 (PoiDB)
# Formation Boss Battle Node AD/AP
AS/AS+
Q Line Ahead
Phases: 2, 3
Heavy Cruiser Ne-Class Kai (1895): 144 Armor, 330 HPBattle Card Flagship Icon.png Heavy Cruiser Ri-Class Elite (1522): 60 Armor, 60 HP Destroyer Ro-Class Late Model (1576): 26 Armor, 37 HP Destroyer I-Class (1501): 5 Armor, 20 HP Destroyer I-Class (1501): 5 Armor, 20 HP Destroyer I-Class (1501): 5 Armor, 20 HP
0/0
0/0
Line Ahead
Phases: 1
Heavy Cruiser Ne-Class Kai (1895): 144 Armor, 330 HPBattle Card Flagship Icon.png Heavy Cruiser Ne-Class (1594): 82 Armor, 80 HP Heavy Cruiser Ri-Class Elite (1522): 60 Armor, 60 HP Destroyer Ro-Class Late Model (1576): 26 Armor, 37 HP Destroyer Ro-Class Late Model (1576): 26 Armor, 37 HP Destroyer I-Class (1501): 5 Armor, 20 HP
0/0
0/0
Line Ahead
Phases: 1
(Final)
Heavy Cruiser Ne-Class Kai (1895): 144 Armor, 330 HPBattle Card Flagship Icon.png Heavy Cruiser Ri-Class Elite (1522): 60 Armor, 60 HP Heavy Cruiser Ri-Class Elite (1522): 60 Armor, 60 HP Destroyer Ro-Class Late Model (1576): 26 Armor, 37 HP Destroyer Ro-Class Late Model (1576): 26 Armor, 37 HP Destroyer I-Class (1501): 5 Armor, 20 HP
0/0
0/0
# Formation Boss Battle Node AD/AP
AS/AS+
E-2 Easy R: 深海任務部隊 空母艦載機群 (PoiDB)
# Formation Air Defense Node AD/AP
AS/AS+
R Diamond
Light Carrier Nu-Class Elite II (1762): 35 Armor, 70 HP, 69 APHell plane 1.pngBattle Card Flagship Icon.png
24/47
104/207
Diamond
Phases: 2
Aircraft Carrier Princess II (1620): 150 Armor, 350 HP, 129 APAbyssal Hell Dive Bomber Kai.pngAbyssal Revenge Torpedo Bomber Kai.pngBattle Card Flagship Icon.png
44/87
194/387
Diamond
Phases: 2
Aircraft Carrier Princess II (1620): 150 Armor, 350 HP, 129 APAbyssal Hell Dive Bomber Kai.pngAbyssal Revenge Torpedo Bomber Kai.pngBattle Card Flagship Icon.png Light Carrier Nu-Class Elite II (1762): 35 Armor, 70 HP, 69 APHell plane 1.png
67/133
297/594
Diamond
Phases: 2
Aircraft Carrier Princess III (1781): 180 Armor, 350 HP, 154 APAbyssal Hell Dive Bomber Kai.pngAbyssal Night Revenge Torpedo Bomber 583 Equipment.pngBattle Card Flagship Icon.png Light Carrier Nu-Class Elite II (1762): 35 Armor, 70 HP, 69 APHell plane 1.png
75/149
335/669
# Formation Air Defense Node AD/AP
AS/AS+
E-2 Easy S
# Empty Node
S 敵影を見ず。
第三艦隊、出撃する!対空警戒を厳に!

No enemy spotted.
3rd Fleet, sortieing!
Maintain high anti-aircraft alert!
# Empty Node
E-2 Easy T: 深海任務部隊 空母艦載機群 (PoiDB)
# Formation Air Defense Node AD/AP
AS/AS+
T Diamond
Phases: 2, 3
Light Carrier Nu-Class Elite II (1762): 35 Armor, 70 HP, 69 APHell plane 1.pngBattle Card Flagship Icon.png
24/47
104/207
Diamond
Phases: 2, 3
Aircraft Carrier Princess II (1620): 150 Armor, 350 HP, 129 APAbyssal Hell Dive Bomber Kai.pngAbyssal Revenge Torpedo Bomber Kai.pngBattle Card Flagship Icon.png
44/87
194/387
Diamond
Phases: 2, 3
Aircraft Carrier Princess II (1620): 150 Armor, 350 HP, 129 APAbyssal Hell Dive Bomber Kai.pngAbyssal Revenge Torpedo Bomber Kai.pngBattle Card Flagship Icon.png Light Carrier Nu-Class Elite II (1762): 35 Armor, 70 HP, 69 APHell plane 1.png
67/133
297/594
Diamond
Phases: 2, 3
Aircraft Carrier Princess III (1781): 180 Armor, 350 HP, 154 APAbyssal Hell Dive Bomber Kai.pngAbyssal Night Revenge Torpedo Bomber 583 Equipment.pngBattle Card Flagship Icon.png Light Carrier Nu-Class Elite II (1762): 35 Armor, 70 HP, 69 APHell plane 1.png
75/149
335/669
# Formation Air Defense Node AD/AP
AS/AS+
E-2 Easy U: 深海艦隊 任務部隊 巡洋艦戦隊 (PoiDB)
# Formation Boss Battle Node AD/AP
AS/AS+
U Line Ahead
Phases: 2
Heavy Cruiser Princess (1659): 145 Armor, 350 HPBattle Card Flagship Icon.png Heavy Cruiser Ri-Class Elite (1522): 60 Armor, 60 HP Heavy Cruiser Ri-Class Elite (1522): 60 Armor, 60 HP Light Cruiser Tsu-Class (1591): 55 Armor, 48 HP Destroyer Ro-Class Late Model (1576): 26 Armor, 37 HP Destroyer I-Class (1501): 5 Armor, 20 HP
0/0
0/0
Line Ahead
Phases: 3
Heavy Cruiser Princess IV (1662): 158 Armor, 350 HPBattle Card Flagship Icon.png Heavy Cruiser Ri-Class Elite (1522): 60 Armor, 60 HP Light Cruiser Tsu-Class (1591): 55 Armor, 48 HP Destroyer Ro-Class Late Model (1576): 26 Armor, 37 HP Destroyer I-Class (1501): 5 Armor, 20 HP Transport Ship Wa-Class (1513): 10 Armor, 70 HP
0/0
0/0
Line Ahead
Phases: 2
(Final)
Heavy Cruiser Princess IV (1662): 158 Armor, 350 HPBattle Card Flagship Icon.png Heavy Cruiser Ri-Class Elite (1522): 60 Armor, 60 HP Heavy Cruiser Ri-Class Elite (1522): 60 Armor, 60 HP Light Cruiser Tsu-Class (1591): 55 Armor, 48 HP Destroyer Ro-Class Late Model (1576): 26 Armor, 37 HP Destroyer Ro-Class Late Model (1576): 26 Armor, 37 HP
0/0
0/0
# Formation Boss Battle Node AD/AP
AS/AS+
E-2 Easy V: 深海ソロモン方面 基地航空隊 (PoiDB)
# Formation Air Defense Node AD/AP
AS/AS+
V Diamond
Phases: 3
Lycoris Princess IV (1682): 100 Armor, 600 HP, 130 APBattle Card Flagship Icon.png
44/87
195/390
Diamond
Phases: 3
Airfield Princess V (1650): 140 Armor, 500 HP, 34 APAbyssal Liberation Land-based Dive Bomber 561 Equipment.pngBattle Card Flagship Icon.png
12/23
51/102
Diamond
Phases: 3
Airfield Princess VI (1651): 140 Armor, 500 HP, 48 APAbyssal Liberation Land-based Dive Bomber Ace 562 Equipment.pngAbyssal Liberation Land-based Dive Bomber 561 Equipment.pngBattle Card Flagship Icon.png
17/33
72/144
Diamond
Phases: 3
Lycoris Princess IV (1682): 100 Armor, 600 HP, 130 APBattle Card Flagship Icon.png Airfield Princess V (1650): 140 Armor, 500 HP, 34 APAbyssal Liberation Land-based Dive Bomber 561 Equipment.png
55/110
246/492
Diamond
Phases: 3
Airfield Princess V (1650): 140 Armor, 500 HP, 34 APAbyssal Liberation Land-based Dive Bomber 561 Equipment.pngBattle Card Flagship Icon.png Airfield Princess V (1650): 140 Armor, 500 HP, 34 APAbyssal Liberation Land-based Dive Bomber 561 Equipment.png
23/46
102/204
# Formation Air Defense Node AD/AP
AS/AS+
E-2 Easy W: 深海艦隊 前衛重巡戦隊 (PoiDB)
# Formation Normal Battle Node AD/AP
AS/AS+
W Double Line
Phases: 3
Heavy Cruiser Ri-Class Elite (1522): 60 Armor, 60 HPBattle Card Flagship Icon.png Heavy Cruiser Ri-Class (1509): 28 Armor, 58 HP Destroyer Ro-Class Late Model (1576): 26 Armor, 37 HP Destroyer I-Class (1501): 5 Armor, 20 HP Destroyer I-Class (1501): 5 Armor, 20 HP
0/0
0/0
Double Line
Phases: 3
Heavy Cruiser Ri-Class Elite (1522): 60 Armor, 60 HPBattle Card Flagship Icon.png Heavy Cruiser Ri-Class (1509): 28 Armor, 58 HP Destroyer Ro-Class Late Model (1576): 26 Armor, 37 HP Destroyer Ro-Class Late Model (1576): 26 Armor, 37 HP Destroyer I-Class (1501): 5 Armor, 20 HP
0/0
0/0
Double Line
Phases: 3
Heavy Cruiser Ri-Class Elite (1522): 60 Armor, 60 HPBattle Card Flagship Icon.png Heavy Cruiser Ri-Class (1509): 28 Armor, 58 HP Heavy Cruiser Ri-Class (1509): 28 Armor, 58 HP Destroyer Ro-Class Late Model (1576): 26 Armor, 37 HP Destroyer Ro-Class Late Model (1576): 26 Armor, 37 HP Destroyer I-Class (1501): 5 Armor, 20 HP
0/0
0/0
# Formation Normal Battle Node AD/AP
AS/AS+
E-2 Easy X: 深海艦隊 ソロモン南方任務部隊 (PoiDB)
# Formation Normal Battle Node AD/AP
AS/AS+
X Line Ahead
Vanguard
Phases: 3
Heavy Cruiser Ri-Class Elite (1522): 60 Armor, 60 HPBattle Card Flagship Icon.png Heavy Cruiser Ri-Class Elite (1522): 60 Armor, 60 HP Destroyer Ro-Class Late Model (1576): 26 Armor, 37 HP Destroyer Ro-Class (1502): 6 Armor, 22 HP Destroyer Ro-Class (1502): 6 Armor, 22 HP
0/0
0/0
Line Ahead
Vanguard
Phases: 3
Heavy Cruiser Ri-Class Elite (1522): 60 Armor, 60 HPBattle Card Flagship Icon.png Heavy Cruiser Ri-Class Elite (1522): 60 Armor, 60 HP Destroyer Ro-Class Late Model (1576): 26 Armor, 37 HP Destroyer Ro-Class Late Model (1576): 26 Armor, 37 HP Destroyer Ro-Class (1502): 6 Armor, 22 HP Destroyer Ro-Class (1502): 6 Armor, 22 HP
0/0
0/0
# Formation Normal Battle Node AD/AP
AS/AS+
E-2 Easy Y
# Selection Node
Y 艦隊の針路を選択できます。提督、どちらの針路をとられますか?
You can decide the fleet's course. Admiral, which heading should we take?
# Selection Node
E-2 Easy Z: 深海ソロモン方面 基地航空隊 (PoiDB)
# Formation Air Defense Node AD/AP
AS/AS+
Z Diamond
Phases: 3
Lycoris Princess IV (1682): 100 Armor, 600 HP, 130 APBattle Card Flagship Icon.png
44/87
195/390
Diamond
Phases: 3
Airfield Princess V (1650): 140 Armor, 500 HP, 34 APAbyssal Liberation Land-based Dive Bomber 561 Equipment.pngBattle Card Flagship Icon.png
12/23
51/102
Diamond
Phases: 3
Airfield Princess VI (1651): 140 Armor, 500 HP, 48 APAbyssal Liberation Land-based Dive Bomber Ace 562 Equipment.pngAbyssal Liberation Land-based Dive Bomber 561 Equipment.pngBattle Card Flagship Icon.png
17/33
72/144
Diamond
Phases: 3
Lycoris Princess IV (1682): 100 Armor, 600 HP, 130 APBattle Card Flagship Icon.png Airfield Princess V (1650): 140 Armor, 500 HP, 34 APAbyssal Liberation Land-based Dive Bomber 561 Equipment.png
55/110
246/492
Diamond
Phases: 3
Airfield Princess V (1650): 140 Armor, 500 HP, 34 APAbyssal Liberation Land-based Dive Bomber 561 Equipment.pngBattle Card Flagship Icon.png Airfield Princess V (1650): 140 Armor, 500 HP, 34 APAbyssal Liberation Land-based Dive Bomber 561 Equipment.png
23/46
102/204
# Formation Air Defense Node AD/AP
AS/AS+
E-2 Easy ZI: 深海艦隊 機動部隊外周護衛部隊 (PoiDB)
# Formation Normal Battle Node AD/AP
AS/AS+
ZI Line Ahead
Phases: 3
Heavy Cruiser Ri-Class Elite (1522): 60 Armor, 60 HPBattle Card Flagship Icon.png Heavy Cruiser Ri-Class Elite (1522): 60 Armor, 60 HP Destroyer Ro-Class Late Model (1576): 26 Armor, 37 HP Destroyer I-Class (1501): 5 Armor, 20 HP Destroyer I-Class (1501): 5 Armor, 20 HP
0/0
0/0
Line Ahead
Phases: 3
Heavy Cruiser Ri-Class Elite (1522): 60 Armor, 60 HPBattle Card Flagship Icon.png Heavy Cruiser Ri-Class Elite (1522): 60 Armor, 60 HP Destroyer Ro-Class Late Model (1576): 26 Armor, 37 HP Destroyer Ro-Class Late Model (1576): 26 Armor, 37 HP Destroyer I-Class (1501): 5 Armor, 20 HP
0/0
0/0
Line Ahead
Phases: 3
Heavy Cruiser Ri-Class Elite (1522): 60 Armor, 60 HPBattle Card Flagship Icon.png Heavy Cruiser Ri-Class Elite (1522): 60 Armor, 60 HP Heavy Cruiser Ri-Class (1509): 28 Armor, 58 HP Destroyer Ro-Class Late Model (1576): 26 Armor, 37 HP Destroyer Ro-Class Late Model (1576): 26 Armor, 37 HP Destroyer I-Class (1501): 5 Armor, 20 HP
0/0
0/0
# Formation Normal Battle Node AD/AP
AS/AS+
E-2 Easy ZII: 深海艦隊 機動部隊 旗艦空母 (PoiDB)
# Formation Boss Battle Node AD/AP
AS/AS+
ZII Diamond
Phases: 3
Aircraft Carrier Princess II (1620): 150 Armor, 350 HP, 129 APAbyssal Hell Dive Bomber Kai.pngAbyssal Revenge Torpedo Bomber Kai.pngBattle Card Flagship Icon.png Heavy Cruiser Ri-Class Elite (1522): 60 Armor, 60 HP Destroyer Ro-Class Late Model (1576): 26 Armor, 37 HP Destroyer Ro-Class (1502): 6 Armor, 22 HP Destroyer Ro-Class (1502): 6 Armor, 22 HP Transport Ship Wa-Class (1513): 10 Armor, 70 HP
44/87
194/387
Diamond
Phases: 3
Aircraft Carrier Princess II (1620): 150 Armor, 350 HP, 129 APAbyssal Hell Dive Bomber Kai.pngAbyssal Revenge Torpedo Bomber Kai.pngBattle Card Flagship Icon.png Heavy Cruiser Ri-Class Elite (1522): 60 Armor, 60 HP Light Cruiser Tsu-Class (1591): 55 Armor, 48 HP Destroyer Ro-Class Late Model (1576): 26 Armor, 37 HP Destroyer Ro-Class (1502): 6 Armor, 22 HP Destroyer Ro-Class (1502): 6 Armor, 22 HP
44/87
194/387
Diamond
Phases: 3
(Final)
Aircraft Carrier Princess II (1620): 150 Armor, 350 HP, 129 APAbyssal Hell Dive Bomber Kai.pngAbyssal Revenge Torpedo Bomber Kai.pngBattle Card Flagship Icon.png Heavy Cruiser Ri-Class Elite (1522): 60 Armor, 60 HP Light Cruiser Tsu-Class (1591): 55 Armor, 48 HP Destroyer Ro-Class Late Model (1576): 26 Armor, 37 HP Destroyer Ro-Class Late Model (1576): 26 Armor, 37 HP Destroyer Ro-Class (1502): 6 Armor, 22 HP
44/87
194/387
# Formation Boss Battle Node AD/AP
AS/AS+

E-2 Casual A
# Empty Node
A 気のせいだった。
ソロモン最前線へ、鼠輸送を敢行する!

Must be my imagination.
To the front lines of the Solomons,
carrying out a Rat Transport Operation!
# Empty Node
E-2 Casual B: 深海ソロモン方面 基地航空隊 (PoiDB)
# Formation Air Defense Node AD/AP
AS/AS+
B Diamond
Phases: 1, 2, 3
Lycoris Princess IV (1682): 100 Armor, 600 HP, 130 APBattle Card Flagship Icon.png
44/87
195/390
Diamond
Phases: 1, 2, 3
Airfield Princess V (1650): 140 Armor, 500 HP, 34 APAbyssal Liberation Land-based Dive Bomber 561 Equipment.pngBattle Card Flagship Icon.png
12/23
51/102
Diamond
Phases: 1, 2, 3
Airfield Princess VI (1651): 140 Armor, 500 HP, 48 APAbyssal Liberation Land-based Dive Bomber Ace 562 Equipment.pngAbyssal Liberation Land-based Dive Bomber 561 Equipment.pngBattle Card Flagship Icon.png
17/33
72/144
# Formation Air Defense Node AD/AP
AS/AS+
E-2 Casual C
# Resource Node
# Resource Node
E-2 Casual D
# Selection Node
D ソロモン最前線へ、鼠輸送を敢行する!
To the front lines of the Solomons,
carrying out a Rat Transport Operation!
# Selection Node
E-2 Casual E: 深海艦隊 前方展開警戒部隊 (PoiDB)
# Formation Normal Battle Node AD/AP
AS/AS+
E Line Ahead
Phases: 1, 3
Destroyer Ro-Class Late Model (1576): 26 Armor, 37 HPBattle Card Flagship Icon.png Destroyer I-Class (1501): 5 Armor, 20 HP Destroyer I-Class (1501): 5 Armor, 20 HP Destroyer I-Class (1501): 5 Armor, 20 HP
0/0
0/0
Line Ahead
Echelon
Phases: 1, 2
Light Cruiser Ho-Class Elite (1518): 30 Armor, 48 HPBattle Card Flagship Icon.png Destroyer Ro-Class Late Model (1576): 26 Armor, 37 HP Destroyer I-Class (1501): 5 Armor, 20 HP Destroyer I-Class (1501): 5 Armor, 20 HP
0/0
0/0
# Formation Normal Battle Node AD/AP
AS/AS+
E-2 Casual F: 深海艦隊 泊地待伏部隊 (PoiDB)
# Formation Normal Battle Node AD/AP
AS/AS+
F Line Ahead
Phases: 1, 2, 3
Submarine Ka-Class (1530): 7 Armor, 19 HPBattle Card Flagship Icon.png Destroyer I-Class (1501): 5 Armor, 20 HP Destroyer I-Class (1501): 5 Armor, 20 HP
0/0
0/0
Echelon
Phases: 1, 2, 3
Submarine Ka-Class (1530): 7 Armor, 19 HPBattle Card Flagship Icon.png Submarine Ka-Class (1530): 7 Armor, 19 HP Destroyer Ro-Class Late Model (1576): 26 Armor, 37 HP Destroyer I-Class (1501): 5 Armor, 20 HP
0/0
0/0
Echelon
Phases: 1, 2
Submarine Ka-Class (1530): 7 Armor, 19 HPBattle Card Flagship Icon.png Destroyer Ro-Class Late Model (1576): 26 Armor, 37 HP Destroyer I-Class (1501): 5 Armor, 20 HP Destroyer I-Class (1501): 5 Armor, 20 HP
0/0
0/0
# Formation Normal Battle Node AD/AP
AS/AS+
E-2 Casual G
# Empty Node
G 気のせいだった。
第三艦隊、出撃する!対空警戒を厳に!

Must be my imagination.
3rd Fleet, sortieing!
Maintain high anti-aircraft alert!
# Empty Node
E-2 Casual H: 深海艦隊 東京急行阻止線 (PoiDB)
# Formation Normal Battle Node AD/AP
AS/AS+
H Line Ahead
Phases: 1
Destroyer I-Class (1501): 5 Armor, 20 HPBattle Card Flagship Icon.png Destroyer I-Class (1501): 5 Armor, 20 HP Destroyer I-Class (1501): 5 Armor, 20 HP
0/0
0/0
Line Ahead
Phases: 1
Destroyer Ro-Class Late Model (1576): 26 Armor, 37 HPBattle Card Flagship Icon.png Destroyer I-Class (1501): 5 Armor, 20 HP Destroyer I-Class (1501): 5 Armor, 20 HP
0/0
0/0
Line Ahead
Phases: 1
Destroyer I-Class (1501): 5 Armor, 20 HPBattle Card Flagship Icon.png Destroyer I-Class (1501): 5 Armor, 20 HP Destroyer I-Class (1501): 5 Armor, 20 HP Destroyer I-Class (1501): 5 Armor, 20 HP
0/0
0/0
Line Ahead
Phases: 1
Destroyer Ro-Class Late Model (1576): 26 Armor, 37 HPBattle Card Flagship Icon.png Destroyer I-Class (1501): 5 Armor, 20 HP Destroyer I-Class (1501): 5 Armor, 20 HP Destroyer I-Class (1501): 5 Armor, 20 HP
0/0
0/0
# Formation Normal Battle Node AD/AP
AS/AS+
E-2 Casual I: 深海艦隊 東京急行阻止増援部隊 (PoiDB)
# Formation Normal Battle Node AD/AP
AS/AS+
I Line Ahead
Phases: 1
Battleship Ta-Class (1541): 80 Armor, 84 HPBattle Card Flagship Icon.png Destroyer I-Class (1501): 5 Armor, 20 HP Destroyer I-Class (1501): 5 Armor, 20 HP
0/0
0/0
Line Ahead
Phases: 1
Battleship Ta-Class (1541): 80 Armor, 84 HPBattle Card Flagship Icon.png Destroyer Ro-Class Late Model (1576): 26 Armor, 37 HP Destroyer I-Class (1501): 5 Armor, 20 HP
0/0
0/0
Line Ahead
Phases: 1
Battleship Ru-Class (1511): 70 Armor, 90 HPBattle Card Flagship Icon.png Destroyer I-Class (1501): 5 Armor, 20 HP Destroyer I-Class (1501): 5 Armor, 20 HP
0/0
0/0
# Formation Normal Battle Node AD/AP
AS/AS+
E-2 Casual J
# Landing Node
# Landing Node
E-2 Casual K: 深海ソロモン方面 基地航空隊 (PoiDB)
# Formation Air Defense Node AD/AP
AS/AS+
K Diamond
Phases: 1, 2, 3
Lycoris Princess IV (1682): 100 Armor, 600 HP, 130 APBattle Card Flagship Icon.png
44/87
195/390
Diamond
Phases: 2
Airfield Princess V (1650): 140 Armor, 500 HP, 34 APAbyssal Liberation Land-based Dive Bomber 561 Equipment.pngBattle Card Flagship Icon.png
12/23
51/102
Diamond
Phases: 2, 3
Airfield Princess VI (1651): 140 Armor, 500 HP, 48 APAbyssal Liberation Land-based Dive Bomber Ace 562 Equipment.pngAbyssal Liberation Land-based Dive Bomber 561 Equipment.pngBattle Card Flagship Icon.png
17/33
72/144
# Formation Air Defense Node AD/AP
AS/AS+
E-2 Casual L
# Empty Node
L 敵影を見ず。
第三艦隊、出撃する!対空警戒を厳に!

No enemy spotted.
3rd Fleet, sortieing!
Maintain high anti-aircraft alert!
# Empty Node
E-2 Casual M: 深海潜水艦隊 ソロモン哨戒線 I群 (PoiDB)
# Formation Normal Battle Node AD/AP
AS/AS+
M Echelon
Line Abreast
Phases: 2
Submarine Ka-Class (1530): 7 Armor, 19 HPBattle Card Flagship Icon.png Submarine Ka-Class (1530): 7 Armor, 19 HP Submarine Ka-Class (1530): 7 Armor, 19 HP
0/0
0/0
Echelon
Line Abreast
Phases: 2
Submarine Ka-Class Elite (1532): 21 Armor, 27 HPBattle Card Flagship Icon.png Submarine Ka-Class (1530): 7 Armor, 19 HP Submarine Ka-Class (1530): 7 Armor, 19 HP
0/0
0/0
# Formation Normal Battle Node AD/AP
AS/AS+
E-2 Casual N: 深海任務部隊 空母艦載機群 (PoiDB)
# Formation Air Defense Node AD/AP
AS/AS+
N Diamond
Phases: 2, 3
Light Carrier Nu-Class Elite II (1762): 35 Armor, 70 HP, 69 APHell plane 1.pngBattle Card Flagship Icon.png
24/47
104/207
Diamond
Phases: 2
Aircraft Carrier Princess II (1620): 150 Armor, 350 HP, 129 APAbyssal Hell Dive Bomber Kai.pngAbyssal Revenge Torpedo Bomber Kai.pngBattle Card Flagship Icon.png
44/87
194/387
Diamond
Phases: 2
Aircraft Carrier Princess II (1620): 150 Armor, 350 HP, 129 APAbyssal Hell Dive Bomber Kai.pngAbyssal Revenge Torpedo Bomber Kai.pngBattle Card Flagship Icon.png Light Carrier Nu-Class Elite II (1762): 35 Armor, 70 HP, 69 APHell plane 1.png
67/133
297/594
# Formation Air Defense Node AD/AP
AS/AS+
E-2 Casual O: 深海潜水艦隊 増援封鎖部隊 II群 (PoiDB)
# Formation Normal Battle Node AD/AP
AS/AS+
O Echelon
Line Abreast
Phases: 2, 3
Submarine Ka-Class (1530): 7 Armor, 19 HPBattle Card Flagship Icon.png Submarine Ka-Class (1530): 7 Armor, 19 HP Submarine Ka-Class (1530): 7 Armor, 19 HP
0/0
0/0
Echelon
Line Abreast
Phases: 2
Submarine Ka-Class Elite (1532): 21 Armor, 27 HPBattle Card Flagship Icon.png Submarine Ka-Class (1530): 7 Armor, 19 HP Submarine Ka-Class (1530): 7 Armor, 19 HP
0/0
0/0
# Formation Normal Battle Node AD/AP
AS/AS+
E-2 Casual P: 深海艦隊 機動部隊 前衛空母群 (PoiDB)
# Formation Normal Battle Node AD/AP
AS/AS+
P Diamond
Phases: 2
Light Carrier Nu-Class Elite II (1762): 35 Armor, 70 HP, 69 APHell plane 1.pngBattle Card Flagship Icon.png Heavy Cruiser Ri-Class Elite (1522): 60 Armor, 60 HP Destroyer Ro-Class Late Model (1576): 26 Armor, 37 HP Destroyer I-Class (1501): 5 Armor, 20 HP Destroyer I-Class (1501): 5 Armor, 20 HP Destroyer I-Class (1501): 5 Armor, 20 HP
24/47
104/207
Diamond
Phases: 2
Light Carrier Nu-Class Elite II (1762): 35 Armor, 70 HP, 69 APHell plane 1.pngBattle Card Flagship Icon.png Light Carrier Nu-Class (1510): 25 Armor, 65 HP, 8 AP Heavy Cruiser Ri-Class Elite (1522): 60 Armor, 60 HP Destroyer Ro-Class Late Model (1576): 26 Armor, 37 HP Destroyer I-Class (1501): 5 Armor, 20 HP Destroyer I-Class (1501): 5 Armor, 20 HP
26/52
116/231
Diamond
Phases: 2
Light Carrier Nu-Class Elite II (1762): 35 Armor, 70 HP, 69 APHell plane 1.pngBattle Card Flagship Icon.png Light Carrier Nu-Class Elite (1523): 35 Armor, 70 HP, 24 AP Heavy Cruiser Ri-Class Elite (1522): 60 Armor, 60 HP Destroyer Ro-Class Late Model (1576): 26 Armor, 37 HP Destroyer I-Class (1501): 5 Armor, 20 HP Destroyer I-Class (1501): 5 Armor, 20 HP
32/63
140/279
# Formation Normal Battle Node AD/AP
AS/AS+
E-2 Casual Q: 深海艦隊 東京急行阻止主力部隊 (PoiDB)
# Formation Boss Battle Node AD/AP
AS/AS+
Q Line Ahead
Heavy Cruiser Ne-Class Kai (1895): 144 Armor, 330 HPBattle Card Flagship Icon.png Destroyer Ro-Class Late Model (1576): 26 Armor, 37 HP Destroyer I-Class (1501): 5 Armor, 20 HP Destroyer I-Class (1501): 5 Armor, 20 HP Destroyer I-Class (1501): 5 Armor, 20 HP
0/0
0/0
Line Ahead
Phases: 1
Heavy Cruiser Ne-Class Kai (1895): 144 Armor, 330 HPBattle Card Flagship Icon.png Heavy Cruiser Ri-Class (1509): 28 Armor, 58 HP Heavy Cruiser Ri-Class (1509): 28 Armor, 58 HP Destroyer Ro-Class Late Model (1576): 26 Armor, 37 HP Destroyer I-Class (1501): 5 Armor, 20 HP
0/0
0/0
Line Ahead
Phases: 1
(Final)
Heavy Cruiser Ne-Class Kai (1895): 144 Armor, 330 HPBattle Card Flagship Icon.png Heavy Cruiser Ri-Class (1509): 28 Armor, 58 HP Heavy Cruiser Ri-Class (1509): 28 Armor, 58 HP Destroyer Ro-Class Late Model (1576): 26 Armor, 37 HP Destroyer I-Class (1501): 5 Armor, 20 HP Destroyer I-Class (1501): 5 Armor, 20 HP
0/0
0/0
# Formation Boss Battle Node AD/AP
AS/AS+
E-2 Casual R: 深海任務部隊 空母艦載機群 (PoiDB)
# Formation Air Defense Node AD/AP
AS/AS+
R Diamond
Phases: 2
Light Carrier Nu-Class Elite II (1762): 35 Armor, 70 HP, 69 APHell plane 1.pngBattle Card Flagship Icon.png
24/47
104/207
Diamond
Phases: 2
Aircraft Carrier Princess II (1620): 150 Armor, 350 HP, 129 APAbyssal Hell Dive Bomber Kai.pngAbyssal Revenge Torpedo Bomber Kai.pngBattle Card Flagship Icon.png
44/87
194/387
Diamond
Phases: 2
Aircraft Carrier Princess II (1620): 150 Armor, 350 HP, 129 APAbyssal Hell Dive Bomber Kai.pngAbyssal Revenge Torpedo Bomber Kai.pngBattle Card Flagship Icon.png Light Carrier Nu-Class Elite II (1762): 35 Armor, 70 HP, 69 APHell plane 1.png
67/133
297/594
# Formation Air Defense Node AD/AP
AS/AS+
E-2 Casual S
# Empty Node
S 敵影を見ず。
第三艦隊、出撃する!対空警戒を厳に!

No enemy spotted.
3rd Fleet, sortieing!
Maintain high anti-aircraft alert!
# Empty Node
E-2 Casual T: 深海任務部隊 空母艦載機群 (PoiDB)
# Formation Air Defense Node AD/AP
AS/AS+
T Diamond
Phases: 2
Light Carrier Nu-Class Elite II (1762): 35 Armor, 70 HP, 69 APHell plane 1.pngBattle Card Flagship Icon.png
24/47
104/207
Diamond
Phases: 2
Aircraft Carrier Princess II (1620): 150 Armor, 350 HP, 129 APAbyssal Hell Dive Bomber Kai.pngAbyssal Revenge Torpedo Bomber Kai.pngBattle Card Flagship Icon.png
44/87
194/387
Diamond
Phases: 2
Aircraft Carrier Princess II (1620): 150 Armor, 350 HP, 129 APAbyssal Hell Dive Bomber Kai.pngAbyssal Revenge Torpedo Bomber Kai.pngBattle Card Flagship Icon.png Light Carrier Nu-Class Elite II (1762): 35 Armor, 70 HP, 69 APHell plane 1.png
67/133
297/594
# Formation Air Defense Node AD/AP
AS/AS+
E-2 Casual U: 深海艦隊 任務部隊 巡洋艦戦隊 (PoiDB)
# Formation Boss Battle Node AD/AP
AS/AS+
U Line Ahead
Phases: 2
Heavy Cruiser Princess (1659): 145 Armor, 350 HPBattle Card Flagship Icon.png Heavy Cruiser Ri-Class (1509): 28 Armor, 58 HP Heavy Cruiser Ri-Class (1509): 28 Armor, 58 HP Light Cruiser Tsu-Class (1591): 55 Armor, 48 HP Destroyer Ro-Class Late Model (1576): 26 Armor, 37 HP Destroyer I-Class (1501): 5 Armor, 20 HP
0/0
0/0
Line Ahead
Heavy Cruiser Princess IV (1662): 158 Armor, 350 HPBattle Card Flagship Icon.png Heavy Cruiser Ri-Class (1509): 28 Armor, 58 HP Destroyer Ro-Class Late Model (1576): 26 Armor, 37 HP Destroyer I-Class (1501): 5 Armor, 20 HP Transport Ship Wa-Class (1513): 10 Armor, 70 HP
0/0
0/0
Line Ahead
Phases: 2
(Final)
Heavy Cruiser Princess IV (1662): 158 Armor, 350 HPBattle Card Flagship Icon.png Heavy Cruiser Ri-Class (1509): 28 Armor, 58 HP Heavy Cruiser Ri-Class (1509): 28 Armor, 58 HP Light Cruiser Tsu-Class (1591): 55 Armor, 48 HP Destroyer Ro-Class Late Model (1576): 26 Armor, 37 HP Destroyer Ro-Class Late Model (1576): 26 Armor, 37 HP
0/0
0/0
# Formation Boss Battle Node AD/AP
AS/AS+
E-2 Casual V: 深海ソロモン方面 基地航空隊 (PoiDB)
# Formation Air Defense Node AD/AP
AS/AS+
V Diamond
Phases: 3
Lycoris Princess IV (1682): 100 Armor, 600 HP, 130 APBattle Card Flagship Icon.png
44/87
195/390
Diamond
Phases: 3
Airfield Princess V (1650): 140 Armor, 500 HP, 34 APAbyssal Liberation Land-based Dive Bomber 561 Equipment.pngBattle Card Flagship Icon.png
12/23
51/102
Diamond
Phases: 3
Airfield Princess VI (1651): 140 Armor, 500 HP, 48 APAbyssal Liberation Land-based Dive Bomber Ace 562 Equipment.pngAbyssal Liberation Land-based Dive Bomber 561 Equipment.pngBattle Card Flagship Icon.png
17/33
72/144
# Formation Air Defense Node AD/AP
AS/AS+
E-2 Casual W: 深海艦隊 前衛重巡戦隊 (PoiDB)
# Formation Normal Battle Node AD/AP
AS/AS+
W Double Line
Phases: 3
Heavy Cruiser Ri-Class (1509): 28 Armor, 58 HPBattle Card Flagship Icon.png Heavy Cruiser Ri-Class (1509): 28 Armor, 58 HP Destroyer I-Class (1501): 5 Armor, 20 HP Destroyer I-Class (1501): 5 Armor, 20 HP Destroyer I-Class (1501): 5 Armor, 20 HP
0/0
0/0
Double Line
Phases: 3
Heavy Cruiser Ri-Class (1509): 28 Armor, 58 HPBattle Card Flagship Icon.png Heavy Cruiser Ri-Class (1509): 28 Armor, 58 HP Destroyer Ro-Class Late Model (1576): 26 Armor, 37 HP Destroyer I-Class (1501): 5 Armor, 20 HP Destroyer I-Class (1501): 5 Armor, 20 HP
0/0
0/0
Double Line
Phases: 3
Heavy Cruiser Ri-Class (1509): 28 Armor, 58 HPBattle Card Flagship Icon.png Heavy Cruiser Ri-Class (1509): 28 Armor, 58 HP Heavy Cruiser Ri-Class (1509): 28 Armor, 58 HP Destroyer Ro-Class Late Model (1576): 26 Armor, 37 HP Destroyer I-Class (1501): 5 Armor, 20 HP Destroyer I-Class (1501): 5 Armor, 20 HP
0/0
0/0
# Formation Normal Battle Node AD/AP
AS/AS+
E-2 Casual X: 深海艦隊 ソロモン南方任務部隊 (PoiDB)
# Formation Normal Battle Node AD/AP
AS/AS+
X Line Ahead
Vanguard
Phases: 3
Heavy Cruiser Ri-Class Elite (1522): 60 Armor, 60 HPBattle Card Flagship Icon.png Heavy Cruiser Ri-Class Elite (1522): 60 Armor, 60 HP Destroyer Ro-Class (1502): 6 Armor, 22 HP Destroyer Ro-Class (1502): 6 Armor, 22 HP Destroyer Ro-Class (1502): 6 Armor, 22 HP
0/0
0/0
Line Ahead
Vanguard
Phases: 3
Heavy Cruiser Ri-Class Elite (1522): 60 Armor, 60 HPBattle Card Flagship Icon.png Heavy Cruiser Ri-Class Elite (1522): 60 Armor, 60 HP Destroyer Ro-Class Late Model (1576): 26 Armor, 37 HP Destroyer Ro-Class (1502): 6 Armor, 22 HP Destroyer Ro-Class (1502): 6 Armor, 22 HP
0/0
0/0
# Formation Normal Battle Node AD/AP
AS/AS+
E-2 Casual Y
# Selection Node
Y 艦隊の針路を選択できます。提督、どちらの針路をとられますか?
You can decide the fleet's course. Admiral, which heading should we take?
# Selection Node
E-2 Casual Z: 深海ソロモン方面 基地航空隊 (PoiDB)
# Formation Air Defense Node AD/AP
AS/AS+
Z Diamond
Phases: 3
Lycoris Princess IV (1682): 100 Armor, 600 HP, 130 APBattle Card Flagship Icon.png
44/87
195/390
Diamond
Phases: 3
Airfield Princess V (1650): 140 Armor, 500 HP, 34 APAbyssal Liberation Land-based Dive Bomber 561 Equipment.pngBattle Card Flagship Icon.png
12/23
51/102
Diamond
Phases: 3
Airfield Princess VI (1651): 140 Armor, 500 HP, 48 APAbyssal Liberation Land-based Dive Bomber Ace 562 Equipment.pngAbyssal Liberation Land-based Dive Bomber 561 Equipment.pngBattle Card Flagship Icon.png
17/33
72/144
# Formation Air Defense Node AD/AP
AS/AS+
E-2 Casual ZI: 深海艦隊 機動部隊外周護衛部隊 (PoiDB)
# Formation Normal Battle Node AD/AP
AS/AS+
ZI Line Ahead
Phases: 3
Heavy Cruiser Ri-Class Elite (1522): 60 Armor, 60 HPBattle Card Flagship Icon.png Heavy Cruiser Ri-Class (1509): 28 Armor, 58 HP Destroyer I-Class (1501): 5 Armor, 20 HP Destroyer I-Class (1501): 5 Armor, 20 HP Destroyer I-Class (1501): 5 Armor, 20 HP
0/0
0/0
Line Ahead
Phases: 3
Heavy Cruiser Ri-Class Elite (1522): 60 Armor, 60 HPBattle Card Flagship Icon.png Heavy Cruiser Ri-Class (1509): 28 Armor, 58 HP Destroyer Ro-Class Late Model (1576): 26 Armor, 37 HP Destroyer I-Class (1501): 5 Armor, 20 HP Destroyer I-Class (1501): 5 Armor, 20 HP
0/0
0/0
Line Ahead
Phases: 3
Heavy Cruiser Ri-Class Elite (1522): 60 Armor, 60 HPBattle Card Flagship Icon.png Heavy Cruiser Ri-Class (1509): 28 Armor, 58 HP Heavy Cruiser Ri-Class (1509): 28 Armor, 58 HP Destroyer Ro-Class Late Model (1576): 26 Armor, 37 HP Destroyer I-Class (1501): 5 Armor, 20 HP Destroyer I-Class (1501): 5 Armor, 20 HP
0/0
0/0
# Formation Normal Battle Node AD/AP
AS/AS+
E-2 Casual ZII: 深海艦隊 機動部隊 旗艦空母 (PoiDB)
# Formation Boss Battle Node AD/AP
AS/AS+
ZII Diamond
Phases: 3
Aircraft Carrier Princess II (1620): 150 Armor, 350 HP, 129 APAbyssal Hell Dive Bomber Kai.pngAbyssal Revenge Torpedo Bomber Kai.pngBattle Card Flagship Icon.png Destroyer Ro-Class Late Model (1576): 26 Armor, 37 HP Destroyer Ro-Class (1502): 6 Armor, 22 HP Destroyer Ro-Class (1502): 6 Armor, 22 HP Transport Ship Wa-Class (1513): 10 Armor, 70 HP
44/87
194/387
Diamond
Phases: 3
Aircraft Carrier Princess II (1620): 150 Armor, 350 HP, 129 APAbyssal Hell Dive Bomber Kai.pngAbyssal Revenge Torpedo Bomber Kai.pngBattle Card Flagship Icon.png Heavy Cruiser Ri-Class Elite (1522): 60 Armor, 60 HP Destroyer Ro-Class Late Model (1576): 26 Armor, 37 HP Destroyer Ro-Class (1502): 6 Armor, 22 HP Destroyer Ro-Class (1502): 6 Armor, 22 HP
44/87
194/387
Diamond
Phases: 3
(Final)
Aircraft Carrier Princess II (1620): 150 Armor, 350 HP, 129 APAbyssal Hell Dive Bomber Kai.pngAbyssal Revenge Torpedo Bomber Kai.pngBattle Card Flagship Icon.png Heavy Cruiser Ri-Class Elite (1522): 60 Armor, 60 HP Destroyer Ro-Class Late Model (1576): 26 Armor, 37 HP Destroyer Ro-Class Late Model (1576): 26 Armor, 37 HP Destroyer Ro-Class (1502): 6 Armor, 22 HP
44/87
194/387
# Formation Boss Battle Node AD/AP
AS/AS+

Ship Drops:

Ship drops
Type Ship? F H I P Q U ZI ZII
DE Hachijou Casual+
DE Ishigaki Casual+
DE Hirato Hard+ Casual+
DD Amagiri Hard+ Casual+ Casual+
DD Sagiri Medium+ Casual+ Casual+
DD Ariake Casual+
DD Umikaze Casual+
DD Kawakaze Medium+ Casual+ Casual+ Casual+ Casual+
DD Minegumo Casual+ Casual+
DD Oyashio Hard+ Medium+ Casual+ Casual+ Casual+ Hard+
DD Takanami Medium+ Casual+ Casual+ Casual+ Casual+
DD Fujinami Casual+
DD Hayanami Casual+
DD Hamanami Casual+
DD Teruzuki Easy+ Casual+ Casual+
CL Ooyodo Easy+ Hard+ Casual+ Casual+ Casual+ Casual+
CL Helena Casual+ Casual+
FBB South Dakota Hard+ Casual+
SS I-26 Casual+
SS I-203 Casual+
AV Nisshin Casual+
AR Akashi Hard+ Casual+
DD Naganami Hard+ Easy+ Casual+ Casual+ Casual+
DD Shimakaze Casual+
CL Nagara Easy+ Casual+ Easy+ Casual+ Casual+ Casual+ Casual+ Casual+
CL Kinu Hard+ Medium+ Casual+ Casual+ Casual+ Medium+
CL Sendai Easy+ Casual+ Easy+ Casual+ Casual+ Casual+ Casual+ Casual+
CA Myoukou Casual+
CA Atago Casual+
CA Suzuya Casual+
CA Kumano Casual+
CA Chikuma Casual+
FBB Kongou Hard+ Casual+ Casual+
FBB Hiei Medium+ Casual+ Casual+
FBB Haruna Medium+ Casual+ Casual+
FBB Kirishima Casual+ Casual+ Casual+
BB Fusou Casual+
BB Yamashiro Casual+
BB Nagato Casual+
BB Mutsu Casual+
SS I-19 Casual+


E-2 Clear Message