Introduction
The Spring 2017 Event titled "Sortie! Fifth Fleet To the North East!"is planned to begin around May 2nd, 2017. Details regarding the event note that the event will be taking place in the Northern Pacific Area (But not in the AL area), will consist of 5 maps in which 3 of them will take place as a main stage operation, while the remaining 2 maps will be an extra Operation.
The Theme of the Operation revealed in KanColle Style Vol.4 and Famitsu's April 27th Magazine notes that it will center around Defensive Operation that will take place after "That battle" in which the remaining Type 97 Torpedo Bombers and Hayabusa fought thier final battle.
Evidence suggests the operation may focus on the Battle of Shumshu as this was where the remaining Type 97 Torpedo Bombers and Hayabusa had thier final battle against invading the Russian forces.
Using the details from the event location and information provided from the sources, the main location of the event is set to take place at the Kurile Islands around near Shumshu. In which the 5th Fleet was sent and stationed there around 1943- 1944.
In addition, it has been noted the some of the ships that will appear in this event will have named tied to locations around the area of the Operation.
For additional information regarding event-related subjects and content related to the dev tweets, please refer to the following links:
Historical Background
Disclaimer: The following information is based upon a summary of World War II history and may not have any influence with the game itself. This is for historical reference only.
The 5th Fleet
The 5th Fleet were mainly composed of IJN ships that were stationed up in the North back in 1943-1944. They were mainly sent there as a defensive measure to prevent US forces from approaching from the Northern Pacific.
They were also being considered to conduct an invasion against Russia at some point during the war, but due to the outcomes as the war progressed, the 5th Fleet would eventually have to move to Letye to battle the American forces down in the south which would ultimately destroy all but two ships that was a part of the fleet. This Fleet would then become disbanded.
The following list is a list of the all the members of the 5th Fleet from the 2nd Sino-Japanese War, all the way to before Leyte Gulf.
The Fifth Fleet Members List of currently existing ships in game prior to Leyte Gulf Campaign
Second Sino-Japanese War
Myoukou, Nagara, Tenryuu, Tatsuta, Kikuzuki, Mikazuki, Mochizuki
Pearl Harbor
Tama, Kiso
Operation Cottage (This Fleet is the closest connected to the Northern Pacific)
Nachi, Maya, Tama, Kiso, Abukuma, Samidare, Hibiki, Asagumo, Yuugumo, Akigumo, Kazagumo, Ushio, Akebono, Wakaba, Hatsushimo, Naganami
Post-Battle of the Philippine Seas (This Fleet is what's being used for the event)
Nachi, Ashigara, Kiso, Abukuma, Tama, Ushio, Akebono, Kasumi, Shiranui, Hatsuharu, Hatsushimo, Wakaba
For more information please feel free to view:
Wikipedia's 5th Fleet Article
Japan Wiki's page on the 5th Fleet
The Kurile Islands and the Battle of Shumshu
Prior to to WWII back in 1941, Japan began to occupy the Kurile Islands to set up as one of many base of operations as they were slowly gathering to engage in war in the US. The place was chosen since it was an area which had a small population and was constant cover of fog. It also was under ownership of the Japanese after a ratified agreement made between Russian and Japan back in 1875.
During the War, the American forces would attempt to attack the Kurile Islands bombing both Shumshu and Paramushiro in 1943 which would later alert Japan's army and navy to take additional defenses again the American's assault resulting in the 5th Fleet being stationed in the North to defend the Kurile Islands and to aid in plans to help expand thier reach in the Northern Pacific.
As time would pass, eventually the 5th Fleet would be reassign to defend the Letye Gulf in late 1944,which would ultimately seal thier fate.
By the time the war came to an end with America, Japan would then face off another battle against the Russian forces that would invade both Shumshu and Paramushiro. The Russian Army would advance from the north from thier base located at Petropavlosk. By around this time, Japan was suffering from a severe lack in resources to keep going. With only a small amount of Type 97 bombers, 4 Hayabusa, the 11th Tank Battalion, and several thousands of soldiers. Japan would fight thier last battle to defend the islands, but ultimately due to thier suffering losses from the war they would ultimately surrender to the Russians and would give the islands back to Russian and leave the Kurile Islands.
For more information please feel free to view the follow:
Wikipedia's Kurile Island Article
Wikipedia's Battle of Shumshu Article
North Pacific Skies' Kurile Island Website
Information
New Ships
The following ships have been added to the game:
- Escort Carrier Kasuga Maru aka Taiyou
- Battleship Gangut
- Fleet Oiler Kamoi
- Destroyer Escort Shimushu
- Destroyer Escort Kunashiri
- Destroyer Escort Etorofu
New Equipment
- New Equipment mentioned in the Tanaka's Interview in KanColle Style Vol.4 notes that we will be getting the Hayabusa.
New Enemy Vessels
New Enemy Equipment
Event Requirements
New Quests
Mechanics
Participation requirements
- Must have a 75% sortie win ratio.
- Must have 5 empty ship slots for new ships.
- Must have 20 free equipment slots.
Special Mechanics
- The difficulty system first used in Spring 2015 Event returns: you can choose between Operation A (甲, Hard), Operation B (乙, Medium) or Operation C (丙, Easy).
- Choosing A or B requires certain HQ Level (HQ Lv 35 for B / 80 for A in Spring 2015 Event).
- An important note to all Admirals intending to clear the event on Hard difficulty - further (new) conditions now apply:
- When switching difficulty from any other difficulty to Hard, the map's debuff mechanism (where applicable) will be reset.
- Switching between any other difficulties will not reset the debuff mechanism.
- The debuff system of Summer 2015 Event's final map, where certain nodes had to be killed to reduce boss armor, returns.
Event Map Summary
Quick Info Table
| Classification
|
Map
|
Name
|
Combined Fleet?
|
Land-Based Air Squadron?
|
Color of Tag
|
Tag Condition & Deployment Restriction
|
Difficulty Restrictions
|
Notes
|
| Main Operation
|
E-1
|
Sortie! Ominato Naval District
|
No
|
No
|

|
Tagging:
Ships not already color-tagged will be tagged with the color associated with the map when deployed. This tag exists on all difficulties and is not reset on remodel, etc.
Deployment Restriction:
Normal or Hard: Must have either the same-colored tag or no tag.
Easy: No restrictions.
|
No restrictions. All difficulties OK
|
|
| E-2
|
Fleet, Assemble! To the Hitokappu Anchorage
|
No
|
Yes
|

|
In order to play these maps on hard, you must complete the previous map* on either normal or hard.
(e.g., to do E-4 on hard, you must complete E-3 on normal or hard.)
|
| E-3
|
Fleet, Head out! Reinforce the Northern Defence Line!
|
Yes
|
Yes
|

|
| Extra Operation
|
E-4
|
Interception! Protect the 11th Tank Battalion!
|
No
|
Yes
|

|
| E-5
|
The Northern Witch
|
Yes
|
Yes
|
|
Contribute Information
We would like you to contribute information regarding pathing, drops, enemy compositions, mechanics, etc. as you play through the event. If you happen to discover anything, be sure to contribute your information via the talk page or by a links down below.
E-1 Data Submission Forms by Tsubakura
Submit a report
View all submitted reports
E-2 Data Submission Forms by Tsubakura
Submit a report
View all submitted reports
E-3 Data Submission Forms by Tsubakura
Submit a report
View all submitted reports
E-4 Data Submission Forms by Tsubakura
Submit a report
View all submitted reports
E-5 Data Submission Forms by Tsubakura
Submit a report
View all submitted reports
Event Maps
E-1
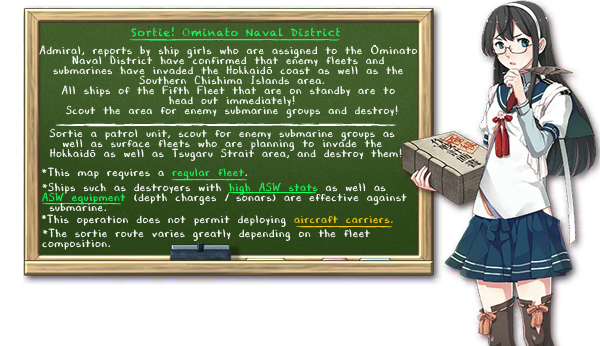
| Sortie! Ominato Naval District [1] [2]
|
| 出撃!大湊警備府
|
Information
- Event Tag:
Boss: Submarine Princess
- Hard (甲): 520
- Medium (乙): 440
- Easy (丙): 330
Key Rewards:
|
|
|
Branching rules
| E-1 Branching Rules
|
| Nodes |
Rules
|
|
|
|
- Do not meet the requirements to go to F.
|
|
|
|
|
|
|
|
|
|
- Pass the LoS check of +34 on Hard using the F33 Cn3 Formula.
|
|
|
|
- Fail the requirements to go to H.
|
|
|
- Pass the LoS check of +13 on Medium/Hard using the F33 Cn3 Formula.
- Easy has no LoS check.
|
|
|
|
|
|
|
|
|
|
- Do not meet the requirements to go to L.
|
|
|
|
|
|
|
|
|
|
|
|
|
|
|
|
|
|
Branching compositions were reported over the course of the event.
|
|
Tips
- CV(L) are not allowed.
- The boss node will have a Submarine Princess present along with some subs and surface ships.
- A minimum of 2 DD ensures east routing towards the boss
- A BBV is recommended to enable second shelling and can also perform ASW attacks with certain setups.
- Normal/Hard requires passing a 45+ F33 Cn3 LoS check to avoid off routing from F to G.
- It's recommended to load your BBV with Zuiuns and Seirans to meet the LOS requirements.
Recommended Compositions:
- 3XX,2DD,1BBV (DDs, CL or CTs can be used in XX) ASW equipment setups are heavily advised.
- If you use the above mentioned recommendation for higher difficulties, you shouldn't have any issue defeating the boss fleet unless you have a bad encounter like T-Disadvantage.
- Most nodes should prevent little issue outside the pre-boss node which may present a possible risk to players on higher difficulties.
|
|
|
|
Ship drops
|
E-2
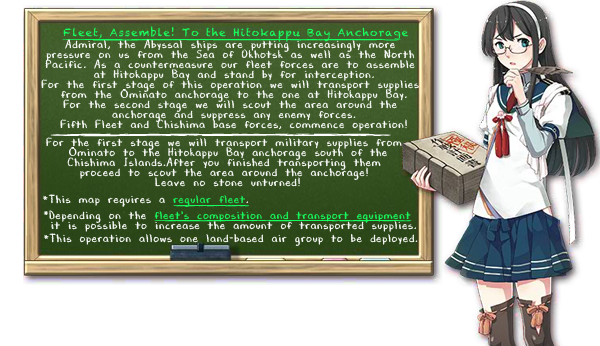
| Fleet, Assemble! To the Hitokappu Anchorage
|
| 艦隊集結!単冠湾泊地へ
|
Information
TP Gauge:
- Hard (甲): 300
- Medium (乙): 240
- Easy (丙): 120
Boss Phase:
- Hard (甲): 1090
- Medium (乙): 1040
- Easy (丙): 970
Key Rewards:
|
|
|
Branching rules
| E-2 Branching Rules
|
| Nodes |
Rules
|
| Start
|
|
- Do not meet the requirements to go to F.
|
|
|
- If the fleet contains SS(V):
- Fleet will always go to F, anything else is irrelevant.
- If the fleet does not contain SS(V):
- Meet all of the following requirements:
- No AV allowed
- Amount of CV(L/B) ≦ 2
- Amount of DD ≧ 1
|
|
|
|
- Do not meet the requirements to go to D.
|
|
|
- Meet all of the following requirements:
- Fast Fleet
- Amount of CV(L) ≦ 2
|
|
|
|
- Do not meet the requirements to go to I.
|
|
|
- Meet all of the following requirements:
- Fast Fleet
- Amount of FBB+CV(L/B) ≦ 2
- Amount of DD ≧ 2
|
|
|
|
|
|
|
|
|
|
- Meet all of the following requirements:
- Fast Fleet
- Amount of FBB+CV(L/B) ≦ 3
- Amount of DD ≧ 2
|
|
|
- Do not meet the requirements to go to O.
|
|
|
|
|
|
|
|
|
|
|
- Do not meet the requirements to go to either R or T.
|
|
|
- Node R cannot be accessed during the HP Phase.
- If you're in the TP Phase, meet all of the following requirements:
- Amount of historical ships ≧ 3 on Easy and Medium / 4 on Hard
- Pass the LoS check
- If the map is cleared:
- Amount of historical ships ≧ 3 on Easy and Medium / 4 on Hard
- Random routing between node R and T if you pass the LoS check, but fail to meet the historical requirement.
|
|
|
- Node T cannot be accessed during the TP Phase.
- If you're in the HP Phase:
- If the map is cleared:
- Random routing between node R and T if you pass the LoS check, but fail to meet the historical requirement.
|
|
|
|
- You will be redirected through this route if node T is not unlocked yet.
|
|
|
|
|
|
|
Branching compositions were reported over the course of the event.
|
|
Tips
Recommended Compositions:
- 2CV, 2CA(V), 2DD
- This composition works for both the transport phase and the Killing phase
- Path: F-G-I-K-O-L-P-N-R (For Transport Phase) and F-G-I-K-O-L-P-T (For Killing Phase)
- 1CV, 1FBB, 2CA(V), 2DD (for Killing phase)
- This composition may be more helpful for killing off the boss node as you'll need to have as much time to attack and possibly eliminate as many of the enemies as possible.
- Path: F-G-I-K-O-L-P-T
- 1CV, 1FBB, 1CA(V), 1CLT, 2DD (for Killing phase)
- Another stronger version which allows you to use a torpedo cruiser to perform a preemptive torpedo attack which can possible help turn the battle to your advantage.
- Path: F-G-I-K-O-L-P-T
Land-Based Air Squadron:
- 1 land-base is available to be sortied.
- A minimum range of 5 is required for the land-base to reach the boss nodes for both phases.
Regarding Nu-class Light Carrier Kai
- This map serves as the introduction to the new enemy unit variant of the Nu-class Light Carrier known as the Light Carrier Nu-class Kai.
- Unlike the previous Nu-class Light Carriers, these versions are much stronger and tougher compared to all of the prior versions.
- They come in an Elite and Flagship variants.
- While the planes they come with don't generally do much damage during the air strike phase, they will generally pose the greatest threat during shelling phase as their attacks appear to be surprisingly accurate and can usually hit someone in your fleet.
- In addition, their air defense is also notably strong, especially for the flagship versions which will require you to have your strongest and most capable fighter planes armed to your Standard carriers to keep up with the Nu-class's so you can have a chance to score Air Parity or Air Superiority against them.
- Due to their accurate shelling attacks, it's highly recommended to try to disable them as soon as possible to minimize the damage they can do to your fleet.
Transport phase notes
Template:Side box
- The above mentioned composition works effectively for the phase if you're fleet is well prepared and well equipped. Bringing ships that can use drum canisters and Daihatsu will help speed the process of lowering the TP gauge.
- During the TP Phase, there is a historical composition fleet that can be useful if you wish to grind the map and bypass Node N.
- Using 4 members from the Fifth Fleet, which must include two of the DDs, and two large ships (FBB and/or CV) of your choice will allow you to avoid Node N.
- Do note that this may not be recommended if you wish to farm node N since it yields some rare drops.
Killing phase notes
- Taking the same path as the one was noted in the recommended compositions is preferred as it will allow you to minimize your encounter with difficult enemy units such as the Nu-class Light Carrier Kai up till the boss node.
- The boss fleet will consist of a Heavy Cruiser Princess along with some Nu-class Light Carrier Kai (except on easy which are the normal versions and don't appear till final kill).
- Using your Land Base bombers is recommended to help pick off some ships, but may present some difficulty since more of the ships are not easy to hit and you may run to risk of losing the planes' ranks during the runs.
- It's recommended to use 1-2 Fighter planes and 1-3 Land Based bombers / Torpedo bombers to max out what you desire most (whether it is Air control or damage potential.)
- Boss shelling support is highly recommended
- Destroyers with good torpedo cut-in are also prefer to max out the chances you'll take out the Heavy Cruiser Princess.
- The main factor that will mostly decide your victory is incapacitating or taking out the Nu-class Kai Light Carriers since they often possess relatively high accurate shelling attacks which can drastically affect your chances of winning depending on who they target.
|
|
|
|
Ship drops
|
E-3
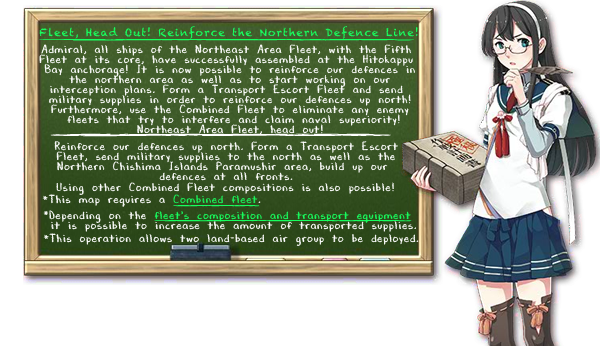
| Fleet, Head out! Reinforce the Northern Defence Line!
|
| 艦隊抜錨!北方防備を強化せよ!
|
Information
Resource Nodes:
TP Gauge:
- Hard (甲): 500
- Medium (乙): 400
- Easy (丙): 300
Boss:
- Hard (甲): 1920
- Medium (乙): 1675
- Easy (丙):
Key Rewards:
- Clearing on Hard (甲): Kasuga Maru, Type 1 Fighter Hayabusa Model III A (54th Air Squadron), Toku Daihatsu Landing Craft + 11th Tank Regiment, 7x Screw, 1x Medal
- Clearing on Medium (乙): Kasuga Maru, Type 1 Fighter Hayabusa Model III A, Toku Daihatsu Landing Craft + 11th Tank Regiment, 4x Screw, 1x Medal
- Clearing on Easy (丙): Kasuga Maru, Type 1 Fighter Hayabusa Model III A,Daihatsu-class Landing Craft, Type 95 Depth Charge
|
|
|
Branching rules
| E-3 Branching Rules
|
| Nodes |
Rules
|
|
|
|
|
|
|
- Transport Escort
- Carrier Task Force
|
|
|
|
|
|
|
|
|
|
|
|
|
|
|
|
|
- Fixed route during the Anchor Phase.
- In case you're using a Transport Escort:
- Amount of AV+LHA+AO ≧ 2 (Overrides all other routing)
|
|
|
|
|
|
- Transport Escort and Slow Fleet
|
|
|
- Transport Escort and Fast Fleet
|
|
|
|
|
|
|
|
|
|
|
|
|
|
|
|
- Does not meet the requirements to go to O.
|
|
|
- Meet all of the following requirements:
- Fast Fleet
- Amount of CV(B) ≦ 2
|
|
|
|
|
|
|
|
|
|
|
|
|
|
|
Branching compositions were reported over the course of the event.
|
|
Tips
Recommended Compositions:
- TCF: Main Fleet - 2 CAV 4 DD Escort Fleet - 1 CL 3 DD 2 CA
- Alternative TCF: Main fleet - 1 CAV, 1 AV(with turbine and boiler if using Commandant Teste or Mizuho), 4DD Escort Fleet - 1 CL 3DD, 2 CA
- Resource Path: J-K-H-G-E or J-K-H-F-D-C or J-K-H-F-D-A-B
- TP Path: J-K-M-Q-U-V
- STF: Main Fleet - 4 (F)BB(V) 2 CVL Escort Fleet - 1 CL 2 CA 2 DD 1 CLT
- HP Path: J-N-P-S-W or J-N-R-S-W
Transport Phase Notes
- Transport phase is divided into 2 parts.
- Part 1: Base Transport
- Part one involves taking your transport fleet to drop out supplies at the near by bases at Nodes A, C, and E.
- Use your LBAS to target Nodes K and F to minimize damage from these nodes.
- Since the enemy fleets lack in air support, a full bomber LBAS is recommended to maximize damage potential.
- Once the 3 base nodes have been made contact with, you will gain access to the next part of the map where you can begin your transport part of the mission.
- Part 2: Transport Operation
- During Transporting, you can use the recommended TCF to complete the operation.
- Drum Canisters and various Daihatsu are recommended to speed up the TP Gauge's countdown.
- If you're looking to save on CAVs for the next map, you may consider the option of using an AV, if you use Chiyoda or Chitose in seaplane tender form.
- If you use a more stronger and large capacity Seaplane tender like Mizuho or Commandant Teste, you will need a turbine + engine combo to make them fast so they can maintain the fast fleet path.
- Seaplane Tenders and/or Aviation Cruiser should be armed with a seaplane fighter or two to help aid in improving the out improving your fighter strength to reach the boss node.
- LBAS should be set up to include 1-2 Fighter / 1-3 Bombers/ 0-1 Flying boat depending on your needs.
- It's recommended to target nodes K, Q and V with you LBAS.
- A distance of 9 is needed to reach Node V and 6 is needed to reach Node Q.
- If reaching Node V is an issue, it is recommenced to bring node support to make the nodes easier.
- Node V will be an enemy combined fleet with a single Nu-class light carrier in the fleet.
- Depending on the difficulty level, you may be pitted again an Elite or Flagship Kai variant.
- Bringing LBAS fighters and a good amount of seaplane fighters with your AV and CAV can help give you a possible edge in battle.
- Overall the Boss node combined fleet shouldn't pose much of an issue in general and should be manageable.
Kill Phase Notes
- Bringing a surface Task force is recommended to take out the enemy fleet present at the boss node more easily.
- LBAS should be set with 1-2 Fighter / 1-2 Bombers/1 Flying boat if you plan to use them at the boss node.
- A distance of 9 is needed to reach Node W.
- Most enemy fleets should be manageable without much concern till you reach the boss node itself.
- Node W will consist of a boss fleet which will be a combined fleet with an Escort Princess.
- Due to the new bombers she and the new Nu-Kai Carriers that may appear in the boss (based on difficulty), her air power will be notably strong. So a strong air defense is highly recommended between both your carriers and your LBAS and take out as many of the planes as possible and help achieve Air Parity or Air Superiority.
- Fighter power may need to be increased during final kill to maintain air control.
The Escort Princess has a Armor reduction mechanic which can be triggered during the killing phase of the map. The requirements are as followed:
- Score an S rank on Node P
- Score an S rank on Node R
- Score an S rank on Node V
By completing this you will get a ding sound at the homeport menu upon returning, when you confront her, her sprite will change, along with her dialogue and her armor will be reduced for final kill making her easier to defeat.
- Node P and V should be manageable to do under normal combat
- S ranking Node R will require you to have ASW gear ready to use since you'll be fighting Enemy subs.
|
|
|
|
Ship drops
|
E-4

| Interception! Protect the 11th Tank Battalion!
|
| 逆上陸!士魂の反撃
|
Information
Boss:
- Hard (甲): 3450
- Medium (乙): 3150
- Easy (丙): 2900
Key Rewards:
- Clearing on Hard (甲): Bomb-carrying Type 1 Fighter Hayabusa Model III Kai (55th Squadron), 1x Reinforcement Expansion, Prototype Flight Deck Catapult, 1x Skilled Pilot, 1x Medal
- Clearing on Medium (乙): 1x Prototype Flight Deck Catapult, 1x Reinforcement Expansion, 1x Medal, 1x Skilled Pilot
- Clearing on Easy (丙): 1x Prototype Flight Deck Catapult, 1x Medal
|
|
|
Branching rules
| E-4 Branching Rules
|
| Nodes |
Rules
|
| Start
|
|
- If the fleet contains SS(V):
- Fleet will always go to A, anything else is irrelevant.
- If the fleet does not contain SS(V):
- Meet all of the following requirements:
- No CV(L/B) allowed
- Fast Fleet
- Amount of CL ≧ 1
- Amount of DD ≧ 3
|
|
|
- Does not meet the requirements to go to A.
|
|
|
|
|
|
|
|
|
|
|
|
|
|
|
|
|
|
|
|
|
|
|
|
|
|
|
|
|
|
|
|
|
|
|
|
|
|
|
|
|
|
|
|
|
|
|
|
|
|
Branching compositions were reported over the course of the event.
|
|
Tips
Recommended Compositions:
- 3-4 CV(B) 1-2 CAV 1 SS(V)
- Path: A-B-C-E-H-I
- This composition starts on the West side and focuses on opening strikes and strong shelling.
- It uses an SS(V) to enable west routing and can also draw the shelling of Northernmost Landing Princess.
- This route can force a lot of early retreats due to sub getting taiha in node C.
- 333 air power is required for AS+ on C node and 408 for AS+ on E node.
- CAVs need to be armed with Anti-Installation gear.
- SS(V) should use turbines and possibly a damecon if necessary.
- CVs should use a Torpedo bombers / Fighter set up and also possibly carry a Saiun. Also bring Type 97 Torpedo Bomber type planes as they are a weakness to the boss node.
Land-Based Air Squadron:
- There map features 3 land-bases where a maximum of 2 can be sortied.
- Hard and Normal features land-base raids where the Abyssal will target land bases resulting in lost planes and resources.
- It is recommended to set your third base to defense mode with 3 or 4 of you best Interceptor or Fighter planes along with a Saiun.
- The range to the boss node is 1 with a fighter power require of 48/108/216 for AP,AS,AS+ respectively.
- If you have Jet Planes, feel free to use them to target the boss node since with an additional air strike you can actually take our possibly more ships making the run more easily.
Boss Notes:
|
|
|
|
Ship drops
|
E-5

|
Information
- Event Tag: None (All ship with prior tags are allowed to join this map.)
Killing Phase 1
Battleship Princess HP:
- Hard (甲): 1200
- Medium (乙): 1200
- Easy (丙): 1200
Killing Phase 2
Northern Water Princess HP:
- Hard (甲): 3850
- Medium (乙): 3080
- Easy (丙): 3000
Key Rewards:
|
|
|
Branching rules
| E-5 Branching Rules
|
| Nodes |
Rules
|
| Start
|
|
|
|
|
|
|
|
|
|
|
|
|
|
|
- Amount of CV(B) in main fleet ≧ 4
- Amount of (F)BB(V)+CV(L/B) in main fleet ≧ 5
|
|
|
- Do not meet the requirements to go to F.
|
|
|
|
- The map has been cleared.
|
|
|
- The map has not been cleared yet.
|
|
|
|
- Amount of (F)BB(V)+CV(B) in main fleet ≧ 4
|
|
|
|
|
|
|
- Do not meet the requirements to go to either I or M.
|
|
|
- If the map is not cleared yet, meet one of the following requirements:
- If the map is cleared, meet one of the following requirement:
|
|
|
- If the map is not cleared yet, meet one of the following requirements:
- If the map is cleared, meet one of the following requirements:
- Fleet contains AO
- Amount of (F)BB(V) ≧ 4
|
|
|
|
|
|
|
|
|
|
|
|
|
|
|
|
|
- Pass the LoS check, but fail to meet the requirements to go to R.
|
|
|
|
|
|
- Amount of historical ships ≧ 4 on Easy/5 on Medium.
- You cannot go through this route on Hard.
|
|
|
|
|
|
|
|
|
|
|
|
|
|
|
Branching compositions were reported over the course of the event.
|
|
Tips
Recommended Compositions:
- Phase 1:
- CTF: Main Fleet - 4 CV(B) 2 (F)BB Escort Fleet - 1 CL 2 DD 1-3 CLT 0-2 CA
- Path: A-D-G-L(-M)-R
- Phase 2:
- STF: Main Fleet - 4 (F)BB 2 CVL Escort Fleet - 1 CL 2 DD 1-3 CLT 0-2 CA
- Path: B-C-F-J-N-O-T
- CTF: Main Fleet - 4 CV(B) 2 (F)BB Escort Fleet - 1 CL 2 DD 3X
- Path: E-F-J-N-O-T
- This Event map will allow the uses of all previous event tag ships so feel free to bring anyone you feel comfortable with keeping in mind that certain ships will have an impact on the boss battles.
First Killing Phase Notes
- The first killing phase requires you to battle and defeat the Battleship Princess
- A Carrier Task Force is recommended and going down the path of Node D will help you reach the Battleship Princess.
- A standard Torpedo bomber / fighter set up is recommended for your Carrier Fleet.
- Have 2 of your LBAS planes set to attack the boss node while keeping the other on defense to intercept the Land Base Air Raid.
- A distance of 6 is needed to reach the Battleship Princess boss node for your LBAS.
- Most enemy fleets here should present almost no issue in battle and the Battleship Princess should be manageable.
- If you manage to defeat her each time, she should be defeated in 3 kills allowing you to enter the second phase.
Template:Side box
- Easy and Normal mode have a special composition which can help you bypass the Carrier Hime node.
- You will need to bring members of the 5th Fleet in your fleet.
- Four Members of the Fifth Fleet are needed for Easy, Five Members of the Fifth Fleet are needed for Normal.
- Hard Mode has no known method to bypass the Carrier Hime Node Battle.
- After depleting the bar and killing the Battleship Princess you'll gain access to the second killing phase.
Second Killing Phase Notes
- To weaken the Northern Water Princess the following conditions must be met:
- S Rank Node C
- S Rank Node D
- S Rank Node E
- Successfully Fully Intercept an enemy Air Raid (White Text)
- Node D and E can be done using your Carrier Task Force.
- C is an Air Attack node and requires you to use a Surface Task Force to reach.
- A ship with strong AACI like Maya or Akizuki are recommended to use along with a group of light carriers with only fighters.
- Additional support from LBAS may also be required, if needed, make one LBAS with nothing but strong fighter planes to use on this node.
- Successfully taking no damage will give you an S rank.
- Upon completing these conditions, you will hear a ding chime upon returning to home port indicating you have completed the Debuff requirements.
- When you battle the Northern Water Princess after fulfilling the debuff requirements, her eyes will be glowing orange and her dialogue will change.
- Surface Task Force Method
- Using the Surface Task Force will require your fleet to have have some strong battleships, and CVLs with strong Air Defense.
- Your Fleet will have to deal with need to deal with the sub node in Node B which can be problematic especially in higher difficulties as you'll be dealing with So-class submarines which are known for their relatively high and accurate torpedo strength.
- A sonar may be required to cripple or eliminate some of the subs (until final kill) to minimize damage and being forced to retreat early.
- Most of the other nodes generally require for your Light Carrier to have strong Air Power to make it through the nodes containing Nu-Kai and Wo-Kai (Node F). It's recommended that your light carriers use either 4 fighters or 3 fighter / 1 Torpedo bombers to take out the enemy fleets maintain air superiority / parity.
- The Boss node should be on the most part manageable with a fleet full of battleships. If you use an LBAS to help eliminate some of the enemy ships in the combined Fleet.
- LBAS should be set up to use 3 Torpedo or Land Based Bombers / 1 Fighter.
- A distance of 7 is needed to reach the boss node for your LBAS.
- Second Fleet should consists of members of the Fifth Fleet or Verniy. (Will be explained in weaknesses of the Northern Water Princess further below.)
- Carrier Task Force Method
- Using a Carrier Task Force will take you down a safer path to the boss node, but will have you lose a little more fuel and ammo in the process which will result in a slight damage penalty at the boss node.
- Standard Carriers are recommended to bring a Mixture of 0-1 Dive bombers/1-2 Torpedo Bobmers / 2 Fighters (Will be explained in weaknesses of the Northern Water Princess further below.)
- The only main concern with this fleet will be the possible risk of taking damage on various nodes such as C,F,and N, since you'll be dealing with stronger carrier units in Nodes C and F and a Fleet consisting of Ta-class and some torpedo based ships in Node N (which can sometimes appear in line ahead)
- Above methods for LBAS still apply here.
- Fifth Fleet members and Verniy also apply here.
- Using this combined fleet can sometimes be beneficial for helping you take on the boss more easily due her many weaknesses (which will be discussed below)
Weaknesses of the Northern Water Princess
- The Northern Water Princess has a large number of weaknesses which can be exploited by using the following:
- Members of the Fifth Fleet X1.25 extra damage (Please refer to the listing above in the E-5 tip section.)
- Russian Ships (Verniy and Gangut) X1.5 extra damage
- Dive Bombers x1.2 Damage
- Using fleets consisting of the above mentioned ships and equipment will allow you to easily beat down the Northern Water Princess.
Final Kill Notes
- Whichever combined fleet you use is up to you. The main thing you may want to consider besides everything mentioned above will be to boost your LBAS Fleet to land a concentrated attack on the boss node.
- It's recommended to use 3 Bombers / 1 Fighter that can reach up to 7 at the boss node for all LBAS. (You will be ignoring attacks against your base.)
- Boss Support is recommended to quickly finish off the boss fleet's ships so you can concentrate your attacks on the Northern Water Princess.
Farming
- Node T has a large amount of rare drops which may be worth looking into (Especially Littorio and Roma).
- Farming this map require some effort since you need to be careful how you go about doing it as you may want to consider the following things.
- If you complete this map, you will be taken a different path which will basically take you through a sub node which will be more difficult to clear due to their ability to take out several of your ships if their torpedoes hit.
- You will also go through a maelstrom node which will further drain your resources.
- So if you consider farming try to do it while playing the map prior to clearing and focus on A rank wins where you don't end up killing the princess.
|
|
|
|
Ship drops
|
|
Events |
|---|
|
2013 | | |
2014 | | |
2015 | | |
2016 | | |
2017 | | |
2018 | | |
2019 | | |
2020 | | |
2021 | | |
2022 | | |
2023 | | |
2024 | | | |
|
2015 · 2016 · 2017 · 2018 · 2019(& sardine) · 2021(large) · 2022 · 2023 | | |
2015 · 2016(simple quest) · 2017(simple quest) · 2020(large) · 2021 · 2022(simple quest) | | |
2019 · 2020 · 2021 · 2022 · 2023 · 2024 | | |
2022 · 2023 | | |
2018 | | |
2014 · 2015 |
|
|


