Fall 2020 Event/E-3
E-3
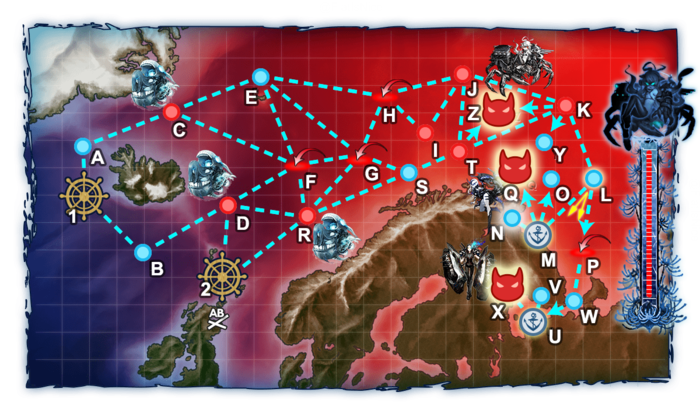
PQ17船団を護衛せよ!
![]()


| Information | ||||
|---|---|---|---|---|
| Event Tag | Convoy PQ 17 | |||
| Boss Gauges | Hard (甲): 600 TP + 900 TP + 6860 HP | |||
| Medium (乙): 450 TP + 720 TP + 6370 HP | ||||
| Easy (丙): 400 TP + 500 TP + 5880 HP | ||||
| Casual (丁): 400 TP + 500 TP + 5880 HP | ||||
| Map Bosses | New Battleship Princess | |||
| Rewards | ||||
|---|---|---|---|---|
| All | ||||

| ||||
| Equipment/Item | 丁 Casual |
丙 Easy |
乙 Medium |
甲 Hard |
Medal |
1 | 1 | 2 | |
Improvement Material |
3 | 6 | 8 | |
New Model Gun Mount Improvement Material |
1 | 2 | ||
 Do 17 Z-2 |
1 | 1 (★2) | ||
 16inch Triple Gun Mount Mk.6 + GFCS |
1 | |||

| E-3 Branching Rules | ||
|---|---|---|
| Nodes | Rules | |
| Start | 1 |
|
2 |
| |
1 |
A |
|
B |
| |
2 |
D |
|
R |
| |
C |
E |
|
F |
| |
D |
F |
|
R |
| |
E |
G |
|
H |
| |
F |
E |
|
G |
| |
R |
F |
|
G |
| |
S |
| |
G |
H |
|
S |
| |
H |
I |
|
J |
| |
T |
J |
|
K |
| |
Z |
| |
K |
L |
|
Y |
| |
Z |
| |
L |
M |
|
P | ||
M |
N |
|
O |
| |
Q |
| |
U |
V |
|
X |
| |


Branching compositions were reported over the course of the event.
Disclaimer: The following guide is a preliminary release for this event map, it contains information from early tests, do note that some things are subject to change as more information is gathered over the event and thus the guide is subject to change.
The event guides are to be constructed through the respective Event map page guide and reviewed by editor staff / collaboration committee before being approved here. Do not under any circumstance update the guides through this page or attempt to fix them through this page. Please only update guides through their respective sandbox pages.
General Guidelines
- E3 is a multi-phase map consisting of, in order:
- 2 TP Phases
- 1 Unlock Phase
- 1 HP Phase.
- You cannot sortie any Flight-Deck equipped ship onto this map unless they have Arctic Gear & Deck Personnel equipped to them.
- 2 Bases of LBAS Support are available to you on this map.
Ship Bonuses (Tentative)
DISCLAIMER: This information is based on user submitted data and is subject to revisions as more data is gathered. Any version of the ship receives the bonus regardless of remodel.
| Ships | Mapwide | Boss Q, X | Boss Z | |||
|---|---|---|---|---|---|---|
| 1.1x | 1.05x (1.155x) | |||||
| 1.15x | 1.05x (1.207x) | |||||
| 1.25x | 1.05x (1.31x) | 1.1x (1.38x) | ||||
| 1.1x (1.38x) | ||||||
| 1.35x (1.69x) | 1.3x (1.63x) | |||||
| New Battleship Princess Only Modifiers | ||||||
| Debuff Effect | 1.05~1.07x | |||||
Map Phases Breakdown
Phase 1: Clear the TP Gauge
After clearing TP Phases for several generations on E1 and E2, it is now up to your great-grandson to reach the Transport Node M and to defeat the Transport Boss at Q, which includes a rather troublesome Ne-Class Kai at up to 255 Armour. There are two Options to complete this Phase. Both of them go through Node J, which can spawn an enemy Torpedo Squadron in Vanguard Formation. There will also be a Submarine Node and Airstrike Node on the way. Depending on Strategy (A or S-Ranks) you might want to set up historical ships to deal with the Ne-Class Kai at Q.
- Recommended Fleet: (0-1CVL 0-1AV/Shinshuu Maru
 0-2CAV 4DD) + (1-2CA 1-2CL 3-4DD)
 - Route: A C E H J K L M Q
- LBAS: Range 7 (Q), Range 7 (J), No Airpower on both Nodes
- Notes:
- Concentrate your Transport Equipment on the Main Fleet as the Escort Fleet are the ones doing the most fighting
- AACI to deal with the Airstrike is recommended
- (O)ASW is optional, the subnode is not that threatening
- There is no Airpower on the Boss, a single Seaplane-Fighter is sufficient to acquire AS
- If Node J is troublesome, consider using one base of high accuracy Carrier Planes in LBAS to deal with them
- Recommended Fleet: (FBB 0-1CV(L) 1-2CA(V) 0-2CL 1-3DD) + (CL 0-1CLT 0-2CA(V) 3-4DD)
- Route: B D F E H J K L M Q
- LBAS: Range 7 (Q), Range 7 (J), No Airpower on both Nodes
- Notes:
- Concentrate your Transport Equipment on the Escort Fleet and Main fleet CL/DD as the Main Fleet are the ones doing the most fighting
- AACI to deal with the Airstrike is recommended
- (O)ASW is optional, the subnode is not that threatening
- There is no Airpower on the Boss, a single Seaplane-Fighter is sufficient to acquire AS
- The Fleet must be fast to avoid the airstrike node G
Phase 2: Second Transport Phase
This Phase is largely a repeat of Phase 1 (including Fleet compositions), the Transport Node is found at U and the Transport Boss at Node X. The Transport Boss's fleet in this Phase largely consists of PT-Imps, so taking means to deal with them is highly recommended. In comparison to Phase 1 there is an additional Airstrike in Form of Node P. The Surface Task Force may opt to use a Fleet Carrier (CV) instead of a CVL in this Phase.
Note that Surface Task Force has different routing compared to Phase 1; in this phase, it will route from Start Point 2, proceeding via:
R S T K L P W U X (Shortest possible route)
The fleet must be Fast to avoid offrouting to nodes F & G. Other than that, the fleet is similar to the Phase 1 Surface Task Force Fleet, with the possibility of swapping a CV for a CVL.
- The only potentially dangerous node is T, which can contain 2 Ne Elites in Vanguard formation.
Phase 3: Unlock the Boss Node
To unlock the Boss Node, you need to obtain Air Superiority on LBAS Raid defence twice (on Hard). Set up your LBAS accordingly and sortie your fleet until you trigger the Raid.
Phase 4: Unlock the Shortcut
To unlock the Shortcut T->Z you need to do the following. You can only do these steps once the Boss Node is unlocked as described above:
- S-Rank Node Q, A-Rank Node C:
- You are required to use a Transport Combined Fleet as outlined in Phase 1 for this step as a STF will no longer route there.
- Replace Transport Equipment for Combat Equipment
- A-Rank Node D
- Routes D. Use a Surface Task Force and load up on ASW equipment
- Use of 1 BB 1 CA + 1 CL 3 DD will take you on the same route to D and save up on resources. Speed does not matter. Load up your CL and DD with ASW equipment
- A-Rank Node R
- Routes R. Use a Surface Task Force and load up on ASW equipment
- Alternative: A-Rank Nodes D & R (in same sortie)
- It is also possible to S-Rank Nodes D & R in one sortie, routing B-D-R. Use a Carrier Task Force that contains 4 or more (F)BB(V)+CV(L/B) and load up on ASW equipment
(optional) Phase 5: Debuff
With the presence of strong historical Bonuses, doing the debuff can be considered optional. It only applies to the Last Dance form. It is currently unknown if debuffing can only be done once the Boss is put into a Last Dance state. The following steps are suspected to be required on Hard Difficulty:
- S-Rank Node T
- S-Rank Node K
- S-Rank Node J (?)
- A-Rank Node Q (P1 Boss, requires usage of TCF)
- S-Rank Node I (slow CTF, Fleet should include a limit of CL = 1 + DD = 2-3 )
Phase 6: Defeat the Abyssal Loli Battleship Princess
The Goal of this Phase is to defeat the New Battleship Princess found at Node Z. She is accompanied by two Wo-Class Kai Aircraft Carriers and a heavier Torpedo Squadron in a Combined Fleet. She herself can be considered the main threat of this Node, her escorting ships are considerably weaker compared to other Event Boss nodes. At up to 356 Armour on Last Dance and 980HP you should be making use of Historical Ships with high bonuses like Verniy , Tashkent
 and Gangut Dva
 .
.
- Recommended Fleet: (2CV 2-3CA(V) 1-2CL) + (FBB CL 1-2CA(V) 0-1CLT 2-3DD)
- Route: B D F G S T Z
- LBAS: Range 7, AD/AP is 69/138 and 89/177 on Hard Mode
- Notes:
- This is the heaviest fleet you can take to this Boss. It also ignores speed, so utilizing Gangut in the Escort will be more viable
- Due to Shelling order, Node T might be problematic for your Escort Fleet
- Support Expeditions recommended on Last Dance
- Recommended Fleet: (1-3(F)BB(V) 0-1CV(B) 2-3CA(V) 0-1CL 0-1DD) + (CL 0-2CLT 0-1CA(V) 3-4DD) | Maximum of 3 (F)BB(V) + CV(B/L), 4DD, Fast Fleet
- Route: R G S T Z
- LBAS: Range 7, AD/AP is 69/138 and 89/177 on Hard Mode
- Notes:
- Better Preboss due to STF shelling at expense of heaviest firepower possible at the boss
- Using Support Expeditions is recommended. Using ASW support is an option to help facetank the Submarine Node.
- It is possible to remove one capital ship (CV/BB) from the fleet to skip the Air Raid Node G
Friend Fleets
| E-3 Z | ||||||||||
|---|---|---|---|---|---|---|---|---|---|---|
| E-3 Z : Ark Royal FS (Variant 1, 2020-12-18~) Powerful Play Play | ||||||||||
| Ship | Lv. | Equipment | ||||||||
Ark Royal Kai |
86 |     |
71 | 50 | 0 | 82 | 70 | |||
Warspite Kai |
90 |    |
82 | 106 | 0 | 98 | 93 | |||
Janus Kai |
84 |    |
31 | 53 | 88 | 72 | 50 | |||
Jervis Kai |
88 | |
31 | 52 | 90 | 70 | 50 | |||
| E-3 Z : Gangut FS (Variant 1, 2020-12-18~) Powerful Play Play | ||||||||||
| Ship | Lv. | Equipment | ||||||||
Gangut Dva |
85 |  |
77 | 90 | 32 | 72 | 95 | |||
Janus Kai |
84 | |
31 | 53 | 90 | 72 | 50 | |||
Jervis Kai |
88 | |
31 | 52 | 90 | 70 | 50 | |||
Tashkent Kai |
80 |  |
39 | 66 | 68 | 69 | 56 | |||
| E-3 Z : Gangut FS (Variant 2, 2020-12-18~) Regular Play Play | ||||||||||
| Ship | Lv. | Equipment | ||||||||
Gangut Dva |
85 | |
77 | 90 | 32 | 72 | 95 | |||
Tashkent Kai |
80 |  |
39 | 66 | 68 | 69 | 56 | |||
Verniy |
88 | |
37 | 58 | 89 | 65 | 58 | |||
| E-3 Z : Gangut FS (Variant 3, 2020-12-18~) Powerful Play Play Play | ||||||||||
| Ship | Lv. | Equipment | ||||||||
Gangut Dva |
85 | |
77 | 90 | 32 | 72 | 95 | |||
Tashkent Kai |
80 | |
39 | 66 | 68 | 69 | 56 | |||
Verniy |
88 | |
37 | 58 | 89 | 65 | 58 | |||
Ark Royal Kai |
86 | |
71 | 50 | 0 | 82 | 70 | |||
Janus Kai |
84 | |
31 | 53 | 90 | 72 | 50 | |||
Jervis Kai |
88 | |
31 | 52 | 90 | 70 | 50 | |||
| E-1 J, E-2 Q, E-3 Z : Janus FS (Variant 1, 2020-12-18~) Regular Powerful Play Play | ||||||||||
| Ship | Lv. | Equipment | ||||||||
Janus Kai |
84 | |
31 | 53 | 90 | 72 | 50 | |||
Jervis Kai |
88 | |
31 | 52 | 90 | 70 | 50 | |||
| E-2 Q, E-3 Z : Jervis FS (Variant 1, 2020-12-18~) Regular Powerful Play Play | ||||||||||
| Ship | Lv. | Equipment | ||||||||
Jervis Kai |
88 | |
31 | 52 | 90 | 70 | 50 | |||
Janus Kai |
84 | |
31 | 53 | 90 | 72 | 50 | |||
| E-3 Z : Jingei FS (Variant 1, 2020-12-18~) Powerful Play Play | ||||||||||
| Ship | Lv. | Equipment | ||||||||
Jingei Kai |
88 |  |
38 | 40 | 0 | 34 | 34 | |||
I-8 Kai |
80 |  |
19 | 14 | 84 | 0 | 19 | |||
I-13 Kai |
48 |   |
21 | 16 | 60 | 0 | 22 | |||
I-14 Kai |
47 | |
22 | 12 | 63 | 0 | 23 | |||
| E-3 Z : Jingei FS (Variant 2, 2020-12-18~) Regular Play Play | ||||||||||
| Ship | Lv. | Equipment | ||||||||
Jingei Kai |
88 | |
38 | 40 | 0 | 34 | 34 | |||
I-8 Kai |
80 | |
19 | 14 | 84 | 0 | 19 | |||
I-13 Kai |
48 | |
21 | 16 | 65 | 0 | 22 | |||
I-14 Kai |
47 | |
22 | 12 | 61 | 0 | 23 | |||
| E-3 Z : Prinz Eugen FS (Variant 1, 2020-12-18~) Powerful Play Play Play | ||||||||||
| Ship | Lv. | Equipment | ||||||||
Prinz Eugen Kai |
80 |   |
63 | 75 | 84 | 60 | 82 | |||
Z1 Zwei |
74 |   |
35 | 49 | 71 | 64 | 53 | |||
Z3 Zwei |
73 |  |
35 | 47 | 71 | 68 | 53 | |||
Gangut Dva |
85 | |
77 | 90 | 32 | 72 | 95 | |||
Tashkent Kai |
80 | |
39 | 66 | 68 | 69 | 56 | |||
| E-3 Z : Tashkent FS (Variant 1, 2020-12-19~) Regular Play | ||||||||||
| Ship | Lv. | Equipment | ||||||||
Tashkent Kai |
80 | |
39 | 66 | 68 | 69 | 56 | |||
Verniy |
88 | |
37 | 58 | 89 | 65 | 58 | |||
| E-3 Z : Z3 FS (Variant 1, 2020-12-18~) Regular Play | ||||||||||
| Ship | Lv. | Equipment | ||||||||
Z3 Zwei |
73 | |
35 | 47 | 71 | 68 | 53 | |||
Z1 Zwei |
74 | |
35 | 49 | 71 | 64 | 53 | |||
Enemy Compositions
| # | Formation | Air Raids | AD/AP AS/AS+ |
|---|---|---|---|
| AB | Diamond | 33/65 144/288 | |
| Diamond | 39/78 174/348 | ||
| Diamond | 44/87 195/390 | ||
| Diamond | 49/97 216/432 | ||
| # | Formation | Air Raids | AD/AP AS/AS+ |
| # | Empty Node | ||
|---|---|---|---|
| A | 気のせいだった。 輸送船団、抜錨! Must be my imagination. Convoy, weigh anchor! | ||
| # | Empty Node | ||
| # | Empty Node | ||
|---|---|---|---|
| B | 気のせいだった。 輸送船団、抜錨! Must be my imagination. Convoy, weigh anchor! | ||
| # | Empty Node | ||
| # | Formation | Normal Battle Node | AD/AP AS/AS+ |
|---|---|---|---|
| C | Echelon Line Abreast |
0/0 0/0 | |
| Echelon Line Abreast |
0/0 0/0 | ||
| # | Formation | Normal Battle Node | AD/AP AS/AS+ |
| # | Formation | Normal Battle Node | AD/AP AS/AS+ |
|---|---|---|---|
| D | Echelon Line Abreast |
0/0 0/0 | |
| Echelon Line Abreast |
0/0 0/0 | ||
| Echelon Line Abreast |
0/0 0/0 | ||
| # | Formation | Normal Battle Node | AD/AP AS/AS+ |
| # | Empty Node | ||
|---|---|---|---|
| E | 気のせいだった。 敵編隊接近中!対空戦闘用意ッ! Must be my imagination. Enemy squadrons approaching! Ready for anti-air combat! | ||
| # | Empty Node | ||
| # | Formation | Air Defense Node | AD/AP AS/AS+ |
|---|---|---|---|
| F | Diamond | 33/65 144/288 | |
| Diamond | 39/78 174/348 | ||
| Diamond | 44/87 195/390 | ||
| Diamond | 49/97 216/432 | ||
| # | Formation | Air Defense Node | AD/AP AS/AS+ |
| # | Formation | Air Defense Node | AD/AP AS/AS+ |
|---|---|---|---|
| G | Diamond | 33/65 144/288 | |
| Diamond | 39/78 174/348 | ||
| Diamond | 44/87 195/390 | ||
| Diamond | 49/97 216/432 | ||
| # | Formation | Air Defense Node | AD/AP AS/AS+ |
| # | Formation | Air Defense Node | AD/AP AS/AS+ |
|---|---|---|---|
| H | Diamond | 33/65 144/288 | |
| Diamond | 39/78 174/348 | ||
| Diamond | 44/87 195/390 | ||
| Diamond | 49/97 216/432 | ||
| # | Formation | Air Defense Node | AD/AP AS/AS+ |
| # | Formation | Normal Battle Node | AD/AP AS/AS+ |
|---|---|---|---|
| I | Line Ahead Double Line Echelon |
0/0 0/0 | |
| # | Formation | Normal Battle Node | AD/AP AS/AS+ |
| # | Formation | Normal Battle Node | AD/AP AS/AS+ |
|---|---|---|---|
| J | Line Ahead Double Line Vanguard |
0/0 0/0 | |
| # | Formation | Normal Battle Node | AD/AP AS/AS+ |
| # | Formation | Normal Battle Node | AD/AP AS/AS+ |
|---|---|---|---|
| K | Line Ahead Double Line |
0/0 0/0 | |
| Line Ahead | 0/0 0/0 | ||
| # | Formation | Normal Battle Node | AD/AP AS/AS+ |
| # | Selection Node | ||
|---|---|---|---|
| L | 輸送船団、抜錨! Convoy, weigh anchor! | ||
| # | Selection Node | ||
| # | Landing Node | ||
|---|---|---|---|
| # | Landing Node | ||
| # | Repair Node | ||
|---|---|---|---|
| # | Repair Node | ||
| # | Empty Node | ||
|---|---|---|---|
| O | 敵影を見ず。 輸送船団、抜錨! No enemy spotted. Convoy, weigh anchor! | ||
| # | Empty Node | ||
| # | Formation | Air Defense Node | AD/AP AS/AS+ |
|---|---|---|---|
| P | Diamond | 33/65 144/288 | |
| Diamond | 39/78 174/348 | ||
| Diamond | 44/87 195/390 | ||
| Diamond | 49/97 216/432 | ||
| # | Formation | Air Defense Node | AD/AP AS/AS+ |
| # | Formation | Boss Battle Node | AD/AP AS/AS+ |
|---|---|---|---|
| Q | Cruising Formation 4 | 0/0 0/0 | |
| # | Formation | Boss Battle Node | AD/AP AS/AS+ |
| # | Formation | Normal Battle Node | AD/AP AS/AS+ |
|---|---|---|---|
| R | Echelon Line Abreast |
0/0 0/0 | |
| Echelon Line Abreast |
0/0 0/0 | ||
| Echelon Line Abreast |
0/0 0/0 | ||
| # | Formation | Normal Battle Node | AD/AP AS/AS+ |
| # | Empty Node | ||
|---|---|---|---|
| S | 気のせいだった。 接近中の敵艦隊を発見!砲戦、魚雷戦……用意ッ! Must be my imagination. Approaching enemy fleet spotted! Ready... the guns and torpedoes! | ||
| # | Empty Node | ||
| # | Formation | Normal Battle Node | AD/AP AS/AS+ |
|---|---|---|---|
| T | Line Ahead Double Line Vanguard |
0/0 0/0 | |
| # | Formation | Normal Battle Node | AD/AP AS/AS+ |
| # | Landing Node | ||
|---|---|---|---|
| # | Landing Node | ||
| # | Empty Node | ||
|---|---|---|---|
| V | 敵影を見ず。 目的地到着……船団入港準備! No enemy spotted. We've arrived at the destination... The fleet is preparing to enter port! | ||
| # | Empty Node | ||
| # | Empty Node | ||
|---|---|---|---|
| W | 気のせいだった。 目的地到着……船団入港準備! Must be my imagination. We've arrived at the destination... The fleet is preparing to enter port! | ||
| # | Empty Node | ||
| # | Formation | Boss Battle Node | AD/AP AS/AS+ |
|---|---|---|---|
| X | Cruising Formation 4 | 0/0 0/0 | |
| # | Formation | Boss Battle Node | AD/AP AS/AS+ |
| # | Empty Node | ||
|---|---|---|---|
| Y | 敵影を見ず。 接近中の敵艦隊を発見!砲戦、魚雷戦……用意ッ! No enemy spotted. Approaching enemy fleet spotted! Ready... the guns and torpedoes! | ||
| # | Empty Node | ||
| # | Formation | Boss Battle Node | AD/AP AS/AS+ |
|---|---|---|---|
| Z | Cruising Formation 4 | 69/138 309/618 | |
| Cruising Formation 4 (Final)
|
89/177 396/792 | ||
| # | Formation | Boss Battle Node | AD/AP AS/AS+ |
| # | Formation | Air Raids | AD/AP AS/AS+ |
|---|---|---|---|
| AB | Diamond | 28/55 123/246 | |
| Diamond | 33/65 144/288 | ||
| Diamond | 35/69 153/306 | ||
| Diamond | 39/78 174/348 | ||
| # | Formation | Air Raids | AD/AP AS/AS+ |
| # | Empty Node | ||
|---|---|---|---|
| A | 気のせいだった。 輸送船団、抜錨! Must be my imagination. Convoy, weigh anchor! | ||
| # | Empty Node | ||
| # | Empty Node | ||
|---|---|---|---|
| B | 気のせいだった。 輸送船団、抜錨! Must be my imagination. Convoy, weigh anchor! | ||
| # | Empty Node | ||
| # | Formation | Normal Battle Node | AD/AP AS/AS+ |
|---|---|---|---|
| C | Echelon Line Abreast |
0/0 0/0 | |
| Echelon Line Abreast |
0/0 0/0 | ||
| Echelon Line Abreast |
0/0 0/0 | ||
| Echelon Line Abreast |
0/0 0/0 | ||
| # | Formation | Normal Battle Node | AD/AP AS/AS+ |
| # | Formation | Normal Battle Node | AD/AP AS/AS+ |
|---|---|---|---|
| D | Echelon Line Abreast |
0/0 0/0 | |
| Echelon Line Abreast |
0/0 0/0 | ||
| Echelon Line Abreast |
0/0 0/0 | ||
| # | Formation | Normal Battle Node | AD/AP AS/AS+ |
| # | Empty Node | ||
|---|---|---|---|
| E | 気のせいだった。 敵編隊接近中!対空戦闘用意ッ! Must be my imagination. Enemy squadrons approaching! Ready for anti-air combat! | ||
| # | Empty Node | ||
| # | Formation | Air Defense Node | AD/AP AS/AS+ |
|---|---|---|---|
| F | Diamond | 28/55 123/246 | |
| Diamond | 33/65 144/288 | ||
| Diamond | 35/69 153/306 | ||
| Diamond | 39/78 174/348 | ||
| # | Formation | Air Defense Node | AD/AP AS/AS+ |
| # | Formation | Air Defense Node | AD/AP AS/AS+ |
|---|---|---|---|
| G | Diamond | 28/55 123/246 | |
| Diamond | 33/65 144/288 | ||
| Diamond | 35/69 153/306 | ||
| Diamond | 39/78 174/348 | ||
| # | Formation | Air Defense Node | AD/AP AS/AS+ |
| # | Formation | Air Defense Node | AD/AP AS/AS+ |
|---|---|---|---|
| H | Diamond | 28/55 123/246 | |
| Diamond | 33/65 144/288 | ||
| Diamond | 35/69 153/306 | ||
| Diamond | 39/78 174/348 | ||
| # | Formation | Air Defense Node | AD/AP AS/AS+ |
| # | Formation | Normal Battle Node | AD/AP AS/AS+ |
|---|---|---|---|
| I | Line Ahead Double Line Echelon |
0/0 0/0 | |
| # | Formation | Normal Battle Node | AD/AP AS/AS+ |
| # | Formation | Normal Battle Node | AD/AP AS/AS+ |
|---|---|---|---|
| J | Line Ahead Double Line Vanguard |
0/0 0/0 | |
| # | Formation | Normal Battle Node | AD/AP AS/AS+ |
| # | Formation | Normal Battle Node | AD/AP AS/AS+ |
|---|---|---|---|
| K | Line Ahead Double Line |
0/0 0/0 | |
| Line Ahead | 0/0 0/0 | ||
| # | Formation | Normal Battle Node | AD/AP AS/AS+ |
| # | Selection Node | ||
|---|---|---|---|
| L | 輸送船団、抜錨! Convoy, weigh anchor! | ||
| # | Selection Node | ||
| # | Landing Node | ||
|---|---|---|---|
| # | Landing Node | ||
| # | Repair Node | ||
|---|---|---|---|
| # | Repair Node | ||
| # | Empty Node | ||
|---|---|---|---|
| O | 敵影を見ず。 輸送船団、抜錨! No enemy spotted. Convoy, weigh anchor! | ||
| # | Empty Node | ||
| # | Formation | Air Defense Node | AD/AP AS/AS+ |
|---|---|---|---|
| P | Diamond | 28/55 123/246 | |
| Diamond | 33/65 144/288 | ||
| Diamond | 35/69 153/306 | ||
| Diamond | 39/78 174/348 | ||
| # | Formation | Air Defense Node | AD/AP AS/AS+ |
| # | Formation | Boss Battle Node | AD/AP AS/AS+ |
|---|---|---|---|
| Q | Cruising Formation 4 | 0/0 0/0 | |
| # | Formation | Boss Battle Node | AD/AP AS/AS+ |
| # | Formation | Normal Battle Node | AD/AP AS/AS+ |
|---|---|---|---|
| R | Echelon Line Abreast |
0/0 0/0 | |
| Echelon Line Abreast |
0/0 0/0 | ||
| Echelon Line Abreast |
0/0 0/0 | ||
| # | Formation | Normal Battle Node | AD/AP AS/AS+ |
| # | Empty Node | ||
|---|---|---|---|
| S | 気のせいだった。 接近中の敵艦隊を発見!砲戦、魚雷戦……用意ッ! Must be my imagination. Approaching enemy fleet spotted! Ready... the guns and torpedoes! | ||
| # | Empty Node | ||
| # | Formation | Normal Battle Node | AD/AP AS/AS+ |
|---|---|---|---|
| T | Line Ahead Double Line Vanguard |
0/0 0/0 | |
| # | Formation | Normal Battle Node | AD/AP AS/AS+ |
| # | Landing Node | ||
|---|---|---|---|
| # | Landing Node | ||
| # | Empty Node | ||
|---|---|---|---|
| V | 敵影を見ず。 目的地到着……船団入港準備! No enemy spotted. We've arrived at the destination... The fleet is preparing to enter port! | ||
| # | Empty Node | ||
| # | Empty Node | ||
|---|---|---|---|
| W | 気のせいだった。 目的地到着……船団入港準備! Must be my imagination. We've arrived at the destination... The fleet is preparing to enter port! | ||
| # | Empty Node | ||
| # | Formation | Boss Battle Node | AD/AP AS/AS+ |
|---|---|---|---|
| X | Cruising Formation 4 | 0/0 0/0 | |
| # | Formation | Boss Battle Node | AD/AP AS/AS+ |
| # | Empty Node | ||
|---|---|---|---|
| Y | 敵影を見ず。 接近中の敵艦隊を発見!砲戦、魚雷戦……用意ッ! No enemy spotted. Approaching enemy fleet spotted! Ready... the guns and torpedoes! | ||
| # | Empty Node | ||
| # | Formation | Boss Battle Node | AD/AP AS/AS+ |
|---|---|---|---|
| Z | Cruising Formation 4 | 67/134 300/600 | |
| Cruising Formation 4 (Final)
|
73/145 324/648 | ||
| # | Formation | Boss Battle Node | AD/AP AS/AS+ |
| # | Formation | Air Raids | AD/AP AS/AS+ |
|---|---|---|---|
| AB | Diamond | 12/23 51/102 | |
| Diamond | 17/33 72/144 | ||
| Diamond | 23/46 102/204 | ||
| Diamond | 28/55 123/246 | ||
| Diamond | 35/69 153/306 | ||
| # | Formation | Air Raids | AD/AP AS/AS+ |
| # | Empty Node | ||
|---|---|---|---|
| A | 気のせいだった。 輸送船団、抜錨! Must be my imagination. Convoy, weigh anchor! | ||
| # | Empty Node | ||
| # | Empty Node | ||
|---|---|---|---|
| B | 気のせいだった。 輸送船団、抜錨! Must be my imagination. Convoy, weigh anchor! | ||
| # | Empty Node | ||
| # | Formation | Normal Battle Node | AD/AP AS/AS+ |
|---|---|---|---|
| C | Echelon Line Abreast |
0/0 0/0 | |
| Echelon Line Abreast |
0/0 0/0 | ||
| Echelon Line Abreast |
0/0 0/0 | ||
| Echelon Line Abreast |
0/0 0/0 | ||
| # | Formation | Normal Battle Node | AD/AP AS/AS+ |
| # | Formation | Normal Battle Node | AD/AP AS/AS+ |
|---|---|---|---|
| D | Echelon Line Abreast |
0/0 0/0 | |
| Echelon Line Abreast |
0/0 0/0 | ||
| Echelon Line Abreast |
0/0 0/0 | ||
| # | Formation | Normal Battle Node | AD/AP AS/AS+ |
| # | Empty Node | ||
|---|---|---|---|
| E | 気のせいだった。 敵編隊接近中!対空戦闘用意ッ! Must be my imagination. Enemy squadrons approaching! Ready for anti-air combat! | ||
| # | Empty Node | ||
| # | Formation | Air Defense Node | AD/AP AS/AS+ |
|---|---|---|---|
| F | Diamond | 12/23 51/102 | |
| Diamond | 17/33 72/144 | ||
| Diamond | 23/46 102/204 | ||
| Diamond | 28/55 123/246 | ||
| # | Formation | Air Defense Node | AD/AP AS/AS+ |
| # | Formation | Air Defense Node | AD/AP AS/AS+ |
|---|---|---|---|
| G | Diamond | 12/23 51/102 | |
| Diamond | 17/33 72/144 | ||
| Diamond | 23/46 102/204 | ||
| Diamond | 28/55 123/246 | ||
| Diamond | 35/69 153/306 | ||
| # | Formation | Air Defense Node | AD/AP AS/AS+ |
| # | Formation | Air Defense Node | AD/AP AS/AS+ |
|---|---|---|---|
| H | Diamond | 12/23 51/102 | |
| Diamond | 17/33 72/144 | ||
| Diamond | 23/46 102/204 | ||
| Diamond | 28/55 123/246 | ||
| Diamond | 35/69 153/306 | ||
| # | Formation | Air Defense Node | AD/AP AS/AS+ |
| # | Formation | Normal Battle Node | AD/AP AS/AS+ |
|---|---|---|---|
| I | Line Ahead Double Line Echelon |
0/0 0/0 | |
| # | Formation | Normal Battle Node | AD/AP AS/AS+ |
| # | Formation | Normal Battle Node | AD/AP AS/AS+ |
|---|---|---|---|
| J | Line Ahead Double Line Vanguard |
0/0 0/0 | |
| # | Formation | Normal Battle Node | AD/AP AS/AS+ |
| # | Formation | Normal Battle Node | AD/AP AS/AS+ |
|---|---|---|---|
| K | Line Ahead Double Line |
0/0 0/0 | |
| Line Ahead | 0/0 0/0 | ||
| # | Formation | Normal Battle Node | AD/AP AS/AS+ |
| # | Selection Node | ||
|---|---|---|---|
| L | 輸送船団、抜錨! Convoy, weigh anchor! | ||
| # | Selection Node | ||
| # | Landing Node | ||
|---|---|---|---|
| # | Landing Node | ||
| # | Repair Node | ||
|---|---|---|---|
| # | Repair Node | ||
| # | Empty Node | ||
|---|---|---|---|
| O | 敵影を見ず。 輸送船団、抜錨! No enemy spotted. Convoy, weigh anchor! | ||
| # | Empty Node | ||
| # | Formation | Air Defense Node | AD/AP AS/AS+ |
|---|---|---|---|
| P | Diamond | 12/23 51/102 | |
| Diamond | 17/33 72/144 | ||
| Diamond | 23/46 102/204 | ||
| Diamond | 28/55 123/246 | ||
| Diamond | 35/69 153/306 | ||
| # | Formation | Air Defense Node | AD/AP AS/AS+ |
| # | Formation | Boss Battle Node | AD/AP AS/AS+ |
|---|---|---|---|
| Q | Cruising Formation 4 | 0/0 0/0 | |
| # | Formation | Boss Battle Node | AD/AP AS/AS+ |
| # | Formation | Normal Battle Node | AD/AP AS/AS+ |
|---|---|---|---|
| R | Echelon Line Abreast |
0/0 0/0 | |
| Echelon Line Abreast |
0/0 0/0 | ||
| Echelon Line Abreast |
0/0 0/0 | ||
| # | Formation | Normal Battle Node | AD/AP AS/AS+ |
| # | Empty Node | ||
|---|---|---|---|
| S | 気のせいだった。 接近中の敵艦隊を発見!砲戦、魚雷戦……用意ッ! Must be my imagination. Approaching enemy fleet spotted! Ready... the guns and torpedoes! | ||
| # | Empty Node | ||
| # | Formation | Normal Battle Node | AD/AP AS/AS+ |
|---|---|---|---|
| T | Line Ahead Double Line Vanguard |
0/0 0/0 | |
| # | Formation | Normal Battle Node | AD/AP AS/AS+ |
| # | Landing Node | ||
|---|---|---|---|
| # | Landing Node | ||
| # | Empty Node | ||
|---|---|---|---|
| V | 敵影を見ず。 目的地到着……船団入港準備! No enemy spotted. We've arrived at the destination... The fleet is preparing to enter port! | ||
| # | Empty Node | ||
| # | Empty Node | ||
|---|---|---|---|
| W | 気のせいだった。 目的地到着……船団入港準備! Must be my imagination. We've arrived at the destination... The fleet is preparing to enter port! | ||
| # | Empty Node | ||
| # | Formation | Boss Battle Node | AD/AP AS/AS+ |
|---|---|---|---|
| X | Cruising Formation 4 | 0/0 0/0 | |
| # | Formation | Boss Battle Node | AD/AP AS/AS+ |
| # | Empty Node | ||
|---|---|---|---|
| Y | 敵影を見ず。 接近中の敵艦隊を発見!砲戦、魚雷戦……用意ッ! No enemy spotted. Approaching enemy fleet spotted! Ready... the guns and torpedoes! | ||
| # | Empty Node | ||
| # | Formation | Boss Battle Node | AD/AP AS/AS+ |
|---|---|---|---|
| Z | Cruising Formation 4 | 19/38 84/168 | |
| Cruising Formation 4 (Final)
|
67/134 300/600 | ||
| # | Formation | Boss Battle Node | AD/AP AS/AS+ |
| # | Formation | Air Raids | AD/AP AS/AS+ |
|---|---|---|---|
| AB | Diamond | 12/23 51/102 | |
| Diamond | 17/33 72/144 | ||
| Diamond | 23/46 102/204 | ||
| # | Formation | Air Raids | AD/AP AS/AS+ |
| # | Empty Node | ||
|---|---|---|---|
| A | 気のせいだった。 輸送船団、抜錨! Must be my imagination. Convoy, weigh anchor! | ||
| # | Empty Node | ||
| # | Empty Node | ||
|---|---|---|---|
| B | 気のせいだった。 輸送船団、抜錨! Must be my imagination. Convoy, weigh anchor! | ||
| # | Empty Node | ||
| # | Formation | Normal Battle Node | AD/AP AS/AS+ |
|---|---|---|---|
| C | Echelon Line Abreast |
0/0 0/0 | |
| Echelon Line Abreast |
0/0 0/0 | ||
| # | Formation | Normal Battle Node | AD/AP AS/AS+ |
| # | Formation | Normal Battle Node | AD/AP AS/AS+ |
|---|---|---|---|
| D | Echelon Line Abreast |
0/0 0/0 | |
| Echelon Line Abreast |
0/0 0/0 | ||
| # | Formation | Normal Battle Node | AD/AP AS/AS+ |
| # | Empty Node | ||
|---|---|---|---|
| E | 気のせいだった。 敵編隊接近中!対空戦闘用意ッ! Must be my imagination. Enemy squadrons approaching! Ready for anti-air combat! | ||
| # | Empty Node | ||
| # | Formation | Air Defense Node | AD/AP AS/AS+ |
|---|---|---|---|
| F | Diamond | 12/23 51/102 | |
| Diamond | 17/33 72/144 | ||
| Diamond | 23/46 102/204 | ||
| # | Formation | Air Defense Node | AD/AP AS/AS+ |
| # | Formation | Air Defense Node | AD/AP AS/AS+ |
|---|---|---|---|
| G | Diamond | 12/23 51/102 | |
| Diamond | 17/33 72/144 | ||
| Diamond | 23/46 102/204 | ||
| # | Formation | Air Defense Node | AD/AP AS/AS+ |
| # | Formation | Air Defense Node | AD/AP AS/AS+ |
|---|---|---|---|
| H | Diamond | 12/23 51/102 | |
| Diamond | 17/33 72/144 | ||
| Diamond | 23/46 102/204 | ||
| # | Formation | Air Defense Node | AD/AP AS/AS+ |
| # | Formation | Normal Battle Node | AD/AP AS/AS+ |
|---|---|---|---|
| I | Line Ahead Double Line Echelon |
0/0 0/0 | |
| # | Formation | Normal Battle Node | AD/AP AS/AS+ |
| # | Formation | Normal Battle Node | AD/AP AS/AS+ |
|---|---|---|---|
| J | Line Ahead Double Line Vanguard |
0/0 0/0 | |
| # | Formation | Normal Battle Node | AD/AP AS/AS+ |
| # | Formation | Normal Battle Node | AD/AP AS/AS+ |
|---|---|---|---|
| K | Line Ahead Double Line |
0/0 0/0 | |
| Line Ahead | 0/0 0/0 | ||
| # | Formation | Normal Battle Node | AD/AP AS/AS+ |
| # | Selection Node | ||
|---|---|---|---|
| L | 輸送船団、抜錨! Convoy, weigh anchor! | ||
| # | Selection Node | ||
| # | Landing Node | ||
|---|---|---|---|
| # | Landing Node | ||
| # | Repair Node | ||
|---|---|---|---|
| # | Repair Node | ||
| # | Empty Node | ||
|---|---|---|---|
| O | 敵影を見ず。 輸送船団、抜錨! No enemy spotted. Convoy, weigh anchor! | ||
| # | Empty Node | ||
| # | Formation | Air Defense Node | AD/AP AS/AS+ |
|---|---|---|---|
| P | Diamond | 12/23 51/102 | |
| Diamond | 17/33 72/144 | ||
| Diamond | 23/46 102/204 | ||
| # | Formation | Air Defense Node | AD/AP AS/AS+ |
| # | Formation | Boss Battle Node | AD/AP AS/AS+ |
|---|---|---|---|
| Q | Cruising Formation 4 | 0/0 0/0 | |
| # | Formation | Boss Battle Node | AD/AP AS/AS+ |
| # | Formation | Normal Battle Node | AD/AP AS/AS+ |
|---|---|---|---|
| R | Echelon Line Abreast |
0/0 0/0 | |
| Echelon Line Abreast |
0/0 0/0 | ||
| # | Formation | Normal Battle Node | AD/AP AS/AS+ |
| # | Empty Node | ||
|---|---|---|---|
| S | 気のせいだった。 接近中の敵艦隊を発見!砲戦、魚雷戦……用意ッ! Must be my imagination. Approaching enemy fleet spotted! Ready... the guns and torpedoes! | ||
| # | Empty Node | ||
| # | Formation | Normal Battle Node | AD/AP AS/AS+ |
|---|---|---|---|
| T | Line Ahead Double Line Vanguard |
0/0 0/0 | |
| # | Formation | Normal Battle Node | AD/AP AS/AS+ |
| # | Landing Node | ||
|---|---|---|---|
| # | Landing Node | ||
| # | Empty Node | ||
|---|---|---|---|
| V | 敵影を見ず。 目的地到着……船団入港準備! No enemy spotted. We've arrived at the destination... The fleet is preparing to enter port! | ||
| # | Empty Node | ||
| # | Empty Node | ||
|---|---|---|---|
| W | 気のせいだった。 目的地到着……船団入港準備! Must be my imagination. We've arrived at the destination... The fleet is preparing to enter port! | ||
| # | Empty Node | ||
| # | Formation | Boss Battle Node | AD/AP AS/AS+ |
|---|---|---|---|
| X | Cruising Formation 4 | 0/0 0/0 | |
| # | Formation | Boss Battle Node | AD/AP AS/AS+ |
| # | Empty Node | ||
|---|---|---|---|
| Y | 敵影を見ず。 接近中の敵艦隊を発見!砲戦、魚雷戦……用意ッ! No enemy spotted. Approaching enemy fleet spotted! Ready... the guns and torpedoes! | ||
| # | Empty Node | ||
| # | Formation | Boss Battle Node | AD/AP AS/AS+ |
|---|---|---|---|
| Z | Cruising Formation 4 | 19/37 81/162 | |
| Cruising Formation 4 (Final)
|
19/37 81/162 | ||
| # | Formation | Boss Battle Node | AD/AP AS/AS+ |
Ship Drops:
| Ship drops | |||||||||||||||||||||||||||||||||||||||||||||||||||||||||||||||||||||||||||||||||||||||||||||||||||
|---|---|---|---|---|---|---|---|---|---|---|---|---|---|---|---|---|---|---|---|---|---|---|---|---|---|---|---|---|---|---|---|---|---|---|---|---|---|---|---|---|---|---|---|---|---|---|---|---|---|---|---|---|---|---|---|---|---|---|---|---|---|---|---|---|---|---|---|---|---|---|---|---|---|---|---|---|---|---|---|---|---|---|---|---|---|---|---|---|---|---|---|---|---|---|---|---|---|---|---|
| Type | Ship | I | J | K | Q | T | X | Z | |||||||||||||||||||||||||||||||||||||||||||||||||||||||||||||||||||||||||||||||||||||||||||
| DD | Amagiri | Medium+ | Casual+ | Casual+ | Casual+ | Casual+ | |||||||||||||||||||||||||||||||||||||||||||||||||||||||||||||||||||||||||||||||||||||||||||||
| DD | Harusame | Casual+ | Casual+ | Casual+ | Casual+ | Casual+ | Casual+ | ||||||||||||||||||||||||||||||||||||||||||||||||||||||||||||||||||||||||||||||||||||||||||||
| DD | Isokaze | Easy+ | Casual+ | Casual+ | |||||||||||||||||||||||||||||||||||||||||||||||||||||||||||||||||||||||||||||||||||||||||||||||
| DD | Kawakaze | Casual+ | |||||||||||||||||||||||||||||||||||||||||||||||||||||||||||||||||||||||||||||||||||||||||||||||||
| DD | Kazagumo | Easy+ | Casual+ | Casual+ | |||||||||||||||||||||||||||||||||||||||||||||||||||||||||||||||||||||||||||||||||||||||||||||||
| DD | Sagiri | Easy+ | Casual+ | Casual+ | Casual+ | Casual+ | |||||||||||||||||||||||||||||||||||||||||||||||||||||||||||||||||||||||||||||||||||||||||||||
| DD | Takanami | Medium+ | Casual+ | Casual+ | |||||||||||||||||||||||||||||||||||||||||||||||||||||||||||||||||||||||||||||||||||||||||||||||
| DD | Tanikaze | Casual+ | Casual+ | Hard+ | Casual+ | ||||||||||||||||||||||||||||||||||||||||||||||||||||||||||||||||||||||||||||||||||||||||||||||
| DD | Umikaze | Casual+ | Casual+ | ||||||||||||||||||||||||||||||||||||||||||||||||||||||||||||||||||||||||||||||||||||||||||||||||
| DD | Z1 | Casual+ | Casual+ | ||||||||||||||||||||||||||||||||||||||||||||||||||||||||||||||||||||||||||||||||||||||||||||||||
| DD | Z3 | Casual+ | |||||||||||||||||||||||||||||||||||||||||||||||||||||||||||||||||||||||||||||||||||||||||||||||||
| CL | Ooyodo | Casual+ | Casual+ | Easy+ | Casual+ | ||||||||||||||||||||||||||||||||||||||||||||||||||||||||||||||||||||||||||||||||||||||||||||||
| CA | Prinz Eugen | Casual+ | Casual+ | ||||||||||||||||||||||||||||||||||||||||||||||||||||||||||||||||||||||||||||||||||||||||||||||||
| CVL | Shinyou | Casual+ | |||||||||||||||||||||||||||||||||||||||||||||||||||||||||||||||||||||||||||||||||||||||||||||||||
| FBB | Gangut | Hard+ | Casual+ | Casual+ | |||||||||||||||||||||||||||||||||||||||||||||||||||||||||||||||||||||||||||||||||||||||||||||||
| CV | Graf Zeppelin | Casual+ | |||||||||||||||||||||||||||||||||||||||||||||||||||||||||||||||||||||||||||||||||||||||||||||||||
| SS | U-511 | Casual+ | |||||||||||||||||||||||||||||||||||||||||||||||||||||||||||||||||||||||||||||||||||||||||||||||||
| AR | Akashi | Casual+ | |||||||||||||||||||||||||||||||||||||||||||||||||||||||||||||||||||||||||||||||||||||||||||||||||
| AS | Jingei | Casual+ | Casual+ | ||||||||||||||||||||||||||||||||||||||||||||||||||||||||||||||||||||||||||||||||||||||||||||||||
| DD | Akigumo | Casual+ | Casual+ | Easy+ | Casual+ | ||||||||||||||||||||||||||||||||||||||||||||||||||||||||||||||||||||||||||||||||||||||||||||||
| DD | Makigumo | Casual+ | |||||||||||||||||||||||||||||||||||||||||||||||||||||||||||||||||||||||||||||||||||||||||||||||||
| DD | Naganami | Casual+ | |||||||||||||||||||||||||||||||||||||||||||||||||||||||||||||||||||||||||||||||||||||||||||||||||
| DD | Urakaze | Casual+ | Casual+ | Medium+ | Casual+ | ||||||||||||||||||||||||||||||||||||||||||||||||||||||||||||||||||||||||||||||||||||||||||||||
| DD | Yuugumo | Casual+ | |||||||||||||||||||||||||||||||||||||||||||||||||||||||||||||||||||||||||||||||||||||||||||||||||
| CL | Nagara | Hard+ | Casual+ | Casual+ | Casual+ | Casual+ | Casual+ | ||||||||||||||||||||||||||||||||||||||||||||||||||||||||||||||||||||||||||||||||||||||||||||
| CL | Sendai | Casual+ | Casual+ | Casual+ | Casual+ | Casual+ | |||||||||||||||||||||||||||||||||||||||||||||||||||||||||||||||||||||||||||||||||||||||||||||
| CA | Atago | Casual+ | |||||||||||||||||||||||||||||||||||||||||||||||||||||||||||||||||||||||||||||||||||||||||||||||||
| CA | Chikuma | Casual+ | |||||||||||||||||||||||||||||||||||||||||||||||||||||||||||||||||||||||||||||||||||||||||||||||||
| CA | Kumano | Casual+ | |||||||||||||||||||||||||||||||||||||||||||||||||||||||||||||||||||||||||||||||||||||||||||||||||
| CA | Myoukou | Casual+ | |||||||||||||||||||||||||||||||||||||||||||||||||||||||||||||||||||||||||||||||||||||||||||||||||
| CA | Suzuya | Casual+ | |||||||||||||||||||||||||||||||||||||||||||||||||||||||||||||||||||||||||||||||||||||||||||||||||
| CA | Tone | Casual+ | |||||||||||||||||||||||||||||||||||||||||||||||||||||||||||||||||||||||||||||||||||||||||||||||||
| CVL | Hiyou | Casual+ | Casual+ | ||||||||||||||||||||||||||||||||||||||||||||||||||||||||||||||||||||||||||||||||||||||||||||||||
| CVL | Junyou | Hard+ | Casual+ | Casual+ | |||||||||||||||||||||||||||||||||||||||||||||||||||||||||||||||||||||||||||||||||||||||||||||||
| CVL | Ryuujou | Casual+ | |||||||||||||||||||||||||||||||||||||||||||||||||||||||||||||||||||||||||||||||||||||||||||||||||
| CVL | Shouhou | Casual+ | |||||||||||||||||||||||||||||||||||||||||||||||||||||||||||||||||||||||||||||||||||||||||||||||||
| FBB | Haruna | Casual+ | |||||||||||||||||||||||||||||||||||||||||||||||||||||||||||||||||||||||||||||||||||||||||||||||||
| FBB | Hiei | Casual+ | |||||||||||||||||||||||||||||||||||||||||||||||||||||||||||||||||||||||||||||||||||||||||||||||||
| FBB | Kirishima | Casual+ | |||||||||||||||||||||||||||||||||||||||||||||||||||||||||||||||||||||||||||||||||||||||||||||||||
| FBB | Kongou | Casual+ | |||||||||||||||||||||||||||||||||||||||||||||||||||||||||||||||||||||||||||||||||||||||||||||||||
| BB | Fusou | Casual+ | |||||||||||||||||||||||||||||||||||||||||||||||||||||||||||||||||||||||||||||||||||||||||||||||||
| BB | Hyuuga | Casual+ | |||||||||||||||||||||||||||||||||||||||||||||||||||||||||||||||||||||||||||||||||||||||||||||||||
| BB | Ise | Casual+ | |||||||||||||||||||||||||||||||||||||||||||||||||||||||||||||||||||||||||||||||||||||||||||||||||
| BB | Nagato | Casual+ | |||||||||||||||||||||||||||||||||||||||||||||||||||||||||||||||||||||||||||||||||||||||||||||||||
| BB | Yamashiro | Casual+ | |||||||||||||||||||||||||||||||||||||||||||||||||||||||||||||||||||||||||||||||||||||||||||||||||
| CV | Hiryuu | Casual+ | |||||||||||||||||||||||||||||||||||||||||||||||||||||||||||||||||||||||||||||||||||||||||||||||||
| CV | Souryuu | Casual+ | |||||||||||||||||||||||||||||||||||||||||||||||||||||||||||||||||||||||||||||||||||||||||||||||||
| E-3 Clear Message |
|---|
| Convoy PQ17, Convoy Transport Operation Completed!
Deployed in Europe, our Combined Fleet and our land-based corps have successfully escorted the Convoy PQ17, and have admirably succeeded in the large scale convoy transport operation! This is our fleet’s victory! |