- Welcome to the Kancolle Wiki!
- If you have any questions regarding site content, account registration, etc., please visit the KanColle Wiki Discord
Difference between revisions of "Fall 2020 Event/E-2/Enemy comps"
< Fall 2020 Event | E-2
Jump to navigation
Jump to search
| Line 2: | Line 2: | ||
|-|Hard= | |-|Hard= | ||
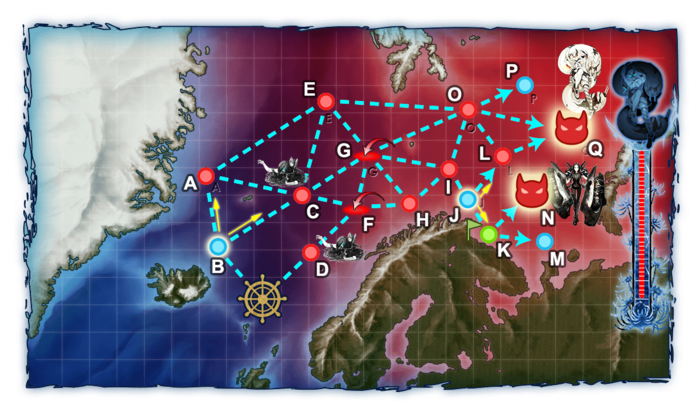
{{Map/Image|page=Fall 2020 Event/E-2| | {{Map/Image|page=Fall 2020 Event/E-2| | ||
| − | {{Map/ImageNode|1|Hard|x=263|y=299}} | + | {{Map/ImageNode|1|Hard|E-2|x=263|y=299}} |
| − | {{Map/ImageNode|A|Hard|x=206|y=176}} | + | {{Map/ImageNode|A|Hard|E-2|x=206|y=176}} |
| − | {{Map/ImageNode|B|Hard|x=218|y=247}} | + | {{Map/ImageNode|B|Hard|E-2|x=218|y=247}} |
| − | {{Map/ImageNode|C|Hard|x=302|y=195}} | + | {{Map/ImageNode|C|Hard|E-2|x=302|y=195}} |
| − | {{Map/ImageNode|D|Hard|x=311|y=253}} | + | {{Map/ImageNode|D|Hard|E-2|x=311|y=253}} |
| − | {{Map/ImageNode|E|Hard|x=326|y=102}} | + | {{Map/ImageNode|E|Hard|E-2|x=326|y=102}} |
| − | {{Map/ImageNode|F|Hard|x=357|y=207}} | + | {{Map/ImageNode|F|Hard|E-2|x=357|y=207}} |
| − | {{Map/ImageNode|G|Hard|x=369|y=153}} | + | {{Map/ImageNode|G|Hard|E-2|x=369|y=153}} |
| − | {{Map/ImageNode|H|Hard|x=410|y=204}} | + | {{Map/ImageNode|H|Hard|E-2|x=410|y=204}} |
| − | {{Map/ImageNode|I|Hard|x=449|y=169}} | + | {{Map/ImageNode|I|Hard|E-2|x=449|y=169}} |
| − | {{Map/ImageNode|J|Hard|x=468|y=201}} | + | {{Map/ImageNode|J|Hard|E-2|x=468|y=201}} |
| − | {{Map/ImageNode|K|Hard|x=489|y=235}} | + | {{Map/ImageNode|K|Hard|E-2|x=489|y=235}} |
| − | {{Map/ImageNode|L|Hard|x=503|y=156}} | + | {{Map/ImageNode|L|Hard|E-2|x=503|y=156}} |
| − | {{Map/ImageNode|M|Hard|x=545|y=242}} | + | {{Map/ImageNode|M|Hard|E-2|x=545|y=242}} |
| − | {{Map/ImageNode|N|Hard|x=531|y=193}} | + | {{Map/ImageNode|N|Hard|E-2|x=531|y=193}} |
| − | {{Map/ImageNode|O|Hard|x=468|y=110}} | + | {{Map/ImageNode|O|Hard|E-2|x=468|y=110}} |
| − | {{Map/ImageNode|P|Hard|x=525|y=85}} | + | {{Map/ImageNode|P|Hard|E-2|x=525|y=85}} |
| − | {{Map/ImageNode|Q|Hard|x=574|y=131}} | + | {{Map/ImageNode|Q|Hard|E-2|x=574|y=131}} |
}} | }} | ||
<div class="map-nodes"> | <div class="map-nodes"> | ||
| − | <div id="E-2 A Hard" style="width:100%;text-align:center">E-2 A ([https://db.kcwiki.moe/drop/map/492/4/A-SAB.html PoiDB])</div> | + | <div id="E-2 A Hard" style="width:100%;text-align:center">E-2 Hard A ([https://db.kcwiki.moe/drop/map/492/4/A-SAB.html PoiDB])</div> |
{|class="wikitable" style="width:100%" | {|class="wikitable" style="width:100%" | ||
!style="width:1px"|# | !style="width:1px"|# | ||
| Line 47: | Line 47: | ||
!style="width:1px"|AD/AP<br>AS/AS+ | !style="width:1px"|AD/AP<br>AS/AS+ | ||
|} | |} | ||
| − | <div id="E-2 B Hard" style="width:100%;text-align:center">E-2 B</div> | + | <div id="E-2 B Hard" style="width:100%;text-align:center">E-2 Hard B</div> |
{|class="wikitable" style="width:100%" | {|class="wikitable" style="width:100%" | ||
!style="width:1px"|# | !style="width:1px"|# | ||
| Line 58: | Line 58: | ||
!colspan="3"|Selection Node | !colspan="3"|Selection Node | ||
|} | |} | ||
| − | <div id="E-2 C Hard" style="width:100%;text-align:center">E-2 C ([https://db.kcwiki.moe/drop/map/492/4/C-SAB.html PoiDB])</div> | + | <div id="E-2 C Hard" style="width:100%;text-align:center">E-2 Hard C ([https://db.kcwiki.moe/drop/map/492/4/C-SAB.html PoiDB])</div> |
{|class="wikitable" style="width:100%" | {|class="wikitable" style="width:100%" | ||
!style="width:1px"|# | !style="width:1px"|# | ||
| Line 79: | Line 79: | ||
!style="width:1px"|AD/AP<br>AS/AS+ | !style="width:1px"|AD/AP<br>AS/AS+ | ||
|} | |} | ||
| − | <div id="E-2 D Hard" style="width:100%;text-align:center">E-2 D ([https://db.kcwiki.moe/drop/map/492/4/D-SAB.html PoiDB])</div> | + | <div id="E-2 D Hard" style="width:100%;text-align:center">E-2 Hard D ([https://db.kcwiki.moe/drop/map/492/4/D-SAB.html PoiDB])</div> |
{|class="wikitable" style="width:100%" | {|class="wikitable" style="width:100%" | ||
!style="width:1px"|# | !style="width:1px"|# | ||
| Line 100: | Line 100: | ||
!style="width:1px"|AD/AP<br>AS/AS+ | !style="width:1px"|AD/AP<br>AS/AS+ | ||
|} | |} | ||
| − | <div id="E-2 E Hard" style="width:100%;text-align:center">E-2 E ([https://db.kcwiki.moe/drop/map/492/4/E-SAB.html PoiDB])</div> | + | <div id="E-2 E Hard" style="width:100%;text-align:center">E-2 Hard E ([https://db.kcwiki.moe/drop/map/492/4/E-SAB.html PoiDB])</div> |
{|class="wikitable" style="width:100%" | {|class="wikitable" style="width:100%" | ||
!style="width:1px"|# | !style="width:1px"|# | ||
| Line 125: | Line 125: | ||
!style="width:1px"|AD/AP<br>AS/AS+ | !style="width:1px"|AD/AP<br>AS/AS+ | ||
|} | |} | ||
| − | <div id="E-2 F Hard" style="width:100%;text-align:center">E-2 F ([https://db.kcwiki.moe/drop/map/492/4/F-SAB.html PoiDB])</div> | + | <div id="E-2 F Hard" style="width:100%;text-align:center">E-2 Hard F ([https://db.kcwiki.moe/drop/map/492/4/F-SAB.html PoiDB])</div> |
{|class="wikitable" style="width:100%" | {|class="wikitable" style="width:100%" | ||
!style="width:1px"|# | !style="width:1px"|# | ||
| Line 150: | Line 150: | ||
!style="width:1px"|AD/AP<br>AS/AS+ | !style="width:1px"|AD/AP<br>AS/AS+ | ||
|} | |} | ||
| − | <div id="E-2 G Hard" style="width:100%;text-align:center">E-2 G ([https://db.kcwiki.moe/drop/map/492/4/G-SAB.html PoiDB])</div> | + | <div id="E-2 G Hard" style="width:100%;text-align:center">E-2 Hard G ([https://db.kcwiki.moe/drop/map/492/4/G-SAB.html PoiDB])</div> |
{|class="wikitable" style="width:100%" | {|class="wikitable" style="width:100%" | ||
!style="width:1px"|# | !style="width:1px"|# | ||
| Line 175: | Line 175: | ||
!style="width:1px"|AD/AP<br>AS/AS+ | !style="width:1px"|AD/AP<br>AS/AS+ | ||
|} | |} | ||
| − | <div id="E-2 H Hard" style="width:100%;text-align:center">E-2 H ([https://db.kcwiki.moe/drop/map/492/4/H-SAB.html PoiDB])</div> | + | <div id="E-2 H Hard" style="width:100%;text-align:center">E-2 Hard H ([https://db.kcwiki.moe/drop/map/492/4/H-SAB.html PoiDB])</div> |
{|class="wikitable" style="width:100%" | {|class="wikitable" style="width:100%" | ||
!style="width:1px"|# | !style="width:1px"|# | ||
| Line 200: | Line 200: | ||
!style="width:1px"|AD/AP<br>AS/AS+ | !style="width:1px"|AD/AP<br>AS/AS+ | ||
|} | |} | ||
| − | <div id="E-2 I Hard" style="width:100%;text-align:center">E-2 I ([https://db.kcwiki.moe/drop/map/492/4/I-SAB.html PoiDB])</div> | + | <div id="E-2 I Hard" style="width:100%;text-align:center">E-2 Hard I ([https://db.kcwiki.moe/drop/map/492/4/I-SAB.html PoiDB])</div> |
{|class="wikitable" style="width:100%" | {|class="wikitable" style="width:100%" | ||
!style="width:1px"|# | !style="width:1px"|# | ||
| Line 225: | Line 225: | ||
!style="width:1px"|AD/AP<br>AS/AS+ | !style="width:1px"|AD/AP<br>AS/AS+ | ||
|} | |} | ||
| − | <div id="E-2 J Hard" style="width:100%;text-align:center">E-2 J</div> | + | <div id="E-2 J Hard" style="width:100%;text-align:center">E-2 Hard J</div> |
{|class="wikitable" style="width:100%" | {|class="wikitable" style="width:100%" | ||
!style="width:1px"|# | !style="width:1px"|# | ||
| Line 236: | Line 236: | ||
!colspan="3"|Selection Node | !colspan="3"|Selection Node | ||
|} | |} | ||
| − | <div id="E-2 K Hard" style="width:100%;text-align:center">E-2 K</div> | + | <div id="E-2 K Hard" style="width:100%;text-align:center">E-2 Hard K</div> |
{|class="wikitable" style="width:100%" | {|class="wikitable" style="width:100%" | ||
!style="width:1px"|# | !style="width:1px"|# | ||
| Line 244: | Line 244: | ||
!colspan="3"|Landing Node | !colspan="3"|Landing Node | ||
|} | |} | ||
| − | <div id="E-2 L Hard" style="width:100%;text-align:center">E-2 L ([https://db.kcwiki.moe/drop/map/492/4/L-SAB.html PoiDB])</div> | + | <div id="E-2 L Hard" style="width:100%;text-align:center">E-2 Hard L ([https://db.kcwiki.moe/drop/map/492/4/L-SAB.html PoiDB])</div> |
{|class="wikitable" style="width:100%" | {|class="wikitable" style="width:100%" | ||
!style="width:1px"|# | !style="width:1px"|# | ||
| Line 265: | Line 265: | ||
!style="width:1px"|AD/AP<br>AS/AS+ | !style="width:1px"|AD/AP<br>AS/AS+ | ||
|} | |} | ||
| − | <div id="E-2 M Hard" style="width:100%;text-align:center">E-2 M</div> | + | <div id="E-2 M Hard" style="width:100%;text-align:center">E-2 Hard M</div> |
{|class="wikitable" style="width:100%" | {|class="wikitable" style="width:100%" | ||
!style="width:1px"|# | !style="width:1px"|# | ||
| Line 276: | Line 276: | ||
!colspan="3"|Empty Node | !colspan="3"|Empty Node | ||
|} | |} | ||
| − | <div id="E-2 N Hard" style="width:100%;text-align:center">E-2 N ([https://db.kcwiki.moe/drop/map/492/4/N-SAB.html PoiDB])</div> | + | <div id="E-2 N Hard" style="width:100%;text-align:center">E-2 Hard N ([https://db.kcwiki.moe/drop/map/492/4/N-SAB.html PoiDB])</div> |
{|class="wikitable" style="width:100%" | {|class="wikitable" style="width:100%" | ||
!style="width:1px"|# | !style="width:1px"|# | ||
| Line 301: | Line 301: | ||
!style="width:1px"|AD/AP<br>AS/AS+ | !style="width:1px"|AD/AP<br>AS/AS+ | ||
|} | |} | ||
| − | <div id="E-2 O Hard" style="width:100%;text-align:center">E-2 O ([https://db.kcwiki.moe/drop/map/492/4/O-SAB.html PoiDB])</div> | + | <div id="E-2 O Hard" style="width:100%;text-align:center">E-2 Hard O ([https://db.kcwiki.moe/drop/map/492/4/O-SAB.html PoiDB])</div> |
{|class="wikitable" style="width:100%" | {|class="wikitable" style="width:100%" | ||
!style="width:1px"|# | !style="width:1px"|# | ||
| Line 318: | Line 318: | ||
!style="width:1px"|AD/AP<br>AS/AS+ | !style="width:1px"|AD/AP<br>AS/AS+ | ||
|} | |} | ||
| − | <div id="E-2 P Hard" style="width:100%;text-align:center">E-2 P</div> | + | <div id="E-2 P Hard" style="width:100%;text-align:center">E-2 Hard P</div> |
{|class="wikitable" style="width:100%" | {|class="wikitable" style="width:100%" | ||
!style="width:1px"|# | !style="width:1px"|# | ||
| Line 329: | Line 329: | ||
!colspan="3"|Empty Node | !colspan="3"|Empty Node | ||
|} | |} | ||
| − | <div id="E-2 Q Hard" style="width:100%;text-align:center">E-2 Q ([https://db.kcwiki.moe/drop/map/492/4/Q-SAB.html PoiDB])</div> | + | <div id="E-2 Q Hard" style="width:100%;text-align:center">E-2 Hard Q ([https://db.kcwiki.moe/drop/map/492/4/Q-SAB.html PoiDB])</div> |
{|class="wikitable" style="width:100%" | {|class="wikitable" style="width:100%" | ||
!style="width:1px"|# | !style="width:1px"|# | ||
| Line 353: | Line 353: | ||
|-|Medium= | |-|Medium= | ||
{{Map/Image|page=Fall 2020 Event/E-2| | {{Map/Image|page=Fall 2020 Event/E-2| | ||
| − | {{Map/ImageNode|1|Medium|x=263|y=299}} | + | {{Map/ImageNode|1|Medium|E-2|x=263|y=299}} |
| − | {{Map/ImageNode|A|Medium|x=206|y=176}} | + | {{Map/ImageNode|A|Medium|E-2|x=206|y=176}} |
| − | {{Map/ImageNode|B|Medium|x=218|y=247}} | + | {{Map/ImageNode|B|Medium|E-2|x=218|y=247}} |
| − | {{Map/ImageNode|C|Medium|x=302|y=195}} | + | {{Map/ImageNode|C|Medium|E-2|x=302|y=195}} |
| − | {{Map/ImageNode|D|Medium|x=311|y=253}} | + | {{Map/ImageNode|D|Medium|E-2|x=311|y=253}} |
| − | {{Map/ImageNode|E|Medium|x=326|y=102}} | + | {{Map/ImageNode|E|Medium|E-2|x=326|y=102}} |
| − | {{Map/ImageNode|F|Medium|x=357|y=207}} | + | {{Map/ImageNode|F|Medium|E-2|x=357|y=207}} |
| − | {{Map/ImageNode|G|Medium|x=369|y=153}} | + | {{Map/ImageNode|G|Medium|E-2|x=369|y=153}} |
| − | {{Map/ImageNode|H|Medium|x=410|y=204}} | + | {{Map/ImageNode|H|Medium|E-2|x=410|y=204}} |
| − | {{Map/ImageNode|I|Medium|x=449|y=169}} | + | {{Map/ImageNode|I|Medium|E-2|x=449|y=169}} |
| − | {{Map/ImageNode|J|Medium|x=468|y=201}} | + | {{Map/ImageNode|J|Medium|E-2|x=468|y=201}} |
| − | {{Map/ImageNode|K|Medium|x=489|y=235}} | + | {{Map/ImageNode|K|Medium|E-2|x=489|y=235}} |
| − | {{Map/ImageNode|L|Medium|x=503|y=156}} | + | {{Map/ImageNode|L|Medium|E-2|x=503|y=156}} |
| − | {{Map/ImageNode|M|Medium|x=545|y=242}} | + | {{Map/ImageNode|M|Medium|E-2|x=545|y=242}} |
| − | {{Map/ImageNode|N|Medium|x=531|y=193}} | + | {{Map/ImageNode|N|Medium|E-2|x=531|y=193}} |
| − | {{Map/ImageNode|O|Medium|x=468|y=110}} | + | {{Map/ImageNode|O|Medium|E-2|x=468|y=110}} |
| − | {{Map/ImageNode|P|Medium|x=525|y=85}} | + | {{Map/ImageNode|P|Medium|E-2|x=525|y=85}} |
| − | {{Map/ImageNode|Q|Medium|x=574|y=131}} | + | {{Map/ImageNode|Q|Medium|E-2|x=574|y=131}} |
}} | }} | ||
<div class="map-nodes"> | <div class="map-nodes"> | ||
| − | <div id="E-2 A Medium" style="width:100%;text-align:center">E-2 A ([https://db.kcwiki.moe/drop/map/492/3/A-SAB.html PoiDB])</div> | + | <div id="E-2 A Medium" style="width:100%;text-align:center">E-2 Medium A ([https://db.kcwiki.moe/drop/map/492/3/A-SAB.html PoiDB])</div> |
{|class="wikitable" style="width:100%" | {|class="wikitable" style="width:100%" | ||
!style="width:1px"|# | !style="width:1px"|# | ||
| Line 398: | Line 398: | ||
!style="width:1px"|AD/AP<br>AS/AS+ | !style="width:1px"|AD/AP<br>AS/AS+ | ||
|} | |} | ||
| − | <div id="E-2 B Medium" style="width:100%;text-align:center">E-2 B</div> | + | <div id="E-2 B Medium" style="width:100%;text-align:center">E-2 Medium B</div> |
{|class="wikitable" style="width:100%" | {|class="wikitable" style="width:100%" | ||
!style="width:1px"|# | !style="width:1px"|# | ||
| Line 409: | Line 409: | ||
!colspan="3"|Selection Node | !colspan="3"|Selection Node | ||
|} | |} | ||
| − | <div id="E-2 C Medium" style="width:100%;text-align:center">E-2 C ([https://db.kcwiki.moe/drop/map/492/3/C-SAB.html PoiDB])</div> | + | <div id="E-2 C Medium" style="width:100%;text-align:center">E-2 Medium C ([https://db.kcwiki.moe/drop/map/492/3/C-SAB.html PoiDB])</div> |
{|class="wikitable" style="width:100%" | {|class="wikitable" style="width:100%" | ||
!style="width:1px"|# | !style="width:1px"|# | ||
| Line 438: | Line 438: | ||
!style="width:1px"|AD/AP<br>AS/AS+ | !style="width:1px"|AD/AP<br>AS/AS+ | ||
|} | |} | ||
| − | <div id="E-2 D Medium" style="width:100%;text-align:center">E-2 D ([https://db.kcwiki.moe/drop/map/492/3/D-SAB.html PoiDB])</div> | + | <div id="E-2 D Medium" style="width:100%;text-align:center">E-2 Medium D ([https://db.kcwiki.moe/drop/map/492/3/D-SAB.html PoiDB])</div> |
{|class="wikitable" style="width:100%" | {|class="wikitable" style="width:100%" | ||
!style="width:1px"|# | !style="width:1px"|# | ||
| Line 455: | Line 455: | ||
!style="width:1px"|AD/AP<br>AS/AS+ | !style="width:1px"|AD/AP<br>AS/AS+ | ||
|} | |} | ||
| − | <div id="E-2 E Medium" style="width:100%;text-align:center">E-2 E ([https://db.kcwiki.moe/drop/map/492/3/E-SAB.html PoiDB])</div> | + | <div id="E-2 E Medium" style="width:100%;text-align:center">E-2 Medium E ([https://db.kcwiki.moe/drop/map/492/3/E-SAB.html PoiDB])</div> |
{|class="wikitable" style="width:100%" | {|class="wikitable" style="width:100%" | ||
!style="width:1px"|# | !style="width:1px"|# | ||
| Line 480: | Line 480: | ||
!style="width:1px"|AD/AP<br>AS/AS+ | !style="width:1px"|AD/AP<br>AS/AS+ | ||
|} | |} | ||
| − | <div id="E-2 F Medium" style="width:100%;text-align:center">E-2 F ([https://db.kcwiki.moe/drop/map/492/3/F-SAB.html PoiDB])</div> | + | <div id="E-2 F Medium" style="width:100%;text-align:center">E-2 Medium F ([https://db.kcwiki.moe/drop/map/492/3/F-SAB.html PoiDB])</div> |
{|class="wikitable" style="width:100%" | {|class="wikitable" style="width:100%" | ||
!style="width:1px"|# | !style="width:1px"|# | ||
| Line 505: | Line 505: | ||
!style="width:1px"|AD/AP<br>AS/AS+ | !style="width:1px"|AD/AP<br>AS/AS+ | ||
|} | |} | ||
| − | <div id="E-2 G Medium" style="width:100%;text-align:center">E-2 G ([https://db.kcwiki.moe/drop/map/492/3/G-SAB.html PoiDB])</div> | + | <div id="E-2 G Medium" style="width:100%;text-align:center">E-2 Medium G ([https://db.kcwiki.moe/drop/map/492/3/G-SAB.html PoiDB])</div> |
{|class="wikitable" style="width:100%" | {|class="wikitable" style="width:100%" | ||
!style="width:1px"|# | !style="width:1px"|# | ||
| Line 530: | Line 530: | ||
!style="width:1px"|AD/AP<br>AS/AS+ | !style="width:1px"|AD/AP<br>AS/AS+ | ||
|} | |} | ||
| − | <div id="E-2 H Medium" style="width:100%;text-align:center">E-2 H ([https://db.kcwiki.moe/drop/map/492/3/H-SAB.html PoiDB])</div> | + | <div id="E-2 H Medium" style="width:100%;text-align:center">E-2 Medium H ([https://db.kcwiki.moe/drop/map/492/3/H-SAB.html PoiDB])</div> |
{|class="wikitable" style="width:100%" | {|class="wikitable" style="width:100%" | ||
!style="width:1px"|# | !style="width:1px"|# | ||
| Line 555: | Line 555: | ||
!style="width:1px"|AD/AP<br>AS/AS+ | !style="width:1px"|AD/AP<br>AS/AS+ | ||
|} | |} | ||
| − | <div id="E-2 I Medium" style="width:100%;text-align:center">E-2 I ([https://db.kcwiki.moe/drop/map/492/3/I-SAB.html PoiDB])</div> | + | <div id="E-2 I Medium" style="width:100%;text-align:center">E-2 Medium I ([https://db.kcwiki.moe/drop/map/492/3/I-SAB.html PoiDB])</div> |
{|class="wikitable" style="width:100%" | {|class="wikitable" style="width:100%" | ||
!style="width:1px"|# | !style="width:1px"|# | ||
| Line 580: | Line 580: | ||
!style="width:1px"|AD/AP<br>AS/AS+ | !style="width:1px"|AD/AP<br>AS/AS+ | ||
|} | |} | ||
| − | <div id="E-2 J Medium" style="width:100%;text-align:center">E-2 J</div> | + | <div id="E-2 J Medium" style="width:100%;text-align:center">E-2 Medium J</div> |
{|class="wikitable" style="width:100%" | {|class="wikitable" style="width:100%" | ||
!style="width:1px"|# | !style="width:1px"|# | ||
| Line 591: | Line 591: | ||
!colspan="3"|Selection Node | !colspan="3"|Selection Node | ||
|} | |} | ||
| − | <div id="E-2 K Medium" style="width:100%;text-align:center">E-2 K</div> | + | <div id="E-2 K Medium" style="width:100%;text-align:center">E-2 Medium K</div> |
{|class="wikitable" style="width:100%" | {|class="wikitable" style="width:100%" | ||
!style="width:1px"|# | !style="width:1px"|# | ||
| Line 599: | Line 599: | ||
!colspan="3"|Landing Node | !colspan="3"|Landing Node | ||
|} | |} | ||
| − | <div id="E-2 L Medium" style="width:100%;text-align:center">E-2 L ([https://db.kcwiki.moe/drop/map/492/3/L-SAB.html PoiDB])</div> | + | <div id="E-2 L Medium" style="width:100%;text-align:center">E-2 Medium L ([https://db.kcwiki.moe/drop/map/492/3/L-SAB.html PoiDB])</div> |
{|class="wikitable" style="width:100%" | {|class="wikitable" style="width:100%" | ||
!style="width:1px"|# | !style="width:1px"|# | ||
| Line 620: | Line 620: | ||
!style="width:1px"|AD/AP<br>AS/AS+ | !style="width:1px"|AD/AP<br>AS/AS+ | ||
|} | |} | ||
| − | <div id="E-2 M Medium" style="width:100%;text-align:center">E-2 M</div> | + | <div id="E-2 M Medium" style="width:100%;text-align:center">E-2 Medium M</div> |
{|class="wikitable" style="width:100%" | {|class="wikitable" style="width:100%" | ||
!style="width:1px"|# | !style="width:1px"|# | ||
| Line 631: | Line 631: | ||
!colspan="3"|Empty Node | !colspan="3"|Empty Node | ||
|} | |} | ||
| − | <div id="E-2 N Medium" style="width:100%;text-align:center">E-2 N ([https://db.kcwiki.moe/drop/map/492/3/N-SAB.html PoiDB])</div> | + | <div id="E-2 N Medium" style="width:100%;text-align:center">E-2 Medium N ([https://db.kcwiki.moe/drop/map/492/3/N-SAB.html PoiDB])</div> |
{|class="wikitable" style="width:100%" | {|class="wikitable" style="width:100%" | ||
!style="width:1px"|# | !style="width:1px"|# | ||
| Line 660: | Line 660: | ||
!style="width:1px"|AD/AP<br>AS/AS+ | !style="width:1px"|AD/AP<br>AS/AS+ | ||
|} | |} | ||
| − | <div id="E-2 O Medium" style="width:100%;text-align:center">E-2 O ([https://db.kcwiki.moe/drop/map/492/3/O-SAB.html PoiDB])</div> | + | <div id="E-2 O Medium" style="width:100%;text-align:center">E-2 Medium O ([https://db.kcwiki.moe/drop/map/492/3/O-SAB.html PoiDB])</div> |
{|class="wikitable" style="width:100%" | {|class="wikitable" style="width:100%" | ||
!style="width:1px"|# | !style="width:1px"|# | ||
| Line 677: | Line 677: | ||
!style="width:1px"|AD/AP<br>AS/AS+ | !style="width:1px"|AD/AP<br>AS/AS+ | ||
|} | |} | ||
| − | <div id="E-2 P Medium" style="width:100%;text-align:center">E-2 P</div> | + | <div id="E-2 P Medium" style="width:100%;text-align:center">E-2 Medium P</div> |
{|class="wikitable" style="width:100%" | {|class="wikitable" style="width:100%" | ||
!style="width:1px"|# | !style="width:1px"|# | ||
| Line 688: | Line 688: | ||
!colspan="3"|Empty Node | !colspan="3"|Empty Node | ||
|} | |} | ||
| − | <div id="E-2 Q Medium" style="width:100%;text-align:center">E-2 Q ([https://db.kcwiki.moe/drop/map/492/3/Q-SAB.html PoiDB])</div> | + | <div id="E-2 Q Medium" style="width:100%;text-align:center">E-2 Medium Q ([https://db.kcwiki.moe/drop/map/492/3/Q-SAB.html PoiDB])</div> |
{|class="wikitable" style="width:100%" | {|class="wikitable" style="width:100%" | ||
!style="width:1px"|# | !style="width:1px"|# | ||
| Line 712: | Line 712: | ||
|-|Easy= | |-|Easy= | ||
{{Map/Image|page=Fall 2020 Event/E-2| | {{Map/Image|page=Fall 2020 Event/E-2| | ||
| − | {{Map/ImageNode|1|Easy|x=263|y=299}} | + | {{Map/ImageNode|1|Easy|E-2|x=263|y=299}} |
| − | {{Map/ImageNode|A|Easy|x=206|y=176}} | + | {{Map/ImageNode|A|Easy|E-2|x=206|y=176}} |
| − | {{Map/ImageNode|B|Easy|x=218|y=247}} | + | {{Map/ImageNode|B|Easy|E-2|x=218|y=247}} |
| − | {{Map/ImageNode|C|Easy|x=302|y=195}} | + | {{Map/ImageNode|C|Easy|E-2|x=302|y=195}} |
| − | {{Map/ImageNode|D|Easy|x=311|y=253}} | + | {{Map/ImageNode|D|Easy|E-2|x=311|y=253}} |
| − | {{Map/ImageNode|E|Easy|x=326|y=102}} | + | {{Map/ImageNode|E|Easy|E-2|x=326|y=102}} |
| − | {{Map/ImageNode|F|Easy|x=357|y=207}} | + | {{Map/ImageNode|F|Easy|E-2|x=357|y=207}} |
| − | {{Map/ImageNode|G|Easy|x=369|y=153}} | + | {{Map/ImageNode|G|Easy|E-2|x=369|y=153}} |
| − | {{Map/ImageNode|H|Easy|x=410|y=204}} | + | {{Map/ImageNode|H|Easy|E-2|x=410|y=204}} |
| − | {{Map/ImageNode|I|Easy|x=449|y=169}} | + | {{Map/ImageNode|I|Easy|E-2|x=449|y=169}} |
| − | {{Map/ImageNode|J|Easy|x=468|y=201}} | + | {{Map/ImageNode|J|Easy|E-2|x=468|y=201}} |
| − | {{Map/ImageNode|K|Easy|x=489|y=235}} | + | {{Map/ImageNode|K|Easy|E-2|x=489|y=235}} |
| − | {{Map/ImageNode|L|Easy|x=503|y=156}} | + | {{Map/ImageNode|L|Easy|E-2|x=503|y=156}} |
| − | {{Map/ImageNode|M|Easy|x=545|y=242}} | + | {{Map/ImageNode|M|Easy|E-2|x=545|y=242}} |
| − | {{Map/ImageNode|N|Easy|x=531|y=193}} | + | {{Map/ImageNode|N|Easy|E-2|x=531|y=193}} |
| − | {{Map/ImageNode|O|Easy|x=468|y=110}} | + | {{Map/ImageNode|O|Easy|E-2|x=468|y=110}} |
| − | {{Map/ImageNode|P|Easy|x=525|y=85}} | + | {{Map/ImageNode|P|Easy|E-2|x=525|y=85}} |
| − | {{Map/ImageNode|Q|Easy|x=574|y=131}} | + | {{Map/ImageNode|Q|Easy|E-2|x=574|y=131}} |
}} | }} | ||
<div class="map-nodes"> | <div class="map-nodes"> | ||
| − | <div id="E-2 A Easy" style="width:100%;text-align:center">E-2 A ([https://db.kcwiki.moe/drop/map/492/2/A-SAB.html PoiDB])</div> | + | <div id="E-2 A Easy" style="width:100%;text-align:center">E-2 Easy A ([https://db.kcwiki.moe/drop/map/492/2/A-SAB.html PoiDB])</div> |
{|class="wikitable" style="width:100%" | {|class="wikitable" style="width:100%" | ||
!style="width:1px"|# | !style="width:1px"|# | ||
| Line 757: | Line 757: | ||
!style="width:1px"|AD/AP<br>AS/AS+ | !style="width:1px"|AD/AP<br>AS/AS+ | ||
|} | |} | ||
| − | <div id="E-2 B Easy" style="width:100%;text-align:center">E-2 B</div> | + | <div id="E-2 B Easy" style="width:100%;text-align:center">E-2 Easy B</div> |
{|class="wikitable" style="width:100%" | {|class="wikitable" style="width:100%" | ||
!style="width:1px"|# | !style="width:1px"|# | ||
| Line 768: | Line 768: | ||
!colspan="3"|Selection Node | !colspan="3"|Selection Node | ||
|} | |} | ||
| − | <div id="E-2 C Easy" style="width:100%;text-align:center">E-2 C ([https://db.kcwiki.moe/drop/map/492/2/C-SAB.html PoiDB])</div> | + | <div id="E-2 C Easy" style="width:100%;text-align:center">E-2 Easy C ([https://db.kcwiki.moe/drop/map/492/2/C-SAB.html PoiDB])</div> |
{|class="wikitable" style="width:100%" | {|class="wikitable" style="width:100%" | ||
!style="width:1px"|# | !style="width:1px"|# | ||
| Line 797: | Line 797: | ||
!style="width:1px"|AD/AP<br>AS/AS+ | !style="width:1px"|AD/AP<br>AS/AS+ | ||
|} | |} | ||
| − | <div id="E-2 D Easy" style="width:100%;text-align:center">E-2 D ([https://db.kcwiki.moe/drop/map/492/2/D-SAB.html PoiDB])</div> | + | <div id="E-2 D Easy" style="width:100%;text-align:center">E-2 Easy D ([https://db.kcwiki.moe/drop/map/492/2/D-SAB.html PoiDB])</div> |
{|class="wikitable" style="width:100%" | {|class="wikitable" style="width:100%" | ||
!style="width:1px"|# | !style="width:1px"|# | ||
| Line 814: | Line 814: | ||
!style="width:1px"|AD/AP<br>AS/AS+ | !style="width:1px"|AD/AP<br>AS/AS+ | ||
|} | |} | ||
| − | <div id="E-2 E Easy" style="width:100%;text-align:center">E-2 E ([https://db.kcwiki.moe/drop/map/492/2/E-SAB.html PoiDB])</div> | + | <div id="E-2 E Easy" style="width:100%;text-align:center">E-2 Easy E ([https://db.kcwiki.moe/drop/map/492/2/E-SAB.html PoiDB])</div> |
{|class="wikitable" style="width:100%" | {|class="wikitable" style="width:100%" | ||
!style="width:1px"|# | !style="width:1px"|# | ||
| Line 839: | Line 839: | ||
!style="width:1px"|AD/AP<br>AS/AS+ | !style="width:1px"|AD/AP<br>AS/AS+ | ||
|} | |} | ||
| − | <div id="E-2 F Easy" style="width:100%;text-align:center">E-2 F ([https://db.kcwiki.moe/drop/map/492/2/F-SAB.html PoiDB])</div> | + | <div id="E-2 F Easy" style="width:100%;text-align:center">E-2 Easy F ([https://db.kcwiki.moe/drop/map/492/2/F-SAB.html PoiDB])</div> |
{|class="wikitable" style="width:100%" | {|class="wikitable" style="width:100%" | ||
!style="width:1px"|# | !style="width:1px"|# | ||
| Line 868: | Line 868: | ||
!style="width:1px"|AD/AP<br>AS/AS+ | !style="width:1px"|AD/AP<br>AS/AS+ | ||
|} | |} | ||
| − | <div id="E-2 G Easy" style="width:100%;text-align:center">E-2 G ([https://db.kcwiki.moe/drop/map/492/2/G-SAB.html PoiDB])</div> | + | <div id="E-2 G Easy" style="width:100%;text-align:center">E-2 Easy G ([https://db.kcwiki.moe/drop/map/492/2/G-SAB.html PoiDB])</div> |
{|class="wikitable" style="width:100%" | {|class="wikitable" style="width:100%" | ||
!style="width:1px"|# | !style="width:1px"|# | ||
| Line 893: | Line 893: | ||
!style="width:1px"|AD/AP<br>AS/AS+ | !style="width:1px"|AD/AP<br>AS/AS+ | ||
|} | |} | ||
| − | <div id="E-2 H Easy" style="width:100%;text-align:center">E-2 H ([https://db.kcwiki.moe/drop/map/492/2/H-SAB.html PoiDB])</div> | + | <div id="E-2 H Easy" style="width:100%;text-align:center">E-2 Easy H ([https://db.kcwiki.moe/drop/map/492/2/H-SAB.html PoiDB])</div> |
{|class="wikitable" style="width:100%" | {|class="wikitable" style="width:100%" | ||
!style="width:1px"|# | !style="width:1px"|# | ||
| Line 918: | Line 918: | ||
!style="width:1px"|AD/AP<br>AS/AS+ | !style="width:1px"|AD/AP<br>AS/AS+ | ||
|} | |} | ||
| − | <div id="E-2 I Easy" style="width:100%;text-align:center">E-2 I ([https://db.kcwiki.moe/drop/map/492/2/I-SAB.html PoiDB])</div> | + | <div id="E-2 I Easy" style="width:100%;text-align:center">E-2 Easy I ([https://db.kcwiki.moe/drop/map/492/2/I-SAB.html PoiDB])</div> |
{|class="wikitable" style="width:100%" | {|class="wikitable" style="width:100%" | ||
!style="width:1px"|# | !style="width:1px"|# | ||
| Line 943: | Line 943: | ||
!style="width:1px"|AD/AP<br>AS/AS+ | !style="width:1px"|AD/AP<br>AS/AS+ | ||
|} | |} | ||
| − | <div id="E-2 J Easy" style="width:100%;text-align:center">E-2 J</div> | + | <div id="E-2 J Easy" style="width:100%;text-align:center">E-2 Easy J</div> |
{|class="wikitable" style="width:100%" | {|class="wikitable" style="width:100%" | ||
!style="width:1px"|# | !style="width:1px"|# | ||
| Line 954: | Line 954: | ||
!colspan="3"|Selection Node | !colspan="3"|Selection Node | ||
|} | |} | ||
| − | <div id="E-2 K Easy" style="width:100%;text-align:center">E-2 K</div> | + | <div id="E-2 K Easy" style="width:100%;text-align:center">E-2 Easy K</div> |
{|class="wikitable" style="width:100%" | {|class="wikitable" style="width:100%" | ||
!style="width:1px"|# | !style="width:1px"|# | ||
| Line 962: | Line 962: | ||
!colspan="3"|Landing Node | !colspan="3"|Landing Node | ||
|} | |} | ||
| − | <div id="E-2 L Easy" style="width:100%;text-align:center">E-2 L ([https://db.kcwiki.moe/drop/map/492/2/L-SAB.html PoiDB])</div> | + | <div id="E-2 L Easy" style="width:100%;text-align:center">E-2 Easy L ([https://db.kcwiki.moe/drop/map/492/2/L-SAB.html PoiDB])</div> |
{|class="wikitable" style="width:100%" | {|class="wikitable" style="width:100%" | ||
!style="width:1px"|# | !style="width:1px"|# | ||
| Line 983: | Line 983: | ||
!style="width:1px"|AD/AP<br>AS/AS+ | !style="width:1px"|AD/AP<br>AS/AS+ | ||
|} | |} | ||
| − | <div id="E-2 M Easy" style="width:100%;text-align:center">E-2 M</div> | + | <div id="E-2 M Easy" style="width:100%;text-align:center">E-2 Easy M</div> |
{|class="wikitable" style="width:100%" | {|class="wikitable" style="width:100%" | ||
!style="width:1px"|# | !style="width:1px"|# | ||
| Line 994: | Line 994: | ||
!colspan="3"|Empty Node | !colspan="3"|Empty Node | ||
|} | |} | ||
| − | <div id="E-2 N Easy" style="width:100%;text-align:center">E-2 N ([https://db.kcwiki.moe/drop/map/492/2/N-SAB.html PoiDB])</div> | + | <div id="E-2 N Easy" style="width:100%;text-align:center">E-2 Easy N ([https://db.kcwiki.moe/drop/map/492/2/N-SAB.html PoiDB])</div> |
{|class="wikitable" style="width:100%" | {|class="wikitable" style="width:100%" | ||
!style="width:1px"|# | !style="width:1px"|# | ||
| Line 1,027: | Line 1,027: | ||
!style="width:1px"|AD/AP<br>AS/AS+ | !style="width:1px"|AD/AP<br>AS/AS+ | ||
|} | |} | ||
| − | <div id="E-2 O Easy" style="width:100%;text-align:center">E-2 O ([https://db.kcwiki.moe/drop/map/492/2/O-SAB.html PoiDB])</div> | + | <div id="E-2 O Easy" style="width:100%;text-align:center">E-2 Easy O ([https://db.kcwiki.moe/drop/map/492/2/O-SAB.html PoiDB])</div> |
{|class="wikitable" style="width:100%" | {|class="wikitable" style="width:100%" | ||
!style="width:1px"|# | !style="width:1px"|# | ||
| Line 1,044: | Line 1,044: | ||
!style="width:1px"|AD/AP<br>AS/AS+ | !style="width:1px"|AD/AP<br>AS/AS+ | ||
|} | |} | ||
| − | <div id="E-2 P Easy" style="width:100%;text-align:center">E-2 P</div> | + | <div id="E-2 P Easy" style="width:100%;text-align:center">E-2 Easy P</div> |
{|class="wikitable" style="width:100%" | {|class="wikitable" style="width:100%" | ||
!style="width:1px"|# | !style="width:1px"|# | ||
| Line 1,055: | Line 1,055: | ||
!colspan="3"|Empty Node | !colspan="3"|Empty Node | ||
|} | |} | ||
| − | <div id="E-2 Q Easy" style="width:100%;text-align:center">E-2 Q ([https://db.kcwiki.moe/drop/map/492/2/Q-SAB.html PoiDB])</div> | + | <div id="E-2 Q Easy" style="width:100%;text-align:center">E-2 Easy Q ([https://db.kcwiki.moe/drop/map/492/2/Q-SAB.html PoiDB])</div> |
{|class="wikitable" style="width:100%" | {|class="wikitable" style="width:100%" | ||
!style="width:1px"|# | !style="width:1px"|# | ||
| Line 1,079: | Line 1,079: | ||
|-|Casual= | |-|Casual= | ||
{{Map/Image|page=Fall 2020 Event/E-2| | {{Map/Image|page=Fall 2020 Event/E-2| | ||
| − | {{Map/ImageNode|1|Casual|x=263|y=299}} | + | {{Map/ImageNode|1|Casual|E-2|x=263|y=299}} |
| − | {{Map/ImageNode|A|Casual|x=206|y=176}} | + | {{Map/ImageNode|A|Casual|E-2|x=206|y=176}} |
| − | {{Map/ImageNode|B|Casual|x=218|y=247}} | + | {{Map/ImageNode|B|Casual|E-2|x=218|y=247}} |
| − | {{Map/ImageNode|C|Casual|x=302|y=195}} | + | {{Map/ImageNode|C|Casual|E-2|x=302|y=195}} |
| − | {{Map/ImageNode|D|Casual|x=311|y=253}} | + | {{Map/ImageNode|D|Casual|E-2|x=311|y=253}} |
| − | {{Map/ImageNode|E|Casual|x=326|y=102}} | + | {{Map/ImageNode|E|Casual|E-2|x=326|y=102}} |
| − | {{Map/ImageNode|F|Casual|x=357|y=207}} | + | {{Map/ImageNode|F|Casual|E-2|x=357|y=207}} |
| − | {{Map/ImageNode|G|Casual|x=369|y=153}} | + | {{Map/ImageNode|G|Casual|E-2|x=369|y=153}} |
| − | {{Map/ImageNode|H|Casual|x=410|y=204}} | + | {{Map/ImageNode|H|Casual|E-2|x=410|y=204}} |
| − | {{Map/ImageNode|I|Casual|x=449|y=169}} | + | {{Map/ImageNode|I|Casual|E-2|x=449|y=169}} |
| − | {{Map/ImageNode|J|Casual|x=468|y=201}} | + | {{Map/ImageNode|J|Casual|E-2|x=468|y=201}} |
| − | {{Map/ImageNode|K|Casual|x=489|y=235}} | + | {{Map/ImageNode|K|Casual|E-2|x=489|y=235}} |
| − | {{Map/ImageNode|L|Casual|x=503|y=156}} | + | {{Map/ImageNode|L|Casual|E-2|x=503|y=156}} |
| − | {{Map/ImageNode|M|Casual|x=545|y=242}} | + | {{Map/ImageNode|M|Casual|E-2|x=545|y=242}} |
| − | {{Map/ImageNode|N|Casual|x=531|y=193}} | + | {{Map/ImageNode|N|Casual|E-2|x=531|y=193}} |
| − | {{Map/ImageNode|O|Casual|x=468|y=110}} | + | {{Map/ImageNode|O|Casual|E-2|x=468|y=110}} |
| − | {{Map/ImageNode|P|Casual|x=525|y=85}} | + | {{Map/ImageNode|P|Casual|E-2|x=525|y=85}} |
| − | {{Map/ImageNode|Q|Casual|x=574|y=131}} | + | {{Map/ImageNode|Q|Casual|E-2|x=574|y=131}} |
}} | }} | ||
<div class="map-nodes"> | <div class="map-nodes"> | ||
| − | <div id="E-2 A Casual" style="width:100%;text-align:center">E-2 A ([https://db.kcwiki.moe/drop/map/492/1/A-SAB.html PoiDB])</div> | + | <div id="E-2 A Casual" style="width:100%;text-align:center">E-2 Casual A ([https://db.kcwiki.moe/drop/map/492/1/A-SAB.html PoiDB])</div> |
{|class="wikitable" style="width:100%" | {|class="wikitable" style="width:100%" | ||
!style="width:1px"|# | !style="width:1px"|# | ||
| Line 1,120: | Line 1,120: | ||
!style="width:1px"|AD/AP<br>AS/AS+ | !style="width:1px"|AD/AP<br>AS/AS+ | ||
|} | |} | ||
| − | <div id="E-2 B Casual" style="width:100%;text-align:center">E-2 B</div> | + | <div id="E-2 B Casual" style="width:100%;text-align:center">E-2 Casual B</div> |
{|class="wikitable" style="width:100%" | {|class="wikitable" style="width:100%" | ||
!style="width:1px"|# | !style="width:1px"|# | ||
| Line 1,131: | Line 1,131: | ||
!colspan="3"|Selection Node | !colspan="3"|Selection Node | ||
|} | |} | ||
| − | <div id="E-2 C Casual" style="width:100%;text-align:center">E-2 C ([https://db.kcwiki.moe/drop/map/492/1/C-SAB.html PoiDB])</div> | + | <div id="E-2 C Casual" style="width:100%;text-align:center">E-2 Casual C ([https://db.kcwiki.moe/drop/map/492/1/C-SAB.html PoiDB])</div> |
{|class="wikitable" style="width:100%" | {|class="wikitable" style="width:100%" | ||
!style="width:1px"|# | !style="width:1px"|# | ||
| Line 1,152: | Line 1,152: | ||
!style="width:1px"|AD/AP<br>AS/AS+ | !style="width:1px"|AD/AP<br>AS/AS+ | ||
|} | |} | ||
| − | <div id="E-2 D Casual" style="width:100%;text-align:center">E-2 D ([https://db.kcwiki.moe/drop/map/492/1/D-SAB.html PoiDB])</div> | + | <div id="E-2 D Casual" style="width:100%;text-align:center">E-2 Casual D ([https://db.kcwiki.moe/drop/map/492/1/D-SAB.html PoiDB])</div> |
{|class="wikitable" style="width:100%" | {|class="wikitable" style="width:100%" | ||
!style="width:1px"|# | !style="width:1px"|# | ||
| Line 1,173: | Line 1,173: | ||
!style="width:1px"|AD/AP<br>AS/AS+ | !style="width:1px"|AD/AP<br>AS/AS+ | ||
|} | |} | ||
| − | <div id="E-2 E Casual" style="width:100%;text-align:center">E-2 E ([https://db.kcwiki.moe/drop/map/492/1/E-SAB.html PoiDB])</div> | + | <div id="E-2 E Casual" style="width:100%;text-align:center">E-2 Casual E ([https://db.kcwiki.moe/drop/map/492/1/E-SAB.html PoiDB])</div> |
{|class="wikitable" style="width:100%" | {|class="wikitable" style="width:100%" | ||
!style="width:1px"|# | !style="width:1px"|# | ||
| Line 1,194: | Line 1,194: | ||
!style="width:1px"|AD/AP<br>AS/AS+ | !style="width:1px"|AD/AP<br>AS/AS+ | ||
|} | |} | ||
| − | <div id="E-2 F Casual" style="width:100%;text-align:center">E-2 F ([https://db.kcwiki.moe/drop/map/492/1/F-SAB.html PoiDB])</div> | + | <div id="E-2 F Casual" style="width:100%;text-align:center">E-2 Casual F ([https://db.kcwiki.moe/drop/map/492/1/F-SAB.html PoiDB])</div> |
{|class="wikitable" style="width:100%" | {|class="wikitable" style="width:100%" | ||
!style="width:1px"|# | !style="width:1px"|# | ||
| Line 1,219: | Line 1,219: | ||
!style="width:1px"|AD/AP<br>AS/AS+ | !style="width:1px"|AD/AP<br>AS/AS+ | ||
|} | |} | ||
| − | <div id="E-2 G Casual" style="width:100%;text-align:center">E-2 G ([https://db.kcwiki.moe/drop/map/492/1/G-SAB.html PoiDB])</div> | + | <div id="E-2 G Casual" style="width:100%;text-align:center">E-2 Casual G ([https://db.kcwiki.moe/drop/map/492/1/G-SAB.html PoiDB])</div> |
{|class="wikitable" style="width:100%" | {|class="wikitable" style="width:100%" | ||
!style="width:1px"|# | !style="width:1px"|# | ||
| Line 1,244: | Line 1,244: | ||
!style="width:1px"|AD/AP<br>AS/AS+ | !style="width:1px"|AD/AP<br>AS/AS+ | ||
|} | |} | ||
| − | <div id="E-2 H Casual" style="width:100%;text-align:center">E-2 H ([https://db.kcwiki.moe/drop/map/492/1/H-SAB.html PoiDB])</div> | + | <div id="E-2 H Casual" style="width:100%;text-align:center">E-2 Casual H ([https://db.kcwiki.moe/drop/map/492/1/H-SAB.html PoiDB])</div> |
{|class="wikitable" style="width:100%" | {|class="wikitable" style="width:100%" | ||
!style="width:1px"|# | !style="width:1px"|# | ||
| Line 1,269: | Line 1,269: | ||
!style="width:1px"|AD/AP<br>AS/AS+ | !style="width:1px"|AD/AP<br>AS/AS+ | ||
|} | |} | ||
| − | <div id="E-2 I Casual" style="width:100%;text-align:center">E-2 I ([https://db.kcwiki.moe/drop/map/492/1/I-SAB.html PoiDB])</div> | + | <div id="E-2 I Casual" style="width:100%;text-align:center">E-2 Casual I ([https://db.kcwiki.moe/drop/map/492/1/I-SAB.html PoiDB])</div> |
{|class="wikitable" style="width:100%" | {|class="wikitable" style="width:100%" | ||
!style="width:1px"|# | !style="width:1px"|# | ||
| Line 1,290: | Line 1,290: | ||
!style="width:1px"|AD/AP<br>AS/AS+ | !style="width:1px"|AD/AP<br>AS/AS+ | ||
|} | |} | ||
| − | <div id="E-2 J Casual" style="width:100%;text-align:center">E-2 J</div> | + | <div id="E-2 J Casual" style="width:100%;text-align:center">E-2 Casual J</div> |
{|class="wikitable" style="width:100%" | {|class="wikitable" style="width:100%" | ||
!style="width:1px"|# | !style="width:1px"|# | ||
| Line 1,301: | Line 1,301: | ||
!colspan="3"|Selection Node | !colspan="3"|Selection Node | ||
|} | |} | ||
| − | <div id="E-2 K Casual" style="width:100%;text-align:center">E-2 K</div> | + | <div id="E-2 K Casual" style="width:100%;text-align:center">E-2 Casual K</div> |
{|class="wikitable" style="width:100%" | {|class="wikitable" style="width:100%" | ||
!style="width:1px"|# | !style="width:1px"|# | ||
| Line 1,309: | Line 1,309: | ||
!colspan="3"|Landing Node | !colspan="3"|Landing Node | ||
|} | |} | ||
| − | <div id="E-2 L Casual" style="width:100%;text-align:center">E-2 L ([https://db.kcwiki.moe/drop/map/492/1/L-SAB.html PoiDB])</div> | + | <div id="E-2 L Casual" style="width:100%;text-align:center">E-2 Casual L ([https://db.kcwiki.moe/drop/map/492/1/L-SAB.html PoiDB])</div> |
{|class="wikitable" style="width:100%" | {|class="wikitable" style="width:100%" | ||
!style="width:1px"|# | !style="width:1px"|# | ||
| Line 1,330: | Line 1,330: | ||
!style="width:1px"|AD/AP<br>AS/AS+ | !style="width:1px"|AD/AP<br>AS/AS+ | ||
|} | |} | ||
| − | <div id="E-2 M Casual" style="width:100%;text-align:center">E-2 M</div> | + | <div id="E-2 M Casual" style="width:100%;text-align:center">E-2 Casual M</div> |
{|class="wikitable" style="width:100%" | {|class="wikitable" style="width:100%" | ||
!style="width:1px"|# | !style="width:1px"|# | ||
| Line 1,341: | Line 1,341: | ||
!colspan="3"|Empty Node | !colspan="3"|Empty Node | ||
|} | |} | ||
| − | <div id="E-2 N Casual" style="width:100%;text-align:center">E-2 N ([https://db.kcwiki.moe/drop/map/492/1/N-SAB.html PoiDB])</div> | + | <div id="E-2 N Casual" style="width:100%;text-align:center">E-2 Casual N ([https://db.kcwiki.moe/drop/map/492/1/N-SAB.html PoiDB])</div> |
{|class="wikitable" style="width:100%" | {|class="wikitable" style="width:100%" | ||
!style="width:1px"|# | !style="width:1px"|# | ||
| Line 1,370: | Line 1,370: | ||
!style="width:1px"|AD/AP<br>AS/AS+ | !style="width:1px"|AD/AP<br>AS/AS+ | ||
|} | |} | ||
| − | <div id="E-2 O Casual" style="width:100%;text-align:center">E-2 O ([https://db.kcwiki.moe/drop/map/492/1/O-SAB.html PoiDB])</div> | + | <div id="E-2 O Casual" style="width:100%;text-align:center">E-2 Casual O ([https://db.kcwiki.moe/drop/map/492/1/O-SAB.html PoiDB])</div> |
{|class="wikitable" style="width:100%" | {|class="wikitable" style="width:100%" | ||
!style="width:1px"|# | !style="width:1px"|# | ||
| Line 1,387: | Line 1,387: | ||
!style="width:1px"|AD/AP<br>AS/AS+ | !style="width:1px"|AD/AP<br>AS/AS+ | ||
|} | |} | ||
| − | <div id="E-2 P Casual" style="width:100%;text-align:center">E-2 P</div> | + | <div id="E-2 P Casual" style="width:100%;text-align:center">E-2 Casual P</div> |
{|class="wikitable" style="width:100%" | {|class="wikitable" style="width:100%" | ||
!style="width:1px"|# | !style="width:1px"|# | ||
| Line 1,398: | Line 1,398: | ||
!colspan="3"|Empty Node | !colspan="3"|Empty Node | ||
|} | |} | ||
| − | <div id="E-2 Q Casual" style="width:100%;text-align:center">E-2 Q ([https://db.kcwiki.moe/drop/map/492/1/Q-SAB.html PoiDB])</div> | + | <div id="E-2 Q Casual" style="width:100%;text-align:center">E-2 Casual Q ([https://db.kcwiki.moe/drop/map/492/1/Q-SAB.html PoiDB])</div> |
{|class="wikitable" style="width:100%" | {|class="wikitable" style="width:100%" | ||
!style="width:1px"|# | !style="width:1px"|# | ||
Revision as of 01:58, 29 November 2020
E-2 Hard A (PoiDB)
| # | Formation | Normal Battle Node | AD/AP AS/AS+ |
|---|---|---|---|
| A | Line Ahead Echelon |
0/0 0/0 | |
| Line Ahead Echelon |
0/0 0/0 | ||
| Line Ahead Echelon |
0/0 0/0 | ||
| # | Formation | Normal Battle Node | AD/AP AS/AS+ |
E-2 Hard B
| # | Selection Node | ||
|---|---|---|---|
| B | 艦隊の針路を選択できます。提督、どちらの針路をとられますか? You can decide the fleet's course. Admiral, which heading should we take? | ||
| # | Selection Node | ||
E-2 Hard C (PoiDB)
| # | Formation | Normal Battle Node | AD/AP AS/AS+ |
|---|---|---|---|
| C | Echelon Line Abreast |
0/0 0/0 | |
| Echelon Line Abreast |
0/0 0/0 | ||
| # | Formation | Normal Battle Node | AD/AP AS/AS+ |
E-2 Hard D (PoiDB)
| # | Formation | Normal Battle Node | AD/AP AS/AS+ |
|---|---|---|---|
| D | Echelon Line Abreast |
0/0 0/0 | |
| Line Abreast | 0/0 0/0 | ||
| # | Formation | Normal Battle Node | AD/AP AS/AS+ |
E-2 Hard E (PoiDB)
| # | Formation | Normal Battle Node | AD/AP AS/AS+ |
|---|---|---|---|
| E | Line Ahead Double Line |
0/0 0/0 | |
| Line Ahead Double Line |
0/0 0/0 | ||
| Line Ahead Double Line |
0/0 0/0 | ||
| # | Formation | Normal Battle Node | AD/AP AS/AS+ |
E-2 Hard F (PoiDB)
| # | Formation | Air Defense Node | AD/AP AS/AS+ |
|---|---|---|---|
| F | Diamond | 33/65 144/288 | |
| Diamond | 44/87 195/390 | ||
| Diamond | 49/97 216/432 | ||
| # | Formation | Air Defense Node | AD/AP AS/AS+ |
E-2 Hard G (PoiDB)
| # | Formation | Air Defense Node | AD/AP AS/AS+ |
|---|---|---|---|
| G | Diamond | 33/65 144/288 | |
| Diamond | 44/87 195/390 | ||
| Diamond | 49/97 216/432 | ||
| # | Formation | Air Defense Node | AD/AP AS/AS+ |
E-2 Hard H (PoiDB)
| # | Formation | Normal Battle Node | AD/AP AS/AS+ |
|---|---|---|---|
| H | Echelon | 0/0 0/0 | |
| Echelon | 0/0 0/0 | ||
| Echelon | 0/0 0/0 | ||
| # | Formation | Normal Battle Node | AD/AP AS/AS+ |
E-2 Hard I (PoiDB)
| # | Formation | Normal Battle Node | AD/AP AS/AS+ |
|---|---|---|---|
| I | Line Ahead Double Line |
0/0 0/0 | |
| Line Ahead Double Line |
0/0 0/0 | ||
| Line Ahead Double Line |
0/0 0/0 | ||
| # | Formation | Normal Battle Node | AD/AP AS/AS+ |
E-2 Hard J
| # | Selection Node | ||
|---|---|---|---|
| J | 艦隊の針路を選択できます。提督、どちらの針路をとられますか? You can decide the fleet's course. Admiral, which heading should we take? | ||
| # | Selection Node | ||
E-2 Hard K
| # | Landing Node | ||
|---|---|---|---|
| # | Landing Node | ||
E-2 Hard L (PoiDB)
| # | Formation | Normal Battle Node | AD/AP AS/AS+ |
|---|---|---|---|
| L | Line Ahead | 0/0 0/0 | |
| Double Line Diamond |
0/0 0/0 | ||
| # | Formation | Normal Battle Node | AD/AP AS/AS+ |
E-2 Hard M
| # | Empty Node | ||
|---|---|---|---|
| M | 敵影を見ず。 No enemy spotted. | ||
| # | Empty Node | ||
E-2 Hard N (PoiDB)
| # | Formation | Boss Battle Node | AD/AP AS/AS+ |
|---|---|---|---|
| N | Line Ahead | 0/0 0/0 | |
| Line Ahead | 0/0 0/0 | ||
| Line Ahead (Final)
|
0/0 0/0 | ||
| # | Formation | Boss Battle Node | AD/AP AS/AS+ |
E-2 Hard O (PoiDB)
| # | Formation | Normal Battle Node | AD/AP AS/AS+ |
|---|---|---|---|
| O | Line Ahead Double Line Vanguard |
0/0 0/0 | |
| # | Formation | Normal Battle Node | AD/AP AS/AS+ |
E-2 Hard P
| # | Empty Node | ||
|---|---|---|---|
| P | 敵影を見ず。 No enemy spotted. | ||
| # | Empty Node | ||
E-2 Hard Q (PoiDB)
| # | Formation | Boss Battle Node | AD/AP AS/AS+ |
|---|---|---|---|
| Q | Cruising Formation 4 | 0/0 0/0 | |
| Cruising Formation 4 (Final)
|
0/0 0/0 | ||
| # | Formation | Boss Battle Node | AD/AP AS/AS+ |
E-2 Medium A (PoiDB)
| # | Formation | Normal Battle Node | AD/AP AS/AS+ |
|---|---|---|---|
| A | Line Ahead Echelon |
0/0 0/0 | |
| Line Ahead Echelon |
0/0 0/0 | ||
| Line Ahead Echelon |
0/0 0/0 | ||
| # | Formation | Normal Battle Node | AD/AP AS/AS+ |
E-2 Medium B
| # | Selection Node | ||
|---|---|---|---|
| B | 艦隊の針路を選択できます。提督、どちらの針路をとられますか? You can decide the fleet's course. Admiral, which heading should we take? | ||
| # | Selection Node | ||
E-2 Medium C (PoiDB)
| # | Formation | Normal Battle Node | AD/AP AS/AS+ |
|---|---|---|---|
| C | Echelon Line Abreast |
0/0 0/0 | |
| Echelon Line Abreast |
0/0 0/0 | ||
| Echelon Line Abreast |
0/0 0/0 | ||
| Echelon Line Abreast |
0/0 0/0 | ||
| # | Formation | Normal Battle Node | AD/AP AS/AS+ |
E-2 Medium D (PoiDB)
| # | Formation | Normal Battle Node | AD/AP AS/AS+ |
|---|---|---|---|
| D | Line Abreast | 0/0 0/0 | |
| # | Formation | Normal Battle Node | AD/AP AS/AS+ |
E-2 Medium E (PoiDB)
| # | Formation | Normal Battle Node | AD/AP AS/AS+ |
|---|---|---|---|
| E | Line Ahead Double Line |
0/0 0/0 | |
| Line Ahead Double Line |
0/0 0/0 | ||
| Line Ahead Double Line |
0/0 0/0 | ||
| # | Formation | Normal Battle Node | AD/AP AS/AS+ |
E-2 Medium F (PoiDB)
| # | Formation | Air Defense Node | AD/AP AS/AS+ |
|---|---|---|---|
| F | Diamond | 28/55 123/246 | |
| Diamond | 35/69 153/306 | ||
| Diamond | 39/78 174/348 | ||
| # | Formation | Air Defense Node | AD/AP AS/AS+ |
E-2 Medium G (PoiDB)
| # | Formation | Air Defense Node | AD/AP AS/AS+ |
|---|---|---|---|
| G | Diamond | 28/55 123/246 | |
| Diamond | 35/69 153/306 | ||
| Diamond | 39/78 174/348 | ||
| # | Formation | Air Defense Node | AD/AP AS/AS+ |
E-2 Medium H (PoiDB)
| # | Formation | Normal Battle Node | AD/AP AS/AS+ |
|---|---|---|---|
| H | Echelon | 0/0 0/0 | |
| Echelon | 0/0 0/0 | ||
| Echelon | 0/0 0/0 | ||
| # | Formation | Normal Battle Node | AD/AP AS/AS+ |
E-2 Medium I (PoiDB)
| # | Formation | Normal Battle Node | AD/AP AS/AS+ |
|---|---|---|---|
| I | Line Ahead Double Line |
0/0 0/0 | |
| Line Ahead Double Line |
0/0 0/0 | ||
| Line Ahead Double Line |
0/0 0/0 | ||
| # | Formation | Normal Battle Node | AD/AP AS/AS+ |
E-2 Medium J
| # | Selection Node | ||
|---|---|---|---|
| J | 艦隊の針路を選択できます。提督、どちらの針路をとられますか? You can decide the fleet's course. Admiral, which heading should we take? | ||
| # | Selection Node | ||
E-2 Medium K
| # | Landing Node | ||
|---|---|---|---|
| # | Landing Node | ||
E-2 Medium L (PoiDB)
| # | Formation | Normal Battle Node | AD/AP AS/AS+ |
|---|---|---|---|
| L | Double Line Diamond |
0/0 0/0 | |
| Line Ahead | 0/0 0/0 | ||
| # | Formation | Normal Battle Node | AD/AP AS/AS+ |
E-2 Medium M
| # | Empty Node | ||
|---|---|---|---|
| M | 敵影を見ず。 No enemy spotted. | ||
| # | Empty Node | ||
E-2 Medium N (PoiDB)
| # | Formation | Boss Battle Node | AD/AP AS/AS+ |
|---|---|---|---|
| N | Line Ahead | 0/0 0/0 | |
| Line Ahead | 0/0 0/0 | ||
| Line Ahead | 0/0 0/0 | ||
| Line Ahead (Final)
|
0/0 0/0 | ||
| # | Formation | Boss Battle Node | AD/AP AS/AS+ |
E-2 Medium O (PoiDB)
| # | Formation | Normal Battle Node | AD/AP AS/AS+ |
|---|---|---|---|
| O | Line Ahead Double Line Vanguard |
0/0 0/0 | |
| # | Formation | Normal Battle Node | AD/AP AS/AS+ |
E-2 Medium P
| # | Empty Node | ||
|---|---|---|---|
| P | 敵影を見ず。 No enemy spotted. | ||
| # | Empty Node | ||
E-2 Medium Q (PoiDB)
| # | Formation | Boss Battle Node | AD/AP AS/AS+ |
|---|---|---|---|
| Q | Cruising Formation 4 | 0/0 0/0 | |
| Cruising Formation 4 (Final)
|
0/0 0/0 | ||
| # | Formation | Boss Battle Node | AD/AP AS/AS+ |
E-2 Easy A (PoiDB)
| # | Formation | Normal Battle Node | AD/AP AS/AS+ |
|---|---|---|---|
| A | Line Ahead Echelon |
0/0 0/0 | |
| Line Ahead Echelon |
0/0 0/0 | ||
| Line Ahead Echelon |
0/0 0/0 | ||
| # | Formation | Normal Battle Node | AD/AP AS/AS+ |
E-2 Easy B
| # | Selection Node | ||
|---|---|---|---|
| B | 艦隊の針路を選択できます。提督、どちらの針路をとられますか? You can decide the fleet's course. Admiral, which heading should we take? | ||
| # | Selection Node | ||
E-2 Easy C (PoiDB)
| # | Formation | Normal Battle Node | AD/AP AS/AS+ |
|---|---|---|---|
| C | Echelon Line Abreast |
0/0 0/0 | |
| Echelon Line Abreast |
0/0 0/0 | ||
| Echelon Line Abreast |
0/0 0/0 | ||
| Echelon Line Abreast |
0/0 0/0 | ||
| # | Formation | Normal Battle Node | AD/AP AS/AS+ |
E-2 Easy D (PoiDB)
| # | Formation | Normal Battle Node | AD/AP AS/AS+ |
|---|---|---|---|
| D | Echelon | 0/0 0/0 | |
| # | Formation | Normal Battle Node | AD/AP AS/AS+ |
E-2 Easy E (PoiDB)
| # | Formation | Normal Battle Node | AD/AP AS/AS+ |
|---|---|---|---|
| E | Line Ahead Double Line |
0/0 0/0 | |
| Line Ahead Double Line |
0/0 0/0 | ||
| Line Ahead Double Line |
0/0 0/0 | ||
| # | Formation | Normal Battle Node | AD/AP AS/AS+ |
E-2 Easy F (PoiDB)
| # | Formation | Air Defense Node | AD/AP AS/AS+ |
|---|---|---|---|
| F | Diamond | 12/23 51/102 | |
| Diamond | 17/33 72/144 | ||
| Diamond | 23/46 102/204 | ||
| Diamond | 28/55 123/246 | ||
| # | Formation | Air Defense Node | AD/AP AS/AS+ |
E-2 Easy G (PoiDB)
| # | Formation | Air Defense Node | AD/AP AS/AS+ |
|---|---|---|---|
| G | Diamond | 17/33 72/144 | |
| Diamond | 23/46 102/204 | ||
| Diamond | 28/55 123/246 | ||
| # | Formation | Air Defense Node | AD/AP AS/AS+ |
E-2 Easy H (PoiDB)
| # | Formation | Normal Battle Node | AD/AP AS/AS+ |
|---|---|---|---|
| H | Echelon | 0/0 0/0 | |
| Echelon | 0/0 0/0 | ||
| Echelon | 0/0 0/0 | ||
| # | Formation | Normal Battle Node | AD/AP AS/AS+ |
E-2 Easy I (PoiDB)
| # | Formation | Normal Battle Node | AD/AP AS/AS+ |
|---|---|---|---|
| I | Line Ahead Double Line |
0/0 0/0 | |
| Line Ahead Double Line |
0/0 0/0 | ||
| Line Ahead Double Line |
0/0 0/0 | ||
| # | Formation | Normal Battle Node | AD/AP AS/AS+ |
E-2 Easy J
| # | Selection Node | ||
|---|---|---|---|
| J | 艦隊の針路を選択できます。提督、どちらの針路をとられますか? You can decide the fleet's course. Admiral, which heading should we take? | ||
| # | Selection Node | ||
E-2 Easy K
| # | Landing Node | ||
|---|---|---|---|
| # | Landing Node | ||
E-2 Easy L (PoiDB)
| # | Formation | Normal Battle Node | AD/AP AS/AS+ |
|---|---|---|---|
| L | Double Line Diamond |
0/0 0/0 | |
| Line Ahead | 0/0 0/0 | ||
| # | Formation | Normal Battle Node | AD/AP AS/AS+ |
E-2 Easy M
| # | Empty Node | ||
|---|---|---|---|
| M | 敵影を見ず。 No enemy spotted. | ||
| # | Empty Node | ||
E-2 Easy N (PoiDB)
| # | Formation | Boss Battle Node | AD/AP AS/AS+ |
|---|---|---|---|
| N | Line Ahead | 0/0 0/0 | |
| Line Ahead | 0/0 0/0 | ||
| Line Ahead | 0/0 0/0 | ||
| Line Ahead | 0/0 0/0 | ||
| Line Ahead (Final)
|
0/0 0/0 | ||
| # | Formation | Boss Battle Node | AD/AP AS/AS+ |
E-2 Easy O (PoiDB)
| # | Formation | Normal Battle Node | AD/AP AS/AS+ |
|---|---|---|---|
| O | Line Ahead Double Line Vanguard |
0/0 0/0 | |
| # | Formation | Normal Battle Node | AD/AP AS/AS+ |
E-2 Easy P
| # | Empty Node | ||
|---|---|---|---|
| P | 敵影を見ず。 No enemy spotted. | ||
| # | Empty Node | ||
E-2 Easy Q (PoiDB)
| # | Formation | Boss Battle Node | AD/AP AS/AS+ |
|---|---|---|---|
| Q | Cruising Formation 4 | 0/0 0/0 | |
| Cruising Formation 4 (Final)
|
0/0 0/0 | ||
| # | Formation | Boss Battle Node | AD/AP AS/AS+ |
E-2 Casual A (PoiDB)
| # | Formation | Normal Battle Node | AD/AP AS/AS+ |
|---|---|---|---|
| A | Line Ahead Echelon |
0/0 0/0 | |
| Line Ahead Echelon |
0/0 0/0 | ||
| # | Formation | Normal Battle Node | AD/AP AS/AS+ |
E-2 Casual B
| # | Selection Node | ||
|---|---|---|---|
| B | 艦隊の針路を選択できます。提督、どちらの針路をとられますか? You can decide the fleet's course. Admiral, which heading should we take? | ||
| # | Selection Node | ||
E-2 Casual C (PoiDB)
| # | Formation | Normal Battle Node | AD/AP AS/AS+ |
|---|---|---|---|
| C | Echelon Line Abreast |
0/0 0/0 | |
| Echelon Line Abreast |
0/0 0/0 | ||
| # | Formation | Normal Battle Node | AD/AP AS/AS+ |
E-2 Casual D (PoiDB)
| # | Formation | Normal Battle Node | AD/AP AS/AS+ |
|---|---|---|---|
| D | Echelon Line Abreast |
0/0 0/0 | |
| Echelon Line Abreast |
0/0 0/0 | ||
| # | Formation | Normal Battle Node | AD/AP AS/AS+ |
E-2 Casual E (PoiDB)
| # | Formation | Normal Battle Node | AD/AP AS/AS+ |
|---|---|---|---|
| E | Line Ahead Double Line |
0/0 0/0 | |
| Line Ahead Double Line |
0/0 0/0 | ||
| # | Formation | Normal Battle Node | AD/AP AS/AS+ |
E-2 Casual F (PoiDB)
| # | Formation | Air Defense Node | AD/AP AS/AS+ |
|---|---|---|---|
| F | Diamond | 12/23 51/102 | |
| Diamond | 17/33 72/144 | ||
| Diamond | 23/46 102/204 | ||
| # | Formation | Air Defense Node | AD/AP AS/AS+ |
E-2 Casual G (PoiDB)
| # | Formation | Air Defense Node | AD/AP AS/AS+ |
|---|---|---|---|
| G | Diamond | 12/23 51/102 | |
| Diamond | 17/33 72/144 | ||
| Diamond | 23/46 102/204 | ||
| # | Formation | Air Defense Node | AD/AP AS/AS+ |
E-2 Casual H (PoiDB)
| # | Formation | Normal Battle Node | AD/AP AS/AS+ |
|---|---|---|---|
| H | Echelon | 0/0 0/0 | |
| Echelon | 0/0 0/0 | ||
| Echelon | 0/0 0/0 | ||
| # | Formation | Normal Battle Node | AD/AP AS/AS+ |
E-2 Casual I (PoiDB)
| # | Formation | Normal Battle Node | AD/AP AS/AS+ |
|---|---|---|---|
| I | Line Ahead Double Line |
0/0 0/0 | |
| Line Ahead Double Line |
0/0 0/0 | ||
| # | Formation | Normal Battle Node | AD/AP AS/AS+ |
E-2 Casual J
| # | Selection Node | ||
|---|---|---|---|
| J | 艦隊の針路を選択できます。提督、どちらの針路をとられますか? You can decide the fleet's course. Admiral, which heading should we take? | ||
| # | Selection Node | ||
E-2 Casual K
| # | Landing Node | ||
|---|---|---|---|
| # | Landing Node | ||
E-2 Casual L (PoiDB)
| # | Formation | Normal Battle Node | AD/AP AS/AS+ |
|---|---|---|---|
| L | Double Line Diamond |
0/0 0/0 | |
| Line Ahead | 0/0 0/0 | ||
| # | Formation | Normal Battle Node | AD/AP AS/AS+ |
E-2 Casual M
| # | Empty Node | ||
|---|---|---|---|
| M | 敵影を見ず。 No enemy spotted. | ||
| # | Empty Node | ||
E-2 Casual N (PoiDB)
| # | Formation | Boss Battle Node | AD/AP AS/AS+ |
|---|---|---|---|
| N | Line Ahead | 0/0 0/0 | |
| Line Ahead | 0/0 0/0 | ||
| Line Ahead | 0/0 0/0 | ||
| Line Ahead (Final)
|
0/0 0/0 | ||
| # | Formation | Boss Battle Node | AD/AP AS/AS+ |
E-2 Casual O (PoiDB)
| # | Formation | Normal Battle Node | AD/AP AS/AS+ |
|---|---|---|---|
| O | Line Ahead Double Line Echelon |
0/0 0/0 | |
| # | Formation | Normal Battle Node | AD/AP AS/AS+ |
E-2 Casual P
| # | Empty Node | ||
|---|---|---|---|
| P | 敵影を見ず。 No enemy spotted. | ||
| # | Empty Node | ||
E-2 Casual Q (PoiDB)
| # | Formation | Boss Battle Node | AD/AP AS/AS+ |
|---|---|---|---|
| Q | Cruising Formation 4 | 0/0 0/0 | |
| Cruising Formation 4 (Final)
|
0/0 0/0 | ||
| # | Formation | Boss Battle Node | AD/AP AS/AS+ |