Fall 2020 Event/E-2
E-2
バレンツ海海戦
![]()


| Information | ||||
|---|---|---|---|---|
| Event Tag | Escort R Unit | |||
| Boss Gauges | Hard (甲): 600 TP + 3240 HP | |||
| Medium (乙): 480 TP + 2340 HP | ||||
| Easy (丙): 400 TP + 2000 HP | ||||
| Casual (丁): 400 TP + 2000 HP | ||||
| Map Bosses | Heavy Cruiser Princess | |||
| Rewards | ||||
|---|---|---|---|---|
| Equipment/Item | 丁 Casual |
丙 Easy |
乙 Medium |
甲 Hard |
Medal |
1 | |||
Reinforcement Expansion |
1 | 1 | 1 | 1 |
Furniture Fairy |
1 | 1 | 1 | 1 |
Emergency Repair Material |
2 | 3 | 3 | |
 Arctic Gear & Deck Personnel |
2 | 2 | 3 | 3 |
 533mm Triple Torpedo Mount (Model 53-39) |
1 | 1 (★2) | ||

| E-2 Branching Rules | ||
|---|---|---|
| Nodes | Rules | |
1 |
B |
|
D |
| |
B |
A |
|
C | ||
A |
C |
|
E |
| |
C |
E |
|
F | ||
G | ||
E |
G |
|
O |
| |
F |
G |
|
H |
| |
G |
H |
|
I |
| |
O |
| |
I |
J |
|
O |
| |
J |
K |
|
L | ||
K |
M |
|
N |
| |
L |
O |
|
Q |
| |
O |
P |
|
Q |
| |
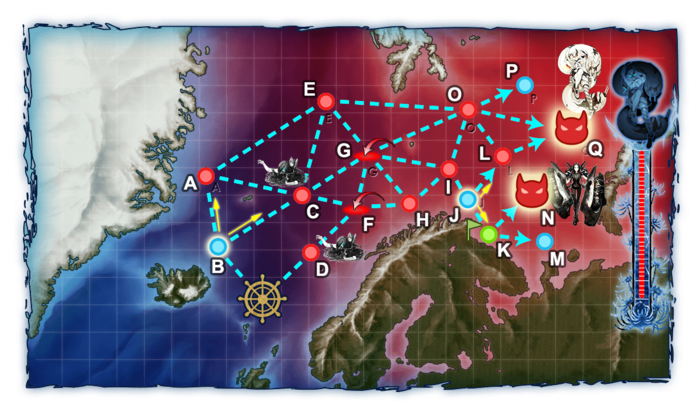
Branching compositions were reported over the course of the event.
Disclaimer: The following guide is a preliminary release for this event map, it contains information from early tests, do note that some things are subject to change as more information is gathered over the event and thus the guide is subject to change.
The event guides are to be constructed through the respective Event map page guide and reviewed by editor staff / collaboration committee before being approved here. Do not under any circumstance update the guides through this page or attempt to fix them through this page. Please only update guides through their respective sandbox pages.
General Guidelines
- E-2 is a multi-phase map starting with a TP Phase followed by a HP Phase.
- You cannot sortie any Flight-Deck equipped ship onto this map unless they have Arctic Gear & Deck Personnel equipped to them.
Ship Bonuses (Tentative)
DISCLAIMER: This information is based on user submitted data and is subject to revisions as more data is gathered. Any version of the ship receives the bonus regardless of remodel.
| Ships | Mapwide | Nodes E, O | Nodes L, N, Q | ||
|---|---|---|---|---|---|
| 1.15x | 1.1x (1.27x) | ||||
| 1.05x (1.21x) | |||||
| 1.06x (1.22x) | 1.08x (1.24x) | ||||
| 1.07x (1.23x) | 1.12x (1.29x) | ||||
| 1.08x (1.24x) | 1.25x (1.44x) | ||||
| 1.07x (1.27x) | 1.29x (1.48x) | ||||
Map Phases Breakdown
Phase 1: Deplete TP Gauge
The Goal of this Phase is depleting the TP-Gauge by reaching Node K and defeating the Transport Boss at Node N using a Transport Combined Fleet (TCF). The preboss gauntlet includes a Submarine Node (Node C), an Airstrike (Node F) and PT Imps (Node H), and an enemy Torpedo Squadron (Node I), the Boss itself is rather unimpressive and obtaining winning ranks should not pose a problem.
- Recommended Fleet (TCF): (0-1AV 0-1CL 1-2CAV 4DD) + (1-2CL 0-1CA(V) 3-5DD) | Maximum of 2(AV/CA/CAV)
- Route: B C F H I J K N
- Notes:
- Concentrate your Transport Equipment on the Main Fleet as the Escort Fleet are the ones doing the most fighting
- AACI to deal with the Airstrike is recommended
- (O)ASW is optional, the subnode is not that threatening
- There is no Airpower on the Boss, a single Seaplane-Fighter is sufficient to acquire AS
- If lacking Destroyers equipped with Reinforcement Expansions to deal with PT-Imps, it is recommended to use Support Shelling
Phase 2: Unlock the Shortcuts E -> O and G -> O
S rank Node A:
- Recommended Fleet: Use the TCF Comp that you used in Phase 1
- Route: B A
- Notes: You can replace Transport Equipment for Combat Equipment
S rank Node C:
- Recommended Fleet: Use TCF Comp from phase 1 but make sure to use sonar and depth charge on your CL and DD in escort fleet
- You can run a cheap STF comp with 2 FBB + 1 CL 5 DD
- Route: B C
S-rank Node L, S-Rank Node H:
- Recommended Fleet: Use the TCF Comp that you used in Phase 1
- Route: B C F H I J L
- Notes:
- Retreat after you reaching the Node as you would be fighting the boss under Ammo Penalty
- AACI to deal with the Airstrike is recommended
- (O)ASW is optional, the subnode is not that threatening
- If lacking Destroyers equipped with Reinforcement Expansions to deal with PT-Imps, it is recommended to use Support Shelling
A+-rank Node N:
- Notes: See Phase 1, but with combat equipment
Phase 3: Defeat Abyssal CA Hime
The Goal of this Phase is to complete the Map by defeating the Heavy Cruiser Princess found in the Combined fleet in Node Q. She is the only threatening Element of the Boss Node, so at least two strong historical ships capable of punching through up to 277 Armour on Last Dance are recommended to deal with her.
There are two options to completing this Phase as outlined below, both of which have the following requirements: Fast Fleet, at least 3 CL, and up to 2 (F)BB(V), also no more than 3 (F)BB(V) + CV(L)
- Recommended Fleet (STF): (1-2(F)BB(V) 2-3CA(V) 2CL 0-1DD) + (CL 1-2CLT 0-1CA(V) 3DD)
- Route: B C E O Q
- Notes:
- More Lock-Intensive than the lighter fleet, but stronger in both pass rate and boss stopping power
- A single Seaplane Fighter or Seaplane Bomber in a large slot is sufficient to secure AS+ on all preboss Nodes as well as the Boss.
- If you want to avoid the submarine Node C, you can go to Node A instead, but this will put you at a damage penalty against the Boss.
- Recommended Fleet (STF): ((F)BB(V) CA(V) 2CL 2DD) + (CA(V) 0-1CLT CL 3-4DD)
- Route: B C E O Q
- Notes:
- A single Seaplane Fighter or Seaplane Bomber in a large slot is sufficient to secure AS+ on all preboss Nodes as well as the Boss.
- If you want to avoid the submarine Node C, you can go to Node A instead, but this will put you at a damage penalty against the Boss.
- Node support is recommended
Friend Fleets
| E-2 Q | ||||||||||
|---|---|---|---|---|---|---|---|---|---|---|
| E-2 Q : Ark Royal FS (Variant 1, 2020-12-18~) Powerful Play Play | ||||||||||
| Ship | Lv. | Equipment | ||||||||
Ark Royal Kai |
86 |    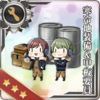 |
71 | 50 | 0 | 82 | 70 | |||
Janus Kai |
84 | 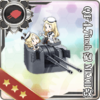  |
31 | 53 | 90 | 72 | 50 | |||
Jervis Kai |
88 | 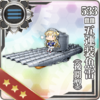  |
31 | 52 | 90 | 70 | 50 | |||
| E-2 Q : Gotland FS (Variant 1, 2020-12-18~) Powerful Play Play | ||||||||||
| Ship | Lv. | Equipment | ||||||||
Gotland Andra |
89 |   |
47 | 60 | 73 | 88 | 67 | |||
Janus Kai |
84 | |
31 | 53 | 90 | 72 | 50 | |||
Jervis Kai |
88 | |
31 | 52 | 90 | 70 | 50 | |||
| E-2 Q : Gotland FS (Variant 2, 2020-12-18~) Powerful Play Play | ||||||||||
| Ship | Lv. | Equipment | ||||||||
Gotland Andra |
89 | |
47 | 60 | 73 | 90 | 67 | |||
Z1 Zwei |
74 |   |
35 | 49 | 71 | 64 | 53 | |||
Z3 Zwei |
73 |  |
35 | 47 | 71 | 68 | 53 | |||
| E-2 Q : Grecale FS (Variant 1, 2020-12-18~) Powerful Play Play | ||||||||||
| Ship | Lv. | Equipment | ||||||||
Grecale Kai |
82 |  |
29 | 55 | 68 | 80 | 50 | |||
Scirocco Kai |
76 | 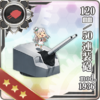 |
28 | 55 | 70 | 63 | 50 | |||
| E-1 J, E-2 Q, E-3 Z : Janus FS (Variant 1, 2020-12-18~) Regular Powerful Play Play | ||||||||||
| Ship | Lv. | Equipment | ||||||||
Janus Kai |
84 | |
31 | 53 | 90 | 72 | 50 | |||
Jervis Kai |
88 | |
31 | 52 | 90 | 70 | 50 | |||
| E-2 Q, E-3 Z : Jervis FS (Variant 1, 2020-12-18~) Regular Powerful Play Play | ||||||||||
| Ship | Lv. | Equipment | ||||||||
Jervis Kai |
88 | |
31 | 52 | 90 | 70 | 50 | |||
Janus Kai |
84 | |
31 | 53 | 90 | 72 | 50 | |||
| E-2 Q : Maestrale FS (Variant 1, 2020-12-18~) Powerful Play Play | ||||||||||
| Ship | Lv. | Equipment | ||||||||
Maestrale Kai |
84 | |
29 | 54 | 72 | 63 | 50 | |||
Grecale Kai |
82 | |
29 | 55 | 67 | 80 | 50 | |||
Enemy Compositions
| # | Formation | Normal Battle Node | AD/AP AS/AS+ |
|---|---|---|---|
| A | Line Ahead Echelon |
0/0 0/0 | |
| Line Ahead Echelon |
0/0 0/0 | ||
| Line Ahead Echelon |
0/0 0/0 | ||
| # | Formation | Normal Battle Node | AD/AP AS/AS+ |
| # | Selection Node | ||
|---|---|---|---|
| B | 艦隊の針路を選択できます。提督、どちらの針路をとられますか? You can decide the fleet's course. Admiral, which heading should we take? | ||
| # | Selection Node | ||
| # | Formation | Normal Battle Node | AD/AP AS/AS+ |
|---|---|---|---|
| C | Echelon Line Abreast |
0/0 0/0 | |
| Echelon Line Abreast |
0/0 0/0 | ||
| # | Formation | Normal Battle Node | AD/AP AS/AS+ |
| # | Formation | Normal Battle Node | AD/AP AS/AS+ |
|---|---|---|---|
| D | Echelon Line Abreast |
0/0 0/0 | |
| Echelon Line Abreast |
0/0 0/0 | ||
| # | Formation | Normal Battle Node | AD/AP AS/AS+ |
| # | Formation | Normal Battle Node | AD/AP AS/AS+ |
|---|---|---|---|
| E | Line Ahead Double Line |
0/0 0/0 | |
| Line Ahead Double Line |
0/0 0/0 | ||
| Line Ahead Double Line |
0/0 0/0 | ||
| # | Formation | Normal Battle Node | AD/AP AS/AS+ |
| # | Formation | Air Defense Node | AD/AP AS/AS+ |
|---|---|---|---|
| F | Diamond | 33/65 144/288 | |
| Diamond | 44/87 195/390 | ||
| Diamond | 49/97 216/432 | ||
| # | Formation | Air Defense Node | AD/AP AS/AS+ |
| # | Formation | Air Defense Node | AD/AP AS/AS+ |
|---|---|---|---|
| G | Diamond | 33/65 144/288 | |
| Diamond | 44/87 195/390 | ||
| Diamond | 49/97 216/432 | ||
| # | Formation | Air Defense Node | AD/AP AS/AS+ |
| # | Formation | Normal Battle Node | AD/AP AS/AS+ |
|---|---|---|---|
| H | Echelon | 0/0 0/0 | |
| Echelon | 0/0 0/0 | ||
| Echelon | 0/0 0/0 | ||
| # | Formation | Normal Battle Node | AD/AP AS/AS+ |
| # | Formation | Normal Battle Node | AD/AP AS/AS+ |
|---|---|---|---|
| I | Line Ahead Double Line |
0/0 0/0 | |
| Line Ahead Double Line |
0/0 0/0 | ||
| Line Ahead Double Line |
0/0 0/0 | ||
| # | Formation | Normal Battle Node | AD/AP AS/AS+ |
| # | Selection Node | ||
|---|---|---|---|
| J | 艦隊の針路を選択できます。提督、どちらの針路をとられますか? You can decide the fleet's course. Admiral, which heading should we take? | ||
| # | Selection Node | ||
| # | Landing Node | ||
|---|---|---|---|
| # | Landing Node | ||
| # | Formation | Normal Battle Node | AD/AP AS/AS+ |
|---|---|---|---|
| L | Line Ahead | 0/0 0/0 | |
| Double Line Diamond |
0/0 0/0 | ||
| # | Formation | Normal Battle Node | AD/AP AS/AS+ |
| # | Empty Node | ||
|---|---|---|---|
| M | 敵影を見ず。 No enemy spotted. | ||
| # | Empty Node | ||
| # | Formation | Boss Battle Node | AD/AP AS/AS+ |
|---|---|---|---|
| N | Line Ahead | 0/0 0/0 | |
| Line Ahead | 0/0 0/0 | ||
| Line Ahead (Final)
|
0/0 0/0 | ||
| # | Formation | Boss Battle Node | AD/AP AS/AS+ |
| # | Formation | Normal Battle Node | AD/AP AS/AS+ |
|---|---|---|---|
| O | Line Ahead Double Line Vanguard |
0/0 0/0 | |
| # | Formation | Normal Battle Node | AD/AP AS/AS+ |
| # | Empty Node | ||
|---|---|---|---|
| P | 敵影を見ず。 No enemy spotted. | ||
| # | Empty Node | ||
| # | Formation | Boss Battle Node | AD/AP AS/AS+ |
|---|---|---|---|
| Q | Cruising Formation 4 | 0/0 0/0 | |
| Cruising Formation 4 (Final)
|
0/0 0/0 | ||
| # | Formation | Boss Battle Node | AD/AP AS/AS+ |
| # | Formation | Normal Battle Node | AD/AP AS/AS+ |
|---|---|---|---|
| A | Line Ahead Echelon |
0/0 0/0 | |
| Line Ahead Echelon |
0/0 0/0 | ||
| Line Ahead Echelon |
0/0 0/0 | ||
| # | Formation | Normal Battle Node | AD/AP AS/AS+ |
| # | Selection Node | ||
|---|---|---|---|
| B | 艦隊の針路を選択できます。提督、どちらの針路をとられますか? You can decide the fleet's course. Admiral, which heading should we take? | ||
| # | Selection Node | ||
| # | Formation | Normal Battle Node | AD/AP AS/AS+ |
|---|---|---|---|
| C | Echelon Line Abreast |
0/0 0/0 | |
| Echelon Line Abreast |
0/0 0/0 | ||
| Echelon Line Abreast |
0/0 0/0 | ||
| Echelon Line Abreast |
0/0 0/0 | ||
| # | Formation | Normal Battle Node | AD/AP AS/AS+ |
| # | Formation | Normal Battle Node | AD/AP AS/AS+ |
|---|---|---|---|
| D | Echelon Line Abreast |
0/0 0/0 | |
| Echelon Line Abreast |
0/0 0/0 | ||
| Echelon Line Abreast |
0/0 0/0 | ||
| Echelon Line Abreast |
0/0 0/0 | ||
| # | Formation | Normal Battle Node | AD/AP AS/AS+ |
| # | Formation | Normal Battle Node | AD/AP AS/AS+ |
|---|---|---|---|
| E | Line Ahead Double Line |
0/0 0/0 | |
| Line Ahead Double Line |
0/0 0/0 | ||
| Line Ahead Double Line |
0/0 0/0 | ||
| # | Formation | Normal Battle Node | AD/AP AS/AS+ |
| # | Formation | Air Defense Node | AD/AP AS/AS+ |
|---|---|---|---|
| F | Diamond | 28/55 123/246 | |
| Diamond | 35/69 153/306 | ||
| Diamond | 39/78 174/348 | ||
| # | Formation | Air Defense Node | AD/AP AS/AS+ |
| # | Formation | Air Defense Node | AD/AP AS/AS+ |
|---|---|---|---|
| G | Diamond | 28/55 123/246 | |
| Diamond | 35/69 153/306 | ||
| Diamond | 39/78 174/348 | ||
| # | Formation | Air Defense Node | AD/AP AS/AS+ |
| # | Formation | Normal Battle Node | AD/AP AS/AS+ |
|---|---|---|---|
| H | Echelon | 0/0 0/0 | |
| Echelon | 0/0 0/0 | ||
| Echelon | 0/0 0/0 | ||
| # | Formation | Normal Battle Node | AD/AP AS/AS+ |
| # | Formation | Normal Battle Node | AD/AP AS/AS+ |
|---|---|---|---|
| I | Line Ahead Double Line |
0/0 0/0 | |
| Line Ahead Double Line |
0/0 0/0 | ||
| Line Ahead Double Line |
0/0 0/0 | ||
| # | Formation | Normal Battle Node | AD/AP AS/AS+ |
| # | Selection Node | ||
|---|---|---|---|
| J | 艦隊の針路を選択できます。提督、どちらの針路をとられますか? You can decide the fleet's course. Admiral, which heading should we take? | ||
| # | Selection Node | ||
| # | Landing Node | ||
|---|---|---|---|
| # | Landing Node | ||
| # | Formation | Normal Battle Node | AD/AP AS/AS+ |
|---|---|---|---|
| L | Double Line Diamond |
0/0 0/0 | |
| Line Ahead | 0/0 0/0 | ||
| # | Formation | Normal Battle Node | AD/AP AS/AS+ |
| # | Empty Node | ||
|---|---|---|---|
| M | 敵影を見ず。 No enemy spotted. | ||
| # | Empty Node | ||
| # | Formation | Boss Battle Node | AD/AP AS/AS+ |
|---|---|---|---|
| N | Line Ahead | 0/0 0/0 | |
| Line Ahead | 0/0 0/0 | ||
| Line Ahead | 0/0 0/0 | ||
| Line Ahead (Final)
|
0/0 0/0 | ||
| # | Formation | Boss Battle Node | AD/AP AS/AS+ |
| # | Formation | Normal Battle Node | AD/AP AS/AS+ |
|---|---|---|---|
| O | Line Ahead Double Line Vanguard |
0/0 0/0 | |
| # | Formation | Normal Battle Node | AD/AP AS/AS+ |
| # | Empty Node | ||
|---|---|---|---|
| P | 敵影を見ず。 No enemy spotted. | ||
| # | Empty Node | ||
| # | Formation | Boss Battle Node | AD/AP AS/AS+ |
|---|---|---|---|
| Q | Cruising Formation 4 | 0/0 0/0 | |
| Cruising Formation 4 (Final)
|
0/0 0/0 | ||
| # | Formation | Boss Battle Node | AD/AP AS/AS+ |
| # | Formation | Normal Battle Node | AD/AP AS/AS+ |
|---|---|---|---|
| A | Line Ahead Echelon |
0/0 0/0 | |
| Line Ahead Echelon |
0/0 0/0 | ||
| Line Ahead Echelon |
0/0 0/0 | ||
| # | Formation | Normal Battle Node | AD/AP AS/AS+ |
| # | Selection Node | ||
|---|---|---|---|
| B | 艦隊の針路を選択できます。提督、どちらの針路をとられますか? You can decide the fleet's course. Admiral, which heading should we take? | ||
| # | Selection Node | ||
| # | Formation | Normal Battle Node | AD/AP AS/AS+ |
|---|---|---|---|
| C | Echelon Line Abreast |
0/0 0/0 | |
| Echelon Line Abreast |
0/0 0/0 | ||
| Echelon Line Abreast |
0/0 0/0 | ||
| Echelon Line Abreast |
0/0 0/0 | ||
| # | Formation | Normal Battle Node | AD/AP AS/AS+ |
| # | Formation | Normal Battle Node | AD/AP AS/AS+ |
|---|---|---|---|
| D | Echelon Line Abreast |
0/0 0/0 | |
| Echelon Line Abreast |
0/0 0/0 | ||
| Echelon Line Abreast |
0/0 0/0 | ||
| Echelon Line Abreast |
0/0 0/0 | ||
| # | Formation | Normal Battle Node | AD/AP AS/AS+ |
| # | Formation | Normal Battle Node | AD/AP AS/AS+ |
|---|---|---|---|
| E | Line Ahead Double Line |
0/0 0/0 | |
| Line Ahead Double Line |
0/0 0/0 | ||
| Line Ahead Double Line |
0/0 0/0 | ||
| # | Formation | Normal Battle Node | AD/AP AS/AS+ |
| # | Formation | Air Defense Node | AD/AP AS/AS+ |
|---|---|---|---|
| F | Diamond | 12/23 51/102 | |
| Diamond | 17/33 72/144 | ||
| Diamond | 23/46 102/204 | ||
| Diamond | 28/55 123/246 | ||
| # | Formation | Air Defense Node | AD/AP AS/AS+ |
| # | Formation | Air Defense Node | AD/AP AS/AS+ |
|---|---|---|---|
| G | Diamond | 12/23 51/102 | |
| Diamond | 17/33 72/144 | ||
| Diamond | 23/46 102/204 | ||
| Diamond | 28/55 123/246 | ||
| # | Formation | Air Defense Node | AD/AP AS/AS+ |
| # | Formation | Normal Battle Node | AD/AP AS/AS+ |
|---|---|---|---|
| H | Echelon | 0/0 0/0 | |
| Echelon | 0/0 0/0 | ||
| Echelon | 0/0 0/0 | ||
| # | Formation | Normal Battle Node | AD/AP AS/AS+ |
| # | Formation | Normal Battle Node | AD/AP AS/AS+ |
|---|---|---|---|
| I | Line Ahead Double Line |
0/0 0/0 | |
| Line Ahead Double Line |
0/0 0/0 | ||
| Line Ahead Double Line |
0/0 0/0 | ||
| # | Formation | Normal Battle Node | AD/AP AS/AS+ |
| # | Selection Node | ||
|---|---|---|---|
| J | 艦隊の針路を選択できます。提督、どちらの針路をとられますか? You can decide the fleet's course. Admiral, which heading should we take? | ||
| # | Selection Node | ||
| # | Landing Node | ||
|---|---|---|---|
| # | Landing Node | ||
| # | Formation | Normal Battle Node | AD/AP AS/AS+ |
|---|---|---|---|
| L | Double Line Diamond |
0/0 0/0 | |
| Line Ahead | 0/0 0/0 | ||
| # | Formation | Normal Battle Node | AD/AP AS/AS+ |
| # | Empty Node | ||
|---|---|---|---|
| M | 敵影を見ず。 No enemy spotted. | ||
| # | Empty Node | ||
| # | Formation | Boss Battle Node | AD/AP AS/AS+ |
|---|---|---|---|
| N | Line Ahead | 0/0 0/0 | |
| Line Ahead | 0/0 0/0 | ||
| Line Ahead | 0/0 0/0 | ||
| Line Ahead | 0/0 0/0 | ||
| Line Ahead (Final)
|
0/0 0/0 | ||
| # | Formation | Boss Battle Node | AD/AP AS/AS+ |
| # | Formation | Normal Battle Node | AD/AP AS/AS+ |
|---|---|---|---|
| O | Line Ahead Double Line Vanguard |
0/0 0/0 | |
| # | Formation | Normal Battle Node | AD/AP AS/AS+ |
| # | Empty Node | ||
|---|---|---|---|
| P | 敵影を見ず。 No enemy spotted. | ||
| # | Empty Node | ||
| # | Formation | Boss Battle Node | AD/AP AS/AS+ |
|---|---|---|---|
| Q | Cruising Formation 4 | 0/0 0/0 | |
| Cruising Formation 4 (Final)
|
0/0 0/0 | ||
| # | Formation | Boss Battle Node | AD/AP AS/AS+ |
| # | Formation | Normal Battle Node | AD/AP AS/AS+ |
|---|---|---|---|
| A | Line Ahead Echelon |
0/0 0/0 | |
| Line Ahead Echelon |
0/0 0/0 | ||
| # | Formation | Normal Battle Node | AD/AP AS/AS+ |
| # | Selection Node | ||
|---|---|---|---|
| B | 艦隊の針路を選択できます。提督、どちらの針路をとられますか? You can decide the fleet's course. Admiral, which heading should we take? | ||
| # | Selection Node | ||
| # | Formation | Normal Battle Node | AD/AP AS/AS+ |
|---|---|---|---|
| C | Echelon Line Abreast |
0/0 0/0 | |
| Echelon Line Abreast |
0/0 0/0 | ||
| # | Formation | Normal Battle Node | AD/AP AS/AS+ |
| # | Formation | Normal Battle Node | AD/AP AS/AS+ |
|---|---|---|---|
| D | Echelon Line Abreast |
0/0 0/0 | |
| Echelon Line Abreast |
0/0 0/0 | ||
| # | Formation | Normal Battle Node | AD/AP AS/AS+ |
| # | Formation | Normal Battle Node | AD/AP AS/AS+ |
|---|---|---|---|
| E | Line Ahead Double Line |
0/0 0/0 | |
| Line Ahead Double Line |
0/0 0/0 | ||
| # | Formation | Normal Battle Node | AD/AP AS/AS+ |
| # | Formation | Air Defense Node | AD/AP AS/AS+ |
|---|---|---|---|
| F | Diamond | 12/23 51/102 | |
| Diamond | 17/33 72/144 | ||
| Diamond | 23/46 102/204 | ||
| # | Formation | Air Defense Node | AD/AP AS/AS+ |
| # | Formation | Air Defense Node | AD/AP AS/AS+ |
|---|---|---|---|
| G | Diamond | 12/23 51/102 | |
| Diamond | 17/33 72/144 | ||
| Diamond | 23/46 102/204 | ||
| # | Formation | Air Defense Node | AD/AP AS/AS+ |
| # | Formation | Normal Battle Node | AD/AP AS/AS+ |
|---|---|---|---|
| H | Echelon | 0/0 0/0 | |
| Echelon | 0/0 0/0 | ||
| Echelon | 0/0 0/0 | ||
| # | Formation | Normal Battle Node | AD/AP AS/AS+ |
| # | Formation | Normal Battle Node | AD/AP AS/AS+ |
|---|---|---|---|
| I | Line Ahead Double Line |
0/0 0/0 | |
| Line Ahead Double Line |
0/0 0/0 | ||
| # | Formation | Normal Battle Node | AD/AP AS/AS+ |
| # | Selection Node | ||
|---|---|---|---|
| J | 艦隊の針路を選択できます。提督、どちらの針路をとられますか? You can decide the fleet's course. Admiral, which heading should we take? | ||
| # | Selection Node | ||
| # | Landing Node | ||
|---|---|---|---|
| # | Landing Node | ||
| # | Formation | Normal Battle Node | AD/AP AS/AS+ |
|---|---|---|---|
| L | Double Line Diamond |
0/0 0/0 | |
| Line Ahead | 0/0 0/0 | ||
| # | Formation | Normal Battle Node | AD/AP AS/AS+ |
| # | Empty Node | ||
|---|---|---|---|
| M | 敵影を見ず。 No enemy spotted. | ||
| # | Empty Node | ||
| # | Formation | Boss Battle Node | AD/AP AS/AS+ |
|---|---|---|---|
| N | Line Ahead | 0/0 0/0 | |
| Line Ahead | 0/0 0/0 | ||
| Line Ahead | 0/0 0/0 | ||
| Line Ahead (Final)
|
0/0 0/0 | ||
| # | Formation | Boss Battle Node | AD/AP AS/AS+ |
| # | Formation | Normal Battle Node | AD/AP AS/AS+ |
|---|---|---|---|
| O | Line Ahead Double Line Echelon |
0/0 0/0 | |
| # | Formation | Normal Battle Node | AD/AP AS/AS+ |
| # | Empty Node | ||
|---|---|---|---|
| P | 敵影を見ず。 No enemy spotted. | ||
| # | Empty Node | ||
| # | Formation | Boss Battle Node | AD/AP AS/AS+ |
|---|---|---|---|
| Q | Cruising Formation 4 | 0/0 0/0 | |
| Cruising Formation 4 (Final)
|
0/0 0/0 | ||
| # | Formation | Boss Battle Node | AD/AP AS/AS+ |
Ship Drops
| Ship drops | |||||||||||||||||||||||||||||||||||||||||||||||||||||||||||||||||||||||||||||||||||||||||||||||||||
|---|---|---|---|---|---|---|---|---|---|---|---|---|---|---|---|---|---|---|---|---|---|---|---|---|---|---|---|---|---|---|---|---|---|---|---|---|---|---|---|---|---|---|---|---|---|---|---|---|---|---|---|---|---|---|---|---|---|---|---|---|---|---|---|---|---|---|---|---|---|---|---|---|---|---|---|---|---|---|---|---|---|---|---|---|---|---|---|---|---|---|---|---|---|---|---|---|---|---|---|
| Type | Ship | E | I | L | N | O | Q | ||||||||||||||||||||||||||||||||||||||||||||||||||||||||||||||||||||||||||||||||||||||||||||
| DD | Janus | Casual+ | |||||||||||||||||||||||||||||||||||||||||||||||||||||||||||||||||||||||||||||||||||||||||||||||||
| DD | Jervis | Hard+ | Casual+ | Casual+ | |||||||||||||||||||||||||||||||||||||||||||||||||||||||||||||||||||||||||||||||||||||||||||||||
| DD | Tashkent | Casual+ | Easy+ | ||||||||||||||||||||||||||||||||||||||||||||||||||||||||||||||||||||||||||||||||||||||||||||||||
| DD | Uzuki | Casual+ | Casual+ | Casual+ | Casual+ | Casual+ | |||||||||||||||||||||||||||||||||||||||||||||||||||||||||||||||||||||||||||||||||||||||||||||
| CL | Gotland | Casual+ | Casual+ | Casual+ | |||||||||||||||||||||||||||||||||||||||||||||||||||||||||||||||||||||||||||||||||||||||||||||||
| CL | Ooyodo | Hard+ | Casual+ | Casual+ | Casual+ | ||||||||||||||||||||||||||||||||||||||||||||||||||||||||||||||||||||||||||||||||||||||||||||||
| CL | Sheffield | Casual+ | |||||||||||||||||||||||||||||||||||||||||||||||||||||||||||||||||||||||||||||||||||||||||||||||||
| FBB | Bismarck | Hard+ | Casual+ | Easy+ | |||||||||||||||||||||||||||||||||||||||||||||||||||||||||||||||||||||||||||||||||||||||||||||||
| BB | Nelson | Casual+ | |||||||||||||||||||||||||||||||||||||||||||||||||||||||||||||||||||||||||||||||||||||||||||||||||
| SS | Luigi Torelli | Easy+ | Casual+ | Casual+ | |||||||||||||||||||||||||||||||||||||||||||||||||||||||||||||||||||||||||||||||||||||||||||||||
| AV | Mizuho | Casual+ | |||||||||||||||||||||||||||||||||||||||||||||||||||||||||||||||||||||||||||||||||||||||||||||||||
| AR | Akashi | Casual+ | |||||||||||||||||||||||||||||||||||||||||||||||||||||||||||||||||||||||||||||||||||||||||||||||||
| DD | Shimakaze | Casual+ | |||||||||||||||||||||||||||||||||||||||||||||||||||||||||||||||||||||||||||||||||||||||||||||||||
| DD | Yayoi | Casual+ | Casual+ | Casual+ | Casual+ | Casual+ | |||||||||||||||||||||||||||||||||||||||||||||||||||||||||||||||||||||||||||||||||||||||||||||
| CL | Abukuma | Casual+ | |||||||||||||||||||||||||||||||||||||||||||||||||||||||||||||||||||||||||||||||||||||||||||||||||
| CL | Kinu | Casual+ | |||||||||||||||||||||||||||||||||||||||||||||||||||||||||||||||||||||||||||||||||||||||||||||||||
| CL | Nagara | Medium+ | Casual+ | Casual+ | Casual+ | Casual+ | Casual+ | ||||||||||||||||||||||||||||||||||||||||||||||||||||||||||||||||||||||||||||||||||||||||||||
| CL | Sendai | Hard+ | Casual+ | Casual+ | Casual+ | Casual+ | Casual+ | ||||||||||||||||||||||||||||||||||||||||||||||||||||||||||||||||||||||||||||||||||||||||||||
| CL | Yuubari | Casual+ | Casual+ | Casual+ | |||||||||||||||||||||||||||||||||||||||||||||||||||||||||||||||||||||||||||||||||||||||||||||||
| CA | Atago | Casual+ | |||||||||||||||||||||||||||||||||||||||||||||||||||||||||||||||||||||||||||||||||||||||||||||||||
| CA | Chikuma | Casual+ | |||||||||||||||||||||||||||||||||||||||||||||||||||||||||||||||||||||||||||||||||||||||||||||||||
| CA | Kinugasa | Casual+ | |||||||||||||||||||||||||||||||||||||||||||||||||||||||||||||||||||||||||||||||||||||||||||||||||
| CA | Kumano | Casual+ | |||||||||||||||||||||||||||||||||||||||||||||||||||||||||||||||||||||||||||||||||||||||||||||||||
| CA | Myoukou | Hard+ | Casual+ | Casual+ | Casual+ | Casual+ | |||||||||||||||||||||||||||||||||||||||||||||||||||||||||||||||||||||||||||||||||||||||||||||
| CA | Suzuya | Casual+ | |||||||||||||||||||||||||||||||||||||||||||||||||||||||||||||||||||||||||||||||||||||||||||||||||
| CA | Tone | Casual+ | |||||||||||||||||||||||||||||||||||||||||||||||||||||||||||||||||||||||||||||||||||||||||||||||||
| CVL | Hiyou | Casual+ | |||||||||||||||||||||||||||||||||||||||||||||||||||||||||||||||||||||||||||||||||||||||||||||||||
| CVL | Junyou | Casual+ | |||||||||||||||||||||||||||||||||||||||||||||||||||||||||||||||||||||||||||||||||||||||||||||||||
| CVL | Ryuujou | Casual+ | |||||||||||||||||||||||||||||||||||||||||||||||||||||||||||||||||||||||||||||||||||||||||||||||||
| FBB | Haruna | Casual+ | |||||||||||||||||||||||||||||||||||||||||||||||||||||||||||||||||||||||||||||||||||||||||||||||||
| FBB | Hiei | Casual+ | |||||||||||||||||||||||||||||||||||||||||||||||||||||||||||||||||||||||||||||||||||||||||||||||||
| FBB | Kirishima | Casual+ | |||||||||||||||||||||||||||||||||||||||||||||||||||||||||||||||||||||||||||||||||||||||||||||||||
| FBB | Kongou | Casual+ | |||||||||||||||||||||||||||||||||||||||||||||||||||||||||||||||||||||||||||||||||||||||||||||||||
| BB | Fusou | Casual+ | |||||||||||||||||||||||||||||||||||||||||||||||||||||||||||||||||||||||||||||||||||||||||||||||||
| BB | Hyuuga | Casual+ | |||||||||||||||||||||||||||||||||||||||||||||||||||||||||||||||||||||||||||||||||||||||||||||||||
| BB | Ise | Casual+ | |||||||||||||||||||||||||||||||||||||||||||||||||||||||||||||||||||||||||||||||||||||||||||||||||
| BB | Yamashiro | Casual+ | |||||||||||||||||||||||||||||||||||||||||||||||||||||||||||||||||||||||||||||||||||||||||||||||||
| E-2 Clear Message |
|---|
| Enemy surface fleet destroyed in the Battle of the Barents Sea!
Deployed from the North Atlantic towards the Arctic, our fleet has escorted the convoy into the Barents Sea, and has also engaged and successfully destroyed the enemy abyssal surface fleet that had attempted to stop the transport operation! |