• Welcome to the Kancolle Wiki!
  • If you have any questions regarding site content, account registration, etc., please visit the KanColle Wiki Discord

Difference between revisions of "Early Fall 2018 Event"

From Kancolle Wiki
Jump to navigation Jump to search
Line 979: Line 979:
 
All your CA(V)s, and (F)BB(V) should be armed with [[Type 3 Shell]] to help battle against the [[Supply Depot Princess]] at the boss nodes.
 
All your CA(V)s, and (F)BB(V) should be armed with [[Type 3 Shell]] to help battle against the [[Supply Depot Princess]] at the boss nodes.
  
For weaker FBBs you may consider AP shells if you need a way to pick off [[Artillery Imps]] if you're lacking in Anti-Installation gear.
+
For weaker FBBs you may consider AP shells if you need a way to pick off [[Artillery Imp]]s if you're lacking in Anti-Installation gear.
  
 
As for your CL and DDs, use a combination of [[WG42]]s, [[Daihatsu]], [[Daihatsu-class Landing Craft (Type 89 Medium Tanks & Marines)]], and [[Type 2 Ka-Mi Tank]]s to stack up the multiplier you can do against Installations.
 
As for your CL and DDs, use a combination of [[WG42]]s, [[Daihatsu]], [[Daihatsu-class Landing Craft (Type 89 Medium Tanks & Marines)]], and [[Type 2 Ka-Mi Tank]]s to stack up the multiplier you can do against Installations.
Line 1,010: Line 1,010:
 
Keep in mind that due to the presence of [[Artillery Imp]]s they may be able to knock out your LBAS's ranks easily and while this may not be a problem for farming or pre-final kill, the boss kill may present some problems as the being able to eliminate as many of the enemies as possible is needed to help improve your odds of success when delivering the final kill on the [[Supply Depot Princess]]
 
Keep in mind that due to the presence of [[Artillery Imp]]s they may be able to knock out your LBAS's ranks easily and while this may not be a problem for farming or pre-final kill, the boss kill may present some problems as the being able to eliminate as many of the enemies as possible is needed to help improve your odds of success when delivering the final kill on the [[Supply Depot Princess]]
  
If an [[Airfield]] Princess is present on the final kill, try to make sure your fleet's air power + AACI is strong enough to wipe out all the bombers so you can fully disable her during day battle to make the fight easier and more possible to efficiently defeat the [[Supply Depot Princess]] once all enemy ships are eliminated.
+
If an [[Airfield Princess]] is present on the final kill, try to make sure your fleet's air power + AACI is strong enough to wipe out all the bombers so you can fully disable her during day battle to make the fight easier and more possible to efficiently defeat the [[Supply Depot Princess]] once all enemy ships are eliminated.
  
 
Support Shelling fleets for both in-route and Boss node are recommend to ensure you will survive your trip and improve your odds of success.
 
Support Shelling fleets for both in-route and Boss node are recommend to ensure you will survive your trip and improve your odds of success.
  
The event guides are to be constructed through the respected [[Sandbox/Early Fall 2018 E-2|Event map page guide]] to be reviewed by editor staff / collaboration committee before being approved here. '''Do not under any circumstance update the guides through this page or attempt to fix them through this page.''' Please only update guides through their respected sandbox pages.
+
The event guides are to be constructed through the respective [[Sandbox/Early Fall 2018 E-2|Event map page guide]] and reviewed by editor staff / collaboration committee before being approved here. '''Do not under any circumstance update the guides through this page or attempt to fix them through this page.''' Please only update guides through their respective sandbox pages.


Revision as of 06:10, 12 September 2018

The "Early" Autumn 2018 Event, "Set Sail! Combined Fleet, to the West" is scheduled to begin on the September 8th, 2018, will last for 3 weeks and will serve as the first event that will be implemented with the HTML 5 release of KanColle as it enters Phase 2.

Due to the numerous delays that have occurred, Kanmusu and Abyssals will still be dressed in their Summer Seasonal CGs since the event was originally intended to be released during the Summer.

As of current, the known details of the event is that the main operation of the event will be taking place in the "South Western and Western Waters" as your fleet makes it's way to European Waters where the Extra Operations will take place. The Extra Operations will be released on August 12th, 2018. The final battle of the Extra Operation will take place up in the far north of the European Waters.

There will be a total of 5 new ships that will be released with this event.

For additional information regarding event-related subjects and content, please refer to the following links:

Historical Background

Disclaimer: The following information is based upon a summary of World War II history and may not have any influence on the game itself. This is for historical reference only.

Battle of Bandung Strait

Indian Ocean Raid

Information

New Ships

Currently, the devs have noted that there will a total of 5 ships which will all be unique and diverse.

Destroyer

  • A Yuugumo-class Destroyer Kishinami
    • Avaliable as a drop on E-2 and E-3 Boss nodes

Escort Carrier

  • Escort Carrier Shinyou
    • Avalaible as a reward for completing the Main Operation

???

  • A Ship who is tied to an Abyssal Princess that has an exsisting ship girl sister in the game already
    • Will be the Reward for the Extra Operation

Light Cruiser

  • Swedish Light Cruiser Gotland
    • Will be Avalaible as a Drop in the Extra Operation

Battleships

  • Nelson-Class Battleship(s) - Nelson
    • Will be the Final Operation Reward
    • May come with a new mechanic ability code named "Nelson's Touch" (Release of said ability pending)

New Equipment

New Enemy Vessels

New Enemy Equipment

Event Quests

Friend Fleet

Fleet Formations

E-?
Kanmusu Equipment 1 Equipment 2 Equipment 3 Equipment 4


'


Friend Fleet Voice Lines

Ship Japanese/English Notes
Destroyers
'
'
'
'
'
'
'
Light Cruisers
'
'
'
Heavy Cruisers
'
'
'
'
Battleships
'
'
'
'
'
'
'

Mechanics

Participation requirements

  • Must have a 75% sortie win ratio.
  • Must have 5 empty ship slots for new ships.
  • Must have 20 free equipment slots.

Special Mechanics

  1. The difficulty system first used in Spring 2015 Event returns: you can choose between Operation A (, Hard), Operation B (, Medium), Operation C (, Easy) or Operation D (, Very Easy) .
    • Choosing A or B requires certain HQ Level (HQ Lv 35 for B / 80 for A in Spring 2015 Event).
    • An important note to all Admirals intending to clear the event on Hard difficulty - further (new) conditions now apply:
      • When switching difficulty from any other difficulty to Hard, the map's debuff mechanism (where applicable) will be reset.
        • Switching between any other difficulties will not reset the debuff mechanism.
  2. The debuff system from Summer 2015 Event's final map, where certain nodes had to be killed to reduce boss armor will return.
  3. Returning this event will allow a fleet with seven ships (Striking Force Fleet) to sortie to certain event maps that allow single fleet operations starting from E-2, and also includes the final map of the event.
    • The Striking Force cannot be sortied during exercises or sent on expeditions while it contains seven ships.
    • The Striking Force can only be created and used in the third fleet in the menu (out of a total of four fleets).
    • A Striking Force with a flagship that carries a new piece of equipment, the Striking Force Fleet Command Facility, will be able to make use of the new Single Ship Evacuation mechanic.
      • The new Single Ship Evacuation mechanic that will become available for the Striking Force as of E-4 allowing a single ship in the fleet to retreat from the battlefield after an enemy engagement if she suffered heavy damage.
        • It is possible for the damage to become even worse during a Single Ship Evacuation.
        • Unlike the Combined Fleet's evacuation mechanic, it does not require an escort destroyer.
      • The new Striking Force Fleet Command Facility will become obtainable and useable via the old Fleet Command Facility and the Action Report that can be earned in the upcoming Fall Event. The Fleet Command Facility, as well as the new Action Report item, will be obtainable on all difficulty levels, including Medium and Easy Mode.
      • Supplementary information regarding the new Striking Force Fleet Command Facility and the Single Ship Evacuation it allows when carried by the striking force's flagship:
        • The evacuation does not require an escort destroyer.
        • The evacuation consumes the ship's entire fuel & ammo reserves.
        • Only one ship can be evacuated per battle.
        • The damage the ship suffered may become worse during the evacuation, but she will never sink.
  4. Returning this event, a new Fleet formation will be introduced called the Vanguard Formation.
    • This formation will organize the fleet such that the 3rd-6th/7th ships protect the Flagship and 2nd Ship of the Fleet.
      • In addition, the formation allows for ships to become more evasive in combat situations, especially with well-trained Destroyer.
      • This formation is also available only during the duration of the event.
      • The formation will be usable by both normal fleets as well as the Striking Force Fleet.
  5. New: NPC Friend Fleets have been introduced into the game.
    • Friend Fleets act as another unit that appears in particular battles to help aid your fleet when attacking the enemy at the start of night battle.
      • As of current, only E-4 will allow the use of Friend Fleets at the boss node.
      • NPC Friend Fleets are selected from a randomized preset list of ship.
      • Depending on who you have in your fleet can also influence who will be arrive to aid you in battle.

Quick Info Table

Classification Map Name Fleet Type? Land-Based Air Squadron? Friendly Fleet? Color of Tag Tag Condition & Deployment Restriction Difficulty Restrictions Notes
Main Operation
South-Western Sea Area Operation
E-1 Off the Bali Island Single Fleet No No GreyTagSummer2018.png Tagging:
Ships not already color-tagged will be tagged with the color associated with the map when deployed. This tag exists on all difficulties and is not reset on remodel, etc.
Deployment Restriction:
Normal or Hard: Must have either the same-colored tag or no tag.
There will be 2 additional locks for Hard mode players in E5.
No restrictions. All difficulties OK
E-2 Northern Straits of Malacca Single Fleet Yes No LightGreenSummer2018.png In order to play these maps on hard, you must complete the previous map* on either normal or hard.
(e.g., to do E-4 on hard, you must complete E-3 on normal or hard.)
E-3 Battle off South-western Ceylon Single Fleet
+
Combined Fleet
Yes No GreenTagSummer2018.png
Extra Operation E-4 OrangeTagSummer2018.png
Final Operation E-5 BlueTagSummer2018.png
PurpleTagSummer2018.png

Event Maps

E-1

OoyodoE-1Summer2018.png

Off the Bali Island
南西作戦海域方面 バリ島沖

Information

  • Event Tag: GreyTagSummer2018.png

Boss: New Submarine Princess (Vacation Mode)

  • Hard (): 1500 HP
  • Medium (): 1200 HP
  • Easy (): 750 HP
  • Casual (): 750 HP

Key Rewards:

Summer2018E-1Banner.png
Summer2018E-1Map.png

Branching rules

E-1 Branching Rules
Nodes Rules
Start
1
  • Do not meet the requirement to start at 2.
2
  • Meet ALL of the following requirements:
    • Fleet may only contain DE/DD/CL/CT
    • Amount of CL+CT ≤ 2
    • Meet ONE of the following requirements:
      • Amount of DE+DD ≥ 2 AND amount of CL ≤ 1
      • Amount of DE+DD ≥ 4
A
B
  • Meet ALL of the following to go to B:
    • Amount of CA(V) ≤ 2
    • No SS(V)
  • Random routing if fleet contains SS(V)
  • Otherwise, go to D.
D
B
C
  • Meet ANY of the following requirements to go to C:
    • Amount of DE ≥ 3
    • Amount of AV ≥ 2
    • Fleet contains AO
  • Random routing if amount of DE = 2
  • Meeting ANY of the following FORCES you to E:
    • Do not meet any of the above requirements for either random routing or routing to C.
    • Fleet contains CA(V)
E
E
F
  • Fixed route
2
G
  • Meet ANY of the following requirements to go to G:
    • Amount of ships ≤ 5
    • Amount of CL+CT ≥ 2
    • Fleet contains no CL
  • Otherwise, 60% G, 40% H.
H
G
E
  • Meet ANY of the following requirements to go to F:
    • Amount of ships ≤ 5
    • Amount of DE ≥ 3
  • Otherwise, 30% E, 70% F.
F

Branching compositions were reported over the course of the event.

Tips
The following guide is an early version. While this will provide some basic info, please be careful when using it as it may still have incomplete information.


Recommended fleet: 2CL/CT, 3-4DE, 0-1DD. This fleet takes the shortest route to the boss. (Start Point #2->G->F->I)

It is also possible to use a 5-ship fleet (see routing restrictions above) to clear the map via the shortest route, although having one less ship in the fleet will probably affect your chances of success. A fleet of 3-6DE, 0-3DD could hypothetically also reach the boss via the same route, but the primary consideration in recommending the 2CL/CT configuration is survivability, as nodes G & F are surface combat nodes.

Vanguard Formation and node support is recommended to help your fleet reach the boss node. Line abreast is recommended for the boss node. During Last Dance, boss support (ASW) may also be useful to help deal with the other submarines in the boss fleet before your own fleet engages, especially when faced with disadvantageous engagement modifiers.

The event guides are to be constructed through the respective Event map page guide and reviewed by editor staff / collaboration committee before being approved here. Do not under any circumstance update the guides through this page or attempt to fix them through this page. Please only update guides through their respective sandbox pages.

Show/Hide Nodes and Enemy Encounters
Nodes and Enemy Encounters
NodePatternXpNode InfoFormAir
A
深海通商破壊部隊 前衛A群
Pattern 1 Light Cruiser Ho-Class flagshipDestroyer I-Class Late ModelDestroyer I-Class Late ModelDestroyer I-Class Late ModelDestroyer I-Class Late ModelSubmarine Ka-Class
Formation 1: Line Ahead
Formation 2: Double Line
Formation 3: Diamond
B
Battle Avoided
Pattern 1"Must be my imagination" (battle avoided)
C
Resource Node
Pattern 1Fuel + ?
D
Maelstrom Node
Pattern 1Fuel - ?
E
深海通商破壊部隊 前衛B群
Pattern 1 Heavy Cruiser Ri-Class flagshipHeavy Cruiser Ri-Class flagshipLight Cruiser Ho-Class flagshipDestroyer I-Class Late ModelDestroyer I-Class Late ModelSubmarine Ka-Class
Formation 1: Line Ahead
Formation 2: Double Line
Formation 3: Diamond
F
深海通商破壊部隊 支援補給群
Pattern 1 Transport Ship Wa-Class eliteTransport Ship Wa-ClassTransport Ship Wa-ClassTransport Ship Wa-ClassDestroyer I-Class Late ModelDestroyer I-Class Late Model
Formation 2: Double Line
Pattern 2 Transport Ship Wa-Class eliteTransport Ship Wa-Class eliteTransport Ship Wa-ClassTransport Ship Wa-ClassDestroyer I-Class Late ModelDestroyer I-Class Late Model
Formation 2: Double Line
Pattern 3 Transport Ship Wa-Class eliteTransport Ship Wa-Class eliteTransport Ship Wa-Class eliteTransport Ship Wa-Class eliteDestroyer I-Class Late ModelDestroyer I-Class Late Model
Formation 2: Double Line
Pattern 4 Transport Ship Wa-Class eliteTransport Ship Wa-Class eliteTransport Ship Wa-Class eliteTransport Ship Wa-Class elitePT Imp GroupPT Imp Group
Formation 2: Double Line
G
深海駆逐隊
Pattern 1 Destroyer I-Class Late Model eliteDestroyer I-Class Late ModelDestroyer I-Class Late ModelDestroyer I-ClassDestroyer I-Class
Formation 1: Line Ahead
Formation 2: Double Line
Formation 3: Diamond
H
Maelstrom Node
Pattern 1Fuel - ?
I
深海通商破壊部隊 指揮潜水艦
Pattern 1 New Submarine Princess - Vacation ModeSubmarine Yo-Class eliteSubmarine Yo-Class eliteDestroyer I-Class Late ModelDestroyer I-Class Late Model
Formation 3: Diamond
Pattern 2 New Submarine Princess - Vacation ModeSubmarine Ka-Class eliteSubmarine Ka-Class eliteSubmarine Ka-Class eliteDestroyer I-Class Late ModelDestroyer I-Class Late Model
Formation 3: Diamond
Pattern 3 New Submarine Princess - Vacation ModeSubmarine Ka-Class flagshipSubmarine Ka-Class eliteSubmarine Ka-Class eliteDestroyer I-Class Late Model eliteDestroyer I-Class Late Model elite
Formation 3: Diamond

Show/Hide Nodes and Enemy Encounters
Nodes and Enemy Encounters
NodePatternXpNode InfoFormAir
A
深海通商破壊部隊 前衛A群
Pattern 1 Light Cruiser Ho-Class flagshipDestroyer I-Class Late ModelDestroyer I-Class Late ModelDestroyer I-ClassDestroyer I-ClassSubmarine Ka-Class
Formation 1: Line Ahead
Formation 2: Double Line
Formation 3: Diamond
Pattern 2 Light Cruiser Ho-Class flagshipDestroyer I-Class Late ModelDestroyer I-Class Late ModelDestroyer I-Class Late ModelDestroyer I-Class Late ModelSubmarine Ka-Class
Formation 1: Line Ahead
Formation 2: Double Line
Formation 3: Diamond
B
Battle Avoided
Pattern 1"Must be my imagination" (battle avoided)
C
Resource Node
Pattern 1Fuel + ?
D
Maelstrom Node
Pattern 1Fuel - ?
E
深海通商破壊部隊 前衛B群
Pattern 1 Heavy Cruiser Ri-Class flagshipHeavy Cruiser Ri-Class flagshipLight Cruiser Ho-Class eliteDestroyer I-Class Late ModelDestroyer I-ClassDestroyer I-Class
Formation 1: Line Ahead
Formation 2: Double Line
Formation 3: Diamond
Pattern 2 Heavy Cruiser Ri-Class flagshipHeavy Cruiser Ri-Class flagshipLight Cruiser Ho-Class flagshipDestroyer I-Class Late ModelDestroyer I-Class Late ModelSubmarine Ka-Class
Formation 1: Line Ahead
Formation 2: Double Line
Formation 3: Diamond
F
深海通商破壊部隊 支援補給群
Pattern 1 Transport Ship Wa-ClassTransport Ship Wa-ClassTransport Ship Wa-ClassDestroyer I-Class Late ModelDestroyer I-Class Late Model
Formation 2: Double Line
Pattern 2 Transport Ship Wa-Class eliteTransport Ship Wa-ClassTransport Ship Wa-ClassTransport Ship Wa-ClassDestroyer I-Class Late ModelDestroyer I-Class Late Model
Formation 2: Double Line
Pattern 3 Transport Ship Wa-Class eliteTransport Ship Wa-ClassTransport Ship Wa-ClassPT Imp GroupPT Imp Group
Formation 2: Double Line
Pattern 4 Transport Ship Wa-Class eliteTransport Ship Wa-Class eliteTransport Ship Wa-ClassTransport Ship Wa-ClassDestroyer I-Class Late ModelDestroyer I-Class Late Model
Formation 2: Double Line
Pattern 5 Transport Ship Wa-Class eliteTransport Ship Wa-Class eliteTransport Ship Wa-Class eliteTransport Ship Wa-Class eliteDestroyer I-Class Late ModelDestroyer I-Class Late Model
Formation 2: Double Line
Pattern 6 Transport Ship Wa-Class eliteTransport Ship Wa-Class eliteTransport Ship Wa-Class eliteTransport Ship Wa-Class elitePT Imp GroupPT Imp Group
Formation 2: Double Line
G
深海駆逐隊
Pattern 1 Destroyer I-Class Late ModelDestroyer I-Class Late ModelDestroyer I-ClassDestroyer I-Class
Formation 1: Line Ahead
Formation 2: Double Line
Formation 3: Diamond
Pattern 2 Destroyer I-Class Late Model eliteDestroyer I-Class Late ModelDestroyer I-Class Late ModelDestroyer I-ClassDestroyer I-Class
Formation 1: Line Ahead
Formation 2: Double Line
Formation 3: Diamond
H
Maelstrom Node
Pattern 1Fuel - ?
I
深海通商破壊部隊 指揮潜水艦
Pattern 1 New Submarine Princess - Vacation ModeSubmarine Ka-ClassSubmarine Ka-Class
Formation 3: Diamond
Pattern 2 New Submarine Princess - Vacation ModeSubmarine Ka-ClassSubmarine Ka-ClassDestroyer I-Class Late Model
Formation 3: Diamond
Pattern 3 New Submarine Princess - Vacation ModeSubmarine Ka-ClassSubmarine Ka-ClassDestroyer I-Class Late ModelDestroyer I-Class Late Model
Formation 3: Diamond

Show/Hide Nodes and Enemy Encounters
Nodes and Enemy Encounters
NodePatternXpNode InfoFormAir
A
深海通商破壊部隊 前衛A群
Pattern 1 Light Cruiser Ho-Class eliteDestroyer I-Class Late ModelDestroyer I-Class Late ModelDestroyer I-ClassDestroyer I-Class
Formation 1: Line Ahead
Formation 2: Double Line
Formation 3: Diamond
Pattern 2 Light Cruiser Ho-Class flagshipDestroyer I-Class Late ModelDestroyer I-Class Late ModelDestroyer I-ClassDestroyer I-ClassSubmarine Ka-Class
Formation 1: Line Ahead
Formation 2: Double Line
Formation 3: Diamond
B
Battle Avoided
Pattern 1"Must be my imagination" (battle avoided)
C
Resource Node
Pattern 1Fuel + ?
D
Maelstrom Node
Pattern 1Fuel - ?
E
深海通商破壊部隊 前衛B群
Pattern 1 Heavy Cruiser Ri-Class eliteHeavy Cruiser Ri-Class eliteLight Cruiser Ho-Class eliteDestroyer I-Class Late ModelDestroyer I-ClassDestroyer I-Class
Formation 1: Line Ahead
Formation 2: Double Line
Formation 3: Diamond
Pattern 2 Heavy Cruiser Ri-Class flagshipHeavy Cruiser Ri-Class flagshipLight Cruiser Ho-Class eliteDestroyer I-Class Late ModelDestroyer I-ClassDestroyer I-Class
Formation 1: Line Ahead
Formation 2: Double Line
Formation 3: Diamond
F
深海通商破壊部隊 支援補給群
Pattern 1 Transport Ship Wa-ClassTransport Ship Wa-ClassTransport Ship Wa-ClassDestroyer I-ClassDestroyer I-Class
Formation 2: Double Line
Pattern 2 Transport Ship Wa-ClassTransport Ship Wa-ClassTransport Ship Wa-ClassDestroyer I-Class Late ModelDestroyer I-Class Late Model
Formation 2: Double Line
Pattern 3 Transport Ship Wa-ClassTransport Ship Wa-ClassTransport Ship Wa-ClassPT Imp GroupPT Imp Group
Formation 2: Double Line
Pattern 4 Transport Ship Wa-Class eliteTransport Ship Wa-ClassTransport Ship Wa-ClassDestroyer I-ClassDestroyer I-Class
Formation 2: Double Line
Pattern 5 Transport Ship Wa-Class eliteTransport Ship Wa-ClassTransport Ship Wa-ClassTransport Ship Wa-ClassDestroyer I-Class Late ModelDestroyer I-Class Late Model
Formation 2: Double Line
Pattern 6 Transport Ship Wa-Class eliteTransport Ship Wa-ClassTransport Ship Wa-ClassPT Imp GroupPT Imp Group
Formation 2: Double Line
G
深海駆逐隊
Pattern 1 Destroyer I-Class Late ModelDestroyer I-ClassDestroyer I-Class
Formation 1: Line Ahead
Formation 2: Double Line
Formation 3: Diamond
Pattern 2 Destroyer I-Class Late ModelDestroyer I-Class Late ModelDestroyer I-ClassDestroyer I-Class
Formation 1: Line Ahead
Formation 2: Double Line
Formation 3: Diamond
H
Maelstrom Node
Pattern 1Fuel - ?
I
深海通商破壊部隊 指揮潜水艦
Pattern 1 New Submarine Princess - Vacation ModeSubmarine Ka-Class
Formation 3: Diamond
Pattern 2 New Submarine Princess - Vacation ModeSubmarine Ka-ClassSubmarine Ka-Class
Formation 3: Diamond
Pattern 3 New Submarine Princess - Vacation ModeSubmarine Ka-ClassSubmarine Ka-Class
Formation 3: Diamond
Pattern 4 New Submarine Princess - Vacation ModeSubmarine Ka-ClassSubmarine Ka-ClassDestroyer I-Class Late Model
Formation 3: Diamond

Show/Hide Nodes and Enemy Encounters
Nodes and Enemy Encounters
NodePatternXpNode InfoFormAir
A
深海通商破壊部隊 前衛A群
Pattern 1 Light Cruiser Ho-Class eliteDestroyer I-Class Late ModelDestroyer I-Class Late ModelDestroyer I-ClassDestroyer I-Class
Formation 1: Line Ahead
Formation 2: Double Line
Formation 3: Diamond
B
Battle Avoided
Pattern 1"Must be my imagination" (battle avoided)
C
Resource Node
Pattern 1Fuel + ?
D
Maelstrom Node
Pattern 1Fuel - ?
E
深海通商破壊部隊 前衛B群
Pattern 1 Heavy Cruiser Ri-Class eliteHeavy Cruiser Ri-Class eliteLight Cruiser Ho-Class eliteDestroyer I-Class Late ModelDestroyer I-ClassDestroyer I-Class
Formation 1: Line Ahead
Formation 2: Double Line
Formation 3: Diamond
F
深海通商破壊部隊 支援補給群
Pattern 1 Transport Ship Wa-ClassTransport Ship Wa-ClassTransport Ship Wa-ClassDestroyer I-ClassDestroyer I-Class
Formation 2: Double Line
Pattern 2 Transport Ship Wa-ClassTransport Ship Wa-ClassTransport Ship Wa-ClassPT Imp GroupPT Imp Group
Formation 2: Double Line
Pattern 3 Transport Ship Wa-Class eliteTransport Ship Wa-ClassTransport Ship Wa-ClassDestroyer I-ClassDestroyer I-Class
Formation 2: Double Line
G
深海駆逐隊
Pattern 1 Destroyer I-Class Late ModelDestroyer I-ClassDestroyer I-Class
Formation 1: Line Ahead
Formation 2: Double Line
Formation 3: Diamond
H
Maelstrom Node
Pattern 1Fuel - ?
I
深海通商破壊部隊 指揮潜水艦
Pattern 1 New Submarine Princess - Vacation Mode
Formation 3: Diamond
Pattern 2 New Submarine Princess - Vacation ModeSubmarine Ka-Class
Formation 3: Diamond
Pattern 3 New Submarine Princess - Vacation ModeSubmarine Ka-ClassSubmarine Ka-Class
Formation 3: Diamond

Ship drops

NodeShip List
FDestroyers
Light Cruisers
Auxiliary Ships
IDestroyers
Light Cruisers
KDestroyers
NDestroyers
Light Cruisers
Auxiliary Ships
ODestroyer Escorts
Destroyers
Light Cruisers
Heavy Cruisers
Battleships
Light Aircraft Carriers
Seaplane Tenders
Submarines


E-2

OoyodoE-2Summer2018.png

Northern Straits of Malacca
No map name yet

Information

  • Event Tag: LightGreenSummer2018.png

Boss: Part 1: Transport Phase

  • Hard (): 300 TP
  • Medium (): 210 TP
  • Easy (): 200 TP
  • Casual (): 200 TP

Part 2: Supply Depot Princess (Vacation Mode)

  • Hard (): 3000 HP
  • Medium (): 2600 HP
  • Easy (): 2300 HP
  • Casual (): 2300 HP

Key Rewards:

Summer2018E-2Banner.png
Summer2018E-2Map.png

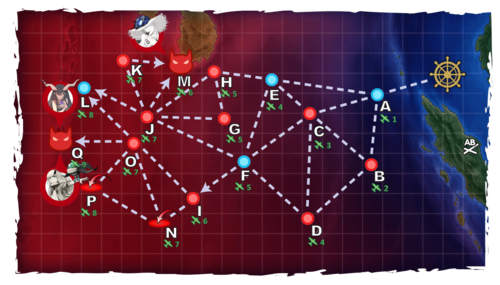
Branching rules

E-2 Branching Rules
Nodes Rules
Start
1
  • Phase 1
2
  • Phase 2
A
B
  • Do not meet the requirements to go to C.
C
  • Meet ALL of the following requirements:
    • Amount of DE+DD ≥ 2
    • Amount of FBB+CVL ≤ 2
    • No BB(V)
    • No CV(B)
D
F
  • Node J is not unlocked yet.
  • Or meet ALL of the following requirements:
    • Amount of CV(B) ≤ 1
    • If fleet contains BBV, amount of CT+CLT+CA(V)+(F)BB(V)+CV(L/B) ≤ 3
    • Amount of (F)BB(V)+CV(L/B) ≤ 3
J
  • Do not meet the requirements to go to F.
F
E
  • Active branching
G
G
H
  • Fail the LoS check.
I
  • Pass the LoS check.
K
M
  • Meet ALL of the following requirements:
    • Amount of DD ≥ 2
    • Amount of (F)BB(V)+CV(B) ≤ 2
    • Amount of CLT?+CA+(F)BB(V)+CV(L/B) ≤ 3 (CAV does not count)
N
  • Do not meet the requirements to go to M.
M
L
  • Fail the LoS check.
O
  • Pass the LoS check.


Branching compositions were reported over the course of the event.

Tips
The following guide is an early version. While this will provide some basic info, please be careful when using it as it may still have incomplete information.

E-2 Operation will involving organizing your fleet to complete 2 major task before completing the entire maps.

Complete the Transport Operation

Fleet Recommendation

1CA, 1CAV, 1CL, 3 DD
2DD, 1CA, 1CAV, 1CVL, 1FBB

Path: A-C-D-F-G-I

If you are playing on a Medium of hard difficulty, consider using ships that can be good in both transports and Anti-Installation combat to help out with the fight.

As like most transport operations, you will need to organize a balance between transport supplies and Combat equipment. Since this operation will involve using a single fleet it's suggested to bring at most 4 Drum Canisters or Daihatsu (preferred).

Your CAV should have at least 1 Seaplane Fighter to ensure that you'll gain air superiority (as the Transport boss has no air power)

While moving through the nodes, use the Vanguard formation to improve your chances of survival until reaching the boss node.

The boss fleet will consist of a Heavy Cruiser Princess along with a few CAs and DDs. Using an LBAS full of Land Base Bombers is recommended to take care of the enemies on this boss fight there fore the following LBAS should be considered:

Recommended LBAS

4 Land Base Bombers/ Torpedo Bombers

If your fleet is capable enough they should gain score consistent A or S ranks at the boss node clearing this map easily.

Defeating the Supply Depot Princess

Fleet Recommendation

1 CV, 1CA, 1CAV, 3 DD
1FBB, 1CAV, 1CVL, 1CV, 2DD
1 CV, 1 BB(V),1 CAV, 0-1 CL, 2-3 DD


Path: D-F-E-K-M-O

In this phase your fleet will need to be armed to deal with Anti-Installation combat since the main target the operation . Because of the high air power in K and O, you will need to have a Carrier that will be equipped with only fighters (some one that isn't Akagi, Souryuu, Hiryuu, Shoukaku and Zuikaku is preferred since they're important for E-3)

If you bring a CV + CVL, then it can be possible to consider being torpedo bombers and Dive bombers, but keep in mind that the AA strength of the enemy will be powerful through the entire may and may destroy your planes.

All your CA(V)s, and (F)BB(V) should be armed with Type 3 Shell to help battle against the Supply Depot Princess at the boss nodes.

For weaker FBBs you may consider AP shells if you need a way to pick off Artillery Imps if you're lacking in Anti-Installation gear.

As for your CL and DDs, use a combination of WG42s, Daihatsu, Daihatsu-class Landing Craft (Type 89 Medium Tanks & Marines), and Type 2 Ka-Mi Tanks to stack up the multiplier you can do against Installations.

Do remember that:

The most ideal set up for a very stong anti-installation attack from a DD is Type 2 Ka-Mi Tank, Daihatsu-class Landing Craft (Type 89 Medium Tanks & Marines) and WG42. The more modified the equipment is, the stronger the results can be.

Using this set up can be super effective in severely or instant killing the Supply Depot Princess in a single hit.

If you are lacking in some of the above mention gear for your CL/ DD consider spreading at least on of the above mention gear among your DD and CL and use 2 guns on them, while this set up isn't nearly as strong, it's will likely hit result in suitable damage against the boss.

On route to the boss use, Vanguard Formation to protect your fleet if you're using a more lighter fleet, but if you're using a more heavier fleet, using Line head can be a possible option.

There will be an Air Attack node with the Supply Depot Princess along with some Airfield Princess, use daimond formation and if you bring a DD with AACI, your chances of survival should improve.

At the boss node, you will face the Vacation Mode Supply Depot Princess along with some Artillery Imps, a DD and a transport.

On Harder difficulties it's possible for an Airfield Princess to appear in the composition as well.

Using an LBAS with an effective set up can help clear out some of the enemies as well as the Artillery Imps that may block your way.

Recommended LBAS

1 Fighter/Land Base Fighter, 3 Land Base Bombers/ Torpedo Bombers

Keep in mind that due to the presence of Artillery Imps they may be able to knock out your LBAS's ranks easily and while this may not be a problem for farming or pre-final kill, the boss kill may present some problems as the being able to eliminate as many of the enemies as possible is needed to help improve your odds of success when delivering the final kill on the Supply Depot Princess

If an Airfield Princess is present on the final kill, try to make sure your fleet's air power + AACI is strong enough to wipe out all the bombers so you can fully disable her during day battle to make the fight easier and more possible to efficiently defeat the Supply Depot Princess once all enemy ships are eliminated.

Support Shelling fleets for both in-route and Boss node are recommend to ensure you will survive your trip and improve your odds of success.

The event guides are to be constructed through the respective Event map page guide and reviewed by editor staff / collaboration committee before being approved here. Do not under any circumstance update the guides through this page or attempt to fix them through this page. Please only update guides through their respective sandbox pages.


Show/Hide Nodes and Enemy Encounters
Nodes and Enemy Encounters
NodePatternXpNode InfoFormAir
A
Battle Avoided
Pattern 1"Must be my imagination" (battle avoided)
B
海峡封鎖 深海戦艦部隊
Pattern 1 Battleship Ru-Class flagshipBattleship Ru-Class flagshipLight Cruiser Ho-Class flagshipLight Cruiser Tsu-ClassDestroyer Ro-Class Late ModelDestroyer Ro-Class Late Model
Formation 1: Line Ahead
Formation 2: Double Line
Pattern 2 Battleship Ru-Class eliteBattleship Ru-Class eliteLight Cruiser Ho-Class eliteDestroyer Ro-Class Late ModelDestroyer I-ClassDestroyer I-Class
Formation 1: Line Ahead
Formation 2: Double Line
Pattern 3 Battleship Ru-Class eliteBattleship Ru-Class eliteLight Cruiser Ho-Class eliteDestroyer I-ClassDestroyer I-ClassDestroyer I-Class
Formation 2: Double Line
Pattern 4 Battleship Ru-Class flagshipBattleship Ru-Class flagshipLight Cruiser Ho-Class eliteDestroyer Ro-Class Late ModelDestroyer I-ClassDestroyer I-Class
Formation 2: Double Line
Pattern 5 Battleship Ru-Class flagshipBattleship Ru-Class flagshipLight Cruiser Ho-Class flagshipLight Cruiser Tsu-ClassDestroyer I-Class Late ModelDestroyer I-Class Late Model
Formation 2: Double Line
Pattern 6 Battleship Ru-Class flagshipBattleship Ru-Class flagshipLight Cruiser Ho-Class eliteDestroyer Ro-Class Late ModelDestroyer Ro-Class Late ModelDestroyer I-Class
Formation 1: Line Ahead
C
海峡警備 深海水雷戦隊
Pattern 1 Light Cruiser Ho-Class flagshipDestroyer I-Class Late ModelDestroyer I-Class Late ModelDestroyer I-Class Late ModelDestroyer I-ClassDestroyer I-Class
Formation 1: Line Ahead
Formation 2: Double Line
Formation 3: Diamond
Pattern 2 Light Cruiser Ho-Class flagshipDestroyer I-Class Late ModelDestroyer I-Class Late ModelDestroyer I-ClassDestroyer I-ClassDestroyer I-Class
Formation 1: Line Ahead
Formation 2: Double Line
Formation 3: Diamond
Pattern 3 Light Cruiser Ho-Class flagshipDestroyer I-Class Late ModelDestroyer I-ClassDestroyer I-ClassDestroyer I-Class
Formation 1: Line Ahead
Formation 2: Double Line
Formation 3: Diamond
D
海峡封鎖 深海遊撃部隊
Pattern 1 Light Cruiser Tsu-Class eliteDestroyer Ro-Class Late ModelDestroyer Ro-Class Late ModelDestroyer I-ClassDestroyer I-ClassSubmarine Ka-Class flagship
Formation 1: Line Ahead
Formation 2: Double Line
Pattern 2 Light Cruiser Tsu-Class eliteDestroyer Ro-Class Late ModelDestroyer Ro-Class Late ModelDestroyer Ro-Class Late ModelDestroyer Ro-Class Late ModelSubmarine Ka-Class flagship
Formation 1: Line Ahead
Pattern 3 Light Cruiser Tsu-ClassDestroyer Ro-Class Late ModelDestroyer Ro-Class Late ModelDestroyer I-ClassDestroyer I-ClassSubmarine Ka-Class
Formation 1: Line Ahead
Formation 2: Double Line
Pattern 4 Light Cruiser Tsu-ClassDestroyer Ro-Class Late ModelDestroyer Ro-Class Late ModelDestroyer I-ClassDestroyer I-ClassSubmarine Ka-Class elite
Formation 1: Line Ahead
Formation 2: Double Line
Pattern 5 Light Cruiser Tsu-ClassDestroyer Ro-Class Late ModelDestroyer I-ClassDestroyer I-ClassDestroyer I-Class
Formation 1: Line Ahead
Formation 2: Double Line
E
深海集積地プーケット航空隊
Air Battle Node
Pattern 1 Supply Depot Princess - Vacation ModeAirfield PrincessAirfield PrincessArtillery ImpArtillery Imp
Formation 4: Echelon
Unknown
Pattern 2 Supply Depot Princess - Vacation ModeAirfield PrincessAirfield PrincessArtillery ImpArtillery Imp
Formation 4: Echelon
Unknown
Pattern 3 Supply Depot Princess - Vacation Mode - DamagedAirfield PrincessAirfield PrincessAirfield PrincessArtillery ImpArtillery Imp
Formation 4: Echelon
Unknown
Pattern 4 Supply Depot Princess - Vacation Mode - DamagedAirfield PrincessAirfield PrincessAirfield PrincessArtillery ImpArtillery Imp
Formation 4: Echelon
Unknown
Pattern 5 Supply Depot Princess - Vacation ModeAirfield PrincessAirfield PrincessArtillery ImpArtillery Imp
Formation 4: Echelon
Unknown
Pattern 6 Supply Depot Princess - Vacation ModeAirfield PrincessAirfield PrincessArtillery ImpArtillery Imp
Formation 4: Echelon
Unknown
Pattern 7 Supply Depot Princess - Vacation ModeAirfield PrincessArtillery ImpArtillery Imp
Formation 4: Echelon
Unknown
Pattern 8 Supply Depot Princess - Vacation ModeAirfield PrincessAirfield PrincessArtillery ImpArtillery Imp
Formation 4: Echelon
Unknown
Pattern 9 Supply Depot Princess - Vacation Mode - DamagedAirfield PrincessAirfield PrincessAirfield PrincessArtillery ImpArtillery Imp
Formation 4: Echelon
Unknown
F
Pattern 1Choose your route
G
Transport Drop-Off Node
Pattern 1 Transport drop-off
H
Battle Avoided
Pattern 1"Must be my imagination" (battle avoided)
I
海峡警備 深海重巡戦隊
Pattern 1 Heavy Cruiser Summer PrincessHeavy Cruiser Ri-Class flagshipHeavy Cruiser Ri-Class flagshipLight Cruiser He-Class flagshipDestroyer Ro-Class Late ModelDestroyer Ro-Class Late Model
Formation 1: Line Ahead
Pattern 2 Heavy Cruiser Summer PrincessHeavy Cruiser Ri-Class flagshipHeavy Cruiser Ri-Class flagshipLight Cruiser Ho-Class flagshipDestroyer Ro-Class Late ModelDestroyer Ro-Class Late Model
Formation 1: Line Ahead
Pattern 3 Heavy Cruiser Summer PrincessHeavy Cruiser Ri-Class flagshipHeavy Cruiser Ri-Class flagshipDestroyer Ro-Class Late ModelDestroyer Ro-Class Late ModelDestroyer Ro-Class Late Model
Formation 1: Line Ahead
Pattern 4 Heavy Cruiser Summer PrincessHeavy Cruiser Ri-Class eliteHeavy Cruiser Ri-Class eliteLight Cruiser Ho-Class flagshipDestroyer Ro-Class Late ModelDestroyer Ro-Class Late Model
Formation 1: Line Ahead
Pattern 5 Heavy Cruiser Summer PrincessHeavy Cruiser Ri-Class eliteHeavy Cruiser Ri-Class eliteDestroyer Ro-Class Late ModelDestroyer Ro-Class Late ModelDestroyer Ro-Class Late Model
Formation 1: Line Ahead
Pattern 6 Heavy Cruiser Summer PrincessHeavy Cruiser Ri-Class eliteHeavy Cruiser Ri-Class eliteDestroyer Ro-Class Late ModelDestroyer I-ClassDestroyer I-Class
Formation 1: Line Ahead
Pattern 7 Heavy Cruiser Summer PrincessHeavy Cruiser Ri-Class eliteHeavy Cruiser Ri-Class eliteDestroyer I-ClassDestroyer I-ClassDestroyer I-Class
Formation 1: Line Ahead
Pattern 8 Heavy Cruiser Summer PrincessHeavy Cruiser Ri-Class eliteHeavy Cruiser Ri-Class eliteDestroyer Ro-Class Late ModelDestroyer Ro-Class Late ModelDestroyer I-Class
Formation 1: Line Ahead
Pattern 9 Heavy Cruiser Summer PrincessHeavy Cruiser Ri-Class eliteHeavy Cruiser Ri-Class eliteDestroyer Ro-Class Late ModelDestroyer Ro-Class Late ModelDestroyer I-Class
Formation 1: Line Ahead
J
海峡封鎖 深海遊撃部隊
Pattern 1 Light Cruiser Tsu-Class eliteDestroyer Ro-Class Late ModelDestroyer Ro-Class Late ModelDestroyer I-ClassDestroyer I-ClassSubmarine Ka-Class flagship
Formation 1: Line Ahead
Formation 2: Double Line
Pattern 2 Light Cruiser Tsu-Class eliteDestroyer Ro-Class Late ModelDestroyer Ro-Class Late ModelDestroyer Ro-Class Late ModelDestroyer Ro-Class Late ModelSubmarine Ka-Class flagship
Formation 1: Line Ahead
Pattern 3 Light Cruiser Tsu-ClassDestroyer Ro-Class Late ModelDestroyer Ro-Class Late ModelDestroyer I-ClassDestroyer I-ClassSubmarine Ka-Class
Formation 1: Line Ahead
Formation 2: Double Line
Pattern 4 Light Cruiser Tsu-ClassDestroyer Ro-Class Late ModelDestroyer I-ClassDestroyer I-ClassDestroyer I-Class
Formation 1: Line Ahead
Formation 2: Double Line
Pattern 5 Light Cruiser Tsu-ClassDestroyer Ro-Class Late ModelDestroyer Ro-Class Late ModelDestroyer I-ClassDestroyer I-ClassSubmarine Ka-Class elite
Formation 1: Line Ahead
Formation 2: Double Line
K
Battle Avoided
Pattern 1"Must be my imagination" (battle avoided)
L
Battle Avoided
Pattern 1"Must be my imagination" (battle avoided)
M
海峡前線集積地 防衛艦隊
Pattern 1 Light Carrier Nu-Class flagshipLight Carrier Nu-Class eliteHeavy Cruiser Ne-Class eliteLight Cruiser Tsu-ClassDestroyer Ro-Class Late ModelDestroyer Ro-Class Late Model
Formation 2: Double Line
Formation 4: Echelon
AP:98
AS:219
AS+:438
Pattern 2 Light Carrier Nu-Class flagshipLight Carrier Nu-Class flagshipHeavy Cruiser Ne-Class eliteLight Cruiser Tsu-Class eliteDestroyer Ro-Class Late ModelDestroyer Ro-Class Late Model
Formation 2: Double Line
Formation 4: Echelon
AP:126
AS:282
AS+:564
Pattern 3 Light Carrier Nu-Class eliteHeavy Cruiser Ne-ClassLight Cruiser Tsu-ClassDestroyer Ro-Class Late ModelDestroyer I-ClassDestroyer I-Class
Formation 2: Double Line
Formation 4: Echelon
AP:46
AS:104
AS+:207
Pattern 4 Light Carrier Nu-Class flagshipLight Carrier Nu-Class eliteHeavy Cruiser Ne-ClassLight Cruiser Tsu-ClassDestroyer Ro-Class Late ModelDestroyer Ro-Class Late Model
Formation 2: Double Line
Formation 4: Echelon
AP:98
AS:219
AS+:438
Pattern 5 Light Carrier Nu-Class eliteHeavy Cruiser Ne-ClassDestroyer Ro-Class Late ModelDestroyer I-ClassDestroyer I-ClassDestroyer I-Class
Formation 4: Echelon
AP:16
AS:36
AS+:72
N
深海潜水艦隊 海峡封鎖B群
Pattern 1 Submarine Ka-Class flagshipSubmarine Ka-Class eliteSubmarine Ka-Class elite
Formation 3: Diamond
Formation 5: Line Abreast
Pattern 2 Submarine Ka-Class eliteSubmarine Ka-ClassSubmarine Ka-Class
Formation 3: Diamond
Formation 5: Line Abreast
Pattern 3 Submarine Ka-Class eliteSubmarine Ka-Class eliteSubmarine Ka-Class elite
Formation 3: Diamond
Formation 5: Line Abreast
Pattern 4 Submarine Ka-Class flagshipSubmarine Ka-Class eliteSubmarine Ka-Class eliteSubmarine Ka-Class elite
Formation 3: Diamond
Formation 5: Line Abreast
Pattern 5 Submarine Ka-ClassSubmarine Ka-ClassSubmarine Ka-Class
Formation 3: Diamond
O
深海前線集積地 本部
Pattern 1 Supply Depot Princess - Vacation ModeArtillery ImpArtillery ImpDestroyer Ro-Class Late Model eliteDestroyer Ro-Class Late Model eliteTransport Ship Wa-Class elite
Formation 2: Double Line
Unknown
Pattern 2 Supply Depot Princess - Vacation Mode - DamagedAirfield PrincessArtillery ImpArtillery ImpDestroyer Ro-Class Late Model eliteTransport Ship Wa-Class elite
Formation 2: Double Line
Unknown
Pattern 3 Supply Depot Princess - Vacation ModeAirfield PrincessArtillery ImpArtillery ImpDestroyer Ro-Class Late Model eliteTransport Ship Wa-Class elite
Formation 2: Double Line
Unknown
Pattern 4 Supply Depot Princess - Vacation ModeArtillery ImpDestroyer Ro-Class Late ModelDestroyer I-ClassDestroyer I-ClassTransport Ship Wa-Class
Formation 4: Echelon
Unknown
Pattern 5 Supply Depot Princess - Vacation ModeDestroyer Ro-Class Late ModelDestroyer I-ClassDestroyer I-ClassTransport Ship Wa-Class
Formation 4: Echelon
Unknown
Pattern 6 Supply Depot Princess - Vacation Mode - DamagedAirfield PrincessArtillery ImpDestroyer Ro-Class Late ModelDestroyer I-ClassTransport Ship Wa-Class
Formation 4: Echelon
Unknown
Pattern 7 Supply Depot Princess - Vacation ModeAirfield PrincessDestroyer Ro-Class Late ModelDestroyer I-ClassDestroyer I-ClassTransport Ship Wa-Class
Formation 4: Echelon
Unknown
Pattern 8 Supply Depot Princess - Vacation Mode - DamagedArtillery ImpDestroyer Ro-Class Late ModelDestroyer Ro-Class Late ModelTransport Ship Wa-Class
Formation 4: Echelon
Unknown
Pattern 9 Supply Depot Princess - Vacation Mode - DamagedDestroyer Ro-Class Late ModelDestroyer I-ClassDestroyer I-ClassTransport Ship Wa-Class
Formation 4: Echelon
Unknown

Show/Hide Nodes and Enemy Encounters
Nodes and Enemy Encounters
NodePatternXpNode InfoFormAir
A
Battle Avoided
Pattern 1"Must be my imagination" (battle avoided)
B
海峡封鎖 深海戦艦部隊
Pattern 1 Battleship Ru-Class eliteBattleship Ru-Class eliteLight Cruiser Ho-Class eliteDestroyer Ro-Class Late ModelDestroyer I-ClassDestroyer I-Class
Formation 1: Line Ahead
Formation 2: Double Line
Pattern 2 Battleship Ru-Class flagshipBattleship Ru-Class flagshipLight Cruiser Ho-Class flagshipLight Cruiser Tsu-ClassDestroyer Ro-Class Late ModelDestroyer Ro-Class Late Model
Formation 1: Line Ahead
Formation 2: Double Line
Pattern 3 Battleship Ru-Class eliteBattleship Ru-Class eliteLight Cruiser Ho-Class eliteDestroyer I-ClassDestroyer I-ClassDestroyer I-Class
Formation 2: Double Line
Pattern 4 Battleship Ru-Class flagshipBattleship Ru-Class flagshipLight Cruiser Ho-Class eliteDestroyer Ro-Class Late ModelDestroyer I-ClassDestroyer I-Class
Formation 2: Double Line
Pattern 5 Battleship Ru-Class flagshipBattleship Ru-Class flagshipLight Cruiser Ho-Class eliteDestroyer Ro-Class Late ModelDestroyer Ro-Class Late ModelDestroyer I-Class
Formation 1: Line Ahead
Pattern 6 Battleship Ru-Class flagshipBattleship Ru-Class flagshipLight Cruiser Ho-Class flagshipLight Cruiser Tsu-ClassDestroyer I-Class Late ModelDestroyer I-Class Late Model
Formation 2: Double Line
C
海峡警備 深海水雷戦隊
Pattern 1 Light Cruiser Ho-Class flagshipDestroyer I-Class Late ModelDestroyer I-Class Late ModelDestroyer I-Class Late ModelDestroyer I-ClassDestroyer I-Class
Formation 1: Line Ahead
Formation 2: Double Line
Formation 3: Diamond
Pattern 2 Light Cruiser Ho-Class flagshipDestroyer I-Class Late ModelDestroyer I-Class Late ModelDestroyer I-ClassDestroyer I-ClassDestroyer I-Class
Formation 1: Line Ahead
Formation 2: Double Line
Formation 3: Diamond
Pattern 3 Light Cruiser Ho-Class flagshipDestroyer I-Class Late ModelDestroyer I-ClassDestroyer I-ClassDestroyer I-Class
Formation 1: Line Ahead
Formation 2: Double Line
Formation 3: Diamond
D
海峡封鎖 深海遊撃部隊
Pattern 1 Light Cruiser Tsu-Class eliteDestroyer Ro-Class Late ModelDestroyer Ro-Class Late ModelDestroyer I-ClassDestroyer I-ClassSubmarine Ka-Class flagship
Formation 1: Line Ahead
Formation 2: Double Line
Pattern 2 Light Cruiser Tsu-Class eliteDestroyer Ro-Class Late ModelDestroyer Ro-Class Late ModelDestroyer Ro-Class Late ModelDestroyer Ro-Class Late ModelSubmarine Ka-Class flagship
Formation 1: Line Ahead
Pattern 3 Light Cruiser Tsu-ClassDestroyer Ro-Class Late ModelDestroyer Ro-Class Late ModelDestroyer I-ClassDestroyer I-ClassSubmarine Ka-Class
Formation 1: Line Ahead
Formation 2: Double Line
Pattern 4 Light Cruiser Tsu-ClassDestroyer Ro-Class Late ModelDestroyer Ro-Class Late ModelDestroyer I-ClassDestroyer I-ClassSubmarine Ka-Class elite
Formation 1: Line Ahead
Formation 2: Double Line
Pattern 5 Light Cruiser Tsu-ClassDestroyer Ro-Class Late ModelDestroyer I-ClassDestroyer I-ClassDestroyer I-Class
Formation 1: Line Ahead
Formation 2: Double Line
E
深海集積地プーケット航空隊
Air Battle Node
Pattern 1 Supply Depot Princess - Vacation ModeAirfield PrincessAirfield PrincessArtillery ImpArtillery Imp
Formation 4: Echelon
Unknown
Pattern 2 Supply Depot Princess - Vacation ModeAirfield PrincessAirfield PrincessArtillery ImpArtillery Imp
Formation 4: Echelon
Unknown
Pattern 3 Supply Depot Princess - Vacation Mode - DamagedAirfield PrincessAirfield PrincessAirfield PrincessArtillery ImpArtillery Imp
Formation 4: Echelon
Unknown
Pattern 4 Supply Depot Princess - Vacation ModeAirfield PrincessAirfield PrincessArtillery ImpArtillery Imp
Formation 4: Echelon
Unknown
Pattern 5 Supply Depot Princess - Vacation ModeAirfield PrincessAirfield PrincessArtillery ImpArtillery Imp
Formation 4: Echelon
Unknown
Pattern 6 Supply Depot Princess - Vacation Mode - DamagedAirfield PrincessAirfield PrincessAirfield PrincessArtillery ImpArtillery Imp
Formation 4: Echelon
Unknown
Pattern 7 Supply Depot Princess - Vacation ModeAirfield PrincessArtillery ImpArtillery Imp
Formation 4: Echelon
Unknown
Pattern 8 Supply Depot Princess - Vacation ModeAirfield PrincessAirfield PrincessArtillery ImpArtillery Imp
Formation 4: Echelon
Unknown
Pattern 9 Supply Depot Princess - Vacation Mode - DamagedAirfield PrincessAirfield PrincessAirfield PrincessArtillery ImpArtillery Imp
Formation 4: Echelon
Unknown
F
Pattern 1Choose your route
G
Transport Drop-Off Node
Pattern 1 Transport drop-off
H
Battle Avoided
Pattern 1"Must be my imagination" (battle avoided)
I
海峡警備 深海重巡戦隊
Pattern 1 Heavy Cruiser Summer PrincessHeavy Cruiser Ri-Class flagshipHeavy Cruiser Ri-Class flagshipLight Cruiser Ho-Class flagshipDestroyer Ro-Class Late ModelDestroyer Ro-Class Late Model
Formation 1: Line Ahead
Pattern 2 Heavy Cruiser Summer PrincessHeavy Cruiser Ri-Class flagshipHeavy Cruiser Ri-Class flagshipLight Cruiser He-Class flagshipDestroyer Ro-Class Late ModelDestroyer Ro-Class Late Model
Formation 1: Line Ahead
Pattern 3 Heavy Cruiser Summer PrincessHeavy Cruiser Ri-Class flagshipHeavy Cruiser Ri-Class flagshipDestroyer Ro-Class Late ModelDestroyer Ro-Class Late ModelDestroyer Ro-Class Late Model
Formation 1: Line Ahead
Pattern 4 Heavy Cruiser Summer PrincessHeavy Cruiser Ri-Class eliteHeavy Cruiser Ri-Class eliteDestroyer Ro-Class Late ModelDestroyer I-ClassDestroyer I-Class
Formation 1: Line Ahead
Pattern 5 Heavy Cruiser Summer PrincessHeavy Cruiser Ri-Class eliteHeavy Cruiser Ri-Class eliteLight Cruiser Ho-Class flagshipDestroyer Ro-Class Late ModelDestroyer Ro-Class Late Model
Formation 1: Line Ahead
Pattern 6 Heavy Cruiser Summer PrincessHeavy Cruiser Ri-Class eliteHeavy Cruiser Ri-Class eliteDestroyer I-ClassDestroyer I-ClassDestroyer I-Class
Formation 1: Line Ahead
Pattern 7 Heavy Cruiser Summer PrincessHeavy Cruiser Ri-Class eliteHeavy Cruiser Ri-Class eliteDestroyer Ro-Class Late ModelDestroyer Ro-Class Late ModelDestroyer Ro-Class Late Model
Formation 1: Line Ahead
Pattern 8 Heavy Cruiser Summer PrincessHeavy Cruiser Ri-Class eliteHeavy Cruiser Ri-Class eliteDestroyer Ro-Class Late ModelDestroyer Ro-Class Late ModelDestroyer I-Class
Formation 1: Line Ahead
Pattern 9 Heavy Cruiser Summer PrincessHeavy Cruiser Ri-Class eliteHeavy Cruiser Ri-Class eliteDestroyer Ro-Class Late ModelDestroyer Ro-Class Late ModelDestroyer I-Class
Formation 1: Line Ahead
J
海峡封鎖 深海遊撃部隊
Pattern 1 Light Cruiser Tsu-Class eliteDestroyer Ro-Class Late ModelDestroyer Ro-Class Late ModelDestroyer I-ClassDestroyer I-ClassSubmarine Ka-Class flagship
Formation 1: Line Ahead
Formation 2: Double Line
Pattern 2 Light Cruiser Tsu-Class eliteDestroyer Ro-Class Late ModelDestroyer Ro-Class Late ModelDestroyer Ro-Class Late ModelDestroyer Ro-Class Late ModelSubmarine Ka-Class flagship
Formation 1: Line Ahead
Pattern 3 Light Cruiser Tsu-ClassDestroyer Ro-Class Late ModelDestroyer Ro-Class Late ModelDestroyer I-ClassDestroyer I-ClassSubmarine Ka-Class
Formation 1: Line Ahead
Formation 2: Double Line
Pattern 4 Light Cruiser Tsu-ClassDestroyer Ro-Class Late ModelDestroyer I-ClassDestroyer I-ClassDestroyer I-Class
Formation 1: Line Ahead
Formation 2: Double Line
Pattern 5 Light Cruiser Tsu-ClassDestroyer Ro-Class Late ModelDestroyer Ro-Class Late ModelDestroyer I-ClassDestroyer I-ClassSubmarine Ka-Class elite
Formation 1: Line Ahead
Formation 2: Double Line
K
Battle Avoided
Pattern 1"Must be my imagination" (battle avoided)
L
Battle Avoided
Pattern 1"Must be my imagination" (battle avoided)
M
海峡前線集積地 防衛艦隊
Pattern 1 Light Carrier Nu-Class flagshipLight Carrier Nu-Class flagshipHeavy Cruiser Ne-Class eliteLight Cruiser Tsu-Class eliteDestroyer Ro-Class Late ModelDestroyer Ro-Class Late Model
Formation 2: Double Line
Formation 4: Echelon
AP:126
AS:282
AS+:564
Pattern 2 Light Carrier Nu-Class flagshipLight Carrier Nu-Class eliteHeavy Cruiser Ne-Class eliteLight Cruiser Tsu-ClassDestroyer Ro-Class Late ModelDestroyer Ro-Class Late Model
Formation 2: Double Line
Formation 4: Echelon
AP:98
AS:219
AS+:438
Pattern 3 Light Carrier Nu-Class eliteHeavy Cruiser Ne-ClassLight Cruiser Tsu-ClassDestroyer Ro-Class Late ModelDestroyer I-ClassDestroyer I-Class
Formation 2: Double Line
Formation 4: Echelon
AP:46
AS:104
AS+:207
Pattern 4 Light Carrier Nu-Class flagshipLight Carrier Nu-Class eliteHeavy Cruiser Ne-ClassLight Cruiser Tsu-ClassDestroyer Ro-Class Late ModelDestroyer Ro-Class Late Model
Formation 2: Double Line
Formation 4: Echelon
AP:98
AS:219
AS+:438
Pattern 5 Light Carrier Nu-Class eliteHeavy Cruiser Ne-ClassDestroyer Ro-Class Late ModelDestroyer I-ClassDestroyer I-ClassDestroyer I-Class
Formation 4: Echelon
AP:16
AS:36
AS+:72
N
深海潜水艦隊 海峡封鎖B群
Pattern 1 Submarine Ka-Class flagshipSubmarine Ka-Class eliteSubmarine Ka-Class elite
Formation 3: Diamond
Formation 5: Line Abreast
Pattern 2 Submarine Ka-Class eliteSubmarine Ka-ClassSubmarine Ka-Class
Formation 3: Diamond
Formation 5: Line Abreast
Pattern 3 Submarine Ka-Class eliteSubmarine Ka-Class eliteSubmarine Ka-Class elite
Formation 3: Diamond
Formation 5: Line Abreast
Pattern 4 Submarine Ka-Class flagshipSubmarine Ka-Class eliteSubmarine Ka-Class eliteSubmarine Ka-Class elite
Formation 3: Diamond
Formation 5: Line Abreast
Pattern 5 Submarine Ka-ClassSubmarine Ka-ClassSubmarine Ka-Class
Formation 3: Diamond
O
深海前線集積地 本部
Pattern 1 Supply Depot Princess - Vacation ModeArtillery ImpArtillery ImpDestroyer Ro-Class Late Model eliteDestroyer Ro-Class Late Model eliteTransport Ship Wa-Class elite
Formation 2: Double Line
Unknown
Pattern 2 Supply Depot Princess - Vacation ModeAirfield PrincessArtillery ImpArtillery ImpDestroyer Ro-Class Late Model eliteTransport Ship Wa-Class elite
Formation 2: Double Line
Unknown
Pattern 3 Supply Depot Princess - Vacation Mode - DamagedAirfield PrincessArtillery ImpArtillery ImpDestroyer Ro-Class Late Model eliteTransport Ship Wa-Class elite
Formation 2: Double Line
Unknown
Pattern 4 Supply Depot Princess - Vacation ModeDestroyer Ro-Class Late ModelDestroyer I-ClassDestroyer I-ClassTransport Ship Wa-Class
Formation 4: Echelon
Unknown
Pattern 5 Supply Depot Princess - Vacation ModeArtillery ImpDestroyer Ro-Class Late ModelDestroyer I-ClassDestroyer I-ClassTransport Ship Wa-Class
Formation 4: Echelon
Unknown
Pattern 6 Supply Depot Princess - Vacation Mode - DamagedAirfield PrincessArtillery ImpDestroyer Ro-Class Late ModelDestroyer I-ClassTransport Ship Wa-Class
Formation 4: Echelon
Unknown
Pattern 7 Supply Depot Princess - Vacation ModeAirfield PrincessDestroyer Ro-Class Late ModelDestroyer I-ClassDestroyer I-ClassTransport Ship Wa-Class
Formation 4: Echelon
Unknown
Pattern 8 Supply Depot Princess - Vacation Mode - DamagedArtillery ImpDestroyer Ro-Class Late ModelDestroyer Ro-Class Late ModelTransport Ship Wa-Class
Formation 4: Echelon
Unknown
Pattern 9 Supply Depot Princess - Vacation Mode - DamagedDestroyer Ro-Class Late ModelDestroyer I-ClassDestroyer I-ClassTransport Ship Wa-Class
Formation 4: Echelon
Unknown

Show/Hide Nodes and Enemy Encounters
Nodes and Enemy Encounters
NodePatternXpNode InfoFormAir
A
Battle Avoided
Pattern 1"Must be my imagination" (battle avoided)
B
海峡封鎖 深海戦艦部隊
Pattern 1 Battleship Ru-Class eliteBattleship Ru-Class eliteLight Cruiser Ho-Class eliteDestroyer Ro-Class Late ModelDestroyer I-ClassDestroyer I-Class
Formation 1: Line Ahead
Formation 2: Double Line
Pattern 2 Battleship Ru-Class flagshipBattleship Ru-Class flagshipLight Cruiser Ho-Class flagshipLight Cruiser Tsu-ClassDestroyer Ro-Class Late ModelDestroyer Ro-Class Late Model
Formation 1: Line Ahead
Formation 2: Double Line
Pattern 3 Battleship Ru-Class eliteBattleship Ru-Class eliteLight Cruiser Ho-Class eliteDestroyer I-ClassDestroyer I-ClassDestroyer I-Class
Formation 2: Double Line
Pattern 4 Battleship Ru-Class flagshipBattleship Ru-Class flagshipLight Cruiser Ho-Class eliteDestroyer Ro-Class Late ModelDestroyer I-ClassDestroyer I-Class
Formation 2: Double Line
Pattern 5 Battleship Ru-Class flagshipBattleship Ru-Class flagshipLight Cruiser Ho-Class flagshipLight Cruiser Tsu-ClassDestroyer I-Class Late ModelDestroyer I-Class Late Model
Formation 2: Double Line
Pattern 6 Battleship Ru-Class flagshipBattleship Ru-Class flagshipLight Cruiser Ho-Class eliteDestroyer Ro-Class Late ModelDestroyer Ro-Class Late ModelDestroyer I-Class
Formation 1: Line Ahead
C
海峡警備 深海水雷戦隊
Pattern 1 Light Cruiser Ho-Class flagshipDestroyer I-Class Late ModelDestroyer I-Class Late ModelDestroyer I-Class Late ModelDestroyer I-ClassDestroyer I-Class
Formation 1: Line Ahead
Formation 2: Double Line
Formation 3: Diamond
Pattern 2 Light Cruiser Ho-Class flagshipDestroyer I-Class Late ModelDestroyer I-Class Late ModelDestroyer I-ClassDestroyer I-ClassDestroyer I-Class
Formation 1: Line Ahead
Formation 2: Double Line
Formation 3: Diamond
Pattern 3 Light Cruiser Ho-Class flagshipDestroyer I-Class Late ModelDestroyer I-ClassDestroyer I-ClassDestroyer I-Class
Formation 1: Line Ahead
Formation 2: Double Line
Formation 3: Diamond
D
海峡封鎖 深海遊撃部隊
Pattern 1 Light Cruiser Tsu-Class eliteDestroyer Ro-Class Late ModelDestroyer Ro-Class Late ModelDestroyer I-ClassDestroyer I-ClassSubmarine Ka-Class flagship
Formation 1: Line Ahead
Formation 2: Double Line
Pattern 2 Light Cruiser Tsu-Class eliteDestroyer Ro-Class Late ModelDestroyer Ro-Class Late ModelDestroyer Ro-Class Late ModelDestroyer Ro-Class Late ModelSubmarine Ka-Class flagship
Formation 1: Line Ahead
Pattern 3 Light Cruiser Tsu-ClassDestroyer Ro-Class Late ModelDestroyer Ro-Class Late ModelDestroyer I-ClassDestroyer I-ClassSubmarine Ka-Class
Formation 1: Line Ahead
Formation 2: Double Line
Pattern 4 Light Cruiser Tsu-ClassDestroyer Ro-Class Late ModelDestroyer I-ClassDestroyer I-ClassDestroyer I-Class
Formation 1: Line Ahead
Formation 2: Double Line
Pattern 5 Light Cruiser Tsu-ClassDestroyer Ro-Class Late ModelDestroyer Ro-Class Late ModelDestroyer I-ClassDestroyer I-ClassSubmarine Ka-Class elite
Formation 1: Line Ahead
Formation 2: Double Line
E
深海集積地プーケット航空隊
Air Battle Node
Pattern 1 Supply Depot Princess - Vacation ModeAirfield PrincessAirfield PrincessArtillery ImpArtillery Imp
Formation 4: Echelon
Unknown
Pattern 2 Supply Depot Princess - Vacation ModeAirfield PrincessAirfield PrincessArtillery ImpArtillery Imp
Formation 4: Echelon
Unknown
Pattern 3 Supply Depot Princess - Vacation Mode - DamagedAirfield PrincessAirfield PrincessAirfield PrincessArtillery ImpArtillery Imp
Formation 4: Echelon
Unknown
Pattern 4 Supply Depot Princess - Vacation ModeAirfield PrincessArtillery ImpArtillery Imp
Formation 4: Echelon
Unknown
Pattern 5 Supply Depot Princess - Vacation ModeAirfield PrincessAirfield PrincessArtillery ImpArtillery Imp
Formation 4: Echelon
Unknown
Pattern 6 Supply Depot Princess - Vacation ModeAirfield PrincessAirfield PrincessArtillery ImpArtillery Imp
Formation 4: Echelon
Unknown
Pattern 7 Supply Depot Princess - Vacation ModeAirfield PrincessAirfield PrincessArtillery ImpArtillery Imp
Formation 4: Echelon
Unknown
Pattern 8 Supply Depot Princess - Vacation Mode - DamagedAirfield PrincessAirfield PrincessAirfield PrincessArtillery ImpArtillery Imp
Formation 4: Echelon
Unknown
Pattern 9 Supply Depot Princess - Vacation Mode - DamagedAirfield PrincessAirfield PrincessAirfield PrincessArtillery ImpArtillery Imp
Formation 4: Echelon
Unknown
F
Pattern 1Choose your route
G
Transport Drop-Off Node
Pattern 1 Transport drop-off
H
Battle Avoided
Pattern 1"Must be my imagination" (battle avoided)
I
海峡警備 深海重巡戦隊
Pattern 1 Heavy Cruiser Summer PrincessHeavy Cruiser Ri-Class flagshipHeavy Cruiser Ri-Class flagshipLight Cruiser Ho-Class flagshipDestroyer Ro-Class Late ModelDestroyer Ro-Class Late Model
Formation 1: Line Ahead
Pattern 2 Heavy Cruiser Summer PrincessHeavy Cruiser Ri-Class flagshipHeavy Cruiser Ri-Class flagshipLight Cruiser He-Class flagshipDestroyer Ro-Class Late ModelDestroyer Ro-Class Late Model
Formation 1: Line Ahead
Pattern 3 Heavy Cruiser Summer PrincessHeavy Cruiser Ri-Class flagshipHeavy Cruiser Ri-Class flagshipDestroyer Ro-Class Late ModelDestroyer Ro-Class Late ModelDestroyer Ro-Class Late Model
Formation 1: Line Ahead
Pattern 4 Heavy Cruiser Summer PrincessHeavy Cruiser Ri-Class eliteHeavy Cruiser Ri-Class eliteDestroyer Ro-Class Late ModelDestroyer I-ClassDestroyer I-Class
Formation 1: Line Ahead
Pattern 5 Heavy Cruiser Summer PrincessHeavy Cruiser Ri-Class eliteHeavy Cruiser Ri-Class eliteLight Cruiser Ho-Class flagshipDestroyer Ro-Class Late ModelDestroyer Ro-Class Late Model
Formation 1: Line Ahead
Pattern 6 Heavy Cruiser Summer PrincessHeavy Cruiser Ri-Class eliteHeavy Cruiser Ri-Class eliteDestroyer I-ClassDestroyer I-ClassDestroyer I-Class
Formation 1: Line Ahead
Pattern 7 Heavy Cruiser Summer PrincessHeavy Cruiser Ri-Class eliteHeavy Cruiser Ri-Class eliteDestroyer Ro-Class Late ModelDestroyer Ro-Class Late ModelDestroyer Ro-Class Late Model
Formation 1: Line Ahead
Pattern 8 Heavy Cruiser Summer PrincessHeavy Cruiser Ri-Class eliteHeavy Cruiser Ri-Class eliteDestroyer Ro-Class Late ModelDestroyer Ro-Class Late ModelDestroyer I-Class
Formation 1: Line Ahead
Pattern 9 Heavy Cruiser Summer PrincessHeavy Cruiser Ri-Class eliteHeavy Cruiser Ri-Class eliteDestroyer Ro-Class Late ModelDestroyer Ro-Class Late ModelDestroyer I-Class
Formation 1: Line Ahead
J
海峡封鎖 深海遊撃部隊
Pattern 1 Light Cruiser Tsu-Class eliteDestroyer Ro-Class Late ModelDestroyer Ro-Class Late ModelDestroyer I-ClassDestroyer I-ClassSubmarine Ka-Class flagship
Formation 1: Line Ahead
Formation 2: Double Line
Pattern 2 Light Cruiser Tsu-Class eliteDestroyer Ro-Class Late ModelDestroyer Ro-Class Late ModelDestroyer Ro-Class Late ModelDestroyer Ro-Class Late ModelSubmarine Ka-Class flagship
Formation 1: Line Ahead
Pattern 3 Light Cruiser Tsu-ClassDestroyer Ro-Class Late ModelDestroyer Ro-Class Late ModelDestroyer I-ClassDestroyer I-ClassSubmarine Ka-Class
Formation 1: Line Ahead
Formation 2: Double Line
Pattern 4 Light Cruiser Tsu-ClassDestroyer Ro-Class Late ModelDestroyer I-ClassDestroyer I-ClassDestroyer I-Class
Formation 1: Line Ahead
Formation 2: Double Line
Pattern 5 Light Cruiser Tsu-ClassDestroyer Ro-Class Late ModelDestroyer Ro-Class Late ModelDestroyer I-ClassDestroyer I-ClassSubmarine Ka-Class elite
Formation 1: Line Ahead
Formation 2: Double Line
K
Battle Avoided
Pattern 1"Must be my imagination" (battle avoided)
L
Battle Avoided
Pattern 1"Must be my imagination" (battle avoided)
M
海峡前線集積地 防衛艦隊
Pattern 1 Light Carrier Nu-Class flagshipLight Carrier Nu-Class flagshipHeavy Cruiser Ne-Class eliteLight Cruiser Tsu-Class eliteDestroyer Ro-Class Late ModelDestroyer Ro-Class Late Model
Formation 2: Double Line
Formation 4: Echelon
AP:126
AS:282
AS+:564
Pattern 2 Light Carrier Nu-Class flagshipLight Carrier Nu-Class eliteHeavy Cruiser Ne-Class eliteLight Cruiser Tsu-ClassDestroyer Ro-Class Late ModelDestroyer Ro-Class Late Model
Formation 2: Double Line
Formation 4: Echelon
AP:98
AS:219
AS+:438
Pattern 3 Light Carrier Nu-Class eliteHeavy Cruiser Ne-ClassLight Cruiser Tsu-ClassDestroyer Ro-Class Late ModelDestroyer I-ClassDestroyer I-Class
Formation 2: Double Line
Formation 4: Echelon
AP:46
AS:104
AS+:207
Pattern 4 Light Carrier Nu-Class flagshipLight Carrier Nu-Class eliteHeavy Cruiser Ne-ClassLight Cruiser Tsu-ClassDestroyer Ro-Class Late ModelDestroyer Ro-Class Late Model
Formation 2: Double Line
Formation 4: Echelon
AP:98
AS:219
AS+:438
Pattern 5 Light Carrier Nu-Class eliteHeavy Cruiser Ne-ClassDestroyer Ro-Class Late ModelDestroyer I-ClassDestroyer I-ClassDestroyer I-Class
Formation 4: Echelon
AP:16
AS:36
AS+:72
N
深海潜水艦隊 海峡封鎖B群
Pattern 1 Submarine Ka-Class flagshipSubmarine Ka-Class eliteSubmarine Ka-Class elite
Formation 3: Diamond
Formation 5: Line Abreast
Pattern 2 Submarine Ka-Class eliteSubmarine Ka-ClassSubmarine Ka-Class
Formation 3: Diamond
Formation 5: Line Abreast
Pattern 3 Submarine Ka-Class eliteSubmarine Ka-Class eliteSubmarine Ka-Class elite
Formation 3: Diamond
Formation 5: Line Abreast
Pattern 4 Submarine Ka-Class flagshipSubmarine Ka-Class eliteSubmarine Ka-Class eliteSubmarine Ka-Class elite
Formation 3: Diamond
Formation 5: Line Abreast
Pattern 5 Submarine Ka-ClassSubmarine Ka-ClassSubmarine Ka-Class
Formation 3: Diamond
O
深海前線集積地 本部
Pattern 1 Supply Depot Princess - Vacation ModeArtillery ImpArtillery ImpDestroyer Ro-Class Late Model eliteDestroyer Ro-Class Late Model eliteTransport Ship Wa-Class elite
Formation 2: Double Line
Unknown
Pattern 2 Supply Depot Princess - Vacation ModeAirfield PrincessArtillery ImpArtillery ImpDestroyer Ro-Class Late Model eliteTransport Ship Wa-Class elite
Formation 2: Double Line
Unknown
Pattern 3 Supply Depot Princess - Vacation ModeDestroyer Ro-Class Late ModelDestroyer I-ClassDestroyer I-ClassTransport Ship Wa-Class
Formation 4: Echelon
Unknown
Pattern 4 Supply Depot Princess - Vacation Mode - DamagedAirfield PrincessArtillery ImpArtillery ImpDestroyer Ro-Class Late Model eliteTransport Ship Wa-Class elite
Formation 2: Double Line
Unknown
Pattern 5 Supply Depot Princess - Vacation ModeArtillery ImpDestroyer Ro-Class Late ModelDestroyer I-ClassDestroyer I-ClassTransport Ship Wa-Class
Formation 4: Echelon
Unknown
Pattern 6 Supply Depot Princess - Vacation Mode - DamagedAirfield PrincessArtillery ImpDestroyer Ro-Class Late ModelDestroyer I-ClassTransport Ship Wa-Class
Formation 4: Echelon
Unknown
Pattern 7 Supply Depot Princess - Vacation ModeAirfield PrincessDestroyer Ro-Class Late ModelDestroyer I-ClassDestroyer I-ClassTransport Ship Wa-Class
Formation 4: Echelon
Unknown
Pattern 8 Supply Depot Princess - Vacation Mode - DamagedArtillery ImpDestroyer Ro-Class Late ModelDestroyer Ro-Class Late ModelTransport Ship Wa-Class
Formation 4: Echelon
Unknown
Pattern 9 Supply Depot Princess - Vacation Mode - DamagedDestroyer Ro-Class Late ModelDestroyer I-ClassDestroyer I-ClassTransport Ship Wa-Class
Formation 4: Echelon
Unknown

Show/Hide Nodes and Enemy Encounters
Nodes and Enemy Encounters
NodePatternXpNode InfoFormAir
A
Battle Avoided
Pattern 1"Must be my imagination" (battle avoided)
B
海峡封鎖 深海戦艦部隊
Pattern 1 Battleship Ru-Class eliteBattleship Ru-Class eliteLight Cruiser Ho-Class eliteDestroyer Ro-Class Late ModelDestroyer I-ClassDestroyer I-Class
Formation 1: Line Ahead
Formation 2: Double Line
Pattern 2 Battleship Ru-Class flagshipBattleship Ru-Class flagshipLight Cruiser Ho-Class flagshipLight Cruiser Tsu-ClassDestroyer Ro-Class Late ModelDestroyer Ro-Class Late Model
Formation 1: Line Ahead
Formation 2: Double Line
Pattern 3 Battleship Ru-Class eliteBattleship Ru-Class eliteLight Cruiser Ho-Class eliteDestroyer I-ClassDestroyer I-ClassDestroyer I-Class
Formation 2: Double Line
Pattern 4 Battleship Ru-Class flagshipBattleship Ru-Class flagshipLight Cruiser Ho-Class eliteDestroyer Ro-Class Late ModelDestroyer I-ClassDestroyer I-Class
Formation 2: Double Line
Pattern 5 Battleship Ru-Class flagshipBattleship Ru-Class flagshipLight Cruiser Ho-Class eliteDestroyer Ro-Class Late ModelDestroyer Ro-Class Late ModelDestroyer I-Class
Formation 1: Line Ahead
Pattern 6 Battleship Ru-Class flagshipBattleship Ru-Class flagshipLight Cruiser Ho-Class flagshipLight Cruiser Tsu-ClassDestroyer I-Class Late ModelDestroyer I-Class Late Model
Formation 2: Double Line
C
海峡警備 深海水雷戦隊
Pattern 1 Light Cruiser Ho-Class flagshipDestroyer I-Class Late ModelDestroyer I-Class Late ModelDestroyer I-Class Late ModelDestroyer I-ClassDestroyer I-Class
Formation 1: Line Ahead
Formation 2: Double Line
Formation 3: Diamond
Pattern 2 Light Cruiser Ho-Class flagshipDestroyer I-Class Late ModelDestroyer I-Class Late ModelDestroyer I-ClassDestroyer I-ClassDestroyer I-Class
Formation 1: Line Ahead
Formation 2: Double Line
Formation 3: Diamond
Pattern 3 Light Cruiser Ho-Class flagshipDestroyer I-Class Late ModelDestroyer I-ClassDestroyer I-ClassDestroyer I-Class
Formation 1: Line Ahead
Formation 2: Double Line
Formation 3: Diamond
D
海峡封鎖 深海遊撃部隊
Pattern 1 Light Cruiser Tsu-Class eliteDestroyer Ro-Class Late ModelDestroyer Ro-Class Late ModelDestroyer I-ClassDestroyer I-ClassSubmarine Ka-Class flagship
Formation 1: Line Ahead
Formation 2: Double Line
Pattern 2 Light Cruiser Tsu-Class eliteDestroyer Ro-Class Late ModelDestroyer Ro-Class Late ModelDestroyer Ro-Class Late ModelDestroyer Ro-Class Late ModelSubmarine Ka-Class flagship
Formation 1: Line Ahead
Pattern 3 Light Cruiser Tsu-ClassDestroyer Ro-Class Late ModelDestroyer Ro-Class Late ModelDestroyer I-ClassDestroyer I-ClassSubmarine Ka-Class
Formation 1: Line Ahead
Formation 2: Double Line
Pattern 4 Light Cruiser Tsu-ClassDestroyer Ro-Class Late ModelDestroyer I-ClassDestroyer I-ClassDestroyer I-Class
Formation 1: Line Ahead
Formation 2: Double Line
Pattern 5 Light Cruiser Tsu-ClassDestroyer Ro-Class Late ModelDestroyer Ro-Class Late ModelDestroyer I-ClassDestroyer I-ClassSubmarine Ka-Class elite
Formation 1: Line Ahead
Formation 2: Double Line
E
深海集積地プーケット航空隊
Pattern 1 Supply Depot Princess - Vacation ModeAirfield PrincessAirfield PrincessArtillery ImpArtillery Imp
Formation 4: Echelon
Unknown
Pattern 2 Supply Depot Princess - Vacation ModeAirfield PrincessAirfield PrincessArtillery ImpArtillery Imp
Formation 4: Echelon
Unknown
Pattern 3 Supply Depot Princess - Vacation Mode - DamagedAirfield PrincessAirfield PrincessAirfield PrincessArtillery ImpArtillery Imp
Formation 4: Echelon
Unknown
Pattern 4 Supply Depot Princess - Vacation ModeAirfield PrincessArtillery ImpArtillery Imp
Formation 4: Echelon
Unknown
Pattern 5 Supply Depot Princess - Vacation ModeAirfield PrincessAirfield PrincessArtillery ImpArtillery Imp
Formation 4: Echelon
Unknown
Pattern 6 Supply Depot Princess - Vacation ModeAirfield PrincessAirfield PrincessArtillery ImpArtillery Imp
Formation 4: Echelon
Unknown
Pattern 7 Supply Depot Princess - Vacation ModeAirfield PrincessAirfield PrincessArtillery ImpArtillery Imp
Formation 4: Echelon
Unknown
Pattern 8 Supply Depot Princess - Vacation Mode - DamagedAirfield PrincessAirfield PrincessAirfield PrincessArtillery ImpArtillery Imp
Formation 4: Echelon
Unknown
Pattern 9 Supply Depot Princess - Vacation Mode - DamagedAirfield PrincessAirfield PrincessAirfield PrincessArtillery ImpArtillery Imp
Formation 4: Echelon
Unknown
F
Pattern 1Choose your route
G
Transport Drop-Off Node
Pattern 1 Transport drop-off
H
Battle Avoided
Pattern 1"Must be my imagination" (battle avoided)
I
海峡警備 深海重巡戦隊
Pattern 1 Heavy Cruiser Summer PrincessHeavy Cruiser Ri-Class flagshipHeavy Cruiser Ri-Class flagshipLight Cruiser He-Class flagshipDestroyer Ro-Class Late ModelDestroyer Ro-Class Late Model
Formation 1: Line Ahead
Pattern 2 Heavy Cruiser Summer PrincessHeavy Cruiser Ri-Class flagshipHeavy Cruiser Ri-Class flagshipLight Cruiser Ho-Class flagshipDestroyer Ro-Class Late ModelDestroyer Ro-Class Late Model
Formation 1: Line Ahead
Pattern 3 Heavy Cruiser Summer PrincessHeavy Cruiser Ri-Class flagshipHeavy Cruiser Ri-Class flagshipDestroyer Ro-Class Late ModelDestroyer Ro-Class Late ModelDestroyer Ro-Class Late Model
Formation 1: Line Ahead
Pattern 4 Heavy Cruiser Summer PrincessHeavy Cruiser Ri-Class eliteHeavy Cruiser Ri-Class eliteDestroyer Ro-Class Late ModelDestroyer I-ClassDestroyer I-Class
Formation 1: Line Ahead
Pattern 5 Heavy Cruiser Summer PrincessHeavy Cruiser Ri-Class eliteHeavy Cruiser Ri-Class eliteDestroyer I-ClassDestroyer I-ClassDestroyer I-Class
Formation 1: Line Ahead
Pattern 6 Heavy Cruiser Summer PrincessHeavy Cruiser Ri-Class eliteHeavy Cruiser Ri-Class eliteDestroyer Ro-Class Late ModelDestroyer Ro-Class Late ModelDestroyer I-Class
Formation 1: Line Ahead
Pattern 7 Heavy Cruiser Summer PrincessHeavy Cruiser Ri-Class eliteHeavy Cruiser Ri-Class eliteLight Cruiser Ho-Class flagshipDestroyer Ro-Class Late ModelDestroyer Ro-Class Late Model
Formation 1: Line Ahead
Pattern 8 Heavy Cruiser Summer PrincessHeavy Cruiser Ri-Class eliteHeavy Cruiser Ri-Class eliteDestroyer Ro-Class Late ModelDestroyer Ro-Class Late ModelDestroyer Ro-Class Late Model
Formation 1: Line Ahead
Pattern 9 Heavy Cruiser Summer PrincessHeavy Cruiser Ri-Class eliteHeavy Cruiser Ri-Class eliteDestroyer Ro-Class Late ModelDestroyer Ro-Class Late ModelDestroyer I-Class
Formation 1: Line Ahead
J
海峡封鎖 深海遊撃部隊
Pattern 1 Light Cruiser Tsu-Class eliteDestroyer Ro-Class Late ModelDestroyer Ro-Class Late ModelDestroyer I-ClassDestroyer I-ClassSubmarine Ka-Class flagship
Formation 1: Line Ahead
Formation 2: Double Line
Pattern 2 Light Cruiser Tsu-Class eliteDestroyer Ro-Class Late ModelDestroyer Ro-Class Late ModelDestroyer Ro-Class Late ModelDestroyer Ro-Class Late ModelSubmarine Ka-Class flagship
Formation 1: Line Ahead
Pattern 3 Light Cruiser Tsu-ClassDestroyer Ro-Class Late ModelDestroyer Ro-Class Late ModelDestroyer I-ClassDestroyer I-ClassSubmarine Ka-Class
Formation 1: Line Ahead
Formation 2: Double Line
Pattern 4 Light Cruiser Tsu-ClassDestroyer Ro-Class Late ModelDestroyer I-ClassDestroyer I-ClassDestroyer I-Class
Formation 1: Line Ahead
Formation 2: Double Line
Pattern 5 Light Cruiser Tsu-ClassDestroyer Ro-Class Late ModelDestroyer Ro-Class Late ModelDestroyer I-ClassDestroyer I-ClassSubmarine Ka-Class elite
Formation 1: Line Ahead
Formation 2: Double Line
K
Battle Avoided
Pattern 1"Must be my imagination" (battle avoided)
L
Battle Avoided
Pattern 1"Must be my imagination" (battle avoided)
M
海峡前線集積地 防衛艦隊
Pattern 1 Light Carrier Nu-Class flagshipLight Carrier Nu-Class flagshipHeavy Cruiser Ne-Class eliteLight Cruiser Tsu-Class eliteDestroyer Ro-Class Late ModelDestroyer Ro-Class Late Model
Formation 2: Double Line
Formation 4: Echelon
AP:126
AS:282
AS+:564
Pattern 2 Light Carrier Nu-Class flagshipLight Carrier Nu-Class eliteHeavy Cruiser Ne-Class eliteLight Cruiser Tsu-ClassDestroyer Ro-Class Late ModelDestroyer Ro-Class Late Model
Formation 2: Double Line
Formation 4: Echelon
AP:98
AS:219
AS+:438
Pattern 3 Light Carrier Nu-Class eliteHeavy Cruiser Ne-ClassLight Cruiser Tsu-ClassDestroyer Ro-Class Late ModelDestroyer I-ClassDestroyer I-Class
Formation 2: Double Line
Formation 4: Echelon
AP:46
AS:104
AS+:207
Pattern 4 Light Carrier Nu-Class flagshipLight Carrier Nu-Class eliteHeavy Cruiser Ne-ClassLight Cruiser Tsu-ClassDestroyer Ro-Class Late ModelDestroyer Ro-Class Late Model
Formation 2: Double Line
Formation 4: Echelon
AP:98
AS:219
AS+:438
Pattern 5 Light Carrier Nu-Class eliteHeavy Cruiser Ne-ClassDestroyer Ro-Class Late ModelDestroyer I-ClassDestroyer I-ClassDestroyer I-Class
Formation 4: Echelon
AP:16
AS:36
AS+:72
N
深海潜水艦隊 海峡封鎖B群
Pattern 1 Submarine Ka-Class flagshipSubmarine Ka-Class eliteSubmarine Ka-Class elite
Formation 3: Diamond
Formation 5: Line Abreast
Pattern 2 Submarine Ka-Class eliteSubmarine Ka-ClassSubmarine Ka-Class
Formation 3: Diamond
Formation 5: Line Abreast
Pattern 3 Submarine Ka-Class flagshipSubmarine Ka-Class eliteSubmarine Ka-Class eliteSubmarine Ka-Class elite
Formation 3: Diamond
Formation 5: Line Abreast
Pattern 4 Submarine Ka-Class eliteSubmarine Ka-Class eliteSubmarine Ka-Class elite
Formation 5: Line Abreast
Formation 3: Diamond
Pattern 5 Submarine Ka-ClassSubmarine Ka-ClassSubmarine Ka-Class
Formation 3: Diamond
O
深海前線集積地 本部
Pattern 1 Supply Depot Princess - Vacation ModeArtillery ImpArtillery ImpDestroyer Ro-Class Late Model eliteDestroyer Ro-Class Late Model eliteTransport Ship Wa-Class elite
Formation 2: Double Line
Unknown
Pattern 2 Supply Depot Princess - Vacation ModeAirfield PrincessArtillery ImpArtillery ImpDestroyer Ro-Class Late Model eliteTransport Ship Wa-Class elite
Formation 2: Double Line
Unknown
Pattern 3 Supply Depot Princess - Vacation Mode - DamagedAirfield PrincessArtillery ImpArtillery ImpDestroyer Ro-Class Late Model eliteTransport Ship Wa-Class elite
Formation 2: Double Line
Unknown
Pattern 4 Supply Depot Princess - Vacation ModeDestroyer Ro-Class Late ModelDestroyer I-ClassDestroyer I-ClassTransport Ship Wa-Class
Formation 4: Echelon
Unknown
Pattern 5 Supply Depot Princess - Vacation ModeArtillery ImpDestroyer Ro-Class Late ModelDestroyer I-ClassDestroyer I-ClassTransport Ship Wa-Class
Formation 4: Echelon
Unknown
Pattern 6 Supply Depot Princess - Vacation Mode - DamagedArtillery ImpDestroyer Ro-Class Late ModelDestroyer Ro-Class Late ModelTransport Ship Wa-Class
Formation 4: Echelon
Unknown
Pattern 7 Supply Depot Princess - Vacation ModeAirfield PrincessDestroyer Ro-Class Late ModelDestroyer I-ClassDestroyer I-ClassTransport Ship Wa-Class
Formation 4: Echelon
Unknown
Pattern 8 Supply Depot Princess - Vacation Mode - DamagedAirfield PrincessArtillery ImpDestroyer Ro-Class Late ModelDestroyer I-ClassTransport Ship Wa-Class
Formation 4: Echelon
Unknown
Pattern 9 Supply Depot Princess - Vacation Mode - DamagedDestroyer Ro-Class Late ModelDestroyer I-ClassDestroyer I-ClassTransport Ship Wa-Class
Formation 4: Echelon
Unknown

Ship drops

NodeShip List
FDestroyers
Light Cruisers
Auxiliary Ships
IDestroyers
Light Cruisers
KDestroyers
NDestroyers
Light Cruisers
Auxiliary Ships
ODestroyer Escorts
Destroyers
Light Cruisers
Heavy Cruisers
Battleships
Light Aircraft Carriers
Seaplane Tenders
Submarines


E-3

OoyodoE-3Summer2018.png

Battle off South-Western Ceylon
No map name yet

Information

  • Event Tag: GreenTagSummer2018.png

Boss: Part 1: Summer Harbor Princess

  • Hard (): 2000 HP
  • Medium (): 1800 HP
  • Easy (): 1700 HP
  • Casual (): 1700 HP

Boss: Part 2: Anchorage Water Demon (Vacation Mode)

  • Hard (): 1500 HP
  • Medium (): 1400 HP
  • Easy (): 1300 HP
  • Casual (): 1300 HP

Boss: Part 3: German Escort Princess

  • Hard (): 1400 HP
  • Medium ():
  • Easy (): 1300 HP
  • Casual (): 1300 HP

Key Rewards:

Summer2018E-3Banner.png
Summer2018E-3Map.png

Branching rules

E-3 Branching Rules
Nodes Rules
A
B
  • Meet ANY of the following requirements to go to B:
    • Amount of (F)BB(V)+CV(L/B) in MAIN Fleet = 4
    • Amount of (F)BB(V)+CV(L/B) in MAIN Fleet = 6
  • Meet ALL of the following requirements to go to E:
    • Amount of ships ≤ 5
    • Amount of DD = 4
    • No CLT
    • ???
    • ???
  • Otherwise, go to C
C
E
B
C
  • Meet ANY of the following requirements:
    • Single Fleet
    • Amount of (F)BB(V)+CV(L/B) in MAIN Fleet = 6
D
  • Do not meet the requirements to go to C.
C
D
  • Meet ANY of the following requirements to go to F:
    • Single Fleet AND amount of DD ≥ 2
    • Amount of (F)BB(V)+CV(L/B) in MAIN Fleet ≤ 3
  • Otherwise, go to D.
F
E
  • ???
E
F
  • Active Branching
H
F
I
  • Active Branching
J
H
G
  • ???
J
  • ???
J
K
  • Failing LoS check FORCES you to L.
  • Go to K if Combined Fleet.
  • Go to M if Single Fleet
L
M
I
N
  • Amount of (F)BB(V)+CV(L/B) in MAIN Fleet ≥ 4
O
  • Amount of (F)BB(V)+CV(L/B) in MAIN Fleet ≤ 3
N
O
  • Amount of (F)BB(V)+CV(L/B) in MAIN Fleet ≤ 4
P
  • Amount of (F)BB(V)+CV(L/B) in MAIN Fleet ≥ 5
O
L
  • Fail the LoS check.
Q
  • Pass the LoS check.

Branching compositions were reported over the course of the event.

Tips

Important Notice:

E-3 is suppose to have Friend Fleets but as of current they are not implemented. Take caution with trying to complete this map until this feature is fully implemented.

The follow guide is an early leaked release of Comptiq's October's issue. While this may provide some very basic hints, please use at your own discretion until event guides are constructed.

  • This Operation will consist of 2 phases where you'll be attacking boss units.
  • A Combined fleet will be needed for this operation.
  • The main boss of the first phase is the Summer Harbor Princess
  • Anti-Installation gear such as Type 3 Shells and Type 2 Ka-Mi Tanks, and WG42s may be important for this section
  • After defeating her, the next boss will be available to take down.

Special thanks to Ruiooshima for his translation work

The event guides are to be constructed through the respected Event map page guide to be reviewed by editor staff / collaboration committee before being approved here. Do not under any circumstance update the guides through this page or attempt to fix them through this page. Please only update guides through their respected sandbox pages.


Show/Hide Nodes and Enemy Encounters
Nodes and Enemy Encounters
NodePatternXpNode InfoFormAir
A
Battle Avoided
Pattern 1"Must be my imagination" (battle avoided)
B
深海潜水艦隊 前方展開群
Pattern 1 Submarine Ka-Class flagshipSubmarine Ka-Class eliteSubmarine Ka-Class eliteSubmarine Ka-Class elite
Formation 3: Diamond
Formation 5: Line Abreast
Pattern 2 Submarine Ka-Class flagshipSubmarine Ka-Class eliteSubmarine Ka-Class elite
Formation 3: Diamond
Formation 5: Line Abreast
C
深海前線泊地艦隊 前衛水雷戦隊
Pattern 1 Light Cruiser Tsu-Class eliteDestroyer Ha-Class Late ModelDestroyer Ha-Class Late ModelDestroyer Ha-Class Late ModelDestroyer I-ClassDestroyer I-Class
Formation 1: Line Ahead
Formation 2: Double Line
Pattern 2 Light Cruiser Tsu-Class eliteDestroyer Ha-Class Late ModelDestroyer Ha-Class Late ModelDestroyer Ha-Class Late ModelDestroyer Ro-Class Late ModelDestroyer Ro-Class Late Model
Formation 1: Line Ahead
D
深海前線泊地艦隊 高速機動部隊
Pattern 1 Standard Carrier Wo-Class Kai flagshipHeavy Cruiser Ri-Class flagshipHeavy Cruiser Ri-Class flagshipLight Cruiser Tsu-Class eliteDestroyer Ha-Class Late ModelDestroyer Ha-Class Late Model
Formation 2: Double Line
Formation 4: Echelon
AP:84
AS:189
AS+:378
Pattern 2 Standard Carrier Wo-Class Kai flagshipHeavy Cruiser Ri-Class flagshipHeavy Cruiser Ri-Class flagshipLight Cruiser Tsu-Class eliteDestroyer Ha-Class Late ModelDestroyer Ha-Class Late Model
Formation 4: Echelon
AP:88
AS:198
AS+:396
E
Pattern 1
F
Pattern 1Choose your route
G
Pattern 1
H
深海港湾兵站 補給船団
Pattern 1 Transport Ship Wa-Class eliteTransport Ship Wa-Class eliteTransport Ship Wa-ClassTransport Ship Wa-ClassDestroyer Ro-Class Late ModelDestroyer Ro-Class Late Model
Formation 2: Double Line
Pattern 2 Transport Ship Wa-Class eliteTransport Ship Wa-Class eliteTransport Ship Wa-Class eliteTransport Ship Wa-ClassDestroyer Ro-Class Late ModelDestroyer Ro-Class Late Model
Formation 2: Double Line
Pattern 3 Transport Ship Wa-Class eliteTransport Ship Wa-ClassTransport Ship Wa-ClassTransport Ship Wa-ClassDestroyer Ro-Class Late ModelDestroyer Ro-Class Late Model
Formation 2: Double Line
Pattern 4 Transport Ship Wa-Class eliteTransport Ship Wa-Class eliteTransport Ship Wa-Class eliteTransport Ship Wa-Class eliteDestroyer Ro-Class Late ModelDestroyer Ro-Class Late Model
Formation 2: Double Line
I
深海東方増派潜水艦隊 I群
Pattern 1 Submarine Yo-Class flagshipSubmarine Ka-Class eliteSubmarine Ka-Class eliteSubmarine Ka-Class elite
Formation 3: Diamond
Formation 5: Line Abreast
Pattern 2 Submarine Yo-Class flagshipSubmarine Ka-Class eliteSubmarine Ka-Class elite
Formation 3: Diamond
Formation 5: Line Abreast
Pattern 3 Submarine Yo-Class flagshipSubmarine Yo-Class flagshipSubmarine Ka-Class eliteSubmarine Ka-Class elite
Formation 3: Diamond
J
海峡封鎖 深海戦艦部隊
Pattern 1 Battleship Ta-Class flagshipBattleship Ta-Class flagshipLight Carrier Nu-Class flagshipLight Cruiser Tsu-Class eliteDestroyer Ha-Class Late ModelDestroyer Ha-Class Late Model
Formation 1: Line Ahead
Formation 2: Double Line
AP:63
AS:141
AS+:282
Pattern 2 Battleship Ta-Class flagshipBattleship Ta-Class flagshipLight Carrier Nu-Class flagshipLight Cruiser Tsu-ClassDestroyer Ha-Class Late ModelDestroyer Ha-Class Late Model
Formation 1: Line Ahead
Formation 2: Double Line
AP:52
AS:116
AS+:231
K
深海東方増派潜水艦隊 II群
Pattern 1 Submarine Yo-Class flagshipSubmarine Ka-Class eliteSubmarine Ka-Class eliteSubmarine Ka-Class elite
Formation 3: Diamond
Formation 5: Line Abreast
Pattern 2 Submarine Yo-Class flagshipSubmarine Yo-Class flagshipSubmarine Ka-Class eliteSubmarine Ka-Class elite
Formation 3: Diamond
Pattern 3 Submarine Yo-Class flagshipSubmarine Ka-Class eliteSubmarine Ka-Class elite
Formation 3: Diamond
Formation 5: Line Abreast
L
Battle Avoided
Pattern 1"Must be my imagination" (battle avoided)
M
セイロン島南部 深海占拠港湾
Pattern 1 summer_Harbor Princess Final FormArtillery ImpArtillery ImpLight Cruiser Tsu-Class elitePT Imp GroupPT Imp Group
Formation 2: Double Line
AP:64
AS:144
AS+:288
Pattern 2 Harbor Summer PrincessArtillery ImpArtillery ImpPT Imp GroupPT Imp GroupTransport Ship Wa-Class elite
Formation 2: Double Line
AP:64
AS:144
AS+:288
Pattern 3 Harbor Summer PrincessArtillery ImpArtillery ImpArtillery ImpPT Imp GroupPT Imp Group
Formation 2: Double Line
AP:64
AS:144
AS+:288
N
深海前線葉艦棲泊地 航空隊
Air Battle Node
Pattern 1 German Escort Princess - DamagedLight Carrier Nu-Class flagshipLight Carrier Nu-Class flagshipLight Carrier Nu-Class flagshipDestroyer Na-Class Late Model eliteDestroyer Na-Class Late Model elite
Formation 4: Echelon
Unknown
Pattern 2 Anchorage Water Demon - Vacation ModeLight Carrier Nu-Class eliteLight Carrier Nu-Class eliteLight Cruiser Tsu-Class eliteDestroyer Na-Class Late ModelDestroyer Na-Class Late Model
Formation 4: Echelon
Unknown
Pattern 3 German Escort PrincessLight Carrier Nu-Class flagshipLight Carrier Nu-Class flagshipLight Cruiser Tsu-Class eliteDestroyer Na-Class Late Model eliteDestroyer Na-Class Late Model elite
Formation 4: Echelon
Unknown
Pattern 4 Anchorage Water Demon - Vacation ModeLight Carrier Nu-Class flagshipLight Carrier Nu-Class flagshipLight Cruiser Tsu-Class eliteDestroyer Na-Class eliteDestroyer Na-Class elite
Formation 4: Echelon
Unknown
O
深海前線葉艦棲泊地 警備艦隊
Pattern 1 Battleship Ta-Class flagshipBattleship Ta-Class flagshipHeavy Cruiser Ne-Class eliteLight Cruiser Tsu-Class eliteDestroyer Ha-Class Late ModelDestroyer Ha-Class Late Model
Formation 1: Line Ahead
Formation 2: Double Line
Pattern 2 Battleship Ta-Class flagshipHeavy Cruiser Ne-Class eliteHeavy Cruiser Ne-Class eliteLight Cruiser Tsu-Class eliteDestroyer Ha-Class Late ModelDestroyer Ha-Class Late Model
Formation 1: Line Ahead
Formation 2: Double Line
P
深海前線葉艦棲泊地 航空隊
Air Battle Node
Pattern 1 Anchorage Water Demon - Vacation ModeLight Carrier Nu-Class eliteLight Carrier Nu-Class eliteLight Cruiser Tsu-Class eliteDestroyer Na-Class Late ModelDestroyer Na-Class Late Model
Formation 4: Echelon
Unknown
Pattern 2 German Escort Princess - DamagedLight Carrier Nu-Class flagshipLight Carrier Nu-Class flagshipLight Carrier Nu-Class flagshipDestroyer Na-Class Late Model eliteDestroyer Na-Class Late Model elite
Formation 4: Echelon
Unknown
Pattern 3 German Escort PrincessLight Carrier Nu-Class flagshipLight Carrier Nu-Class flagshipLight Cruiser Tsu-Class eliteDestroyer Na-Class Late Model eliteDestroyer Na-Class Late Model elite
Formation 4: Echelon
Unknown
Pattern 4 Anchorage Water Demon - Vacation ModeLight Carrier Nu-Class flagshipLight Carrier Nu-Class flagshipLight Cruiser Tsu-Class eliteDestroyer Na-Class eliteDestroyer Na-Class elite
Formation 4: Echelon
Unknown
Q
深海前線葉艦棲泊地
Pattern 1
phase 2
Anchorage Water Demon - Vacation ModeLight Carrier Nu-Class eliteLight Carrier Nu-Class eliteBattleship Ru-Class flagshipHeavy Cruiser Ne-Class eliteHeavy Cruiser Ne-Class elite
Light Cruiser Tsu-Class eliteDestroyer Na-Class eliteDestroyer Na-Class Late ModelDestroyer Na-Class Late ModelDestroyer Ha-Class Late ModelDestroyer Ha-Class Late Model
Cruising Formation 4: Battle Formation
Unknown
Pattern 2
Final Form
phase 2
Anchorage Water Demon - Vacation ModeLight Carrier Nu-Class flagshipLight Carrier Nu-Class flagshipBattleship Ru-Class flagshipHeavy Cruiser Ne-Class eliteHeavy Cruiser Ne-Class elite
Light Cruiser Tsu-Class eliteDestroyer Na-Class eliteDestroyer Na-Class eliteDestroyer Na-Class eliteDestroyer Ha-Class Late ModelDestroyer Ha-Class Late Model
Cruising Formation 4: Battle Formation
Unknown
Pattern 3
phase 3
German Escort PrincessLight Carrier Nu-Class flagshipLight Carrier Nu-Class flagshipBattleship Summer PrincessHeavy Cruiser Ne-Class eliteHeavy Cruiser Ne-Class elite
Light Cruiser Tsu-Class eliteDestroyer Na-Class Late Model eliteDestroyer Na-Class Late Model eliteDestroyer Na-Class Late Model eliteDestroyer Ha-Class Late ModelDestroyer Ha-Class Late Model
Cruising Formation 4: Battle Formation
Unknown
Pattern 4
Final Form
phase 3
German Escort Princess - DamagedLight Carrier Nu-Class flagshipLight Carrier Nu-Class flagshipBattleship Summer PrincessBattleship Summer PrincessHeavy Cruiser Ne-Class elite
Light Cruiser Tsu-Class eliteDestroyer Na-Class Late Model eliteDestroyer Na-Class Late Model eliteDestroyer Na-Class Late Model eliteDestroyer Na-Class Late Model eliteDestroyer Na-Class Late Model elite
Cruising Formation 4: Battle Formation
Unknown

Show/Hide Nodes and Enemy Encounters
Nodes and Enemy Encounters
NodePatternXpNode InfoFormAir
A
Battle Avoided
Pattern 1"Must be my imagination" (battle avoided)
B
深海潜水艦隊 前方展開群
Pattern 1 Submarine Ka-Class flagshipSubmarine Ka-Class eliteSubmarine Ka-Class elite
Formation 3: Diamond
Formation 5: Line Abreast
Pattern 2 Submarine Ka-Class eliteSubmarine Ka-Class eliteSubmarine Ka-Class elite
Formation 3: Diamond
Formation 5: Line Abreast
Pattern 3 Submarine Ka-Class eliteSubmarine Ka-ClassSubmarine Ka-Class
Formation 3: Diamond
Formation 5: Line Abreast
C
深海前線泊地艦隊 前衛水雷戦隊
Pattern 1 Light Cruiser Tsu-ClassDestroyer Ha-Class Late ModelDestroyer Ha-Class Late ModelDestroyer I-ClassDestroyer I-ClassDestroyer I-Class
Formation 1: Line Ahead
Formation 2: Double Line
Pattern 2 Light Cruiser Tsu-ClassDestroyer Ha-Class Late ModelDestroyer I-ClassDestroyer I-ClassDestroyer I-Class
Formation 1: Line Ahead
Formation 2: Double Line
Pattern 3 Light Cruiser Tsu-ClassDestroyer Ha-Class Late ModelDestroyer Ha-Class Late ModelDestroyer Ha-Class Late ModelDestroyer I-ClassDestroyer I-Class
Formation 1: Line Ahead
Pattern 4 Light Cruiser Tsu-ClassDestroyer Ha-Class Late ModelDestroyer Ha-Class Late ModelDestroyer I-ClassDestroyer I-Class
Formation 1: Line Ahead
D
深海前線泊地艦隊 高速機動部隊
Pattern 1 Standard Carrier Wo-Class flagshipHeavy Cruiser Ri-Class eliteHeavy Cruiser Ri-Class eliteLight Cruiser Tsu-ClassDestroyer Ha-Class Late ModelDestroyer Ha-Class Late Model
Formation 2: Double Line
Formation 4: Echelon
AP:69
AS:155
AS+:309
Pattern 2 Standard Carrier Wo-Class flagshipHeavy Cruiser Ri-Class flagshipHeavy Cruiser Ri-Class flagshipLight Cruiser Tsu-ClassDestroyer Ha-Class Late ModelDestroyer Ha-Class Late Model
Formation 4: Echelon
AP:69
AS:155
AS+:309
Pattern 3 Standard Carrier Wo-Class flagshipHeavy Cruiser Ri-Class eliteHeavy Cruiser Ri-Class eliteLight Cruiser Tsu-ClassDestroyer Ha-Class Late ModelDestroyer Ha-Class Late Model
Formation 4: Echelon
AP:67
AS:150
AS+:300
E
Pattern 1
F
Pattern 1Choose your route
G
Pattern 1
H
深海港湾兵站 補給船団
Pattern 1 Transport Ship Wa-ClassTransport Ship Wa-ClassTransport Ship Wa-ClassTransport Ship Wa-ClassDestroyer Ro-Class Late ModelDestroyer Ro-Class Late Model
Formation 2: Double Line
Pattern 2 Transport Ship Wa-ClassTransport Ship Wa-ClassTransport Ship Wa-ClassDestroyer I-Class Late ModelDestroyer I-Class Late Model
Formation 2: Double Line
Pattern 3 Transport Ship Wa-Class eliteTransport Ship Wa-ClassTransport Ship Wa-ClassTransport Ship Wa-ClassDestroyer Ro-Class Late ModelDestroyer Ro-Class Late Model
Formation 2: Double Line
Pattern 4 Transport Ship Wa-ClassTransport Ship Wa-ClassTransport Ship Wa-ClassDestroyer Ro-Class Late ModelDestroyer Ro-Class Late Model
Formation 2: Double Line
Pattern 5 Transport Ship Wa-Class eliteTransport Ship Wa-Class eliteTransport Ship Wa-ClassTransport Ship Wa-ClassDestroyer Ro-Class Late ModelDestroyer Ro-Class Late Model
Formation 2: Double Line
I
深海東方増派潜水艦隊 I群
Pattern 1 Submarine Yo-Class flagshipSubmarine Ka-Class eliteSubmarine Ka-Class elite
Formation 3: Diamond
Formation 5: Line Abreast
Pattern 2 Submarine Yo-Class eliteSubmarine Ka-Class eliteSubmarine Ka-Class elite
Formation 3: Diamond
Formation 5: Line Abreast
Pattern 3 Submarine Yo-Class eliteSubmarine Ka-ClassSubmarine Ka-Class
Formation 3: Diamond
Formation 5: Line Abreast
Pattern 4 Submarine Yo-Class flagshipSubmarine Ka-Class eliteSubmarine Ka-Class eliteSubmarine Ka-Class elite
Formation 3: Diamond
Formation 5: Line Abreast
J
海峡封鎖 深海戦艦部隊
Pattern 1 Battleship Ta-Class eliteBattleship Ta-Class eliteLight Carrier Nu-Class eliteLight Cruiser Tsu-ClassDestroyer Ha-Class Late ModelDestroyer Ha-Class Late Model
Formation 1: Line Ahead
Formation 2: Double Line
AP:46
AS:104
AS+:207
Pattern 2 Battleship Ta-Class flagshipBattleship Ta-Class flagshipLight Carrier Nu-Class flagshipLight Cruiser Tsu-ClassDestroyer Ha-Class Late ModelDestroyer Ha-Class Late Model
Formation 1: Line Ahead
Formation 2: Double Line
AP:52
AS:116
AS+:231
K
深海東方増派潜水艦隊 II群
Pattern 1 Submarine Yo-Class eliteSubmarine Ka-Class eliteSubmarine Ka-Class elite
Formation 3: Diamond
Formation 5: Line Abreast
Pattern 2 Submarine Yo-Class flagshipSubmarine Ka-Class eliteSubmarine Ka-Class elite
Formation 3: Diamond
Formation 5: Line Abreast
Pattern 3 Submarine Yo-Class flagshipSubmarine Ka-Class eliteSubmarine Ka-Class eliteSubmarine Ka-Class elite
Formation 3: Diamond
Formation 5: Line Abreast
Pattern 4 Submarine Yo-Class eliteSubmarine Ka-ClassSubmarine Ka-Class
Formation 3: Diamond
Formation 5: Line Abreast
L
Battle Avoided
Pattern 1"Must be my imagination" (battle avoided)
M
セイロン島南部 深海占拠港湾
Pattern 1 Harbor Summer PrincessArtillery ImpArtillery ImpPT Imp GroupPT Imp GroupTransport Ship Wa-Class
Formation 2: Double Line
AP:50
AS:113
AS+:225
Pattern 2 summer_Harbor Princess Final FormArtillery ImpArtillery ImpLight Cruiser Tsu-ClassPT Imp GroupPT Imp Group
Formation 2: Double Line
AP:50
AS:113
AS+:225
N
深海前線葉艦棲泊地 航空隊
Air Battle Node
Pattern 1 Anchorage Water Demon - Vacation ModeLight Carrier Nu-Class eliteLight Carrier Nu-Class eliteLight Cruiser Tsu-ClassDestroyer Ha-Class Late ModelDestroyer Ha-Class Late Model
Formation 4: Echelon
Unknown
Pattern 2 German Escort PrincessLight Carrier Nu-Class eliteLight Carrier Nu-Class eliteLight Cruiser Tsu-ClassDestroyer Na-ClassDestroyer Na-Class
Formation 4: Echelon
Unknown
Pattern 3 German Escort Princess - DamagedLight Carrier Nu-Class eliteLight Carrier Nu-Class eliteLight Cruiser Tsu-ClassDestroyer Na-Class Late ModelDestroyer Na-Class Late Model
Formation 4: Echelon
Unknown
Pattern 4 Anchorage Water Demon - Vacation ModeLight Carrier Nu-Class eliteLight Carrier Nu-Class eliteLight Cruiser Tsu-ClassDestroyer Na-ClassDestroyer Na-Class
Formation 4: Echelon
Unknown
O
深海前線葉艦棲泊地 警備艦隊
Pattern 1 Battleship Ta-Class flagshipHeavy Cruiser Ne-Class eliteHeavy Cruiser Ne-Class eliteLight Cruiser Tsu-Class eliteDestroyer Ha-Class Late ModelDestroyer Ha-Class Late Model
Formation 1: Line Ahead
Formation 2: Double Line
Pattern 2 Battleship Ta-Class eliteHeavy Cruiser Ne-Class eliteHeavy Cruiser Ne-Class eliteLight Cruiser Tsu-ClassDestroyer Ha-Class Late ModelDestroyer Ha-Class Late Model
Formation 1: Line Ahead
Formation 2: Double Line
Pattern 3 Battleship Ta-Class eliteHeavy Cruiser Ne-Class eliteHeavy Cruiser Ne-ClassLight Cruiser Tsu-ClassDestroyer Ha-Class Late ModelDestroyer Ha-Class Late Model
Formation 1: Line Ahead
P
深海前線葉艦棲泊地 航空隊
Air Battle Node
Pattern 1 Anchorage Water Demon - Vacation ModeLight Carrier Nu-Class eliteLight Carrier Nu-Class eliteLight Cruiser Tsu-ClassDestroyer Ha-Class Late ModelDestroyer Ha-Class Late Model
Formation 4: Echelon
Unknown
Pattern 2 German Escort Princess - DamagedLight Carrier Nu-Class eliteLight Carrier Nu-Class eliteLight Cruiser Tsu-ClassDestroyer Na-Class Late ModelDestroyer Na-Class Late Model
Formation 4: Echelon
Unknown
Q
深海前線葉艦棲泊地
Pattern 1
phase 2
Anchorage Water Demon - Vacation ModeLight Carrier Nu-Class eliteLight Carrier Nu-Class eliteBattleship Ru-Class eliteHeavy Cruiser Ne-ClassHeavy Cruiser Ne-Class
Light Cruiser Tsu-ClassDestroyer Na-ClassDestroyer Ha-Class Late ModelDestroyer Ha-Class Late ModelDestroyer I-ClassDestroyer I-Class
Cruising Formation 4: Battle Formation
Unknown
Pattern 2
Final Form
phase 2
Anchorage Water Demon - Vacation ModeLight Carrier Nu-Class eliteLight Carrier Nu-Class eliteBattleship Ru-Class eliteHeavy Cruiser Ne-ClassHeavy Cruiser Ne-Class
Light Cruiser Tsu-ClassDestroyer Na-ClassDestroyer Na-ClassDestroyer Na-ClassDestroyer I-ClassDestroyer I-Class
Cruising Formation 4: Battle Formation
Unknown
Pattern 3
phase 3
German Escort PrincessLight Carrier Nu-Class eliteLight Carrier Nu-Class eliteBattleship Ru-Class flagshipHeavy Cruiser Ne-ClassHeavy Cruiser Ne-Class
Light Cruiser Tsu-ClassDestroyer Na-Class Late ModelDestroyer Na-ClassDestroyer Na-ClassDestroyer I-ClassDestroyer I-Class
Cruising Formation 4: Battle Formation
Unknown
Pattern 4
Final Form
phase 3
German Escort Princess - DamagedLight Carrier Nu-Class eliteLight Carrier Nu-Class eliteBattleship Ru-Class flagshipHeavy Cruiser Ne-ClassHeavy Cruiser Ne-Class
Light Cruiser Tsu-ClassDestroyer Na-Class Late ModelDestroyer Na-Class Late ModelDestroyer Na-Class Late ModelDestroyer I-ClassDestroyer I-Class
Cruising Formation 4: Battle Formation
Unknown

Show/Hide Nodes and Enemy Encounters
Nodes and Enemy Encounters
NodePatternXpNode InfoFormAir
A
Battle Avoided
Pattern 1"Must be my imagination" (battle avoided)
B
深海潜水艦隊 前方展開群
Pattern 1 Submarine Ka-Class eliteSubmarine Ka-ClassSubmarine Ka-Class
Formation 3: Diamond
Formation 5: Line Abreast
Pattern 2 Submarine Ka-Class eliteSubmarine Ka-Class eliteSubmarine Ka-Class elite
Formation 3: Diamond
Formation 5: Line Abreast
Pattern 3 Submarine Ka-ClassSubmarine Ka-ClassSubmarine Ka-Class
Formation 3: Diamond
C
深海前線泊地艦隊 前衛水雷戦隊
Pattern 1 Light Cruiser Tsu-ClassDestroyer Ha-Class Late ModelDestroyer I-ClassDestroyer I-ClassDestroyer I-Class
Formation 1: Line Ahead
Formation 2: Double Line
Pattern 2 Light Cruiser Tsu-ClassDestroyer Ha-Class Late ModelDestroyer Ha-Class Late ModelDestroyer I-ClassDestroyer I-Class
Formation 1: Line Ahead
Pattern 3 Light Cruiser Tsu-ClassDestroyer Ha-Class Late ModelDestroyer Ha-Class Late ModelDestroyer I-ClassDestroyer I-ClassDestroyer I-Class
Formation 1: Line Ahead
Formation 2: Double Line
D
深海前線泊地艦隊 高速機動部隊
Pattern 1 Standard Carrier Wo-Class flagshipHeavy Cruiser Ri-Class eliteHeavy Cruiser Ri-Class eliteLight Cruiser Tsu-ClassDestroyer I-ClassDestroyer I-Class
Formation 2: Double Line
Formation 4: Echelon
AP:67
AS:150
AS+:300
Pattern 2 Standard Carrier Wo-Class flagshipHeavy Cruiser Ri-Class eliteHeavy Cruiser Ri-Class eliteLight Cruiser Tsu-ClassDestroyer Ha-Class Late ModelDestroyer Ha-Class Late Model
Formation 4: Echelon
AP:67
AS:150
AS+:300
E
Pattern 1
F
Pattern 1Choose your route
G
Pattern 1
H
深海港湾兵站 補給船団
Pattern 1 Transport Ship Wa-ClassTransport Ship Wa-ClassTransport Ship Wa-ClassDestroyer I-ClassDestroyer I-Class
Formation 2: Double Line
Pattern 2 Transport Ship Wa-ClassTransport Ship Wa-ClassTransport Ship Wa-ClassTransport Ship Wa-ClassDestroyer Ro-Class Late ModelDestroyer Ro-Class Late Model
Formation 2: Double Line
Pattern 3 Transport Ship Wa-ClassTransport Ship Wa-ClassTransport Ship Wa-ClassDestroyer I-Class Late ModelDestroyer I-Class
Formation 2: Double Line
Pattern 4 Transport Ship Wa-ClassTransport Ship Wa-ClassTransport Ship Wa-ClassDestroyer Ro-Class Late ModelDestroyer Ro-Class Late Model
Formation 2: Double Line
Pattern 5 Transport Ship Wa-ClassTransport Ship Wa-ClassTransport Ship Wa-ClassDestroyer I-Class Late ModelDestroyer I-Class Late Model
Formation 2: Double Line
I
深海東方増派潜水艦隊 I群
Pattern 1 Submarine Yo-Class eliteSubmarine Ka-Class eliteSubmarine Ka-Class elite
Formation 3: Diamond
Formation 5: Line Abreast
Pattern 2 Submarine Yo-Class eliteSubmarine Ka-ClassSubmarine Ka-Class
Formation 3: Diamond
Formation 5: Line Abreast
Pattern 3 Submarine Yo-Class flagshipSubmarine Ka-Class eliteSubmarine Ka-Class elite
Formation 3: Diamond
Formation 5: Line Abreast
J
海峡封鎖 深海戦艦部隊
Pattern 1 Battleship Ta-Class eliteBattleship Ta-Class eliteLight Carrier Nu-Class eliteLight Cruiser Tsu-ClassDestroyer I-ClassDestroyer I-Class
Formation 1: Line Ahead
Formation 2: Double Line
AP:46
AS:104
AS+:207
Pattern 2 Battleship Ta-Class eliteBattleship Ta-Class eliteLight Carrier Nu-Class eliteLight Cruiser Tsu-ClassDestroyer Ha-Class Late ModelDestroyer Ha-Class Late Model
Formation 1: Line Ahead
Formation 2: Double Line
AP:46
AS:104
AS+:207
Pattern 3 Battleship Ta-ClassBattleship Ta-ClassLight Carrier Nu-Class eliteLight Cruiser Tsu-ClassDestroyer I-ClassDestroyer I-Class
Formation 1: Line Ahead
AP:46
AS:104
AS+:207
K
深海東方増派潜水艦隊 II群
Pattern 1 Submarine Yo-Class eliteSubmarine Ka-ClassSubmarine Ka-Class
Formation 3: Diamond
Formation 5: Line Abreast
Pattern 2 Submarine Yo-Class eliteSubmarine Ka-Class eliteSubmarine Ka-Class elite
Formation 3: Diamond
Formation 5: Line Abreast
Pattern 3 Submarine Yo-Class flagshipSubmarine Ka-Class eliteSubmarine Ka-Class elite
Formation 3: Diamond
Formation 5: Line Abreast
L
Battle Avoided
Pattern 1"Must be my imagination" (battle avoided)
M
セイロン島南部 深海占拠港湾
Pattern 1 Harbor Summer PrincessArtillery ImpArtillery ImpPT Imp GroupDestroyer I-ClassTransport Ship Wa-Class
Formation 2: Double Line
AP:36
AS:81
AS+:162
Pattern 2 summer_Harbor Princess Final FormArtillery ImpArtillery ImpLight Cruiser Tsu-ClassPT Imp GroupTransport Ship Wa-Class
Formation 2: Double Line
AP:36
AS:81
AS+:162
N
深海前線葉艦棲泊地 航空隊
Air Battle Node
Pattern 1 Anchorage Water Demon - Vacation ModeLight Carrier Nu-Class eliteLight Cruiser Tsu-ClassDestroyer Ha-Class Late ModelDestroyer I-ClassDestroyer I-Class
Formation 4: Echelon
Unknown
Pattern 2 German Escort PrincessLight Carrier Nu-Class eliteLight Carrier Nu-Class eliteLight Cruiser Tsu-ClassDestroyer Ha-Class Late ModelDestroyer Ha-Class Late Model
Formation 4: Echelon
Unknown
Pattern 3 Anchorage Water Demon - Vacation ModeLight Carrier Nu-Class eliteLight Carrier Nu-Class eliteLight Cruiser Tsu-ClassDestroyer Ha-Class Late ModelDestroyer Ha-Class Late Model
Formation 4: Echelon
Unknown
Pattern 4 German Escort Princess - DamagedLight Carrier Nu-Class eliteLight Carrier Nu-Class eliteLight Cruiser Tsu-ClassDestroyer Ha-Class Late ModelDestroyer Ha-Class Late Model
Formation 4: Echelon
Unknown
O
深海前線葉艦棲泊地 警備艦隊
Pattern 1 Battleship Ta-Class eliteHeavy Cruiser Ne-Class eliteHeavy Cruiser Ne-ClassLight Cruiser Tsu-ClassDestroyer Ha-Class Late ModelDestroyer Ha-Class Late Model
Formation 1: Line Ahead
Formation 2: Double Line
Pattern 2 Battleship Ta-Class eliteHeavy Cruiser Ne-Class eliteHeavy Cruiser Ne-Class eliteLight Cruiser Tsu-ClassDestroyer Ha-Class Late ModelDestroyer Ha-Class Late Model
Formation 1: Line Ahead
Formation 2: Double Line
Pattern 3 Battleship Ta-Class eliteHeavy Cruiser Ne-ClassHeavy Cruiser Ne-ClassLight Cruiser Tsu-ClassDestroyer I-ClassDestroyer I-Class
Formation 1: Line Ahead
P
深海前線葉艦棲泊地 航空隊
Air Battle Node
Pattern 1 Anchorage Water Demon - Vacation ModeLight Carrier Nu-Class eliteLight Cruiser Tsu-ClassDestroyer Ha-Class Late ModelDestroyer I-ClassDestroyer I-Class
Formation 4: Echelon
Unknown
Pattern 2 Anchorage Water Demon - Vacation ModeLight Carrier Nu-Class eliteLight Carrier Nu-Class eliteLight Cruiser Tsu-ClassDestroyer Ha-Class Late ModelDestroyer Ha-Class Late Model
Formation 4: Echelon
Unknown
Pattern 3 German Escort Princess - DamagedLight Carrier Nu-Class eliteLight Carrier Nu-Class eliteLight Cruiser Tsu-ClassDestroyer Ha-Class Late ModelDestroyer Ha-Class Late Model
Formation 4: Echelon
Unknown
Pattern 4 German Escort PrincessLight Carrier Nu-Class eliteLight Carrier Nu-Class eliteLight Cruiser Tsu-ClassDestroyer Ha-Class Late ModelDestroyer Ha-Class Late Model
Formation 4: Echelon
Unknown
Q
深海前線葉艦棲泊地
Pattern 1
phase 2
Anchorage Water Demon - Vacation ModeLight Carrier Nu-Class eliteLight Carrier Nu-Class eliteBattleship Ru-Class eliteHeavy Cruiser Ne-ClassHeavy Cruiser Ne-Class
Light Cruiser Tsu-ClassDestroyer Ha-Class Late ModelDestroyer Ha-Class Late ModelDestroyer Ha-Class Late ModelDestroyer I-ClassDestroyer I-Class
Cruising Formation 3: Ring Formation
Unknown
Pattern 2
Final Form
phase 2
Anchorage Water Demon - Vacation ModeLight Carrier Nu-Class eliteLight Carrier Nu-Class eliteBattleship Ru-Class eliteHeavy Cruiser Ne-ClassHeavy Cruiser Ne-Class
Light Cruiser Tsu-ClassDestroyer Ha-Class Late ModelDestroyer Ha-Class Late ModelDestroyer Ha-Class Late ModelDestroyer I-ClassDestroyer I-Class
Cruising Formation 3: Ring Formation
Unknown
Pattern 3
phase 3
German Escort PrincessLight Carrier Nu-Class eliteLight Carrier Nu-Class eliteBattleship Ru-Class eliteHeavy Cruiser Ne-ClassHeavy Cruiser Ne-Class
Light Cruiser Tsu-ClassDestroyer Na-ClassDestroyer Ha-Class Late ModelDestroyer Ha-Class Late ModelDestroyer I-ClassDestroyer I-Class
Cruising Formation 3: Ring Formation
Unknown
Pattern 4
Final Form
phase 3
German Escort Princess - DamagedLight Carrier Nu-Class eliteLight Carrier Nu-Class eliteBattleship Ru-Class eliteHeavy Cruiser Ne-ClassHeavy Cruiser Ne-Class
Light Cruiser Tsu-ClassDestroyer Na-ClassDestroyer Ha-Class Late ModelDestroyer Ha-Class Late ModelDestroyer I-ClassDestroyer I-Class
Cruising Formation 3: Ring Formation
Unknown

Show/Hide Nodes and Enemy Encounters
Nodes and Enemy Encounters
NodePatternXpNode InfoFormAir
A
Battle Avoided
Pattern 1"Must be my imagination" (battle avoided)
B
深海潜水艦隊 前方展開群
Pattern 1 Submarine Ka-Class eliteSubmarine Ka-ClassSubmarine Ka-Class
Formation 3: Diamond
Formation 5: Line Abreast
Pattern 2 Submarine Ka-ClassSubmarine Ka-ClassSubmarine Ka-Class
Formation 3: Diamond
C
深海前線泊地艦隊 前衛水雷戦隊
Pattern 1 Light Cruiser Tsu-ClassDestroyer Ha-Class Late ModelDestroyer I-ClassDestroyer I-ClassDestroyer I-Class
Formation 1: Line Ahead
Formation 2: Double Line
Pattern 2 Light Cruiser Tsu-ClassDestroyer Ha-Class Late ModelDestroyer Ha-Class Late ModelDestroyer I-ClassDestroyer I-Class
Formation 1: Line Ahead
D
深海前線泊地艦隊 高速機動部隊
Pattern 1 Standard Carrier Wo-Class flagshipHeavy Cruiser Ri-Class eliteHeavy Cruiser Ri-Class eliteLight Cruiser Tsu-ClassDestroyer I-ClassDestroyer I-Class
Formation 2: Double Line
Formation 4: Echelon
AP:67
AS:150
AS+:300
E
Pattern 1
F
Pattern 1Choose your route
G
Pattern 1
H
深海港湾兵站 補給船団
Pattern 1 Transport Ship Wa-ClassTransport Ship Wa-ClassTransport Ship Wa-ClassDestroyer I-Class Late ModelDestroyer I-Class
Formation 2: Double Line
Pattern 2 Transport Ship Wa-ClassTransport Ship Wa-ClassTransport Ship Wa-ClassDestroyer I-Class Late ModelDestroyer I-Class Late Model
Formation 2: Double Line
Pattern 3 Transport Ship Wa-ClassTransport Ship Wa-ClassTransport Ship Wa-ClassDestroyer I-ClassDestroyer I-Class
Formation 2: Double Line
I
深海東方増派潜水艦隊 I群
Pattern 1 Submarine Yo-Class eliteSubmarine Ka-ClassSubmarine Ka-Class
Formation 3: Diamond
Formation 5: Line Abreast
J
海峡封鎖 深海戦艦部隊
Pattern 1 Battleship Ta-Class eliteBattleship Ta-Class eliteLight Carrier Nu-Class eliteLight Cruiser Tsu-ClassDestroyer I-ClassDestroyer I-Class
Formation 1: Line Ahead
Formation 2: Double Line
AP:46
AS:104
AS+:207
Pattern 2 Battleship Ta-ClassBattleship Ta-ClassLight Carrier Nu-Class eliteLight Cruiser Tsu-ClassDestroyer I-ClassDestroyer I-Class
Formation 1: Line Ahead
AP:46
AS:104
AS+:207
K
深海東方増派潜水艦隊 II群
Pattern 1 Submarine Yo-Class eliteSubmarine Ka-ClassSubmarine Ka-Class
Formation 3: Diamond
Formation 5: Line Abreast
L
Battle Avoided
Pattern 1"Must be my imagination" (battle avoided)
M
セイロン島南部 深海占拠港湾
Pattern 1 Harbor Summer PrincessArtillery ImpPT Imp GroupDestroyer I-ClassDestroyer I-ClassTransport Ship Wa-Class
Formation 2: Double Line
AP:36
AS:81
AS+:162
Pattern 2 summer_Harbor Princess Final FormArtillery ImpArtillery ImpPT Imp GroupDestroyer I-ClassTransport Ship Wa-Class
Formation 2: Double Line
AP:36
AS:81
AS+:162
N
深海前線葉艦棲泊地 航空隊
Air Battle Node
Pattern 1 Anchorage Water Demon - Vacation ModeLight Carrier Nu-Class eliteLight Cruiser Tsu-ClassDestroyer Ha-Class Late ModelDestroyer I-ClassDestroyer I-Class
Formation 4: Echelon
Unknown
Pattern 2 German Escort Princess - DamagedLight Carrier Nu-Class eliteLight Carrier Nu-Class eliteLight Cruiser Tsu-ClassDestroyer Ha-Class Late ModelDestroyer Ha-Class Late Model
Formation 4: Echelon
Unknown
Pattern 3 Anchorage Water Demon - Vacation ModeLight Carrier Nu-Class eliteLight Carrier Nu-Class eliteLight Cruiser Tsu-ClassDestroyer Ha-Class Late ModelDestroyer Ha-Class Late Model
Formation 4: Echelon
Unknown
Pattern 4 German Escort PrincessLight Carrier Nu-Class eliteLight Carrier Nu-Class eliteLight Cruiser Tsu-ClassDestroyer Ha-Class Late ModelDestroyer Ha-Class Late Model
Formation 4: Echelon
Unknown
O
深海前線葉艦棲泊地 警備艦隊
Pattern 1 Battleship Ta-Class eliteHeavy Cruiser Ne-Class eliteHeavy Cruiser Ne-ClassLight Cruiser Tsu-ClassDestroyer Ha-Class Late ModelDestroyer Ha-Class Late Model
Formation 1: Line Ahead
Formation 2: Double Line
Pattern 2 Battleship Ta-Class eliteHeavy Cruiser Ne-ClassHeavy Cruiser Ne-ClassLight Cruiser Tsu-ClassDestroyer I-ClassDestroyer I-Class
Formation 1: Line Ahead
P
深海前線葉艦棲泊地 航空隊
Air Battle Node
Pattern 1 Anchorage Water Demon - Vacation ModeLight Carrier Nu-Class eliteLight Cruiser Tsu-ClassDestroyer Ha-Class Late ModelDestroyer I-ClassDestroyer I-Class
Formation 4: Echelon
Unknown
Pattern 2 German Escort PrincessLight Carrier Nu-Class eliteLight Carrier Nu-Class eliteLight Cruiser Tsu-ClassDestroyer Ha-Class Late ModelDestroyer Ha-Class Late Model
Formation 4: Echelon
Unknown
Q
深海前線葉艦棲泊地
Enemy Combined Fleet
Pattern 1
phase 2
Anchorage Water Demon - Vacation ModeLight Carrier Nu-Class eliteLight Carrier Nu-Class eliteBattleship Ru-Class eliteHeavy Cruiser Ri-ClassHeavy Cruiser Ri-Class
Light Cruiser Tsu-ClassDestroyer Ha-Class Late ModelDestroyer Ha-Class Late ModelDestroyer I-ClassDestroyer I-ClassDestroyer I-Class
Cruising Formation 3: Ring Formation
Unknown
Pattern 2
Final Form
phase 2
Anchorage Water Demon - Vacation ModeLight Carrier Nu-Class eliteLight Carrier Nu-Class eliteBattleship Ru-Class eliteHeavy Cruiser Ne-ClassHeavy Cruiser Ne-Class
Light Cruiser Tsu-ClassDestroyer Ha-Class Late ModelDestroyer Ha-Class Late ModelDestroyer I-ClassDestroyer I-ClassDestroyer I-Class
Cruising Formation 3: Ring Formation
Unknown
Pattern 3
phase 3
German Escort PrincessLight Carrier Nu-Class eliteLight Carrier Nu-Class eliteBattleship Ru-Class eliteHeavy Cruiser Ne-ClassHeavy Cruiser Ne-Class
Light Cruiser Tsu-ClassDestroyer Ha-Class Late ModelDestroyer Ha-Class Late ModelDestroyer I-ClassDestroyer I-ClassDestroyer I-Class
Cruising Formation 3: Ring Formation
Unknown
Pattern 4
Final Form
phase 3
German Escort Princess - DamagedLight Carrier Nu-Class eliteLight Carrier Nu-Class eliteBattleship Ru-Class eliteHeavy Cruiser Ne-ClassHeavy Cruiser Ne-Class
Light Cruiser Tsu-ClassDestroyer Ha-Class Late ModelDestroyer Ha-Class Late ModelDestroyer Ha-Class Late ModelDestroyer I-ClassDestroyer I-Class
Cruising Formation 3: Ring Formation
Unknown

Ship drops

NodeShip List
FDestroyers
Light Cruisers
Auxiliary Ships
IDestroyers
Light Cruisers
KDestroyers
NDestroyers
Light Cruisers
Auxiliary Ships
ODestroyer Escorts
Destroyers
Light Cruisers
Heavy Cruisers
Battleships
Light Aircraft Carriers
Seaplane Tenders
Submarines