- Welcome to the Kancolle Wiki!
- If you have any questions regarding site content, account registration, etc., please visit the KanColle Wiki Discord
Combined Fleet
Introduction

Combined Fleets were first introduced during the Summer 2014 Event.
During events, you may be required to sortie two fleets at a time in a combined fleet. You are only able to sortie Combined Fleets to certain event maps and you are not allowed to use them in normal maps when they are available. A Combined Fleet is formed out of your 1st and 2nd fleets so you must have the 2nd fleet unlocked. You form a combined fleet by clicking and dragging the flag icon for the 2nd fleet over to the flag icon for the 1st fleet and selecting the type of fleet you want to form from the pop-up menu. The three different fleets are detailed below, but they are:
- Carrier Task Force (Kidou Butai "機動部隊")
- Surface Task Force (Suijou Butai "水上部隊")
- Transport Escort Force (Yuusou Goei Butai "輸送護衛部隊")
General Information
1. If the flagship of the 1st or 2nd fleet is Moderately Damaged (中破) or worse, the Combined Fleet cannot be sortied.
2. The accuracy of shelling and carrier attacks during daytime combat is reduced. Please see Accuracy for more details.
3. The flagships of both fleets cannot be sunk.
- You will be forced to retreat if the 1st fleet flagship is Heavily Damaged (大破) unless she has damage control equipped.
- You will be allowed to continue the sortie if the 2nd fleet flagship is Heavily Damaged (大破).
4. Aerial combat works differently.
- When contesting the air control state:
- Versus single fleets, only the fighter power of the main fleet is taken into account.
- Versus combined fleets', the fighter power of both fleets is taken into account.
- This means that versus single fleets, planes in the 2nd fleet aren't considered for triggering contact.
- Anti-air shoot down is calculated using the sum of both fleets.
- Ships in the 2nd fleet are eligible to perform anti-air cut-ins.
- Ships in the 2nd fleet are eligible targets for enemy bombers.
5. Torpedo attacks, Opening Anti-Submarine Warfare, and night battle are only performed by the 2nd fleet.
6. When encountering a maelstrom node, there are two types of supply loss reductions at play. Which version applies depends on the node and is fixed.
- The first only considers the amount of radars in the 1st fleet and the 2nd fleet does not lose any supplies.
- The second considers the amount of radars in both fleets independently. This means that having no radars in the 1st fleet but radars in the 2nd fleet would cause only the 1st fleet to lose supplies.
7. The Combined Fleet will automatically be disbanded if you no longer meet the composition requirements for that specific fleet.
8. You are allowed to bring duplicate ships as long as they are in separate fleets.
Special Mechanics
Fleet Command Facility
When the flagship of the 1st fleet is equipped with a Fleet Command Facility (FCF), you are able to evacuate Heavily Damaged (大破) mid-sortie. This can help increase your pass rate to the boss node. The option to evacuate "退避" or not evacuate "退避せず" will appear after the results screen but before the continue/abandon sortie option. You will be shown the damaged ship to be evacuated and the ship that will be escorting her back. You are not able to pick which damaged ship gets evacuated and who escorts her. The selection is based off fleet order and the ships higher in the fleet order are selected.
Requirements for using FCF are:
- FCF equipped on the 1st fleet flagship.
- At least one heavily damaged ship.
- The damaged ship must not be the flagships of either fleet.
- At least one destroyer in the 2nd fleet that is not Lightly Damaged (小破) or worse.
- The destroyer must not be the 2nd fleet flagship.
Important Notes
- It is important to remember that only one ship can be evacuated per battle. If you have more than one heavily damaged ship, you should retreat.
- Evacuated ships and their escorts will lose 40 morale and all their remaining fuel.
- Missing ships will not count towards ships lost for determining victory conditions.
- It is possible to fail LoS checks or routing requirements if you evacuate too many key ships.
Combined Fleet Night Battle
In Combined vs Combined engagements, only a single fleet will participate in night battle. So the game will determine if your escort fleet engages the enemy escort or main fleet.
Your fleet must obtain 3 points or less in order to fight the enemy main fleet.
- Escort flagship alive - 1 point
- For every ship in the escort above moderate damage - 1 point
- This means the escort flagship can count for 2 points if she is above moderate damage.
The following are also exceptions to Combined Fleet night battles.
- ASW damage and accuracy is not reduced.
- Night battle equipment on the main fleet does not count.
Combined Fleet Types

Carrier Task Force
Main Fleet (1st Fleet):
- 2-4 Carriers (CVL/CV/CVB)
- Maximum of 2 Battleships (FBB/BB/BBV)
- Maximum of 4 Submarines (SS/SSV) - They cannot be the flagship
- Maximum of 4 Other ships (CA/CAV/CL/DD/etc)
Escort Fleet (2nd Fleet):
- 1 Light Cruiser (CL)
- 2-5 Destroyers (DD)
- Maximum of 2 Heavy Cruisers (CA/CAV)
- Maximum of 1 Seaplane Tender (AV)
- Maximum of 1 Light Carrier (CVL/CVE)
- Maximum of 2 Fast Battleships (FBB) - Slow battleships can be categorised as fast battleships if their speed is increased to Fast+. Please see Ship Speed for details. Gangut is considered a FBB even though her speed is slow.
- Maximum of 3 Submarines (SS/SSV) - They cannot be the flagship
- Maximum of 3 Other ships (CLT/CT/DE/etc).
- No Carriers allowed (CV/CVB)
Important Notes
- This is the easiest type to obtain air supremacy because of the amount of carriers you are allowed to bring.
- The powerful airstrike can take out multiple enemies before shelling begins.
- Because the escort fleet attacks first, it can leave your vulnerable ships exposed.
- It does mean that your escort has a chance to take out the weaker ships so that your main fleet can focus on the tougher targets.
Surface Task Force
Main Fleet (1st Fleet):
- 2-6 Light Cruisers (CL/CLT)
- Maximum of 4 Battleships (BB/FBB/BBV)
- Maximum of 4 Heavy Cruisers (CA/CAV)
- Maximum of 1 Carrier (CV/CVB) - Cannot be combined with 2 light carriers.
- Maximum of 2 Light Carriers (CVL/CVE) - Cannot be combined with 1 carrier.
- Maximum of 4 Submarines (SS/SSV) - Cannot be flagship.
- Maximum of 4 Other ships (CT/DD/AV/etc)
Escort Fleet (2nd Fleet):
- 1 Light Cruiser (CL)
- 2-5 Destroyers (DD)
- Maximum of 2 Heavy Cruisers (CA/CAV)
- Maximum of 1 Seaplane Tender (AV) - Can be combined with 1 light carrier.
- Maximum of 1 Light Carrier (CVL/CVE) - Can be combined with 1 seaplane tender.
- Maximum of 2 Fast Battleships (FBB) - Slow battleships can be categorised as fast battleships if their speed is increased to Fast+. Please see Ship Speed for details. Gangut is considered a FBB even though her speed is slow.
- Maximum of 3 Submarines (SS/SSV) - They cannot be the flagship
- Maximum of 3 Other ships (CLT/CT/DE/etc).
- No Carriers allowed (CV/CVB)
Important Notes
- This fleet typically has the highest pass rate because your heavy main fleet faces the enemy first. This spares your light escort from the brunt of enemy attacks.
- It can be difficult to secure air superiority because of a lack of fighter power.
Transport Escort Force
Main Fleet (1st Fleet):
- 4-6 Destroyers or Destroyer Escorts (DD/DE)
- Maximum of 2 Light Cruisers, Aviation Cruisers, Aviation Battleships, Seaplane Tenders or Oilers (CL/CT/CAV/BBV/AV/AO)
- Maximum of 1 Landing Ship, Escort Carrier or Submarine Tender (LHA/CVE/AS)
Escort Fleet (2nd Fleet):
- 1-2 Light Cruisers or Training Cruisers (CL/CT) - 1 must be flagship.
- 3-5 Destroyers (DD)
- Maximum of 2 Heavy Cruisers (CA/CAV)
Important Notes
- The lightest of all the Combined Fleets, making it the most vulnerable to attacks.
- It is typically only used for Transport phases during events or for anti-installation work.
- It can be very hard to secure air superiority because of a lack of carriers.
Combat Flow
Formation Selection
Combined Fleets have special formations that differ from the standard single fleet formations. You will be able to select from the following formations.
| Formation | Formation Icon | Fleet | Shelling | Torpedo | Anti-Submarine | Anti-Air | Flagship Protection | Notes | ||||||
|---|---|---|---|---|---|---|---|---|---|---|---|---|---|---|
| Damage | Accuracy | Evasion | Damage | Accuracy | Evasion | Damage | Accuracy | Evasion | ||||||
| Cruising Formation 1 (ASW Alert) 第一警戒航行序列(対潜警戒) |
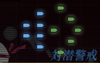
|
Main | 0.8 | ?? | ?? | - | ?? | ?? | 1.3 | ?? | ?? | 1.1 | ?? | Moderate shelling and torpedo accuracy. Similar to Line Abreast. |
| Escort | 0.8 | ?? | ?? | 0.7 | ?? | ?? | 1.3 | ?? | ?? | |||||
| Cruising Formation 2 (Forward Alert) 第二警戒航行序列(前方警戒) |
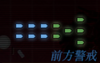
|
Main | 1.0 | ?? | ?? | - | ?? | ?? | 1.1 | ?? | ?? | 1.0 | ?? | Higher shelling and torpedo accuracy than Formation 1. Similar to Double Line without the accuracy bonus. |
| Escort | 1.0 | ?? | ?? | 0.9 | ?? | ?? | 1.1 | ?? | ?? | |||||
| Cruising Formation 3 (Ring Formation) 第三警戒航行序列(輪形陣) |

|
Main | 0.7 | ?? | ?? | - | ?? | ?? | 1.0 | ?? | ?? | 1.5 | ?? | Requires 5 or more ships in the 2nd fleet. Very low shelling and torpedo accuracy. Similar to Diamond. |
| Escort | 0.7 | ?? | ?? | 0.6 | ?? | ?? | 1.0 | ?? | ?? | |||||
| Cruising Formation 4 (Battle Formation) 第四警戒航行序列(戦闘隊形) |
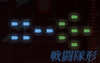
|
Main | 1.1 | 1.0 | ?? | - | ?? | ?? | 0.7 | ?? | ?? | 1.0 | ?? | Requires 4 or more ships in the 2nd fleet. Highest shelling and torpedo accuracy. Similar to Line Ahead. |
| Escort | 1.1 | ?? | ?? | 1.0 | ?? | ?? | 0.7 | ?? | ?? | |||||
Combined Fleet vs Single Fleet
| Combat Phase | Carrier Task Force | Surface Task Force | Transport Escort Force |
|---|---|---|---|
| Detection | Same as single fleet. | ||
| Jet Assault | Same as single fleet. | ||
| Land Based Bombing | Same as single fleet. | ||
| Aerial Combat | Same as single fleet with only the main fleet participating. | ||
| Support Fleet | Same as single fleet. | ||
| Opening Attacks | Same as single fleet with only the escort fleet participating. | ||
| Engagement | Same as single fleet | ||
| 1st Shelling | Escort | Main | Escort |
| Closing Torpedo | Escort | N/A | Escort |
| 2nd Shelling[1] | Main | Main | Main |
| 3rd Shelling | Main | Escort | Main |
| Closing Torpedo | N/A | Escort | N/A |
| Night Battle | Same as single fleet with only the escort fleet participating. | ||
- ↑ 2nd and 3rd shelling phases only occur when there is a Battleship or similar in the 1st fleet or enemy fleet.
Combined Fleet vs Combined Fleet
| Combat Phase | Carrier Task Force | Surface Task Force | Transport Escort Force |
|---|---|---|---|
| Detection | Same as single fleet. | ||
| Jet Assault | Same as single fleet. | ||
| Land Based Bombing | Same as single fleet. | ||
| Aerial Combat | Same as single fleet with both fleets participating. | ||
| Support Fleet | Same as single fleet. | ||
| Opening Attacks | Same as single fleet with only the escort fleet participating. | ||
| Engagement | Same as single fleet | ||
| 1st Shelling[1] | Main vs Main | Main vs Main | Main vs Main |
| 2nd Shelling[2] | Escort vs Escort | Main vs Both Fleets | Escort vs Escort |
| Closing Torpedo | Escort vs Both Fleets | N/A | Escort vs Both Fleets |
| 3rd Shelling | Main vs Both Fleets | Escort vs Escort | Main vs Both Fleets |
| Closing Torpedo | N/A | Escort vs Both Fleets | N/A |
| Night Battle | Same as single fleet with only the escort fleet participating. There is an extra determination to see whether your fleet will fight the enemy escort or main fleet. | ||
Single Fleet vs Combined Fleet
| Combat Phase | Action |
|---|---|
| Detection | Same as single fleet. |
| Jet Assault | Same as single fleet. |
| Land Based Bombing | Same as single fleet. |
| Aerial Combat | Same as single fleet. |
| Support Fleet | Same as single fleet. |
| Opening Attacks | Same as single fleet. |
| Engagement | Same as single fleet |
| 1st Shelling[1] | Vs Escort |
| Closing Torpedo | Vs Both Fleets |
| 2nd Shelling | Vs Main |
| 3rd Shelling[2] | Vs Both Fleets |
| Night Battle | Same as single fleet. There is an extra determination to see whether your fleet will fight the enemy escort or main fleet. |
Special Nodes
The special nodes with exceptions to the usual combat flow are:
- Air Battle nodes that are similar to the ones in 1-6 consist of two aerial combat phases with only the main fleet participating.
- Air Raid nodes that are similar to the ones in 6-5 just consist of a single aerial combat phase with only the main fleet participating.
- Submarine Only nodes will skip the aerial combat phase.
- Night Battle that are similar to the ones in 5-3 work the same way as a single fleet.
- Night/Day nodes that can be found on some event maps begin with a normal single fleet night battle then shifts to combined fleet battle in the day. Because you must select from single fleet formations, your fleet will shift to the equivalent combined fleet formation in day.
- Line Abreast → Cruising Formation 1
- Double Line → Cruising Formation 2
- Diamond → Cruising Formation 3
- Line Ahead → Cruising Formation 4
Damage Calculations
Basic attack power in a Combined Fleet has slightly different formulas for shelling, carrier attacks and torpedo attacks. Damage is otherwise calculated the same way as a single fleet. Please see Damage Calculations for more details on the pre- and post- cap modifiers applicable. The new basic attack power formulas are as follows:
[math]\displaystyle{ \text{Shelling Power}_\text{CF} = \text{FP} + \bigstar + \text{Mod}_\text{CF} + 5 }[/math]
[math]\displaystyle{ \text{Power}_\text{carrierCF} = \left[ \left[ \text{FP} + \text{TRP} + \bigstar + \left[ \text{DB} \times 1.3 \right] + \text{Mod}_\text{CF} \right] \times 1.5 \right] + 55 }[/math]
[math]\displaystyle{ \text{Torpedo Power}_\text{CF} = \text{TRP} + \bigstar }[/math]
- [math]\displaystyle{ \text{Mod}_\text{CF} }[/math] is the combined fleet modifier based on the tables below.
Combined Fleet vs Single Fleet Modifiers
| Combat Phase | Forces | Carrier Task Force | Surface Task Force | Transport Escort Force |
|---|---|---|---|---|
| Main Fleet Shelling | Allies | +2 | +10 | -5 |
| Enemy | +10 | +5 | +10 | |
| Escort Fleet Shelling | Allies | +10 | -5 | +10 |
| Enemy | +5 | -5 | +5 |
Combined Fleet vs Combined Fleet Modifiers
| Combat Phase | Forces | Carrier Task Force | Surface Task Force | Transport Escort Force |
|---|---|---|---|---|
| Main Fleet Shelling | Allies | +2 | +2 | -5 |
| Enemy | +10 | +10 | +10 | |
| Escort Fleet Shelling | Allies | -5 | -5 | -5 |
| Enemy | -5 | -5 | -5 |
Single Fleet vs Combined Fleet Modifiers
| Combat Phase | Forces | Bonus |
|---|---|---|
| Vs Main Fleet | Allies | +5 |
| Enemy | +10 | |
| Vs Escort | Allies | +5 |
| Enemy | -5 |
See Also
Accuracy, Evasion and Criticals
Help:Equipment Setups
| |||||||||||||||||||||||||||||||||||||