- Welcome to the Kancolle Wiki!
- If you have any questions regarding site content, account registration, etc., please visit the KanColle Wiki Discord
Difference between revisions of "Special Attacks/Yamato Touch"
Jigaraphale (talk | contribs) m |
Jigaraphale (talk | contribs) m |
||
| (49 intermediate revisions by 3 users not shown) | |||
| Line 1: | Line 1: | ||
| − | Yamato gains two different | + | Yamato gains two different special attacks on Kai Ni/Juu. |
| − | + | They're distinguished by how many ships participate, there's a '''2-ship touch''' and a '''3-ship touch''': | |
| − | |||
| − | |||
| − | |||
| − | |||
| − | |||
| − | + | Devs also have stated that the touch helpers will be updated with relevant ship implementation [https://twitter.com/KanColle_STAFF/status/1534456312054304769?s=20]. | |
| + | *So far have been added: | ||
| + | **[[Jean Bart]] for the 2-ship touch, | ||
| + | **[[Maryland]]+[[Colorado]], [[Kongou]]+[[Haruna]]/[[Kirishima]], [[Hiei]]+[[Kirishima]], [[Richelieu]]+[[Jean Bart]], [[Nelson]]+[[Rodney]], and [[Warspite]]+[[Valiant]] for the 3-ship touch. | ||
| + | **[[Massachusetts]] has not yet been added as any touch helpers. | ||
| − | <div class="mw-collapsible {{{1}}}" |"mw-collapsible"}}><h3>Yamato 2-Ship Special Attack</h3> | + | <div class="mw-collapsible {{{1}}}" |"mw-collapsible"}}><h3>Yamato-class 2-Ship Special Attack</h3> |
<div class="mw-collapsible-content"> | <div class="mw-collapsible-content"> | ||
<tabber> | <tabber> | ||
|-|Activation requirements= | |-|Activation requirements= | ||
| − | {| class="wikitable" style="float:right | + | {|class="wikitable" style="float:right |
| − | !"Touch Helpers" | + | !colspan=3|"Touch Helpers" |
|- | |- | ||
| − | |{{Ship/Banner|Musashi Kai Ni|small=true}}<br>{{Ship/Banner|Iowa Kai|small=true}}<br>{{Ship/Banner|Bismarck Kai|small=true}}<br>{{Ship/Banner| | + | !Yamato Flagship: |
| − | |} | + | !Musashi Flagship: |
| + | |- | ||
| + | |{{Ship/Banner|Musashi Kai Ni|small=true}}<br>{{Ship/Banner|Iowa Kai|small=true}}<br>{{Ship/Banner|Bismarck Drei|small=true}}<br>{{ItemStack|item={{Ship/Banner|Richelieu Kai|small=true}}|text=Kai/Deux}}<br>{{Ship/Banner|Jean Bart Kai|small=true}} | ||
| + | |{{ItemStack|item={{Ship/Banner|Yamato Kai Ni|small=true}}|text=Kai Ni/Juu|text-position=bottom:-15px;right:4px}} | ||
| + | |} | ||
| − | * '''Yamato Kai Ni/Juu''' must be | + | * A '''{{Class|Yamato|Kai Ni/Juu}}''' must be '''flagship'''. |
** '''Secretary''' for combined fleets. | ** '''Secretary''' for combined fleets. | ||
** She must not be more than {{color|gold|'''lightly damaged (小破)'''}}. | ** She must not be more than {{color|gold|'''lightly damaged (小破)'''}}. | ||
* Another "Touch Helper" must be in the 2nd position. | * Another "Touch Helper" must be in the 2nd position. | ||
** She must not be more than {{color|gold|'''lightly damaged (小破)'''}}. | ** She must not be more than {{color|gold|'''lightly damaged (小破)'''}}. | ||
| − | |||
** When using [[Musashi Kai Ni]] as the helper in the 2nd position with [[Nagato Kai Ni]] or [[Mutsu Kai Ni]] in the 3rd one being {{color|gold|'''lightly damaged (小破)'''}} or better, there is a random chance to trigger the "'''3-Ship Special Attack'''" instead. | ** When using [[Musashi Kai Ni]] as the helper in the 2nd position with [[Nagato Kai Ni]] or [[Mutsu Kai Ni]] in the 3rd one being {{color|gold|'''lightly damaged (小破)'''}} or better, there is a random chance to trigger the "'''3-Ship Special Attack'''" instead. | ||
* There must be 6 or more surface ships in the fleet. | * There must be 6 or more surface ships in the fleet. | ||
** There must be no submarine in 6-ship fleets. In 7-ship fleets, only 1 submarine is allowed. | ** There must be no submarine in 6-ship fleets. In 7-ship fleets, only 1 submarine is allowed. | ||
| − | ** There must be no surface ship in the fleet sunk or | + | ** There must be no surface ship in the fleet sunk or [[Evacuation|evacuated]] via {{CommandFacility}} {{EquipmentLink|Fleet Command Facility|Striking Force Fleet Command Facility|text=FCF}} during a sortie, making the remaining total < 6. Ships in the escort fleet are not counted. |
| − | * In single fleet, {{ToolTip|[[ | + | * In single fleet, {{ToolTip|[[Echelon]]|[[File:Echelon.png]]}} needs to be selected. |
| − | * In a combined fleet, {{ToolTip|[[ | + | * In a combined fleet, {{ToolTip|[[Cruising Formation 4]]|[[File:Formation_4.png]]}} needs to be selected. |
| − | + | * The touch can activate even if Yamato Kai Ni Juu is equipped with ASW equipment when facing a fleet mixed with submarines. | |
| − | * The touch can activate even if Yamato Kai Ni Juu is equipped with ASW equipment when | ||
|-|Multiplier= | |-|Multiplier= | ||
If triggered: | If triggered: | ||
*The flagship will do '''a 1st & 2nd attack''', | *The flagship will do '''a 1st & 2nd attack''', | ||
| − | *The Helper will do '''a 3rd attack''' | + | *The Helper will do '''a 3rd attack''', |
| − | *Each attack | + | *Each attack targets a ship at random, |
| + | *If all enemies sunk, then touch stops early. | ||
{| class="wikitable" style="text-align: center;" | {| class="wikitable" style="text-align: center;" | ||
!rowspan=2|Equipment | !rowspan=2|Equipment | ||
| − | !colspan=2|{{Ship/Link|Musashi/Kai Ni}} | + | !colspan=2|{{Ship/Link|Yamato/Kai Ni Juu}} 2nd |
| − | !colspan=2|{{Ship/Link|Iowa/Kai|Bismarck/ | + | !colspan=2|{{Ship/Link|Yamato/Kai Ni|Musashi/Kai Ni|text=''Yamato''-class Kai Ni|link_class=Yamato}} 2nd |
| + | !colspan=2|{{Ship/Link|Iowa/Kai|Bismarck/Drei|Richelieu/Kai|text=Other Helpers}} | ||
|- | |- | ||
| − | |'''Attacks 1 & 2'''||'''Attack 3'''||'''Attacks 1 & 2'''||'''Attack 3''' | + | |'''Attacks 1 & 2'''||'''Attack 3'''||'''Attacks 1 & 2'''||'''Attack 3'''||'''Attacks 1 & 2'''||'''Attack 3''' |
|- | |- | ||
|'''No Bonus Equipment''' | |'''No Bonus Equipment''' | ||
| − | | 1.54|| 1. | + | | 1.54|| 1.94|| 1.54|| 1.86|| 1.40|| 1.55 |
|- | |- | ||
| − | |{{Radar}} '''[[ | + | |{{Surface Radar}} '''[[Surface Radar]] Only''' |
| − | | 1.77|| 2. | + | | 1.77|| 2.23|| 1.77|| 2.14|| 1.61|| 1.78 |
|- | |- | ||
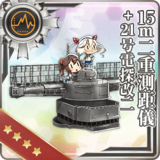
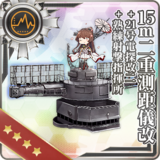
| − | |{{ | + | |{{Very Large Radar}} '''{{Equipment/Link|15m Duplex Rangefinder + Type 21 Radar Kai Ni|15m Duplex Rangefinder Kai + Type 21 Radar Kai Ni + Skilled Fire Direction Center|text=Very large radar|link_category=Very Large Radar}} Only''' |
| − | | 2. | + | | 1.96|| 2.45|| 1.95|| 2.35|| 1.77|| 1.96 |
|- | |- | ||
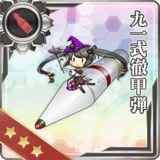
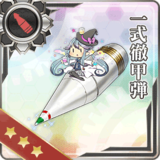
| − | |{{ | + | |{{AP Shell}} '''{{Equipment/Link|Type 91 Armor Piercing Shell|Type 1 Armor Piercing Shell|Type 1 Armor Piercing Shell Kai|text=AP Shells|link_category=Armour-Piercing Shells}} Only''' |
| − | | 2.08|| 2. | + | | 2.08|| 2.62|| 2.08|| 2.51|| 1.89|| 2.09 |
|- | |- | ||
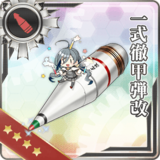
| − | |{{ | + | |{{AP Shell}} '''{{Equipment/Link|Type 91 Armor Piercing Shell|Type 1 Armor Piercing Shell|Type 1 Armor Piercing Shell Kai|text=AP|link_category=Armour-Piercing Shells}} + {{Surface Radar}} [[Radar]]''' |
| − | | 2.39|| 2.89|| 2.17|| 2. | + | | 2.39|| 3.01|| 2.39|| 2.89|| 2.17|| 2.41 |
|- | |- | ||
| − | |{{ | + | |{{AP Shell}} '''{{Equipment/Link|Type 91 Armor Piercing Shell|Type 1 Armor Piercing Shell|Type 1 Armor Piercing Shell Kai|text=AP|link_category=Armour-Piercing Shells}} + {{Very Large Radar}} {{Equipment/Link|15m Duplex Rangefinder + Type 21 Radar Kai Ni|15m Duplex Rangefinder Kai + Type 21 Radar Kai Ni + Skilled Fire Direction Center|text=Very large radar|link_category=Very Large Radar}}''' |
| − | | 2.63|| 3. | + | | 2.63|| 3.31|| 2.63|| 3.18|| 2.39|| 2.65 |
|} | |} | ||
| − | The equipment bonuses do not stack further than 1 radar and/or 1 AP shell. | + | *The modifiers are [[Damage Calculations|post-cap]] on day battle, and [[Damage Calculations|pre-cap]] on night battle. |
| − | *Only ships equipped with those equipment will get a bonus for their attack(s). | + | *The equipment bonuses do not stack further than 1 radar and/or 1 AP shell per ship. |
| + | **Only ships equipped with those equipment will get a bonus for their attack(s). | ||
|-|Cost= | |-|Cost= | ||
| Line 75: | Line 79: | ||
|-|Trigger Rate= | |-|Trigger Rate= | ||
| − | + | The touch: | |
| − | |||
* Can be triggered even if artillery spotting fails to activate. | * Can be triggered even if artillery spotting fails to activate. | ||
* Can only be activated '''once per sortie'''. | * Can only be activated '''once per sortie'''. | ||
| − | * Has a chance to trigger every time | + | * Has a chance to trigger every time the flagship takes a turn at shelling. |
** In single fleet, if it fails to trigger in day battle, there is a chance to trigger it in the follow-up night battle. | ** In single fleet, if it fails to trigger in day battle, there is a chance to trigger it in the follow-up night battle. | ||
| + | *The rate is<ref>https://x.com/chang1124414276/status/1634896670575198209</ref><ref>https://x.com/chang1124414276/status/1636190200593522688</ref><ref>https://x.com/Divinity_123/status/1820114422343376976</ref>: | ||
| + | |||
| + | {|style="padding:10px; margin:20px; border:1px solid orange; border-radius:10px" | ||
| + | |valign="center"| <math> | ||
| + | \text{Trigger}_\text{Rate}\text{%} = \Biggl\lfloor \sum_\text{Ships} \sqrt{\text{Lv}} + 1.25 \times \sum_\text{Ships} \sqrt{\text{Luck}} + \text{A} + \text{B} + 33 \Biggr\rfloor | ||
| + | </math> | ||
| + | |} | ||
| + | |||
| + | ;With | ||
| + | *<math>\text{Lv}</math> the Level of the participating ships, | ||
| + | *<math>\text{Luck}</math> the {{Luck}} Luck of the participating ships, | ||
| + | *<math>\text{A}</math> the helper bonus, being: | ||
| + | **'''4''' if Yamato is helper, | ||
| + | **'''7''' if Musashi is the helper, | ||
| + | **'''0''' otherwise. | ||
| + | *<math>\text{B}</math> the bonus for equipping {{Radar}} [[Radar]]s with ({{Hit}} Acc ≥ 8?), being: | ||
| + | **'''10''' if 1 ship has a radar, | ||
| + | **'''20''' if both ships have a radar, | ||
| + | **'''0''' otherwise. | ||
| + | |||
| + | <references/> | ||
</tabber> | </tabber> | ||
| Line 90: | Line 114: | ||
|-|Activation requirements= | |-|Activation requirements= | ||
* '''Yamato Kai Ni/Juu''' must be the '''flagship'''. | * '''Yamato Kai Ni/Juu''' must be the '''flagship'''. | ||
| + | ** '''Secretary''' for combined fleets. | ||
** She must not be more than {{color|gold|'''lightly damaged (小破)'''}}. | ** She must not be more than {{color|gold|'''lightly damaged (小破)'''}}. | ||
* A pair of ships from a same "Helper Pair" must be in the 2nd and 3rd positions. | * A pair of ships from a same "Helper Pair" must be in the 2nd and 3rd positions. | ||
| Line 99: | Line 124: | ||
* There must be 6 or more surface ships in the fleet. | * There must be 6 or more surface ships in the fleet. | ||
** There must be no submarine in 6-ship fleets. In 7-ship fleets, only 1 submarine is allowed. | ** There must be no submarine in 6-ship fleets. In 7-ship fleets, only 1 submarine is allowed. | ||
| − | ** There must be no surface ship in the fleet sunk or | + | ** There must be no surface ship in the fleet sunk or [[Evacuation|evacuated]] via {{CommandFacility}} {{EquipmentLink|Fleet Command Facility|Striking Force Fleet Command Facility|text=FCF}} during a sortie, making the remaining total < 6. Ships in the escort fleet are not counted. |
| − | * In single fleet, {{ToolTip|[[ | + | * In single fleet, {{ToolTip|[[Echelon]]|[[File:Echelon.png]]}} needs to be selected. |
| − | * In a combined fleet, {{ToolTip|[[ | + | * In a combined fleet, {{ToolTip|[[Cruising Formation 4]]|[[File:Formation_4.png]]}} needs to be selected. |
| + | * The touch can activate even if Yamato Kai Ni Juu is equipped with ASW equipment when facing a fleet mixed with submarines. | ||
| − | {| class="wikitable" | + | {|class="wikitable" |
| − | !colspan= | + | !colspan=9|"Helper Pairs" |
|- | |- | ||
| − | |style="text-align: center" | + | |style="text-align:center" colspan=9| One of the following pairs: |
|- | |- | ||
| − | |style="text-align: center"|[[Musashi Kai Ni]] 2nd ship: | + | |style="text-align:center"|[[Musashi Kai Ni]] 2nd ship: |
| − | |style="text-align: center" | + | !rowspan=3| |
| + | |style="text-align:center" colspan=7|In any order: | ||
|- | |- | ||
| | | | ||
| − | {| class="wikitable" | + | {|class="wikitable" |
!{{Ship/Banner|Musashi Kai Ni|small=true}}<br>{{Ship/Banner|Nagato Kai Ni|small=true}} | !{{Ship/Banner|Musashi Kai Ni|small=true}}<br>{{Ship/Banner|Nagato Kai Ni|small=true}} | ||
| − | |} | + | |} |
| | | | ||
| − | {| class="wikitable" | + | {|class="wikitable" |
!{{Ship/Banner|Nagato Kai Ni|small=true}}<br>{{Ship/Banner|Mutsu Kai Ni|small=true}} | !{{Ship/Banner|Nagato Kai Ni|small=true}}<br>{{Ship/Banner|Mutsu Kai Ni|small=true}} | ||
| − | |} | + | |} |
| | | | ||
| − | {| class="wikitable" | + | {|class="wikitable" |
!{{Ship/Banner|Kongou Kai Ni C|small=true}}<br>{{Ship/Banner|Hiei Kai Ni C|small=true}} | !{{Ship/Banner|Kongou Kai Ni C|small=true}}<br>{{Ship/Banner|Hiei Kai Ni C|small=true}} | ||
|} | |} | ||
| | | | ||
| − | {| class="wikitable" | + | {|class="wikitable" |
| + | !{{Ship/Banner|Kongou Kai Ni C|small=true}}<br>{{ItemStack|item={{Ship/Banner|Haruna Kai Ni B|small=true}}|text=Kai Ni B/C}} | ||
| + | |} | ||
| + | | | ||
| + | {|class="wikitable" | ||
| + | !{{Ship/Banner|Kongou Kai Ni C|small=true}}<br>{{Ship/Banner|Kirishima Kai Ni C|small=true}} | ||
| + | |} | ||
| + | | | ||
| + | {|class="wikitable" | ||
| + | !{{Ship/Banner|Hiei Kai Ni C|small=true}}<br>{{Ship/Banner|Kirishima Kai Ni C|small=true}} | ||
| + | |} | ||
| + | | | ||
| + | {|class="wikitable" | ||
!{{Ship/Banner|Ise Kai Ni|small=true}}<br>{{Ship/Banner|Hyuuga Kai Ni|small=true}} | !{{Ship/Banner|Ise Kai Ni|small=true}}<br>{{Ship/Banner|Hyuuga Kai Ni|small=true}} | ||
| − | |} | + | |} |
| | | | ||
{|class="wikitable" | {|class="wikitable" | ||
!{{Ship/Banner|Fusou Kai Ni|small=true}}<br>{{Ship/Banner|Yamashiro Kai Ni|small=true}} | !{{Ship/Banner|Fusou Kai Ni|small=true}}<br>{{Ship/Banner|Yamashiro Kai Ni|small=true}} | ||
| − | |} | + | |} |
|- | |- | ||
| | | | ||
| − | {| class="wikitable" | + | {|class="wikitable" |
!{{Ship/Banner|Musashi Kai Ni|small=true}}<br>{{Ship/Banner|Mutsu Kai Ni|small=true}} | !{{Ship/Banner|Musashi Kai Ni|small=true}}<br>{{Ship/Banner|Mutsu Kai Ni|small=true}} | ||
| − | |} | + | |} |
| | | | ||
| − | {| class="wikitable" | + | {|class="wikitable" |
| + | !{{Ship/Banner|Italia|small=true}}<br>{{Ship/Banner|Roma Kai|small=true}} | ||
| + | |} | ||
| + | | | ||
| + | {|class="wikitable" | ||
!{{Ship/Banner|South Dakota Kai|small=true}}<br>{{Ship/Banner|Washington Kai|small=true}} | !{{Ship/Banner|South Dakota Kai|small=true}}<br>{{Ship/Banner|Washington Kai|small=true}} | ||
| − | |} | + | |} |
| | | | ||
| − | {| class="wikitable" | + | {|class="wikitable" |
!{{Ship/Banner|Colorado Kai|small=true}}<br>{{Ship/Banner|Maryland Kai|small=true}} | !{{Ship/Banner|Colorado Kai|small=true}}<br>{{Ship/Banner|Maryland Kai|small=true}} | ||
|} | |} | ||
| | | | ||
| − | {| class="wikitable" | + | {|class="wikitable" |
| + | !{{Ship/Banner|Warspite Kai|small=true}}<br>{{Ship/Banner|Valiant Kai|small=true}} | ||
| + | |} | ||
| + | | | ||
| + | {|class="wikitable" | ||
!{{Ship/Banner|Warspite Kai|small=true}}<br>{{Ship/Banner|Nelson Kai|small=true}} | !{{Ship/Banner|Warspite Kai|small=true}}<br>{{Ship/Banner|Nelson Kai|small=true}} | ||
| − | |} | + | |} |
| | | | ||
| − | {| class="wikitable" | + | {|class="wikitable" |
| − | !{{Ship/Banner| | + | !{{Ship/Banner|Nelson Kai|small=true}}<br>{{Ship/Banner|Rodney Kai|small=true}} |
| − | |} | + | |} |
| − | |} | + | | |
| + | {|class="wikitable" | ||
| + | !{{ItemStack|item={{Ship/Banner|Richelieu Kai|small=true}}|text=Kai/Deux}}<br>{{Ship/Banner|Jean Bart Kai|small=true}} | ||
| + | |} | ||
| + | |} | ||
|-|Multiplier= | |-|Multiplier= | ||
| Line 159: | Line 210: | ||
*Yamato will do '''a 1st attack''', | *Yamato will do '''a 1st attack''', | ||
*The 2nd ship will do '''a 2nd attack''', | *The 2nd ship will do '''a 2nd attack''', | ||
| − | *The 3rd ship will do '''a 3rd attack''' | + | *The 3rd ship will do '''a 3rd attack''', |
| − | *Each attack | + | *Each attack targets a ship at random, |
| + | *If all enemies sunk, then touch stops early. | ||
{| class="wikitable" style="text-align: center;" | {| class="wikitable" style="text-align: center;" | ||
!rowspan=2|Equipment | !rowspan=2|Equipment | ||
| − | !colspan=2|{{Ship/Link|Musashi/Kai Ni}} (& {{Ship/Link|Nagato/Kai Ni|Mutsu/Kai Ni|text=Helper}}) | + | !colspan=2|{{Ship/Link|Musashi/Kai Ni}} (& {{Ship/Link|Nagato/Kai Ni|Mutsu/Kai Ni|text=Helper|link_class=Nagato}}) |
| − | !colspan=2|Other "Helper Pairs" | + | !{{Ship/Link|Nagato/Kai Ni|Mutsu/Kai Ni|text=''Nagato''-class|link_class=Nagato}} Pair |
| + | !colspan=2|{{Ship/Link|Ise/Kai Ni|Hyuuga/Kai Ni|text=''Ise''-class|link_class=Ise}} Pair | ||
| + | !Other "Helper Pairs" | ||
| + | !Any "Helper Pairs" | ||
|- | |- | ||
| − | |'''Attacks 1'''||'''Attack 2 | + | |'''Attacks 1'''||'''Attacks 2'''||'''Attack 1 & 2'''||'''Attacks 1'''||'''Attacks 2'''||'''Attack 1 & 2'''||'''Attacks 3''' |
|- | |- | ||
|'''No Bonus Equipment''' | |'''No Bonus Equipment''' | ||
| − | | 1.65|| 1. | + | | 1.65|| 1.80|| 1.65|| 1.65|| 1.58|| 1.50|| 1.65 |
|- | |- | ||
| − | |{{Radar}} '''[[ | + | |{{Surface Radar}} '''[[Surface Radar]] Only''' |
| − | | 1.90|| 2. | + | | 1.90|| 2.07|| 1.90|| 1.90|| 1.80|| 1.73|| rowspan=2| 1.90 |
|- | |- | ||
| − | |{{ | + | |{{Very Large Radar}} '''{{Equipment/Link|15m Duplex Rangefinder + Type 21 Radar Kai Ni|15m Duplex Rangefinder Kai + Type 21 Radar Kai Ni + Skilled Fire Direction Center|text=Very large radar|link_category=Very Large Radar}} Only''' |
| − | | 2.09|| 2. | + | | 2.09|| 2.28|| 2.09|| 2.09|| 1.99|| 1.90 |
|- | |- | ||
| − | |{{ | + | |{{AP Shell}} '''{{Equipment/Link|Type 91 Armor Piercing Shell|Type 1 Armor Piercing Shell|Type 1 Armor Piercing Shell Kai|text=AP Shells|link_category=Armour-Piercing Shells}} Only''' |
| − | | 2.23|| 2. | + | | 2.23|| 2.43|| 2.23|| 2.23|| 2.13|| 2.03|| 2.23 |
|- | |- | ||
| − | |{{ | + | |{{AP Shell}} '''{{Equipment/Link|Type 91 Armor Piercing Shell|Type 1 Armor Piercing Shell|Type 1 Armor Piercing Shell Kai|text=AP|link_category=Armour-Piercing Shells}} + {{Surface Radar}} [[Surface Radar|Radar]]''' |
| − | | 2.56|| 2. | + | | 2.56|| 2.79|| 2.56|| 2.56|| 2.45|| 2.33|| rowspan=2| 2.56 |
|- | |- | ||
| − | |{{ | + | |{{AP Shell}} '''{{Equipment/Link|Type 91 Armor Piercing Shell|Type 1 Armor Piercing Shell|Type 1 Armor Piercing Shell Kai|text=AP|link_category=Armour-Piercing Shells}} + {{Very Large Radar}} {{Equipment/Link|15m Duplex Rangefinder + Type 21 Radar Kai Ni|15m Duplex Rangefinder Kai + Type 21 Radar Kai Ni + Skilled Fire Direction Center|text=Very large radar|link_category=Very Large Radar}}''' |
| − | | 2.82|| 3. | + | | 2.82|| 3.07|| 2.82|| 2.82|| 2.69|| 2.56 |
|} | |} | ||
| − | The equipment bonuses do not stack further than 1 radar and/or 1 AP shell. | + | *The modifiers are [[Damage Calculations|post-cap]] on day battle, and [[Damage Calculations|pre-cap]] on night battle. |
| − | *Only ships equipped with those equipment will get a bonus for their attack(s). | + | *The equipment bonuses do not stack further than 1 radar and/or 1 AP shell per ship. |
| + | **Only ships equipped with those equipment will get a bonus for their attack(s). | ||
|-|Cost= | |-|Cost= | ||
| Line 194: | Line 250: | ||
|-|Trigger Rate= | |-|Trigger Rate= | ||
| − | + | The touch: | |
| − | |||
* Can be triggered even if artillery spotting fails to activate. | * Can be triggered even if artillery spotting fails to activate. | ||
* Can only be activated '''once per sortie'''. | * Can only be activated '''once per sortie'''. | ||
| − | * Has a chance to trigger every time | + | * Has a chance to trigger every time the flagship takes a turn at shelling. |
** In single fleet, if it fails to trigger in day battle, there is a chance to trigger it in the follow-up night battle. | ** In single fleet, if it fails to trigger in day battle, there is a chance to trigger it in the follow-up night battle. | ||
| + | *The rate is probably: | ||
| + | |||
| + | {|style="padding:10px; margin:20px; border:1px solid orange; border-radius:10px" | ||
| + | |valign="center"| <math> | ||
| + | \text{Trigger}_\text{Rate}\text{%} = \Biggl\lfloor \text{V} \times \sum_\text{Ships} \sqrt{\text{Lv}} + \text{W} \times \sum_\text{Ships} \sqrt{\text{Luck}} + \text{X} + \text{Y} \Biggr\rfloor | ||
| + | </math> | ||
| + | |} | ||
| + | |||
| + | ;With | ||
| + | *<math>\text{Lv}</math> the Level of the participating ships, | ||
| + | *<math>\text{Luck}</math> the {{Luck}} Luck of the participating ships, | ||
| + | *<math>\text{V & W}</math> some yet unknown bonus factors, | ||
| + | *<math>\text{X}</math> some yet unknown bonus variables, | ||
| + | *<math>\text{Y}</math> some yet unknown base rate. | ||
| + | |||
| + | It is notably affected by: | ||
| + | *The Level and luck {{Luck}} stat of the participating ships, | ||
| + | *{{Radar}} [[Surface Radar]]s (5+ LoS?) on attacking ships (+8~10 %)<ref>https://twitter.com/Divinity_123/status/1541123774736908290?s=20&t=aT63CJ7RkK57JeMU7s0xGQ</ref>. | ||
| + | It is currently measured above 70 %. | ||
| + | <references/> | ||
</tabber> | </tabber> | ||
Latest revision as of 17:19, 25 September 2024
Yamato gains two different special attacks on Kai Ni/Juu.
They're distinguished by how many ships participate, there's a 2-ship touch and a 3-ship touch:
Devs also have stated that the touch helpers will be updated with relevant ship implementation [1].
- So far have been added:
Yamato-class 2-Ship Special Attack
| "Touch Helpers" | ||
|---|---|---|
| Yamato Flagship: | Musashi Flagship: | |
- A Yamato-class Kai Ni/Juu must be flagship.
- Secretary for combined fleets.
- She must not be more than lightly damaged (小破).
- Another "Touch Helper" must be in the 2nd position.
- She must not be more than lightly damaged (小破).
- When using Musashi Kai Ni as the helper in the 2nd position with Nagato Kai Ni or Mutsu Kai Ni in the 3rd one being lightly damaged (小破) or better, there is a random chance to trigger the "3-Ship Special Attack" instead.
- There must be 6 or more surface ships in the fleet.


- In single fleet, Echelon
 needs to be selected.
 - In a combined fleet, Cruising Formation 4
 needs to be selected.
 - The touch can activate even if Yamato Kai Ni Juu is equipped with ASW equipment when facing a fleet mixed with submarines.


If triggered:
- The flagship will do a 1st & 2nd attack,
- The Helper will do a 3rd attack,
- Each attack targets a ship at random,
- If all enemies sunk, then touch stops early.
| Equipment | Yamato Kai Ni Juu 2nd 2nd
|
Yamato-class Kai Ni  2nd 2nd
|
Other Helpers  
| |||
|---|---|---|---|---|---|---|
| Attacks 1 & 2 | Attack 3 | Attacks 1 & 2 | Attack 3 | Attacks 1 & 2 | Attack 3 | |
| No Bonus Equipment | 1.54 | 1.94 | 1.54 | 1.86 | 1.40 | 1.55 |
| 1.77 | 2.23 | 1.77 | 2.14 | 1.61 | 1.78 | |
  Only Only
|
1.96 | 2.45 | 1.95 | 2.35 | 1.77 | 1.96 |
   Only Only
|
2.08 | 2.62 | 2.08 | 2.51 | 1.89 | 2.09 |
| + |
2.39 | 3.01 | 2.39 | 2.89 | 2.17 | 2.41 |
| +
|
2.63 | 3.31 | 2.63 | 3.18 | 2.39 | 2.65 |
The attack will consume extra ammo from participating ships when triggered. The total ammo consumption will be x1.6 of the original ammo consumption of those ships when the attack is triggered.
The touch:
- Can be triggered even if artillery spotting fails to activate.
- Can only be activated once per sortie.
- Has a chance to trigger every time the flagship takes a turn at shelling.
- In single fleet, if it fails to trigger in day battle, there is a chance to trigger it in the follow-up night battle.
- The rate is[1][2][3]:
| [math]\displaystyle{ \text{Trigger}_\text{Rate}\text{%} = \Biggl\lfloor \sum_\text{Ships} \sqrt{\text{Lv}} + 1.25 \times \sum_\text{Ships} \sqrt{\text{Luck}} + \text{A} + \text{B} + 33 \Biggr\rfloor }[/math] |
- With
- [math]\displaystyle{ \text{Lv} }[/math] the Level of the participating ships,
- [math]\displaystyle{ \text{Luck} }[/math] the
 Luck of the participating ships,
 - [math]\displaystyle{ \text{A} }[/math] the helper bonus, being:
- 4 if Yamato is helper,
- 7 if Musashi is the helper,
- 0 otherwise.
- [math]\displaystyle{ \text{B} }[/math] the bonus for equipping
 Radars with (
 Acc ≥ 8?), being:
- 10 if 1 ship has a radar,
- 20 if both ships have a radar,
- 0 otherwise.
Yamato 3-Ship Special Attack
- Yamato Kai Ni/Juu must be the flagship.
- Secretary for combined fleets.
- She must not be more than lightly damaged (小破).
- A pair of ships from a same "Helper Pair" must be in the 2nd and 3rd positions.
- They must not be more than lightly damaged (小破).
- When using Musashi Kai Ni as the helper in the 2nd position with Nagato Kai Ni or Mutsu Kai Ni in the 3rd one:
- If the 3rd ship is lightly damaged (小破) or better, there is a random chance to trigger the "2-Ship Special Attack" instead.
- If the 3rd ship is moderately damaged (中破) or worse, the "2-Ship Special Attack" will trigger instead.
- There must be 6 or more surface ships in the fleet.
- In single fleet, Echelon needs to be selected.
- In a combined fleet, Cruising Formation 4 needs to be selected.
- The touch can activate even if Yamato Kai Ni Juu is equipped with ASW equipment when facing a fleet mixed with submarines.
| "Helper Pairs" | |||||||||||||||
|---|---|---|---|---|---|---|---|---|---|---|---|---|---|---|---|
| One of the following pairs: | |||||||||||||||
| Musashi Kai Ni 2nd ship: | In any order: | ||||||||||||||
|
|
|
|
|
|
|
|
| ||||||||
|
|
|
|
|
|
|
|
| ||||||||
If triggered:
- Yamato will do a 1st attack,
- The 2nd ship will do a 2nd attack,
- The 3rd ship will do a 3rd attack,
- Each attack targets a ship at random,
- If all enemies sunk, then touch stops early.
| Equipment | Musashi Kai Ni (& Helper  ) )
|
Nagato-class Pair
|
Ise-class  Pair Pair
|
Other "Helper Pairs" | Any "Helper Pairs" | ||
|---|---|---|---|---|---|---|---|
| Attacks 1 | Attacks 2 | Attack 1 & 2 | Attacks 1 | Attacks 2 | Attack 1 & 2 | Attacks 3 | |
| No Bonus Equipment | 1.65 | 1.80 | 1.65 | 1.65 | 1.58 | 1.50 | 1.65 |
| 1.90 | 2.07 | 1.90 | 1.90 | 1.80 | 1.73 | 1.90 | |
| Only
|
2.09 | 2.28 | 2.09 | 2.09 | 1.99 | 1.90 | |
| Only
|
2.23 | 2.43 | 2.23 | 2.23 | 2.13 | 2.03 | 2.23 |
| + |
2.56 | 2.79 | 2.56 | 2.56 | 2.45 | 2.33 | 2.56 |
| +
|
2.82 | 3.07 | 2.82 | 2.82 | 2.69 | 2.56 | |
The attack will consume extra ammo from participating ships when triggered. The total ammo consumption will be x1.8 of the original ammo consumption of those ships when the attack is triggered.
The touch:
- Can be triggered even if artillery spotting fails to activate.
- Can only be activated once per sortie.
- Has a chance to trigger every time the flagship takes a turn at shelling.
- In single fleet, if it fails to trigger in day battle, there is a chance to trigger it in the follow-up night battle.
- The rate is probably:
| [math]\displaystyle{ \text{Trigger}_\text{Rate}\text{%} = \Biggl\lfloor \text{V} \times \sum_\text{Ships} \sqrt{\text{Lv}} + \text{W} \times \sum_\text{Ships} \sqrt{\text{Luck}} + \text{X} + \text{Y} \Biggr\rfloor }[/math] |
- With
- [math]\displaystyle{ \text{Lv} }[/math] the Level of the participating ships,
- [math]\displaystyle{ \text{Luck} }[/math] the Luck of the participating ships,
- [math]\displaystyle{ \text{V & W} }[/math] some yet unknown bonus factors,
- [math]\displaystyle{ \text{X} }[/math] some yet unknown bonus variables,
- [math]\displaystyle{ \text{Y} }[/math] some yet unknown base rate.
It is notably affected by:
- The Level and luck stat of the participating ships,
- Surface Radars (5+ LoS?) on attacking ships (+8~10 %)[1].
It is currently measured above 70 %.
Main source: [2]