- Welcome to the Kancolle Wiki!
- If you have any questions regarding site content, account registration, etc., please visit the KanColle Wiki Discord
Difference between revisions of "World 5/5-4"
< World 5
Jump to navigation
Jump to search
(Created page with "==World 5-4: サーモン海域 Salmon Sea Area== {{LabSortieworld | map = 5-4 Map.png | difficulty = ☆ ☆ ☆ ☆ ☆ ☆ ☆ ☆ ☆ | item = {{...") |
Jigaraphale (talk | contribs) m (→Tips) |
||
| (35 intermediate revisions by 10 users not shown) | |||
| Line 1: | Line 1: | ||
| + | {{World/Hub}} | ||
==World 5-4: サーモン海域 [[wikipedia:en:The Slot|Salmon Sea Area]]== | ==World 5-4: サーモン海域 [[wikipedia:en:The Slot|Salmon Sea Area]]== | ||
{{LabSortieworld | {{LabSortieworld | ||
| − | | | + | | page = World 5/5-4 |
| difficulty = ☆ ☆ ☆ ☆ ☆ ☆ ☆ ☆ ☆ | | difficulty = ☆ ☆ ☆ ☆ ☆ ☆ ☆ ☆ ☆ | ||
| − | | item = {{ | + | | item = {{ammo}} |
| exp = 420 | | exp = 420 | ||
| code = 東京急行 ([[wikipedia:Tokyo_Express|Tokyo Express]]) | | code = 東京急行 ([[wikipedia:Tokyo_Express|Tokyo Express]]) | ||
| jptext = 南方海域に有力な艦隊を投入し鼠輸送作戦を敢行、可能であれば同方面の敵艦隊も撃滅せよ! | | jptext = 南方海域に有力な艦隊を投入し鼠輸送作戦を敢行、可能であれば同方面の敵艦隊も撃滅せよ! | ||
| entext = Perform a vital "rat transport" operation. If possible, also destroy the enemy fleet in the area! | | entext = Perform a vital "rat transport" operation. If possible, also destroy the enemy fleet in the area! | ||
| + | | aircon = | ||
| + | {{AirControlSystem | ||
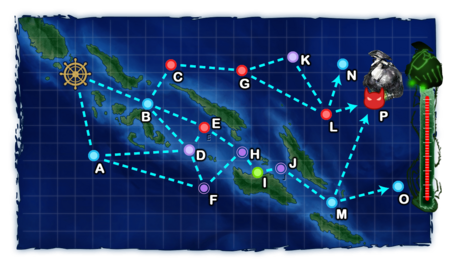
| + | | Map = 5-4 North route | ||
| + | | Route = {{MapRoute|B|blue|C|red|G|red|L|red|P|red}} | ||
| + | | Fleet = 2BB(V), 2CV, 2CA(V) | ||
| + | | AS = 309 | ||
| + | }} | ||
| + | {{AirControlSystem | ||
| + | | Map = 5-4 Middle route | ||
| + | | Route = {{MapRoute|B|blue|E|red|H|purple|I|green|J|purple|M|blue|P|red}} | ||
| + | | Fleet = 1CL, 3DD, 2CLT {{color|red|'''(Torpedo Squadron)'''}}<br>1FBB, 1CAV, 1CL, 3DD (Fast) | ||
| + | | AS = 141 | ||
| + | | Notes = Boss node doesn't contain the enemy comp with {{Enemy/Link|Heavy Cruiser Ne-Class Elite}} post clear. | ||
| + | }} | ||
| + | {{AirControlSystem | ||
| + | | Map = 5-4 South route | ||
| + | | Route = {{MapRoute|A|blue|D|violet|E|red|H|purple|I|green|J|purple|M|blue|P|red}} | ||
| + | | Fleet = 3CA(V), 1CL, 2DD | ||
| + | | AS = 141 | ||
| + | | Notes = Mikawa Fleet.<br>Boss node doesn't contain the enemy comp with {{Enemy/Link|Heavy Cruiser Ne-Class Elite}} post clear. | ||
| + | }} | ||
}} | }} | ||
| + | |||
| + | ===Map Unlocking & Progression=== | ||
| + | '''5-4''' is unlocked after clearing [[5-3]] HP bar. | ||
| + | |||
| + | To clear the map, the boss's flagship must be sunk 5 times. | ||
| + | *[[Support Expedition]]s are available on this map. | ||
===Stage Guide=== | ===Stage Guide=== | ||
{{MapBranchingTable | {{MapBranchingTable | ||
|title = 5-4 Branching Rules | |title = 5-4 Branching Rules | ||
| − | |||
|id = 5-4 | |id = 5-4 | ||
|0 -> A/empty, B/empty = | |0 -> A/empty, B/empty = | ||
| Line 23: | Line 50: | ||
**CL = 1 '''AND''' DD ≥ 3 | **CL = 1 '''AND''' DD ≥ 3 | ||
**DD ≥ 4 | **DD ≥ 4 | ||
| − | ** | + | ** Number of ships carrying specific {{ToolTip|[[Landing Craft]]|{{Equipment/Card|Daihatsu Landing Craft|size=90px}}{{Equipment/Card|Toku Daihatsu Landing Craft|size=90px}}{{Equipment/Card|Daihatsu Landing Craft (Type 89 Medium Tank & Landing Force)|size=90px}}{{Equipment/Card|Armed Daihatsu|size=90px}}{{Equipment/Card|Daihatsu Landing Craft (Panzer II/North African Specification)|size=90px}}{{Equipment/Card|Toku Daihatsu Landing Craft + Type 1 Gun Tank|size=90px}}}}/{{Equipment/Link|Special Type 2 Amphibious Tank|text=Special Amphibious Tank}} + Number of ships carrying [[Drum Canister]] >= 5 |
| + | *** Some {{ToolTip|[[Landing Craft]]|{{Equipment/Card|Toku Daihatsu Landing Craft + 11th Tank Regiment|size=90px}}{{Equipment/Card|M4A1 DD|size=90px}}{{Equipment/Card|Soukoutei (Armored Boat Class)|size=90px}}{{Equipment/Card|Toku Daihatsu Landing Craft + Panzer III (North African Specification)|size=90px}}}} are invalid | ||
* Otherwise, go to A | * Otherwise, go to A | ||
| Line 40: | Line 68: | ||
** DD = 0 | ** DD = 0 | ||
** Fleet contains (F)BB(V) '''AND''' slow ship | ** Fleet contains (F)BB(V) '''AND''' slow ship | ||
| − | ** BBV ≥ 1 and amount of slow BB(V) in total ≥ 2 ('''Ignores | + | ** BBV ≥ 1 and amount of slow BB(V) in total ≥ 2 ('''Ignores [[Speed|Speed improvements]]''') |
| + | * Random between D and E if DD ≤ 2 | ||
* Otherwise, go to E | * Otherwise, go to E | ||
|D/storm -> E, F/night = | |D/storm -> E, F/night = | ||
| − | * Go to E if DD ≥ 2 '''AND''' slow BB ≤ 1 ('''BBV doesn't count, ignores | + | * Go to E if DD ≥ 2 '''AND''' slow BB ≤ 1 ('''BBV doesn't count, ignores [[Speed|Speed improvements]]''') |
* Otherwise, go to F | * Otherwise, go to F | ||
| Line 55: | Line 84: | ||
*Meet '''ALL''' of the following to go to P | *Meet '''ALL''' of the following to go to P | ||
**(F)BB(V)+CV(B) ≤ 4 | **(F)BB(V)+CV(B) ≤ 4 | ||
| − | **'''Fast+''' fleet '''OR''' pass the LoS Check | + | **'''Fast+''' fleet '''OR''' pass the LoS Check, '''≥ 60''' (Cn2) |
*Random between N and P if (F)BB(V)+CV(B) ≥ 5 | *Random between N and P if (F)BB(V)+CV(B) ≥ 5 | ||
| − | * | + | *Otherwise, N |
|M/empty -> O/empty = | |M/empty -> O/empty = | ||
* Random between O and P if fleet contains SS(V) | * Random between O and P if fleet contains SS(V) | ||
| − | * Fail the | + | * Fail the LoS Check, < 45 (Cn2) |
|M/empty -> P = | |M/empty -> P = | ||
* Random between O and P if fleet contains SS(V) | * Random between O and P if fleet contains SS(V) | ||
* Meet '''ANY''' of the following requirements: | * Meet '''ANY''' of the following requirements: | ||
| − | ** Pass the LoS check | + | ** Pass the LoS check, '''≥ 45''' (Cn2) |
| − | ** '''Fast+''' fleet ('''LoS check | + | ** '''Fast+''' fleet ('''LoS check ignored''') |
}} | }} | ||
| − | |||
| − | |||
| − | |||
| − | |||
| − | |||
| − | |||
| − | |||
| − | |||
| − | |||
| − | |||
| − | |||
| − | |||
| − | * | + | ===Tips=== |
| + | There are two main routes available to reach the boss: north and south. | ||
| + | *North route contains {{Enemy/Link|Standard Carrier Wo-Class Flagship IV}} and {{Enemy/Link|Battleship Ta-Class Flagship}} with high evasion and accuracy. | ||
| + | **Node {{MapRoute|C|red}} can also contain 1-2 {{Enemy/Link|Submarine Ka-Class Elite}}, sometimes in Line Ahead. It is recommended to go Line Abreast against this Node (BBs and CVs can handle all Surface Enemies in the Node even in this formation), and bring [[OASW]] DDs to deal with the submarines. | ||
| + | **There is an LoS Check in {{MapRoute|L|red}} to go to the Boss Node, requiring LoS ≥ 60 (Cn2). | ||
| + | *South route doesn't feature any enemy carriers, but will enter night battle nodes like in [[5-3]] against enemy {{Enemy/Link|Heavy Cruiser Ri-Class Flagship|Heavy Cruiser Ri-Class Elite|text=Heavy Cruiser Ri-Class}} and Late Model DDs. | ||
| + | **SPFs are highly advised for this route in order to obtain AS at the boss node, as no CVs are allowed. | ||
| + | **There is an LoS Check in {{MapRoute|M|blue}} to go to the Boss Node, requiring LoS ≥ 45 (Cn2). | ||
| + | ***LoS Check is ignored if the fleet is '''Fast+'''. | ||
| + | |||
| + | *No matter which route is taken, {{Enemy/Link|Light Cruiser Tsu-Class}} will show up nearly everywhere in this map. Therefore, when using a composition with CVs and going north, it is recommended to use ones with high capacity slots, and place bombers only in the highest capacity slots to avoid all bombers getting shot down to 0 before the Boss Node. | ||
| + | |||
| + | *As with every map in World 5, [[Support Expedition]]s are available to assist with clearing. This can be especially useful for completing more difficult quests. | ||
| + | |||
| + | *'''{{color|red|After clearing, the boss node will no longer contain {{Enemy/Link|Battleship Ta-Class Flagship}} nor {{Enemy/Link|Destroyer Ha-Class Late Model}}.}}''' | ||
| + | **When arriving via the '''southern route''', the boss node additionally will not contain {{Enemy/Link|Heavy Cruiser Ne-Class Elite}} | ||
| + | **This can make the southern route a viable leveling spot as transport node {{MapRoute|J|purple}} and boss node {{MapRoute|P|red}} each give a significant amount of experience | ||
| + | |||
| + | ===Recommended Fleets=== | ||
| + | <tabber> | ||
| + | |-|Middle route= | ||
| + | Route = {{MapRoute|B|blue|E|red|H|purple|I|green|J|purple|M|blue|P|red}} | ||
| + | *2FBB/CA(V), 1CL, 3DD '''(Fast)''' (Quest {{Q|Bq6}}) | ||
| + | |||
| + | *1FBB, 1CLT, 4DD '''(Fast)''' | ||
| + | |||
| + | |-|Advanced Middle route= | ||
| + | Route = {{MapRoute|B|blue|E|red|H|purple|I|green|J|purple|M|blue|P|red}} | ||
| + | * {{color|red|'''"Torpedo Squadron"'''}}: '''1CL (flagship), 3DD, 2CLT''' | ||
| + | **This solution requires more advanced gears, and might be out of reach of new players. {{color|red|'''It is required to bring'''}} an {{CommandFacility}} FCF capable CL as flagship, preferably an {{Class|Agano|Kai+}}, equipped with: | ||
| + | ***2 {{Med Gun}} [[Main Gun]]s, | ||
| + | ***1 {{Night SPB}} {{EquipmentLink|Prototype Night Zuiun (Attack Equipment)}} (having a 2nd Night Zuiun or 1 {{Surface Radar}} [[Surface Radar]] is advised if possible, to increase the trigger rate), | ||
| + | ***'''And''' the {{IconText|{{CommandFacility}}|ETSCF}} {{EquipmentLink|Elite Torpedo Squadron Command Facility}} (preferably in the [[RE]]). | ||
| + | **The best comp for farming boss node '''without''' the need of [[Support Expedition]], having the highest pass rate thanks to the usage of [[ETSCF]] in case a ship got heavily damaged. | ||
| + | **The [[Evacuation]] mechanic of the ETSCF should be used if needed, as long as the routing is maintained. | ||
| + | ***The boss routing is secured as long as '''the fleet LoS is higher than Cn2 45'''. | ||
| + | **Do note that the [[Night Zuiun]] will likely be shot down completely due to fighting under AI and the presence of {{Enemy/Link|Light Cruiser Tsu-Class|text=CL Tsu-Class}}, something negligible face to the potential double targeting of the Night Zuiun CI on previous nodes. | ||
| + | |||
| + | |-|North route= | ||
| + | Route = {{MapRoute|B|blue|C|red|G|red|L|red|P|red}} | ||
| + | *2BB(V), 2CV, 2XX (XX can't be (F)BB(V)/CV(L)) | ||
| + | *2CL, 3CA, 1CV (Quests [[Quests#Bq7|Bq7]] & [[Quests#Bq13|Bq13]]) | ||
| − | + | |-|South routes= | |
| − | + | Route = {{MapRoute|A|blue|D|violet|E|red|H|purple|I|green|J|purple|M|blue|P|red}} | |
| − | + | *3CA(V), 1CL, 2DD | |
| − | + | **Quests {{Q|Bq6}} & {{Q|Bq7}} | |
| − | + | <br> | |
| − | + | Route = {{MapRoute|A|blue|D|violet|F|purple|H|purple|I|green|J|purple|M|blue|P|red}} | |
| − | + | *2CL, 3CA, 1BBV | |
| − | + | **Quests {{Q|Bq7}} & {{Q|Bq13}} | |
| − | + | *4CA, 2CAV | |
| − | + | **Quest {{Q|Bq7}} | |
| − | + | </tabber> | |
| − | |||
| − | |||
| − | |||
| − | * | ||
| − | ** | ||
| − | |||
| − | ** | ||
| − | ** | ||
| − | ===Nodes | + | ===Resource Nodes=== |
| − | {{ | + | {{MapRoute|I|green}} is a "Special Resource Node" rewarding ammo {{Ammo}}. |
| − | + | *''See [[Resource Node|here]] for more details. | |
| − | |||
| − | | | ||
| − | |||
| − | |||
| − | |||
| − | |||
| − | |||
| − | |||
| − | |||
| − | |||
| − | |||
| − | |||
| − | |||
| − | |||
| − | |||
| − | |||
| − | |||
| − | |||
| − | |||
| − | |||
| − | |||
| − | |||
| − | |||
| − | |||
| − | |||
| − | |||
| − | |||
| − | |||
| − | |||
| − | |||
| − | |||
| − | |||
| − | |||
| − | |||
| − | |||
| − | |||
| − | |||
| − | |||
| − | |||
| − | |||
| − | |||
| − | |||
| − | |||
| − | |||
| − | |||
| − | |||
| − | |||
| − | |||
| − | |||
| − | |||
| − | |||
| − | |||
| − | |||
| − | |||
| − | |||
| − | |||
| − | |||
| − | |||
| − | |||
| − | |||
| − | |||
| − | |||
| − | |||
| − | |||
| − | |||
| − | |||
| − | |||
| − | |||
| − | |||
| − | |||
| − | |||
| − | |||
| − | |||
| − | |||
| − | |||
| − | |||
| − | |||
| − | |||
| − | |||
| − | |||
| − | |||
| − | |||
| − | |||
| − | |||
| − | |||
| − | |||
| − | |||
| − | |||
| − | |||
| − | |||
| − | |||
| − | |||
| − | |||
| − | |||
| − | |||
| − | |||
| − | |||
| − | |||
| − | |||
| − | |||
| − | |||
| − | |||
| − | |||
| − | |||
| − | |||
| − | |||
| − | |||
| − | |||
| − | |||
| − | |||
| − | |||
| − | |||
| − | |||
| − | |||
| − | |||
| − | |||
| − | |||
| − | |||
| − | |||
| − | |||
| − | |||
| − | |||
| − | |||
| − | |||
| − | |||
| − | |||
| − | |||
| − | |||
| − | |||
| − | |||
| − | |||
| − | |||
| − | |||
| − | |||
| − | |||
| − | |||
| − | |||
| − | |||
| − | |||
| − | |||
| − | |||
| − | |||
| − | |||
| − | |||
| − | |||
| − | |||
| − | |||
| − | |||
| − | |||
| − | |||
| − | |||
| − | |||
| − | |||
| − | |||
| − | |||
| − | | | ||
| − | |||
| − | |||
| − | |||
| − | |||
| − | |||
| − | |||
| − | |||
| − | |||
| − | |||
| − | |||
| − | + | {{Map/Footer|5-4| | |
| − | + | |enemycompsnotes= | |
| + | |shipdropnotes= | ||
| − | + | }} | |
| − | |||
| − | |||
| − | |||
| − | |||
| − | |||
| − | |||
| − | |||
| − | |||
| − | |||
| − | |||
| − | |||
| − | |||
| − | |||
| − | |||
| − | |||
| − | |||
| − | |||
| − | |||
| − | |||
| − | |||
| − | |||
| − | |||
| − | |||
| − | |||
| − | |||
| − | |||
| − | |||
| − | |||
| − | |||
| − | |||
| − | |||
| − | |||
| − | |||
| − | |||
| − | |||
| − | |||
| − | |||
| − | |||
| − | |||
| − | |||
| − | |||
| − | |||
| − | |||
| − | |||
| − | |||
| − | |||
| − | |||
| − | |||
| − | |||
| − | |||
| − | |||
| − | |||
| − | |||
| − | |||
| − | |||
| − | |||
| − | |||
| − | |||
| − | |||
| − | |||
| − | |||
| − | |||
| − | |||
| − | |||
| − | |||
| − | |||
| − | |||
| − | |||
| − | |||
| − | |||
| − | |||
| − | |||
| − | |||
| − | |||
| − | |||
| − | |||
| − | |||
| − | |||
| − | |||
| − | |||
| − | |||
| − | |||
| − | |||
| − | |||
| − | |||
| − | |||
| − | |||
| − | |||
| − | |||
| − | |||
| − | |||
| − | |||
| − | |||
| − | |||
| − | |||
Latest revision as of 08:52, 24 April 2024
World 5-4: サーモン海域 Salmon Sea Area
| Strategy Name | 東京急行 (Tokyo Express)
| ||
| Difficulty | ☆ ☆ ☆ ☆ ☆ ☆ ☆ ☆ ☆
| ||
| Item | |||
| Strategy Content | 南方海域に有力な艦隊を投入し鼠輸送作戦を敢行、可能であれば同方面の敵艦隊も撃滅せよ!
Perform a vital "rat transport" operation. If possible, also destroy the enemy fleet in the area! | ||
| 5-4 North route | ||
| Fleet | 2BB(V), 2CV, 2CA(V) | |
| Route | B C G L P | |
| Other Notes | ||
| AP | AS | AS+ |
| 138 | 309 | 618 |
| 5-4 Middle route | ||
| Fleet | 1CL, 3DD, 2CLT (Torpedo Squadron) 1FBB, 1CAV, 1CL, 3DD (Fast) | |
| Route | B E H I J M P | |
| Other Notes | Boss node doesn't contain the enemy comp with Heavy Cruiser Ne-Class Elite post clear. post clear.
| |
| AP | AS | AS+ |
| 63 | 141 | 282 |
| 5-4 South route | ||
| Fleet | 3CA(V), 1CL, 2DD | |
| Route | A D E H I J M P | |
| Other Notes | Mikawa Fleet. Boss node doesn't contain the enemy comp with Heavy Cruiser Ne-Class Elite post clear.
| |
| AP | AS | AS+ |
| 63 | 141 | 282 |
Map Unlocking & Progression
5-4 is unlocked after clearing 5-3 HP bar.
To clear the map, the boss's flagship must be sunk 5 times.
- Support Expeditions are available on this map.
Stage Guide
| 5-4 Branching Rules | ||
|---|---|---|
| Nodes | Rules | |
| Start | A |
|
B | ||
A |
D |
|
F | ||
B |
C |
|
D | ||
E | ||
D |
E |
|
F | ||
G |
K |
|
L | ||
L |
N |
|
P | ||
M |
O |
|
P |
| |


Tips
There are two main routes available to reach the boss: north and south.
- North route contains Standard Carrier Wo-Class Flagship IV
 and Battleship Ta-Class Flagship
 with high evasion and accuracy.
- Node C can also contain 1-2 Submarine Ka-Class Elite
 , sometimes in Line Ahead. It is recommended to go Line Abreast against this Node (BBs and CVs can handle all Surface Enemies in the Node even in this formation), and bring OASW DDs to deal with the submarines.
 - There is an LoS Check in L to go to the Boss Node, requiring LoS ≥ 60 (Cn2).
- Node C can also contain 1-2 Submarine Ka-Class Elite
- South route doesn't feature any enemy carriers, but will enter night battle nodes like in 5-3 against enemy Heavy Cruiser Ri-Class

 and Late Model DDs.
- SPFs are highly advised for this route in order to obtain AS at the boss node, as no CVs are allowed.
- There is an LoS Check in M to go to the Boss Node, requiring LoS ≥ 45 (Cn2).
- LoS Check is ignored if the fleet is Fast+.
- No matter which route is taken, Light Cruiser Tsu-Class
 will show up nearly everywhere in this map. Therefore, when using a composition with CVs and going north, it is recommended to use ones with high capacity slots, and place bombers only in the highest capacity slots to avoid all bombers getting shot down to 0 before the Boss Node.
- As with every map in World 5, Support Expeditions are available to assist with clearing. This can be especially useful for completing more difficult quests.
- After clearing, the boss node will no longer contain Battleship Ta-Class Flagship nor Destroyer Ha-Class Late Model
 .
.
- When arriving via the southern route, the boss node additionally will not contain Heavy Cruiser Ne-Class Elite
- This can make the southern route a viable leveling spot as transport node J and boss node P each give a significant amount of experience
- When arriving via the southern route, the boss node additionally will not contain Heavy Cruiser Ne-Class Elite
Recommended Fleets
Route = B E H I J M P
- "Torpedo Squadron": 1CL (flagship), 3DD, 2CLT
- This solution requires more advanced gears, and might be out of reach of new players. It is required to bring an
 FCF capable CL as flagship, preferably an Agano-class Kai+, equipped with:
- 2
 Main Guns,
 - 1
 Prototype Night Zuiun (Attack Equipment)
 (having a 2nd Night Zuiun or 1
  Surface Surface Radar is advised if possible, to increase the trigger rate),
 - And the ETSCF Elite Torpedo Squadron Command Facility
 (preferably in the RE).
- 2
- The best comp for farming boss node without the need of Support Expedition, having the highest pass rate thanks to the usage of ETSCF in case a ship got heavily damaged.
- The Evacuation mechanic of the ETSCF should be used if needed, as long as the routing is maintained.
- The boss routing is secured as long as the fleet LoS is higher than Cn2 45.
- Do note that the Night Zuiun will likely be shot down completely due to fighting under AI and the presence of CL Tsu-Class, something negligible face to the potential double targeting of the Night Zuiun CI on previous nodes.
- This solution requires more advanced gears, and might be out of reach of new players. It is required to bring an
Resource Nodes
I is a "Special Resource Node" rewarding ammo ![]() .
.
- See here for more details.
Enemy Compositions

5-4 A
| # | Empty Node | ||
|---|---|---|---|
| A | 気のせいだった。/敵影を見ず。/穏やかな海です。/穏やかな海峡です。/警戒が必要です。/静かな海です。 Must be my imagination./No enemy spotted./Calm seas./Calm straits./Be alert./Peaceful seas. | ||
| # | Empty Node | ||
5-4 B
| # | Empty Node | ||
|---|---|---|---|
| B | 気のせいだった。/敵影を見ず。/穏やかな海です。/穏やかな海峡です。/警戒が必要です。/静かな海です。 Must be my imagination./No enemy spotted./Calm seas./Calm straits./Be alert./Peaceful seas. | ||
| # | Empty Node | ||
5-4 C: 敵南方増援部隊 前方警戒艦隊 (PoiDB)
| # | Enemy Form. |
Base EXP | Normal Battle Node | AD/AP AS/AS+ |
|---|---|---|---|---|
| C | Line Ahead Echelon |
200 | 0/0 0/0 | |
| Line Ahead Echelon |
220 | 0/0 0/0 | ||
| Line Ahead Echelon |
240 | 0/0 0/0 | ||
| # | Enemy Form. |
Base EXP | Normal Battle Node | AD/AP AS/AS+ |
5-4 D
| # | Maelstrom Node | ||
|---|---|---|---|
| D | Lost ?% | ||
| # | Maelstrom Node | ||
5-4 E: 敵鉄底海峡哨戒隊 (PoiDB)
| # | Enemy Form. |
Base EXP | Normal Battle Node | AD/AP AS/AS+ |
|---|---|---|---|---|
| E | Line Ahead Double Line |
200 | 0/0 0/0 | |
| Line Ahead Double Line |
220 | 0/0 0/0 | ||
| Line Ahead Double Line |
240 | 0/0 0/0 | ||
| # | Enemy Form. |
Base EXP | Normal Battle Node | AD/AP AS/AS+ |
5-4 F: 深海水上打撃群-夜战 (PoiDB)
| # | Enemy Form. |
Base EXP | Night Battle Node | AD/AP AS/AS+ |
|---|---|---|---|---|
| F | Line Ahead Double Line Echelon |
330 | 0/0 0/0 | |
| Line Ahead Double Line Echelon |
360 | 0/0 0/0 | ||
| # | Enemy Form. |
Base EXP | Night Battle Node | AD/AP AS/AS+ |
5-4 G: 敵南方増援部隊 機動部隊 (PoiDB)
| # | Enemy Form. |
Base EXP | Normal Battle Node | AD/AP AS/AS+ |
|---|---|---|---|---|
| G | Diamond | 300 | 69/138 309/618 | |
| Diamond | 320 | 69/138 309/618 | ||
| Diamond | 330 | 69/138 309/618 | ||
| Diamond | 340 | 69/138 309/618 | ||
| Diamond | 350 | 69/138 309/618 | ||
| Diamond | 360 | 69/138 309/618 | ||
| # | Enemy Form. |
Base EXP | Normal Battle Node | AD/AP AS/AS+ |
5-4 H: 敵鉄底海峡巡洋艦戦隊-夜战 (PoiDB)
| # | Enemy Form. |
Base EXP | Night Battle Node | AD/AP AS/AS+ |
|---|---|---|---|---|
| H | Line Ahead Echelon |
230 | 0/0 0/0 | |
| Line Ahead Echelon |
250 | 0/0 0/0 | ||
| Line Ahead Echelon |
270 | 0/0 0/0 | ||
| # | Enemy Form. |
Base EXP | Night Battle Node | AD/AP AS/AS+ |
5-4 I
| # | Resource Node | ||
|---|---|---|---|
| I | Gained 60 | ||
| # | Resource Node | ||
5-4 J: 敵泊地投錨中 輸送船団-夜战 (PoiDB)
| # | Enemy Form. |
Base EXP | Night Battle Node | AD/AP AS/AS+ |
|---|---|---|---|---|
| J | Double Line | 450 | 0/0 0/0 | |
| Double Line | 460 | 0/0 0/0 | ||
| Double Line | 470 | 0/0 0/0 | ||
| Double Line | 480 | 0/0 0/0 | ||
| Double Line | 490 | 0/0 0/0 | ||
| Double Line | 490 | 0/0 0/0 | ||
| # | Enemy Form. |
Base EXP | Night Battle Node | AD/AP AS/AS+ |
5-4 K
| # | Maelstrom Node | ||
|---|---|---|---|
| K | Lost ?% ? | ||
| # | Maelstrom Node | ||
5-4 L: 敵南方増援部隊 本隊 (PoiDB)
| # | Enemy Form. |
Base EXP | Normal Battle Node | AD/AP AS/AS+ |
|---|---|---|---|---|
| L | Line Ahead Diamond Echelon |
390 | 0/0 0/0 | |
| Double Line Diamond Echelon |
390 | 0/0 0/0 | ||
| # | Enemy Form. |
Base EXP | Normal Battle Node | AD/AP AS/AS+ |
5-4 M
| # | Empty Node | ||
|---|---|---|---|
| M | 気のせいだった。/敵影を見ず。/穏やかな海です。/穏やかな海峡です。/警戒が必要です。/静かな海です。 Must be my imagination./No enemy spotted./Calm seas./Calm straits./Be alert./Peaceful seas. | ||
| # | Empty Node | ||
5-4 N
| # | Empty Node | ||
|---|---|---|---|
| N | 気のせいだった。/敵影を見ず。/穏やかな海です。/穏やかな海峡です。/警戒が必要です。/静かな海です。 Must be my imagination./No enemy spotted./Calm seas./Calm straits./Be alert./Peaceful seas. | ||
| # | Empty Node | ||
5-4 O
| # | Empty Node | ||
|---|---|---|---|
| O | 気のせいだった。/敵影を見ず。/穏やかな海です。/穏やかな海峡です。/警戒が必要です。/静かな海です。 Must be my imagination./No enemy spotted./Calm seas./Calm straits./Be alert./Peaceful seas. | ||
| # | Empty Node | ||
5-4 P: 敵南方増援部隊 本隊 (PoiDB)
| # | Enemy Form. |
Base EXP | Boss Battle Node | AD/AP AS/AS+ |
|---|---|---|---|---|
| P | Diamond | 540 | 32/63 140/279 | |
| Diamond | 540 | 32/63 140/279 | ||
| Diamond | 510 | 32/63 140/279 | ||
| Diamond | 550 | 32/63 140/279 | ||
| Diamond | 520 | 32/63 140/279 | ||
| Diamond | 550 | 32/63 140/279 | ||
| # | Enemy Form. |
Base EXP | Boss Battle Node | AD/AP AS/AS+ |
Ship Drops
This map currently has "limited-time" drops that don't appear in the table below, see Drop List for more info.
| Ship drops | |||||||||||||||||||||||||||||||||||||||||||||||||||||||||||||||||||||||||||||||||||||||||||||||||||
|---|---|---|---|---|---|---|---|---|---|---|---|---|---|---|---|---|---|---|---|---|---|---|---|---|---|---|---|---|---|---|---|---|---|---|---|---|---|---|---|---|---|---|---|---|---|---|---|---|---|---|---|---|---|---|---|---|---|---|---|---|---|---|---|---|---|---|---|---|---|---|---|---|---|---|---|---|---|---|---|---|---|---|---|---|---|---|---|---|---|---|---|---|---|---|---|---|---|---|---|
| Type | Ship? | C | E | F | G | H | J | L | P | ||||||||||||||||||||||||||||||||||||||||||||||||||||||||||||||||||||||||||||||||||||||||||
| DD | Uzuki | ✔️ | |||||||||||||||||||||||||||||||||||||||||||||||||||||||||||||||||||||||||||||||||||||||||||||||||
| CL | Agano | ✔️ | |||||||||||||||||||||||||||||||||||||||||||||||||||||||||||||||||||||||||||||||||||||||||||||||||
| DD | Yayoi | ✔️ | |||||||||||||||||||||||||||||||||||||||||||||||||||||||||||||||||||||||||||||||||||||||||||||||||
| DD | Yukikaze | ✔️ | |||||||||||||||||||||||||||||||||||||||||||||||||||||||||||||||||||||||||||||||||||||||||||||||||
| DD | Hamakaze | ✔️ | |||||||||||||||||||||||||||||||||||||||||||||||||||||||||||||||||||||||||||||||||||||||||||||||||
| DD | Akigumo | ✔️ | |||||||||||||||||||||||||||||||||||||||||||||||||||||||||||||||||||||||||||||||||||||||||||||||||
| DD | Yuugumo | ✔️ | |||||||||||||||||||||||||||||||||||||||||||||||||||||||||||||||||||||||||||||||||||||||||||||||||
| DD | Makigumo | ✔️ | ✔️ | ✔️ | |||||||||||||||||||||||||||||||||||||||||||||||||||||||||||||||||||||||||||||||||||||||||||||||
| DD | Naganami | ✔️ | ✔️ | ✔️ | |||||||||||||||||||||||||||||||||||||||||||||||||||||||||||||||||||||||||||||||||||||||||||||||
| CL | Nagara | ✔️ | ✔️ | ✔️ | ✔️ | ✔️ | ✔️ | ✔️ | ✔️ | ||||||||||||||||||||||||||||||||||||||||||||||||||||||||||||||||||||||||||||||||||||||||||
| CL | Sendai | ✔️ | ✔️ | ✔️ | ✔️ | ✔️ | ✔️ | ✔️ | ✔️ | ||||||||||||||||||||||||||||||||||||||||||||||||||||||||||||||||||||||||||||||||||||||||||
| CL | Yuubari | ✔️ | |||||||||||||||||||||||||||||||||||||||||||||||||||||||||||||||||||||||||||||||||||||||||||||||||
| CA | Kinugasa | ✔️ | ✔️ | ✔️ | ✔️ | ✔️ | ✔️ | ✔️ | ✔️ | ||||||||||||||||||||||||||||||||||||||||||||||||||||||||||||||||||||||||||||||||||||||||||
| CA | Myoukou | ✔️ | ✔️ | ✔️ | ✔️ | ✔️ | ✔️ | ✔️ | ✔️ | ||||||||||||||||||||||||||||||||||||||||||||||||||||||||||||||||||||||||||||||||||||||||||
| CA | Takao | ✔️ | ✔️ | ✔️ | ✔️ | ✔️ | ✔️ | ✔️ | |||||||||||||||||||||||||||||||||||||||||||||||||||||||||||||||||||||||||||||||||||||||||||
| CA | Atago | ✔️ | ✔️ | ✔️ | ✔️ | ✔️ | ✔️ | ✔️ | ✔️ | ||||||||||||||||||||||||||||||||||||||||||||||||||||||||||||||||||||||||||||||||||||||||||
| CA | Suzuya | ✔️ | |||||||||||||||||||||||||||||||||||||||||||||||||||||||||||||||||||||||||||||||||||||||||||||||||
| CA | Kumano | ✔️ | |||||||||||||||||||||||||||||||||||||||||||||||||||||||||||||||||||||||||||||||||||||||||||||||||
| CA | Tone | ✔️ | ✔️ | ✔️ | ✔️ | ✔️ | ✔️ | ✔️ | ✔️ | ||||||||||||||||||||||||||||||||||||||||||||||||||||||||||||||||||||||||||||||||||||||||||
| CA | Chikuma | ✔️ | ✔️ | ✔️ | ✔️ | ✔️ | ✔️ | ✔️ | ✔️ | ||||||||||||||||||||||||||||||||||||||||||||||||||||||||||||||||||||||||||||||||||||||||||
| CVL | Ryuujou | ✔️ | ✔️ | ✔️ | ✔️ | ✔️ | ✔️ | ✔️ | ✔️ | ||||||||||||||||||||||||||||||||||||||||||||||||||||||||||||||||||||||||||||||||||||||||||
| CVL | Zuihou | ✔️ | |||||||||||||||||||||||||||||||||||||||||||||||||||||||||||||||||||||||||||||||||||||||||||||||||
| CVL | Junyou | ✔️ | ✔️ | ✔️ | ✔️ | ✔️ | ✔️ | ✔️ | ✔️ | ||||||||||||||||||||||||||||||||||||||||||||||||||||||||||||||||||||||||||||||||||||||||||
| FBB | Kongou | ✔️ | ✔️ | ✔️ | |||||||||||||||||||||||||||||||||||||||||||||||||||||||||||||||||||||||||||||||||||||||||||||||
| FBB | Hiei | ✔️ | ✔️ | ✔️ | ✔️ | ✔️ | |||||||||||||||||||||||||||||||||||||||||||||||||||||||||||||||||||||||||||||||||||||||||||||
| FBB | Haruna | ✔️ | ✔️ | ✔️ | |||||||||||||||||||||||||||||||||||||||||||||||||||||||||||||||||||||||||||||||||||||||||||||||
| FBB | Kirishima | ✔️ | ✔️ | ✔️ | ✔️ | ✔️ | ✔️ | ✔️ | |||||||||||||||||||||||||||||||||||||||||||||||||||||||||||||||||||||||||||||||||||||||||||
| BB | Mutsu | ✔️ | |||||||||||||||||||||||||||||||||||||||||||||||||||||||||||||||||||||||||||||||||||||||||||||||||
| CV | Shoukaku | ✔️ | |||||||||||||||||||||||||||||||||||||||||||||||||||||||||||||||||||||||||||||||||||||||||||||||||
| CV | Zuikaku | ✔️ | |||||||||||||||||||||||||||||||||||||||||||||||||||||||||||||||||||||||||||||||||||||||||||||||||
| SS | I-19 | ✔️ | |||||||||||||||||||||||||||||||||||||||||||||||||||||||||||||||||||||||||||||||||||||||||||||||||
| SS | I-58 | ✔️ | |||||||||||||||||||||||||||||||||||||||||||||||||||||||||||||||||||||||||||||||||||||||||||||||||
| DD | Mutsuki | ✔️ | ✔️ | ✔️ | ✔️ | ✔️ | ✔️ | ✔️ | ✔️ | ||||||||||||||||||||||||||||||||||||||||||||||||||||||||||||||||||||||||||||||||||||||||||
| DD | Satsuki | ✔️ | ✔️ | ✔️ | ✔️ | ✔️ | ✔️ | ✔️ | ✔️ | ||||||||||||||||||||||||||||||||||||||||||||||||||||||||||||||||||||||||||||||||||||||||||
| DD | Mikazuki | ✔️ | ✔️ | ✔️ | ✔️ | ✔️ | ✔️ | ✔️ | ✔️ | ||||||||||||||||||||||||||||||||||||||||||||||||||||||||||||||||||||||||||||||||||||||||||
| DD | Mochizuki | ✔️ | ✔️ | ✔️ | ✔️ | ✔️ | ✔️ | ✔️ | ✔️ | ||||||||||||||||||||||||||||||||||||||||||||||||||||||||||||||||||||||||||||||||||||||||||
| DD | Fubuki | ✔️ | ✔️ | ✔️ | ✔️ | ✔️ | ✔️ | ✔️ | ✔️ | ||||||||||||||||||||||||||||||||||||||||||||||||||||||||||||||||||||||||||||||||||||||||||
| DD | Hatsuyuki | ✔️ | ✔️ | ✔️ | ✔️ | ✔️ | ✔️ | ✔️ | ✔️ | ||||||||||||||||||||||||||||||||||||||||||||||||||||||||||||||||||||||||||||||||||||||||||
| DD | Murakumo | ✔️ | ✔️ | ✔️ | ✔️ | ✔️ | ✔️ | ✔️ | ✔️ | ||||||||||||||||||||||||||||||||||||||||||||||||||||||||||||||||||||||||||||||||||||||||||
| DD | Ayanami | ✔️ | ✔️ | ✔️ | ✔️ | ✔️ | ✔️ | ✔️ | ✔️ | ||||||||||||||||||||||||||||||||||||||||||||||||||||||||||||||||||||||||||||||||||||||||||
| DD | Shikinami | ✔️ | ✔️ | ✔️ | ✔️ | ✔️ | ✔️ | ✔️ | ✔️ | ||||||||||||||||||||||||||||||||||||||||||||||||||||||||||||||||||||||||||||||||||||||||||
| DD | Akatsuki | ✔️ | ✔️ | ✔️ | ✔️ | ✔️ | ✔️ | ✔️ | ✔️ | ||||||||||||||||||||||||||||||||||||||||||||||||||||||||||||||||||||||||||||||||||||||||||
| DD | Ikazuchi | ✔️ | ✔️ | ✔️ | ✔️ | ✔️ | ✔️ | ✔️ | ✔️ | ||||||||||||||||||||||||||||||||||||||||||||||||||||||||||||||||||||||||||||||||||||||||||
| DD | Inazuma | ✔️ | ✔️ | ✔️ | ✔️ | ✔️ | ✔️ | ✔️ | ✔️ | ||||||||||||||||||||||||||||||||||||||||||||||||||||||||||||||||||||||||||||||||||||||||||
| DD | Yuudachi | ✔️ | ✔️ | ✔️ | ✔️ | ✔️ | ✔️ | ✔️ | ✔️ | ||||||||||||||||||||||||||||||||||||||||||||||||||||||||||||||||||||||||||||||||||||||||||
| DD | Samidare | ✔️ | ✔️ | ✔️ | ✔️ | ✔️ | ✔️ | ✔️ | ✔️ | ||||||||||||||||||||||||||||||||||||||||||||||||||||||||||||||||||||||||||||||||||||||||||
| DD | Suzukaze | ✔️ | ✔️ | ✔️ | ✔️ | ✔️ | ✔️ | ✔️ | ✔️ | ||||||||||||||||||||||||||||||||||||||||||||||||||||||||||||||||||||||||||||||||||||||||||
| DD | Kagerou | ✔️ | ✔️ | ✔️ | ✔️ | ✔️ | ✔️ | ✔️ | ✔️ | ||||||||||||||||||||||||||||||||||||||||||||||||||||||||||||||||||||||||||||||||||||||||||
| DD | Kuroshio | ✔️ | ✔️ | ✔️ | ✔️ | ✔️ | ✔️ | ✔️ | ✔️ | ||||||||||||||||||||||||||||||||||||||||||||||||||||||||||||||||||||||||||||||||||||||||||
| CL | Tenryuu | ✔️ | ✔️ | ✔️ | ✔️ | ✔️ | ✔️ | ✔️ | ✔️ | ||||||||||||||||||||||||||||||||||||||||||||||||||||||||||||||||||||||||||||||||||||||||||
| CL | Isuzu | ✔️ | ✔️ | ✔️ | ✔️ | ✔️ | ✔️ | ✔️ | ✔️ | ||||||||||||||||||||||||||||||||||||||||||||||||||||||||||||||||||||||||||||||||||||||||||
| CL | Yura | ✔️ | ✔️ | ✔️ | ✔️ | ✔️ | ✔️ | ✔️ | |||||||||||||||||||||||||||||||||||||||||||||||||||||||||||||||||||||||||||||||||||||||||||
| CL | Jintsuu | ✔️ | ✔️ | ✔️ | ✔️ | ✔️ | ✔️ | ✔️ | ✔️ | ||||||||||||||||||||||||||||||||||||||||||||||||||||||||||||||||||||||||||||||||||||||||||
| CA | Furutaka | ✔️ | ✔️ | ✔️ | ✔️ | ✔️ | ✔️ | ✔️ | ✔️ | ||||||||||||||||||||||||||||||||||||||||||||||||||||||||||||||||||||||||||||||||||||||||||
| CA | Kako | ✔️ | ✔️ | ✔️ | ✔️ | ✔️ | ✔️ | ✔️ | ✔️ | ||||||||||||||||||||||||||||||||||||||||||||||||||||||||||||||||||||||||||||||||||||||||||
| CA | Aoba | ✔️ | ✔️ | ✔️ | ✔️ | ✔️ | ✔️ | ✔️ | ✔️ | ||||||||||||||||||||||||||||||||||||||||||||||||||||||||||||||||||||||||||||||||||||||||||
| CA | Haguro | ✔️ | ✔️ | ✔️ | ✔️ | ✔️ | ✔️ | ✔️ | ✔️ | ||||||||||||||||||||||||||||||||||||||||||||||||||||||||||||||||||||||||||||||||||||||||||
| CA | Maya | ✔️ | ✔️ | ✔️ | ✔️ | ✔️ | ✔️ | ✔️ | ✔️ | ||||||||||||||||||||||||||||||||||||||||||||||||||||||||||||||||||||||||||||||||||||||||||
| CA | Choukai | ✔️ | ✔️ | ✔️ | ✔️ | ✔️ | ✔️ | ✔️ | ✔️ | ||||||||||||||||||||||||||||||||||||||||||||||||||||||||||||||||||||||||||||||||||||||||||
| AV | Chitose | ✔️ | ✔️ | ✔️ | ✔️ | ✔️ | ✔️ | ✔️ | ✔️ | ||||||||||||||||||||||||||||||||||||||||||||||||||||||||||||||||||||||||||||||||||||||||||
| |||||||||||||||||||||||